FakeHeader
good evening, question, I changed the radiator, connected the fan and pipes back, but didn’t put the plastic back on, just the radiator and that’s it, the stove doesn’t heat up at all, it may be due to the fact that I didn’t put the plastic back on, thanks in advance.
I covered it with cardboard behind the radiator and air intakes on the bumper.
Today I solved this problem... It turns out I don’t know why this is so, my father says that it was like this from the factory, from the block the pipe went into the lower pipe of the stove, and the top went to the thermostat, and the faucet turned out to be on the lower pipe, and I connected the electric pump to the upper pipe... Today, purely by chance, I opened a book on the 29 Volga and saw in the picture that the top of the stove is the entrance, and the bottom is the exit and the faucet is placed on the top, at the entrance... in principle, it’s logical why it didn’t come to me before... I redid everything, the faucet is in the trash for the winter, Instead, I installed an electric pump... what we have: at 40 degrees (according to the sensor, the first division) the stove begins to blow heat, at 80 according to the sensor very good hot air begins to blow, at 100 degrees. I can’t hold my hand on the first speed of the fan... I decided to test it on the highway to see how it would be, by the way it’s -30 today, everything is fine... it blows the same as in the city - warm... in the car after these changes it became much warmer... I just have to come up with something... then with the gas pedal... the highway becomes oak =)
I installed a Zhiguli radiator instead of mine. Gazelle 2705, 2004 onwards. The case broke during installation. The stove began to heat poorly. Although the radiator is a three-row copper radiator, the radiator and hoses are hot. The place is warm, but cool air blows as you go. What to do?
It's very cold in the cabin, what can I do? – 1 answer
After you broke the housing and made your own changes to the design of the gazelle stove, which does not heat well from the factory, do you have a complete flow of air through the radiator? Or has a gap formed through which the air flow bypasses the radiator?
Another possibility is that the thermostat is either constantly open or missing. In this case, the symptoms are also the following: you stand still and it heats up; when you start moving, it stops heating, as the engine temperature drops uncontrollably.
Factory designers know about the poorly heating stove on the Gazelle and Volga, and therefore they came up with and sell a booster electric pump in stores. Buy this email. Insert the pump onto the stove hose and it will be warmer.
Even more useful tips in a convenient format
Characteristics of the engine UMZ 421 1002014
On new cars, the stove may fail after a few weeks.
The stove in the Gazelle Business does not heat for reasons not directly related to its design. For example, if the thermostat malfunctions, or if there is a failure in the on-board power supply system.
Diagnostics
There can be many reasons why the Gazelle Business stove does not work. And for a successful repair, you must first identify the cause of the malfunction, and only then begin to eliminate it:
- The first step is to check the coolant level in the expansion tank. A low coolant level leads to the formation of an air plug in the cooling system, and since the heater is the highest point, the “plug” will be there.
- Next, you need to check the coolant temperature. During the cold season, the engine cools down rapidly before it has time to reach temperature. The temperature sensor may be faulty and show an incorrect temperature value.
- Then you need to check the cabin radiator; it is clogged and may not allow a sufficient amount of coolant to pass through it. You can check this by testing the inlet and outlet pipes; they should be approximately the same temperature. If the inlet pipe is hot and the outlet is cold, then the reason is a clogged radiator.
- If the inlet pipe is also cold, then you need to try the pipe that goes to the radiator from the engine compartment to the tap. If it is hot, then the problem is that the faucet is not working.
- Well, if the pipe to the faucet is cold, then there are more options
- The first thing to check is the thermostat. This can be done with the engine running but not warmed up. We start it and test the surface before and after the thermostat. The surface must be heated before the thermostat, and afterward it must remain cold. If the pipe after the thermostat heats up, then the problem is in the thermostat.
- pump is faulty. It either jammed, or the shaft burst, or the pump impeller became unusable. The fluid does not circulate well through the system, and because of this, the heater may blow cold.
- The gasket between the block and the cylinder head is broken. This malfunction also affects the operation of the heater and the entire engine as a whole. It is accompanied by clouds of white steam from the exhaust pipe and a decrease in coolant in the cooling system. In some cases, antifreeze may be released from the expansion tank.
After diagnostics, we begin repairs:
- If the coolant level is below the minimum mark, then it must be brought to normal, having first eliminated fluid leaks, if any. It is possible to remove the plug by pushing the pipes along their entire length with the engine running. Or by placing the front of the car downhill and increasing the engine speed to 3,000 rpm. There is also a way to pump the system with air pressure. You need to remove the upper pipe from the expansion tank and lower it into an empty canister. Next, bring the coolant level to the full tank and, by connecting a hand pump to the vacated fitting, pump air into the tank to the lower mark. Then drain the antifreeze from the canister back into the tank and repeat the procedure. This should be repeated 2 – 3 times.
- If the pipes are barely warm and the sensor shows 90° C, then most likely either it or the temperature gauge itself is faulty. They need to be replaced. In extreme cold (more than -20), you can close part of the radiator (no more than 50%), then the engine will heat up better and cool down more slowly.
- To repair the radiator, it must be removed and washed. If washing does not bring results, then you need to replace it with a new one.
The faucet may not work due to the drive, or the locking mechanism itself may be faulty. On the Gazelle Business, the faucet turns the electric drive. Therefore, you need to first check the drive, and if it is working, start replacing the faucet. It either does not open completely or is completely stuck in one position, and this can cause a cold air flow. To replace the thermostat, you need to drain the coolant, unscrew the cap and replace it with a new one, since this mechanism cannot be repaired. The pump also needs to be dismantled and replaced with a new one. This is a very important element, and due to its incorrect operation, the entire engine may fail, since coolant circulation is disrupted and heat cannot be effectively removed from highly heated parts. And, as a result, they overheat and become deformed. The worst thing that can happen in a broken gasket is water hammer. When the piston tries to compress the liquid, an increased load is placed on all the internal combustion engine mechanisms, which leads to failure of the entire engine, so such a malfunction must be corrected immediately. In this case, it is prohibited to continue moving using engine power. Such repairs are carried out only with the involvement of specialists, since the cylinder head needs to be grooved; everything else can be done on your own.
Maintenance and repair
Maintenance of the 4216 Euro-3 GAZelle engine includes operations such as:
- Cleaning the power unit from dirt using a rag.
- External inspection of the crank device and gas distribution mechanism for damage and defects.
- Checking the tightness of connections and eliminating leaks of working fluid from the cooling system.
- Changing the engine oil.
- Adjusting valve clearances.
- Checking the pressure level in the power system.
- Checking the tightening torque of fasteners.
- Cleaning filter elements and replacing worn mechanisms.
- Check the motor for extraneous noise during operation.
Error codes
Engine fault codes:
| 111 | The system control module is not working correctly |
| 115 | Malfunctions of the sensor that reflects the number of engine revolutions at idle |
| 143 | Low oil pressure level |
| 146 | High coolant temperature |
| 151 | The cooling system does not reach the required temperature |
| 197 | Insufficient amount of liquid in the cooling system |
| 214 | Oil overheating |
| 233 | Low pressure level of the liquid used for cooling, pump malfunction |
| 234 | Increased engine speed |
| 235 | Increased diesel fuel temperature |
| 245 | Fan Circuit Low Voltage |
| 261 | Incorrect operation of the pumping mechanism |
| 275 | High pressure valve malfunction |
| 281 | Malfunction of power supply injectors |
| 351 | Insufficient oil pressure |
If it twitches while moving
The reason that the power unit jerks while driving may be clogged flexible durite hoses that supply gasoline to the pumping mechanism. In this case, it is recommended to blow out the hose or replace it with a new one.
This malfunction may also be caused by a dirty carburetor intake filter. In this case, it is recommended to unscrew the plug from the filter element, rinse it thoroughly and blow it out using a stream of compressed air.
If the holder of the vane valve of the gasoline pump is broken, then this valve should be replaced with a new one. It is recommended to check the traction of the cylinder head heads and, if necessary, tighten the fastening mechanisms.
It won’t start: reasons and what to do
If the power unit starts poorly when hot or there is no spark, then it is recommended:
- Adjust the gaps between the valve stem tips and the rocker arm pressure bolts.
- Unscrew the cylinder head and grind the valves.
- Inspect the ignition system for defects.
- Tighten the ignition system and carburetor mounting bolts.
- Remove the fuel and cooling system jets, rinse and blow them with compressed air.
- Dismantle the carburetor, remove the mixing chamber, unscrew the fuel system nozzle and idle screw, and blow out the channels with compressed air.
- Replace the crankshaft oil seal with a new one.
Why does the engine get hot?
Overheating of the motor may be due to weakened tension in the fan drive belt of the water pump mechanism. In this case, the belt tension should be adjusted or replaced.
If the engine starting system is not working, you need to install an earlier ignition.
The cause of the malfunction may be high temperature in the cooling system. If the coolant boils, it is recommended to flush the system and clean the filter elements from accumulated scale.
You should also check the level of the cooling fluid and, if necessary, add it to the required minimum level.
Why doesn't the fan turn on?
Electric fan malfunction may be caused by:
- failure of the electric motor;
- violation of the integrity of the wiring;
- unreliable contact in the system connectors.
If the fuse is lit, the fan stops working.
If a malfunction is detected, worn brushes and wires should be replaced, short circuits in the windings of the rotor part should be eliminated, and an external inspection of the safety device should be carried out for damage and defects.
It is recommended to diagnose the fan sensor.
To do this, you need to disconnect it from the injector and check the emergency fan switching on. If the sensor does not respond to shutdown, it should be replaced.
Replacing the alternator belt
In order to replace the belt on a GAZelle Business 4216, you need to prepare the following tools:
- a set of wrenches to remove the generator;
- new belt;
- kernel;
- mounting blade;
- protective gloves for installing a new mechanism.
- Remove the old belt using a knife.
- Turn the generator set mounting bolt from below 3-4 turns.
- We press the generator forward until the ear is positioned behind the bracket.
- We fix the position of the generator.
- We put a new belt on the pulley.
- Turn the shaft using a wrench.
- We tighten all fasteners.
- We return the generator to its original position.
UMZ 4216 engine malfunctions
The service life of the 4216 engine, declared by the manufacturer, is 250 thousand km, but often the engines fail ahead of schedule. Frequently occurring internal combustion engine problems:
- engine oil leakage;
- increased oil loss through the piston rings:
- valve knocking, which is sometimes difficult to eliminate;
- overheat;
- failure of various sensors.
Various breakdowns can occur prematurely for various reasons:
- the driver violates operating conditions - the motor overheats due to overload;
- maintenance standards are not followed;
- The vehicle is operated in difficult road conditions.
Unfortunately, defects often occur in UMP engines, but ZMZ engines are not immune from this. If the 4216 engine jerks (jerks), the cause of the malfunction may be either the engine itself or a breakdown in the ECM. To determine the cause of the defect, it is necessary to diagnose the internal combustion engine.
Motor UMZ-417: characteristics and design features
Engine Maintenance
The entire range of maintenance that must be carried out in order for the 4216 engine to continue to work perfectly can be divided into 3 parts: condition check, control and diagnostic aspect and routine maintenance.
Checking the status consists of the following actions:
- Checking the oil level;
- Checking the fluid level;
- Checking the tightness of power, cooling and lubrication systems.
Number of KDR (control and diagnostic work) that the UMZ 4216 engine must undergo during maintenance:
- Checking the thermostat, coolant sensors, oil temperature and pressure;
- Tightness of crankcase ventilation systems, power supply, lubrication, cooling systems;
- Condition of contacts in electrical equipment;
- Diagnostics of CMPSUD and elimination of detected problems;
- Checking for extraneous sounds during operation;
- Check the condition of the generator and fan belts;
- Checking compression in cylinders;
- Checking the operation of the generator.
And the last list - routine maintenance:
- Tighten the fastenings;
- Adjusting valves UMZ 4216 (the procedure for adjusting the valves depends on personal desire);
- Adjust the gaps;
- Clean from carbon deposits and dirt;
- Flush the cooling system and then replace the fluid;
- Flush the crankcase ventilation system;
- Change the oil filter;
- Change the oil.
Adjustment of valves UMZ 4216. Gazelle Business. part 1
Malfunctions and their elimination
| Malfunction | Cause |
| Appearance of oil on parts | Problems with the rear crankshaft oil seal (occurs at speeds above 2500; a gazelle with a UMZ 4216 engine is not designed for more revolutions). Replacing the stuffing box completely solves the problem. |
| Jerking or vibration at idle | Uneven flow of mixture into the cylinders due to design flaws. In this case, the car has increased fuel consumption. |
| Knock in the engine | Unadjusted valves. Valve clearance prevention should be done every 15,000 kilometers. Adjusting the UMZ 4216 valves is not the only solution. The problem can be partially solved by installing a hydraulic compensator. If the valve is normal, check the camshaft or connecting rod bearings. |
| Vibration | Pillows or imbalance of the crankshaft, carburetor or ignition system. |
| The engine gets hot | Thermostat, pump or air lock (located in the cooling system). The gasket could potentially burn out. To avoid this, tighten the nuts and adjust the washers. |
The UMZ-4216 engine has the following modifications:
- Motor 4216.10, producing a maximum power of 123 hp. With. Euro-3.
- Motor 42161.10 is a simplified version with 99 hp. With.
- Motor 42164.10 - 125 l. pp., Euro-4 standard.
- Engines 42167.10 and 421647.10 are gas-gasoline, with a power of 123 and 100 hp. With. respectively.
This engine is the only one among Russian engines, the installation of gas equipment on which does not lead to loss of warranty.
Tips for motorists
One of the most common and unpleasant breakdowns on GAZelle cars in winter is a malfunction of the stove. There may be several reasons for this problem. The first thing you should check is whether the heating supply or return pipe has come off. In this case, the hot air will not heat the inside of the car, but the street. If such a breakdown is confirmed, the pipe should be put in its place and secured with a clamp.
If none of the pipes has flown off, you need to check their temperature. The return pipe must be cooler than the supply pipe. However, it is quite difficult to determine the temperature difference between two pipes by touching them with your hand.
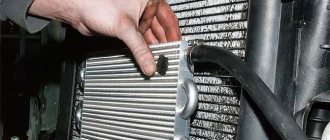
Another reason for faulty heating of a GAZelle can be a clogged stove radiator, which should be removed and properly vented. The radiator can be clogged both externally with various debris that gets into it when the car is moving, and internally with scale, rust, etc.
After dismantling the radiator, you need to pay attention to its temperature. If the radiator is cold, it should be repaired or completely replaced.
If the heating radiator is also in good condition, then it is necessary to check the hoses for the presence of delamination, which may not be noticeable during external inspection. The manufacturer recommends replacing all pipes of the GAZelle car every 3 years.
How to replace?
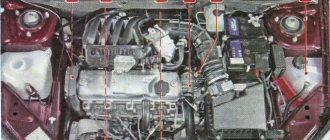
If the seal is lost, the radiator should be replaced. This operation is performed in several stages. First you need to remove the bumper (or just the grille, if this is an old-style Gazelle), remove the element mounting bracket from the top panel of the radiator trim. Next, the audio signal wire terminals are disconnected. The top cladding panel is dismantled. The bolts of the lower cladding are unscrewed. Next, the radiator is pulled out. A new one is installed in its place. Assembly is carried out in reverse order.
Please note: the tightening torque of the nut of the lower and upper bracket of the Gazelle oil radiator (405 engine) is from 1.7 to 2.3 Nm. And the tightening torque of the bolts that go to the cladding panel is from 12 to 18 Nm.
Blocks under the hood
Relay block diagram
Decoding
- Fuel pump relay
- Fan clutch relay
- Main relay
Fuse box
It is located on the battery mounting bracket, behind the closed cover.
Scheme
Designation
| Fuse box on vehicles with ABS | |
| 1 | 90A UMZ-4216: Generator power circuit (connection of the generator with the battery), starter relay contacts, ignition switch, fuses F9, F10, F18, F21–F24, F26–F28, air conditioner circuit |
| 1 | 125A ISF2.8s4129Р: Air heater |
| 2 | 25A UMZ-4216: ABS control unit |
| 2 | 40A ISF2.8s4129Р: Car light circuit and air conditioner circuit |
| 3 | 40A UMZ-4216: ABS control unit |
| 3 | 30A ISF2.8s4129Р: Engine control unit |
| 4 | 90A UMZ-4216: Low and high beam relay contacts, lighting control unit |
| 4 | 6A F2.8s4129Р: Fuel heater and the general positive circuit of the car, except for the light, positive generator, starter and air conditioner circuits, fuse link |
Fuse box on vehicles without ABS
- 90A Light circuit and generator positive circuit
- 60A Common positive circuit of the vehicle, except for the light, generator and starter circuits
Additional fuse box on vehicles with ABS and diesel engine
- 40A ABS control unit
- 25A ABS control unit
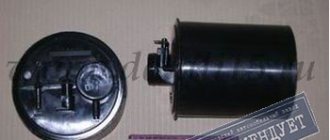
gazelle business stove radiator replacement
How to change the radiator of a Gazelle Business
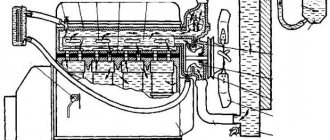
For high-quality repairs, you need correct diagnostics, and to carry it out you need to know how the mechanism works and the principles of its operation. First, let's carefully examine the principle of operation of the heating system in a Gazelle . As in most cars, heating occurs due to heated liquid. Heat is a side effect of the engine running. Heating occurs due to fuel combustion and rubbing surfaces. Heat is removed by the cooling system to the atmosphere. During the cold season, this heat is used to heat the interior. For this purpose, the car is equipped with a heating system, which is an integral part of the cooling system . And the higher the temperature of the coolant in the engine cooling system, the hotter radiator .
Next, the fan blows air, which, passing through the honeycombs, heats up and spreads throughout the car interior. To control all parameters of the Gazelle heater, a control is installed. It is located on the center console of the car and has adjustments such as temperature, intensity and airflow directions. All controls are electronic and all drives are electric. This is very convenient: the driver does not need to be distracted from driving to change parameters. It is also possible to adjust the temperature automatically. Temperature adjustment is carried out by changing the amount of hot coolant passing through the heater. This controls the electric valve. The dampers are adjusted by gear motors.
Loan 9.9% and installments 0%
Replacing UMZ 4216 engines
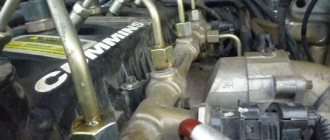
If they purchase a Gazelle with an unsuccessful engine, car owners try to get rid of the power unit by replacing it with an internal combustion engine of another model. Many different options can be considered as a replacement, but most often owners of commercial vehicles install ZMZ-405 engines; this particular engine is chosen for a number of reasons:
- the Trans-Volga engine is not capricious - it “digests” Russian fuel well and does not break down often;
- relative to imported power units (Cummins, Toyota, Nissan), the ZMZ-405 is inexpensive;
- When installing the ZMZ, a minimum of rework is required.
Recently, Gazelle Business cars have been equipped with a Cummins turbodiesel as standard, but owners of cars with UMZ-4216 almost never consider this engine as a replacement:
- Cummins doesn't come cheap;
- The American engine is very sensitive to the quality of fuel, and if the car is fueled with bad diesel fuel, the Cummins can quickly fail.
Another advantage of the ZMZ-405 (or 406) is that many used engines in good working condition are sold on the secondary market, and their price is several times lower than a new internal combustion engine. True, when buying a used unit there are no serious guarantees - you have to take the seller’s word for it. But even if the 405 requires minor repairs (replacing chains or piston rings), purchasing it along with repairs is still much cheaper than purchasing an expensive imported engine. Another disadvantage of an imported internal combustion engine is that if it was not installed as standard on the Gazelle, you will have to purchase it together with the gearbox or be puzzled by the adjustment of attaching the Gazelle gearbox to the new engine.
Engine UMZ-4216
This is a modern gasoline engine that meets the environmental requirements of the Euro 4 standard. Among the main advantages:
good traction at the “bottoms”, which is especially important for the Gazelle. After all, many of these cars work within the city, for example, delivering goods - and in this case the driver simply needs torque; a balanced set of technical characteristics, selected specifically for cars such as Gazelle
After all, GAZ and UMP specialists work side by side, since these engines are supplied to the assembly line only in Nizhny Novgorod - and nowhere else; ease of repair and maintenance.
At first, however, drivers and service employees were hostile to the newcomer - they had simply become accustomed to ZMZ engines over many years and did not want to part with them. But this had to be done, because you can’t buy a new Gazelle Business from ZMZ. Therefore, the design of the Ulyanovsk unit was gradually studied by everyone who encounters these engines in their work. Both strengths and weaknesses were identified. The manufacturing plant did not stand aside. He carefully collects complaints and improves his products if possible in a particular case.
Specifications
Let's look at the characteristics:
- type of power system - injector. “Carburetors” have not been produced for a long time, primarily due to the fact that it is impossible to achieve modern environmental standards with them, which are now mandatory for all manufacturers;
- working volume – 2.89 liters;
- number of cylinders – 4. They are arranged in a row;
- maximum power – 107 hp The boost by modern standards is low, but reliability in this case is much more important. And for a Gazelle this level of power is quite enough;
- type of cooling – liquid (using water or antifreeze).
- The fuel consumed is A-92 gasoline. But it is allowed to use the more expensive “95th”. In addition, there is a factory version that runs on a propane-butane mixture. It is installed under the hood of any version of the Business gazelle, including the GAZ 3302 flatbed truck and the GAZ 2705 all-metal van;
- the total weight in the so-called “first configuration” (with all attachments, including starter, generator, etc.) is 177 kg.
The certified fuel consumption of a Gazelle Business with a UMZ engine is about 10-12 liters per “hundred”, if we are talking about gasoline. The situation with gas is different - approximately 13 l/100 km, according to the car manufacturer.
The real numbers may be higher, since several factors influence the Gazelle’s appetite:
- driving style of a particular driver;
- serviceability of both the engine and the car in general;
- loading the machine;
- time of year (in summer the consumption is less, and in winter – more).
The technical characteristics of the Gazelle Business UMZ 4216 are close to those with the well-deserved “four hundred and sixth” Trans-Volga engine under the hood - there are no significant differences.
Engine device
UMZ-4216 is another incarnation of the “veteran” UMZ-421, developed almost in the fifties of the last century and since then modified many times. The dry type cylinder block is made entirely of aluminum. The valves are located at the top. By the way, there are two valves themselves for each cylinder. Valves need to be adjusted quite often. Although this procedure is simple and you can quickly get used to it. True, some owners who don’t want to get used to it install hydraulic compensators - they say it’s real.
There are no belts or chains in the timing drive. There is a small gear on the crankshaft, which is constantly engaged with the larger one - that's all. The design is simplified to the limit.
The motor life in practice is about 300 thousand kilometers. This is a lot for passenger cars, but for commercial vehicles, on the contrary, it is not enough. Another Achilles heel is overheating.
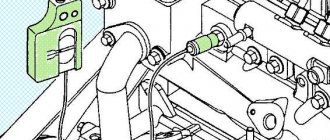
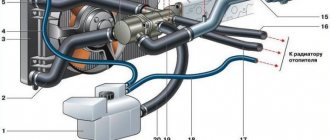
Features of installing an additional electric pump on the stove
The radiator unit itself in the Gazelle heating system is located slightly higher than the expansion tank. Because of this, air pockets may form in the system, and accordingly, the stove will heat either ineffectively or not heat at all. To prevent the formation of air pockets, you can additionally install another heater pump. An additional pump, if installed and connected correctly, will allow you to expel the air lock and force consumables, in this case antifreeze, into the heater.
- Before installing a new pump, it is recommended to disassemble the device and treat it with sealant.
- Open the engine compartment and determine where to install the device. Many Gazelle owners place the pump on the frame, on the side of the intake manifold. In principle, the device should fit into this place without any problems - depending on the specification of the car, even the technological holes for installation may coincide.
- The pump should be connected to the input of the heating unit and the gas reducer, which is installed parallel to the stove. Most likely, you will need to additionally purchase about half a meter of hose, a wire for connection and corrugation, and you will also need a button to activate the device with the block.
- Connect all wiring. If you are installing an additional pump, then there must be a corresponding plug for it, located near the right headlight of the car. As for the power connection itself, you can use the safety mounting block of the heating unit for this; in this case, the plus will be supplied when the ignition is activated. Also, power should be connected to the control button, and dimensions can also be connected to it.
- Having completed all these steps, you need to diagnose the performance of the heating system. If everything works correctly, the pump will immediately allow the air lock to be driven through the lines, thus the temperature in the car interior when the heater is turned on will be very high. As practice shows, a hot air flow, if the pump is connected correctly, will blow from the air ducts already when the engine warms up to 50 degrees. As for the disadvantages of this solution, when activating the heater on a not warmed-up engine, the power unit will have to warm up much longer. If problems begin with the operation of the system after installing an additional pump, check all the actions performed, each stage. Perhaps the problem lies simply in poor power supply to the button or pump, so it would be a good idea to check the quality of the contacts.
Methods for eliminating air lock in the cooling system
Method 1
The solution depends on the causes of the malfunction. In most cases, the cause is draining coolant from the engine. Draining is done either for replacement or repair. Before adding liquid, you need to loosen the clamp on the upper pipe of the heater on the side of the engine compartment. So that it can be removed freely. Then move the stove tap to the position where it is fully open. After this, proceed to filling the coolant. Fill in small portions, while pushing large hoses with your hands along the entire length. This should be done from the moment the expansion tank becomes full. At the same time, gradually remove the upper pipe of the stove from the fitting, releasing the air. After the tank is empty, add coolant and push the hoses again. Then, placing a container under the upper hose to drain the liquid, remove it little by little to allow air to escape until coolant appears. Then top up the expansion tank to the top mark and start the engine. With the engine running, we also remove the upper hose and push the large pipes along the entire length until the liquid flows without bubbles. After this, we put on and warm up the engine to the temperature when the electric fan works (this will mean that the thermostat has opened), and try to very carefully pull off the air outlet pipe. Continue until liquid appears without bubbles. And while monitoring the coolant level (so that it does not fall below the minimum mark), we push the pipes along the entire length. It is also necessary to monitor all joints for leaks. If there are any, eliminate them immediately. If, when the engine is running, the liquid in the tank remains at the same level and no bubbles enter it, then everything is sealed and you can close the lid.
Method 2
If the coolant was not drained and the stove became airy due to leaks, then after eliminating the leak, adding fluid to the maximum level, you need to open the tap on the stove and, starting the engine, push all the hoses along their entire length by hand until bubbles stop appearing in the expansion tank. If this does not help, choose a place with a rise and park the car so that the front is higher than the rear. Then start the engine and, pushing through the pipes, open the throttle (no more than 3 thousand revolutions).
Method 3
The next method is the most correct and effective. It allows you to completely get rid of air jams. For this we need a hand pump. It is the pump, not the compressor, since it is very easy for them to control the pressure. Fill the expansion tank to the top. Close the lid tightly and remove the hose at the top of the tank (return). Next, you need to place any empty container (preferably a canister) in the engine compartment and lower it there. And connect the tube from the pump to the tank fitting using a clamp. And while pumping up pressure with the pump, monitor the coolant level in the barrel and, when the minimum level is reached, top up to full (you can use the liquid that will flow out of the tube). This procedure must be performed until the coolant with bubbles stops coming out. Next, bring the liquid level to the maximum mark and close the lid tightly.
So we looked at how to ventilate the Gazelle Business stove. This does not require expensive equipment or first-class specialists. You can do all these procedures yourself, without outside help. All of the above can be done on the road if a malfunction catches you on the way. This set of tools and devices is available in every car. There is no need for special skills or knowledge to perform such procedures. If all this does not help you, then the problem lies in something else. And for further repairs, it is necessary to find the cause of the breakdown, and then deal with it.
Tees with temperature sensors were cut into the upper pipes
Tees with temperature sensors were cut into the upper pipes Tees with temperature sensors were cut into the top pipes
It is more difficult to cut and solder the threaded part for the sensor into the radiator itself. However, the mechanics of our GAZelles installed sensors in the upper radiator pipe (this way there is less fiddling). As a result, the fan turns on earlier than necessary - at a lower temperature. At the same time, the engine warms up somewhat worse, and since it is equipped with electronically controlled fuel injection, errors in the operation of the fuel system may occur - an enriched mixture will be prepared. This will lead to increased fuel consumption. In addition, it is possible that the upper pipe is hot, but there is no fluid circulation through the radiator. But the sensor “will not understand” this - the fan will turn on and work completely pointlessly, in addition, the load on the electrical wiring will increase, and the cyclicity of the relay and sensor contacts will become higher. Correct installation of the sensor in the lower pipe of the UMZ-4216 engine allows you to obtain a more stable temperature regime of the engine.
Device and technical data
The design of this motor includes the following elements:
- Block of cylindrical parts made of aluminum.
- Cylinder heads that are mounted on the axial mechanism of the rocker arms.
- A crankshaft equipped with main and connecting rod journals, which improved engine performance.
- Single-mass flywheel equipped with a gear-type rim.
- Piston part of the motor. Each piston has 2 compression rings and one oil scraper ring.
Parameters and technical characteristics of UMZ-4216:
| Engine displacement | 2.89 l |
| Piston stroke | 100 mm |
| Compression ratio | 9,2 |
| Diameter of cylindrical parts | 92 mm |
| Power unit power | 107 horsepower |
| Full mass | 177 kg |
Cooling system
The 4216 engine cooling system includes:
- radiator;
- thermostat valve;
- fan;
- stove tap;
- expansion tank for working fluid;
- small and large cooling circuit.
The complete diagram is given in the user manual. Cooling system type: liquid. Using a centrifugal pump mechanism, forced circulation of coolant in the system begins. Passing through the heater device, it is brought to the desired temperature, and the process of cooling begins in the radiator part. The liquid itself passes through two circulation circles: small and large. The small circle does not include passage through the radiator.
Clutch
The design of the coupling mechanism includes the following elements:
- crankshaft;
- flywheel;
- slave type disk;
- pressure disk;
- protective casing;
- springs;
- release handle;
- bearing;
- pipeline;
- gears;
- gearbox housing;
- master cylinder
When the driver presses the pedal, force is transmitted through the rod and piston part, after which the pressure transfers from the pistons to the working cylinder. Then the rod begins to move the clutch release fork and the pressure bearing, from which the force is transmitted to the gears. When the driver releases the pedal, the spring parts begin to act, and all parts return to their original position.
The clutch can only be replaced with the engine switched off.
Electrical diagram
The electrical connection diagram consists of the following elements:
- rechargeable batteries;
- electric starter;
- ammeter;
- ignition coil;
- control relay;
- generator set;
- spark plug.
Before starting work, it is always recommended to carry out an external inspection of the wiring for damage, breaks and defects. The rated voltage of the electrical equipment connection system is 12 V.
When the engine is running at low speeds, consumers are powered by batteries, because The generator set does not develop the required electromotive force. All consumers are connected in parallel.
Fuel consumption
This model of the power unit is produced by the Ulyanovsk Motor Plant. The average gasoline consumption of the engine power system in summer is 18 liters per 100 km. The fuel consumption of the GAZelle UMZ-4216 in winter is 26 liters per 100 km.
Engine Cooling System 4216
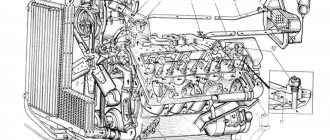
The cooling system is liquid, closed, with forced circulation of liquid, with liquid supplied from the pump to the cylinder block. The engine cooling system is shown schematically in Fig. 12.
Rice. 12. Engine cooling system:
1 – heater radiator; 2 – heater tap; 4 – cylinder head; 5 – gasket; 6 – intercylinder channels for the passage of coolant; 7 – throttle device; 8 – hose for supplying fluid to the throttle device; 9 – hose for draining fluid from the throttle device; 10 – two-valve thermostat; 12 – exhaust pipeline; 13 – steam outlet pipe; 13a – fluid supply pipe to the expansion tank; 14 – plug; 15 – expansion tank; 16 – o; 17 – pipe for draining fluid from the expansion tank; 18 – thermostat housing; 19 – cooling system pump; 20 – impeller; 21 – connecting pipe; 22 – fan; 23 – radiator; 24 – radiator drain plug; 25 – inlet pipeline; 26 – cylinder block.
The cooling system includes a pump, a thermostat, cooling jackets in the cylinder block and head, a radiator, an expansion tank, a fan, connecting pipes, and a body heating radiator.
The tightness of the cooling system allows the engine to operate at a coolant temperature exceeding plus 100°C. When the temperature rises above the permissible level (105°C), the temperature alarm is activated (red lamp on the instrument panel). When the temperature indicator lamp lights up, the engine must be stopped and the cause of overheating must be eliminated.
The causes of overheating may be: insufficient amount of coolant in the cooling system, low tension of the coolant pump drive belt.
Coolant pump
shown in Fig. 13.
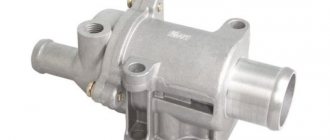
Thermostat housing
cast aluminum alloy. Together with the housing cover, it performs the functions of distributing coolant in the external part of the engine cooling system, depending on the position of the thermostat valves (Fig. 14).
| Rice. 14. Thermostat operation diagram: a – position of the thermostat valves and direction of coolant flow when the engine warms up; b – the same after warming up; 1 – thermostat housing; 2 – thermostat; 3 – gasket; 4 – thermostat cover; 5 – steam outlet fitting; 6 – throttle hole; 7 – bottom valve; 8 – lower valve spring; 9 – balloon; 10 – upper valve spring; 11 – top valve; 12 – rod |
Fan drive
autonomous, includes the following components and parts: additional pulley on the crankshaft; fan drive housing with a drive pulley and an electromagnetic fan shut-off clutch built into it (Fig. 15); Tensioner assembly – tensioner of the fan drive belt (Fig. 16).
| Rice. 15. Fan drive housing with electromagnetic clutch: 1 – bracket; 2 – bolt M12x1.25x100 mm; 3 – coil output; 4 – pulley; 5 – driven disk; 6 – driven disk stop; 7 – spacer; 8 – double-row special ball fan bearing with fan hub; 9 – plate spring of the driven disk; 10 – rivet for fastening the leaf spring to the driven disk 5; 11 – coil with support and magnetic circuit; 12 – clamp of the coupling against rotation. A = 0.4±0.1 mm – gap between the end of pulley 4 and driven disk 5 of the fan hub in the absence of current in coil 11 |
The clutch is turned on and off automatically.
After starting the engine at a low coolant temperature, the rotation of the pulley 4 is not transmitted to the driven disk 5 and the associated fan hub 8 with the bearing, because the end of the pulley 4 and the driven disk 5 are separated by a gap A. The required gap is ensured by adjusting the position of the three lobes of the stop 6 of the driven disk. In the extreme right position, the driven disk 5 is held by three leaf springs 9.
After the engine has warmed up and a certain coolant temperature has been reached (more than plus 90°C), the temperature sensor for turning on the electromagnetic clutch (installed in the cooling radiator housing) is triggered and supplies current through pin 3 to the coil winding. The resulting magnetic flux closes through the driven disk 5 and attracts it to the end of the pulley 4, overcoming the resistance of three leaf springs 9. The fan hub 8 (together with the fan) begins to rotate at the speed of the pulley 4.
When the temperature drops below the temperature sensor switch-off threshold, the current in the winding of coil 11 stops flowing. Under the action of three leaf springs 9, the driven disk moves away from the end of the pulley 4 by the amount of gap A. The fan hub 8, together with the fan, stops rotating. When the coolant temperature rises above 90°C, the process is repeated.
Caring for the coupling consists of periodically checking the clearance A at each maintenance and, if necessary, adjusting it using a flat feeler gauge 0.4 mm thick by bending the three stops 3 of the driven disk.
The coupling must be periodically cleaned of dust and dirt. The coupling does not require any lubrication during operation.
Fan belt tensioner
shown in Fig. 16.
| Rice. 16. Fan drive belt tensioner: 1 – bracket; 2 – pulley; 3 – ball bearings 60203A; 4 – retaining ring; 5 – roller with threaded shank; 6 and 7 – holes for the lever (mount) when tensioning the belt; 8 – hole for fastening the tensioner on the timing gear cover; 9 – groove for locking bolt |
6.4.1 Cooling system maintenance
engine 4216
Periodically check the fluid level in the expansion tank.
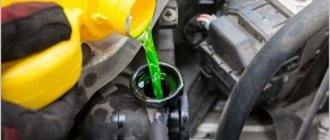
In cases where a decrease in the level of coolant in the expansion tank occurs in a short period of time and or after short runs (up to 500 km), you need to check the tightness of the cooling system and, having eliminated the leak, add the same coolant to the radiator or expansion tank.
Every three years or every 60,000 km (whichever comes first), the cooling system must be flushed and the coolant replaced with new one.
Periodically check the tension of the fan drive belts and the water pump and generator drive belts.
The fan drive belt is tensioned by changing the position of the tension roller pulley using a lever (mount) inserted into holes 6 and 7.
The water pump drive belt is tensioned by changing the position of the generator. Belt tension is controlled by a spring dynamometer based on the amount of belt deflection under a load of 4 kgf. The permissible belt deflection values are shown in Fig. 17.
| Rice. 17. Accessory drive belts: 1 – water pump pulley; 2 – tension roller pulley; 3 – fan drive pulley; 4 – crankshaft pulley; 5 – generator pulley |
Major failures of the UMZ 4216 engine
A more common failure is a rupture of the intake manifold. According to the manufacturer, on the UMZ engine 4216
an intake manifold made of insufficiently strong steel was installed. In 2010, this problem was successfully corrected. UMZ engines with a manifold made of durable steel began to be installed on Gazelle cars.
How to drain antifreeze from the UMZ 4216 block.
The next most popular malfunction is in the cooling system of the UMP engine. 4216
. At average speeds at speeds above 60 km/h, the engine temperature is normal. Once you slow down, the temperature rises evenly and it doesn’t take long for the antifreeze to boil. If the Gazelle is stuck in a traffic jam, then overheating of the engine is inevitable.
convenient device for draining antifreeze (not a drop missed) convenient device for draining antifreeze (not a drop missed)
for gazelles and other cars.
The UMZ 4216 engines are equipped with an electric clutch, which is used to turn on the radiator fan. This clutch begins to work incorrectly and the fan does not turn on. Naturally, the engine overheats. Methods to get rid of overheating:
- Install a copper radiator. Copper conducts heat better and cools liquid more efficiently.
- Instead of antifreeze, use high-quality antifreeze.
- Fool the fan drive - turn it on manually from the cab. A better option is to get rid of the electric coupling in the UMZ 4216
and install an electric fan with the largest number of blades and a thermal switch.