Typical problems with the VAZ electric motor
First, let's discuss what are the typical malfunctions of the VAZ 2107 passenger car.
- A particularly common type of breakdown is wear of the electric motor brushes. This problem can be indicated by too low output voltage, which means frequent discharge of the battery.
- Also, car enthusiasts often have to deal with bearing failures. Many VAZ owners complain about characteristic noises, after which they have to replace the bearing.
- There are reviews about the failure of the diode bridge. This sometimes happens due to improper handling of the electric motor.
To more specifically determine the breakdown of the generator of this seventh generation classic car or, say, a VAZ 2106, you need to prepare:
- a set of keys;
- screwdrivers;
- puller;
- block, rubber hammer.
By the way, the typical generator problems of the VAZ 2109 are the same. In general, in order to identify them all, you must first remove the unit from the car.
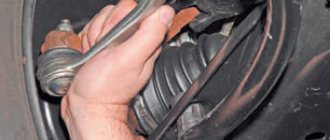
- But to do this, we first disconnect the battery and wires from the electric motor.
- We dismantle the unit. Now it will be easier to identify all problems with the assembly unit.
- After removing the device, we separate the pulley, while simultaneously fixing the rotor with a tool.
- Here you can immediately inspect the voltage regulator relay; it also sometimes fails. For example, if the battery is constantly boiling, it is worth checking this relay.
- By unscrewing the nuts, you can remove the electric motor cover.
- There is a bearing in the cover, which sometimes makes noise. This refers to the main malfunctions of the domestic generator. If the bearing falls apart, it must be pressed out using a puller and replaced.
- Using a block with a hammer, you can squeeze out the rotor and check it, but rotor failures are extremely rare.
- Having separated the stator from the cover, it is worth inspecting the stator winding, but a break in the circuit is unlikely. The cause of such a malfunction may be its operation at extreme conditions.
- Next, you can remove the diode bridge; it often fails. You can check it with a multimeter.
- And of course, the brushes of the electric motor - they need to be measured, if the length is too short, replace them.
- Assembly and installation of the unit is done in reverse.
Here it should be added that the faults of the VAZ 2110 are of the same nature. However, the Chevrolet Niva generator usually has the same malfunctions.
Bottom line: what are the signs?
Now let's try to summarize the above, in other words, summarize all the signs of typical generator malfunctions.
- The first is signs of a malfunction of the diode bridge of a junk generator. Namely: frequent voltage drops, the battery is either recharged or not properly charged. After all, the diode bridge serves as a kind of check valve and is responsible for ensuring that the electric current flows directly from the unit and does not return back.
- There are also frequent cases of failure of the voltage regulator relay, as evidenced by frequent recharging of the battery.
- Next is the wear of the motor brushes, which is indicated by a voltage drop.
- Bearing failure is indicated by a characteristic hum that can be heard even from under the hood.
- Less common is winding breakage, which is diagnosed after a complete failure of the unit.
Well, a car generator can show its bad side with precisely such malfunctions. However, not all of them can be identified by car enthusiasts on their own. Often you have to contact a car service for this.
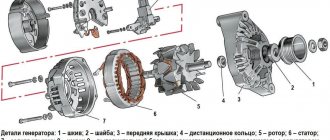
Generator design: its composition
ATTENTION! A completely simple way to reduce fuel consumption has been found! Don't believe me? An auto mechanic with 15 years of experience also didn’t believe it until he tried it. And now he saves 35,000 rubles a year on gasoline! Read more"
The mere fact that a gene is always under high load a priori includes it in the risk group. He needs an eye and an eye. Experienced and caring motorists know this. Beginners and amateurs don’t pay attention, “ruin” the new device and battery, and then wonder why the car doesn’t drive.
What does a gene consist of? Its components necessarily include a rotor or inductor. Its main function is to create a magnetic field inside the device. The rotor has a shaft on which there is an excitation winding. Due to it, the gene is recharged or self-excited.
On the same shaft there is a contact group consisting of copper rings. They are connected through terminals to a winding or exciter, as it is also called.
Depending on the gene model, fan blades and a drive pulley may be installed on the rotor shaft. One of the bearings is also located here.
Read also: Hair dryer for welding PVC film
Stator – performs the function of providing the device with alternating voltage. The stator consists of a metal core assembled from plates and a winding.
The stator has grooves that are used for laying winding turns. They can be laid in different ways, but there are always several windings connected to each other according to the diagrams.
The generator has a rectifier unit, which is needed to convert the current. That is why it is also called a converter. Thanks to the block, the voltage is converted from sinusoidal to constant, and then goes to the car's on-board network.
A converter is nothing more than plates that dissipate heat well. Modern rectifier units have semiconductor-type power diodes installed (more about them below).
The brush assembly ensures the transmission of voltage to the contacts. The assembly consists of graphite brushes, springs and a holder. In the genes of the latest series, the brush assembly is connected to the voltage regulator, together they create a single unit.
The regulator itself or the tablet serves to maintain the voltage of the unit at specific values. In other words, it is the tablet that is responsible for the stable current produced by the gene. As you know, the crank shaft rotates with different amplitudes. Therefore, we need a regulator that will stabilize the frequencies, and thereby influence the winding. The regulator not only controls the frequency of the pulses, but also regulates their duration.
And, of course, the diode bridge is an important part of the generator. It is described in detail below.
The main function of the diode bridge on the VAZ 2107
The diode bridge is an integral part of the VAZ 2107 generator. The car's generator produces alternating current. And the main task of the diode bridge is to convert the alternating current of the generator into direct current of the on-board network with subsequent charging of the battery. That is why car enthusiasts usually call a diode bridge a rectifier block. The peculiarity of this unit is that it allows direct current to pass only towards the battery. The current passed through the diode bridge is subsequently used to ensure the operation of the heater, low and high beam headlights, side lights, audio system, etc.
The charging voltage in a VAZ 2107 car ranges from 13.5 to 14.5 volts. To provide the required voltage, 2D219B diodes are most often used in the diode bridges of this car.
And there is a diode bridge inside the VAZ 2107 generator. And in order to get to the bridge, the car owner will first have to remove and disassemble the generator. There are no other options.
How to change a diode bridge in a generator
Changing the diode bridge in the generator
To perform the work you need to acquire:
- a set of heads;
- flat screwdriver;
- curly screwdriver;
- new diode bridge.
Note! Basically, the generator stops charging the battery due to a faulty voltage regulator or breakdown of the diode bridge. For more detailed diagnostics, it is recommended to remove the device from the engine compartment and install it on a plumbing installation.
Replacement of the bridge must be carried out in a certain sequence:
- After removing the diode bridge, check the current flow in the circuit. This can be done using an ohmmeter or a special tester. If the semiconductors fail, the bridge will need to be replaced completely.
Note! It is difficult to replace individual parts of the bridge yourself; this requires certain skills.
- To reach the diode mounts, you need to remove the brush block from the generator. The bolts that hold the back and front covers are unscrewed. One part of the device is removed from the stator.
- Half of the generator is set aside. Using a socket wrench, unscrew the nuts securing the stator winding leads to the rectifier unit. The middle area of the device will be disconnected only after the negative wire is detached from ground. Also, the bolts with the corresponding insulators and the diode bridge itself are removed from the back cover.
- The new diode bridge is installed in its place. Now bolts with insulators are placed in the cover, the winding terminals are put on them and tightened with nuts.
- The rotor and front cover are installed into the rear through the stator. The generator housing is tightened using bolts. At the last stage of work, brushes are installed.
As you can see, the process of changing the diode bridge is not complicated; it is recommended to watch videos and photos to do the work yourself. In addition, the novice car mechanic is provided with additional instructions with a detailed description of the processes. Since the price of service stations is not acceptable for everyone, many try to repair their car themselves.
Signs and causes of diode bridge failure
As mentioned above, a generator equipped with a diode bridge is the most important component of a car. If the alternator fails for some reason, the battery will stop charging. And this is the only sign of a faulty diode bridge. Without additional recharge, the battery will work for a few hours at most, after which the car will be completely immobilized. A diode bridge fails when one or more diodes burn out in it. Here are the reasons why this happens:
- moisture has entered the generator. Most often, this is condensation that forms on the internal surfaces of the generator in the autumn-spring period, when relatively warm weather alternates with frosts;
How to ring a diode bridge on a VAZ 2107
To find out whether the diode bridge is working, the car owner does not need to have any special skills. All he needs is basic knowledge of electrical engineering and a couple of instruments:
- household multimeter;
- 12 volt incandescent light bulb.
We check the diode bridge with a regular light bulb
Before starting the test, make sure that the battery is charged. It is desirable that the battery charge level is maximum.
- The base of the diode bridge (i.e., the thin plate into which the diodes are screwed) is connected to the negative terminal of the battery. The plate itself must be firmly secured to the generator housing.
- Two wires are connected to the light bulb. Then one of them should be connected to the positive terminal of the battery, and the second wire should first be connected to the output provided for the additional diode, and then with the same wire you should touch the positive output bolt of the diode and the connection point of the stator winding.
Checking the diode bridge for open circuit
This verification method is similar to the one described above, with the exception of two nuances.
- The negative terminal of the light bulb is connected to the positive terminal of the battery.
- The second wire of the light bulb is connected to the negative terminal of the battery. Then the same points are checked as indicated above, but here the control light should be on. If the light does not light (or it lights up, but very dimly), then there is a broken bridge.
How to check a generator diode bridge
Test the unit on an installed or removed generator. To carry out the procedure, you will need wires and an ohmmeter, but an ordinary car light bulb will do.
Checking the diode bridge on a car
Before testing, remove the negative terminal from the battery and disconnect the wires from the generator. If you are using a multimeter, set it to ohmmeter mode. Touch the positive red probe to terminal “30” of the generator, and the negative probe to the metal body of the generator. If the rectifier unit is working properly, the device readings will show an infinitely high resistance. Otherwise, the diode bridge must be replaced.
The above test allows you to determine the integrity of the bridge in terms of the absence of a short circuit. At the next stage, the element is checked for breakdown. Using the red positive probe, touch terminal “30” of the generator again, and the negative probe, in turn, touch the axle mounting bolts (usually they are square). The resistance must be infinitely large. Now swap the probes: the readings should be 500-700 Ohms. You need to check each diode separately, changing the polarity of the tester!
If you don't have a meter, use a 12V car light bulb. Then disconnect all the terminals from the battery and the wires from the generator. First you need to test the entire bridge:
- connect the minus battery to the metal housing of the generator;
- take a suitable wire and connect a light bulb (in series) to its gap;
- connect the other end of the wire from it to terminal “30” of the generator;
- the glow of the lamp indicates a bridge malfunction.
Next you need to test each diode. To do this, attach the minus to the housing, and touch the diode mounting bolt with the plus through the lamp. Its glow indicates a breakdown of the electronic component. Check each of them. Next, attach the “plus” coming from the battery to terminal “30” of the generator, and touch the diodes with the minus one by one. If the lamp lights up in any case, the bridge needs to be replaced. If you need to check additional diodes, leave the “plus” on terminal “30”, and connect the minus to terminal “61”: a glowing light indicates problems in the rectifier unit.
Checking the dismantled rectifier unit
Remove the generator and remove the bridge from it. Further course of action:
- set the tester to the ohmmeter position and turn on (if available) the sound indication;
- connect the negative probe of the device to the central plate, and touch the positive probe to a metal core (this can be a flat strip of metal or a bare wire);
- the device will show either infinity or 500-700 Ohms;
- swap the poles of the probes: the readings should change to the opposite;
- if the readings match, the diode is faulty;
- Do this procedure for each electronic component of the bridge.
The process of replacing the diode bridge on a VAZ 2107
Before we get started, let's select the necessary tools. Here's what we need:
- open-end wrench 17;
- open-end wrench 19;
- socket head 8;
- 10mm socket with long wrench;
- flat screwdriver;
- a new diode bridge for the VAZ 2107 (cost about 400 rubles);
- hammer.
Sequencing
When getting started, you should understand the following: before removing the diode bridge, you will first have to remove the generator and disassemble it almost completely. Without this, it will not be possible to get to the diode bridge.
- Using a 19-mm open-end wrench, unscrew the fastening nut holding the generator bracket. The generator is removed.
Video: changing the diode bridge on a VAZ 2107
One mechanic I know, who was dismantling the diode bridge of the “seven” before my eyes, several times drew attention to the following nuance: if you have already disassembled the generator, please check not only the diode bridge, but also everything else. And special attention should be paid to generator bearings. They must be checked for lubrication and play. If even a very slight play is detected, it’s time to change the bearings. Moreover, it is “bearings”, not a bearing. This is the second important nuance: under no circumstances should you leave one old bearing and one new one in a VAZ generator, because such a design will last a very, very short time. I decided to change the generator bearings - change everything. Or don't touch them at all.
About installing an additional diode
Installing an additional diode is quite rare. Why is this being done? In order to slightly increase the voltage of the on-board network. The need for this increase arose due to new laws. As you know, in 2015, changes were made to the traffic rules, forcing drivers to constantly drive with their running lights on. And owners of classic VAZ models are forced to constantly drive with their low beams on. In such a situation, both battery charging and on-board voltage drop significantly. To somehow solve this problem, craftsmen install additional diodes, which are located between the voltage regulator terminals and the common output wires for the additional diode, as shown in the figure below.
For installation, KD202D diodes are usually used, which can be found in any radio parts store.
If the above diode is not available, you can choose any other one. The main thing is that the direct forward current is at least 5 amperes, and the maximum permissible reverse voltage is not lower than 20 volts.
So, in order to change the diode bridge on a VAZ 2107, you do not need to go to the nearest service center and pay a mechanic 800 rubles. Everything can be done on your own, and in a fairly short time. To remove and disassemble the generator, 20 minutes is enough for an experienced car enthusiast. It will take a beginner more time, but in the end he will cope with the task. All you need to do is follow the recommendations given above exactly.
Let's figure out why the diode bridge in a car generator burns
The main component in the electrical system of any vehicle is the generator. Without this unit, a serviceable car, even with a new, fully charged battery, will not drive for long. Therefore, this unit must be in working order at all times, that is, fully operational.
In this case, initial diagnostics of the car can be carried out without leaving the driver’s seat. However, repairs or detailed inspections require dismantling the DC source and then disassembling it to gain access to the diodes. But before this, the motorist must know the basic ways to check the diode bridge.
Tasks of the VAZ diode bridge, causes and malfunctions
The generator circuit is very simple - it consists of a rotor with an excitation winding and a stator made of thin steel plates.
The three-phase stator winding is located in special slots, connected to the zero point and a group of four (sometimes six) diodes.
The task of a diode bridge is to convert the type of current from alternating to direct. The peculiarity of its operation is that current flows only in one direction - from the generator to the on-board network.
One of the most common breakdowns is the burnout of one or more diodes. The reasons may be different - moisture (dirt, oil or dust) getting into the generator, polarity errors in the event of “lighting” another car, and so on.
As we have already mentioned, checking the diode bridge of a VAZ even in a garage. All you need is a 12V light bulb and a multimeter.
Before starting work, it is advisable to remove the protective casing of the mechanism and disconnect the regulator terminals. Please note that the “positive” diodes have red wires, and the “negative” ones have black wires.
Let's look at two ways to check a diode bridge:
- Using a multimeter (tester).
- Using a light bulb.
How to determine the health of the generator
Information about the operating status of the main unit responsible for generating electrical energy in the car is displayed on the dashboard for the convenience of motorists. The icon on the instrument panel that resembles a battery should go out after starting the vehicle’s power unit. This means that the power to the main electrical components has been switched from the battery to the generator. If the indicator does not go out, this indicates a breakdown in the electrical circuit. Problems may also be indicated by insufficient battery charge due to the lack of normal current rating.
Main signs indicating a faulty diode bridge
A normally operating diode conducts current in only one direction. In the event of a breakdown, a current leak appears, which flows from the on-board network to the starter windings. Today, several types of diode bridges are installed on cars:
- diode bridge without additional cooling;
- diode bridge with passive cooling due to special radiators.
In addition, there are different types of connecting windings and connecting bridge platforms: using welding or soldering. The first sign that the generator is operating unstably due to a broken diode bridge is the rapid and frequent discharge of the battery. There are other reasons why you can indirectly determine the combustion of diodes in a rectifier:
- insufficient spark on the spark plugs;
- headlights with dim light during operation of the power unit;
- interruptions in the sound system;
- significant reduction in cooling fan power;
- poor operation of the air conditioning system.
If any of the above-mentioned signs are noticed, there is no need to panic, but it is better to find out why the diodes burned out, for which you should seek help from the service station specialists.
Generator burnout or what is a diode bridge
When they talk about the generator burning out, they mean the diode bridge. It is a mandatory component of the generator.
Diagnosing a car with a burnt-out gene can be done easily. But repairs will require some effort and specific knowledge. It will be necessary to carefully study the design of the generator in order to be able to disassemble it, thereby getting to the diodes.
How to check the diode bridge? First of all, check the readings with the values on the dashboard. There is an icon that resembles a battery. After starting the engine, this icon should go out. Thus, the motorist is informed that the power supply to the main electrical components of the car has been switched from the battery to the generator.
But if the icon does not go out, then this is a cause for concern. The system gives a signal that a breakdown has occurred in the circuit. The reason still needs to be clarified more specifically, because this may also indicate a weak or damaged battery.
The main marks confirming damage to the diode bridge are the following:
- leakage current;
- fast and frequent battery discharge;
- small spark on spark plugs;
- reduction in cooling fan power;
- unstable operation of the air conditioner;
- interruptions in the functioning of the sound system;
- poor lighting of the optics while the engine is running.
Read also: DIY circuit board drilling machine drawings
By looking at the headlights, many experienced motorists will immediately determine the faulty gene, without confusing it with battery problems. If the headlights shine dimly when the engine is off, the battery is to blame; if when the engine is running, it’s the generator.
A diode bridge (DM) on generators can be installed in two ways: without additional cooling or with it. Additional cooling is carried out using special radiators.
If the diodes burn out, don't panic. It is better to find out the reason why this happens. Below we will describe instructions that imply autonomous diagnostics of DM.
The generator will need to be disassembled to gain access to the diode bridge.
- the current at the gene outputs is checked (it should not be lower than 13.5 V);
- At the same time, you need to check the instrument readings to see if the indicator continues to light after starting the internal combustion engine (provided that the gene is connected to the car);
- check the diode bridge with a voltmeter (if the meter needle moves into the red zone, the diodes are definitely faulty).
However, these signs, even if they are identified in their entirety, cannot yet prove 100% failure of the diode bridge, since similar symptoms indicate a breakdown of the chocolate bar (regulator).
Experts advise using the exclusion method in this case. That is, check the voltage regulator. If it is working properly, there is definitely a problem with the bridge.
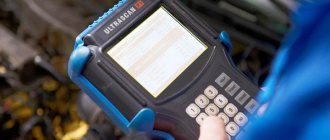
The diode bridge is professionally tested with a multimeter. The device must be set to sound indication mode. If the multimeter does not have this ability, then you will have to measure in 1-kOhm mode.
It is noteworthy that individual measurements are carried out for diodes. In particular, the ends of the diodes should be touched with the probe of the measuring device several times, changing the terminals of the device each time. In one of the cases, the test should show BRS (infinity resistance), in the other - Ohm fluctuations in the range of 500-700.
A diode can be considered damaged if the readings are the same when measured in different directions.
Diodes are also checked using an indicator. This is done like this:
- gene protection is dismantled;
- The DM plate is connected to the negative terminal of the battery;
- The indicator is connected at one end to the positive terminal of the battery, and at the other end it is checked.
If, after touching the second end of the indicator to the diodes, the light bulb lights up, then the element is damaged.
We prepare the diode bridge for self-diagnosis
You can check the functionality of the generator bridge on your own if you understand how the diodes are connected. But before you start diagnosing, you need to carry out preparatory measures. To do this, you need to the generator to gain access to the diodes:
- The fasteners (bolts) holding the front and back covers are unscrewed.
- The next step is to disconnect the housing from the starter winding.
- If the bridge structure is collapsible, then the assembly is unscrewed.
- The positive terminal is disconnected from the generator.
- The method of attaching the minus is checked. If the terminal is independent, it is disconnected.
- After removing the front wall, the bridge is disconnected from the windings. For this purpose, a soldering iron is used to heat the leads until the solder boils, after which they are carefully moved to the side using a screwdriver.
After completing the preparatory work, you need to figure out the question of how to properly check that the diode bridge has burned out ?
Signs of diode failure
The main problem in a rectifier bridge is the diodes. You should start checking the unit that generates electricity in the car only after identifying the following indirect problems:
- the voltage at the generator output terminals is below 13.5 Volts;
- the indicator on the instrument panel inside the car continues to light after starting the power unit;
- the arrow on the voltmeter shifts to the red zone when readings are taken;
- The battery indicator does not light up after turning on the ignition.
Similar symptoms are detected when the voltage regulator breaks down; therefore, its serviceability is checked first. There are various reasons why a rectifier bridge fails, which requires its repair or complete replacement.
Why does the diode bridge burn out?
There are many situations that can lead to diode failure. However, the most common breakdowns include the following:
- the board was flooded with water;
- dirt, together with engine oil, penetrated inside the bridge and led to a short circuit;
- The polarity of the contacts on the battery has been reversed.
Experts are considering several options for checking the functionality of the generator rectifier. The first method involves using a multimeter. In the second case, a standard car light bulb is sufficient.
Diagnostics of a diode bridge using a multimeter
Before you understand why the diode bridge may be burning, you first need to dismantle the broken unit. After which a sound indication is installed on the measuring device. If such a function is not provided in the multimeter, then the test takes place in 1 kOhm mode. Individual measurements are carried out for all diodes. In the process of checking with the working contact, you need to touch the ends of the diode several times, while swapping the probes of the device. In one case, the test shows an infinitely high resistance, and in the second, the parameters should fluctuate in the range from 500 to 700 Ohms. If the measurement results turn out to be the same in different directions, this indicates that the diode under test has failed and needs to be replaced.
Self-test of the generator
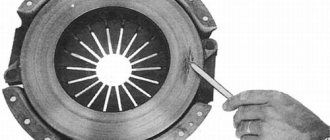
The easiest way is to check the fuse. If it is in good condition, the generator and its location are inspected. The free rotation of the rotor, the integrity of the belt, wires, and housing are checked. If nothing arouses suspicion, the brushes and slip rings are checked. During operation, the brushes inevitably wear out, they can become jammed, skewed, and the grooves of the slip rings become clogged with graphite dust. A clear sign of this is excessive sparking.
There are frequent cases of complete wear or failure of both bearings and stator failure.
The most common mechanical problem with a generator is bearing wear. A sign of this malfunction is a howling or whistling sound when the unit is operating. Of course, the bearings must be replaced immediately or tried to be restored by cleaning and lubrication. Loose drive belt tension can also cause poor generator performance. One of the signs may be a high-pitched whistle from under the hood when the car accelerates or accelerates.
To check the rotor field winding for short-circuited turns or breaks, you need to connect a multimeter, switched to resistance measurement mode, to both contact rings of the generator. Normal resistance is from 1.8 to 5 ohms. The readings below indicate the presence of a short circuit in the turns; above – direct winding break.
To check the stator windings for ground fault, they need to be disconnected from the rectifier unit. If the resistance readings given by the multimeter are infinitely large, there is no doubt that there is no contact between the stator windings and the housing (“ground”).
To check the diodes in the rectifier block, use a multimeter (after completely disconnecting it from the stator windings). The test mode is “diode test”. The positive probe is connected to the plus or minus of the rectifier, and the negative probe is connected to the phase terminal. After this, the probes are swapped. If the values of the multimeter readings differ greatly from the previous ones, the diode is working; if they do not differ, it is faulty. Another sign indicating the imminent “death” of the generator diode bridge is oxidation of the contacts, and the reason for this is overheating of the radiator.
Checking the diode bridge using a light bulb
Naturally, not every car owner has a multimeter, and therefore you need to know how to check the vehicle’s generator using improvised means? To do this you need two pieces of electrical wire and a car lamp. The check itself involves the following simple steps:
- The protective casing of the generator is removed and a diode bridge plate is connected to the negative terminal of the battery.
- The wire from one end of the light bulb is connected to the positive of the battery, and with the other you need to touch the terminals of the remaining diodes and the connection points of the starter winding in turn.
- If the lamp lights up at any terminal of the diode, it means that this element is faulty and needs to be replaced.
In some cases, it may be necessary to check the diode bridge for an open circuit, for which you need to carry out the following manipulations:
- The wire from the negative terminal of the light bulb is connected to the negative terminal of the battery and in the same sequence as checking for breakdown of the diodes, they are tested. The only thing is that in such a situation the light should be constantly on.
- If, during the test, the light on any of the diode terminals does not light up or its light is very dim, then the part has broken and will have to be replaced.
You can find out why malfunctions occur in the diode bridge of the generator yourself in a garage. In this case, you will need a regular tester, which almost every car enthusiast has, or a car light bulb with two wires.
Signs of a diode bridge malfunction
First of all, you need to remember that the diode bridge on the VAZ-2114 is no different from the same unit on the VAZ-2109, VAZ-2110 and other models. Therefore, if you figure out how to determine the malfunction, it will not be difficult to identify it on any of the cars. There are several main symptoms; they can appear together or separately. Any of them requires an immediate check of the generator:
- The warning lamp, which lights up when the ignition is turned on, does not go out even after the engine is started. This is a general indicator of a problem, but if the diode bridge has failed, the lamp will light in any case. If a voltmeter is installed in the car, you can check its readings; the arrow will most likely be either in the red zone or at its very border.
- Another option is that the warning light does not light up when you turn the ignition key and does not light up after starting the engine.
- When measuring the voltage produced by the generator with the engine running, the reading is less than 13.5 Volts. You need to measure at the battery terminals.
- The next morning the car will not start due to a dead battery, although in the evening it was in normal condition. After charging the battery, it discharged again in a short time, and the generator housing becomes so hot that you can burn your hand on its surface.
- Extraneous noise appears under the hood, most often it is a whistle or howl. The noise level may vary depending on engine speed.
- Various errors appear - the ABS, ESP, and so on may light up. The power steering may stop working, the radio will begin to wheeze and freeze. Instead of a turn signal, the light turns on. All this manifests itself against the background of a dead battery, which does not charge due to a broken diode bridge.
- The headlights begin to dim or stop working altogether, and the air conditioner does not cool as it should.
These are the main signs of a diode bridge breakdown, but it is worth remembering that they may indicate other generator failures. Therefore, first of all, you need to accurately identify the faulty unit. It is not necessary to take the car to a service center for diagnostics; the car owner can do the work; a minimum set of tools is needed.
Advice! If the control light on the panel lights up or, conversely, does not work, first of all you need to check it and the control relay. Often it is these elements that are faulty, and not the generator.