ALTERNATOR BELT TENSIONER
The comfort level of any car is determined by additional equipment that consumes energy, the main source of which remains only the engine. Electrical consumers in a car are low-power and therefore are powered by a generator. Driving attachments using electric motors would increase the price and weight of the machine. Therefore, the classic drive scheme for an electric generator, coolant pump, air conditioning compressor, power steering pump is a belt drive using a ridged belt from the crankshaft pulley.
Operating principle of the alternator belt tensioner
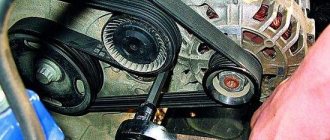
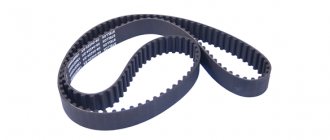
Ribbed belts form V-shaped “streams” on the working surface into the reciprocal projections of the drive pulleys. This achieves an increase in the friction surface and, accordingly, an increase in the transmitted power. The more grooves, the less belt slippage and the higher the transmission efficiency. For normal operation of the belt, a generator belt tensioner .
Alternator belt tensioner device:
- Structurally, it is a bracket with a roller at one end, fixed to the engine at the other end.
- The roller is pressed against the belt, tensioning it, with a spring.
- Inside the spring there is a shock absorber that performs the same function as a car.
- Due to its elasticity, longitudinal and transverse vibrations occur in the belt under variable loads from attachments. So the shock absorber dampens them. For this purpose, rollers called “parasitic” are additionally installed, acting as intermediate supports for the belt.
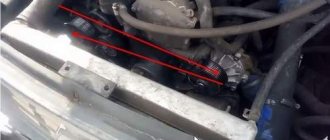
The operating conditions of the vehicle have a decisive influence on the reliability of the entire belt drive. Mud, water and stones do their job. The ribbed belt is subject to increased wear and tension weakens. This is evidenced by a loud squeak - the result of a belt slipping on the pulleys of the attachment. In this case, the first thing you need to do is check the alternator belt tensioner .
Destruction of the roller bearing protection is the root cause of such troubles as:
- poor battery charging,
- engine overheating,
- poor air conditioning performance,
- feeling of inadequate steering response.
In some engine models, the roller can be replaced. Regardless of this, during repairs it is recommended to completely replace the ridge belt tensioner.
For safe driving on our roads, constant monitoring of all components of the belt drive is necessary. Often troubles start not only with the tensioner. The crankshaft pulley or air conditioning compressor can cause premature belt wear. Therefore, periodic monitoring of these parts should be included in the mandatory regulations for the technical inspection of the car by the driver.
Selecting and purchasing a generator belt tensioner
In our online store Autocompas.ru you will find a large selection of alternator belt tensioners from various manufacturers. You can also select and purchase the following spare parts from us: Clutch basket, Stabilizer, Engine sump and any other spare parts that you need. Here you can easily select spare parts for Acura, Chery, Dodge and other makes and models of cars.
Pay attention to the following manufacturers of alternator belt tensioners: AUTOKIT, JP GROUP, TREVI AUTOMOTIVE and others.
We wish you successful shopping and pleasant trips in a working car.
When does the drive belt tensioner need to be replaced?
Both the drive element itself and its tensioner have a limited resource, the development of which requires their replacement. The service life can be different for different types of mechanisms - simple eccentric ones need regular replacement along with the belt, spring and damper ones have a longer service life.
The drive belt tensioner must be replaced at the time and in the manner specified by the manufacturer for certain engines. Deviation from these requirements may have negative consequences for the engine, including the possibility of jamming (occurring due to overheating due to the pump stopping).
The following symptoms indicate the need to replace the drive belt tensioner:
- Presence of traces of rust and cracks.
Externally they appear as streaks of rust between the lever and the base; you can see rust dripping from the tensioner. It wouldn’t hurt to check for cracks or damage on its lever, body and bracket. Please note that a number of signs can only be seen by removing the tensioner.Dripping or leaking rust indicates internal wear on the tensioner elements. Cracks can most often be observed in the area of the travel stops and mounting bolts.
To solve the problem, the drive belt tensioner needs to be replaced.
- Worn pulley bearing.
To detect this problem, manually rotate the pulley by turning on the engine and removing the belt. If your operation is accompanied by noise, resistance or uneven rotation, the cause may be wear on the pulley bearing.
The reason is a faulty bearing and/or pulley.
To solve the problem, the worn drive element assembly must be replaced. You should not limit yourself to replacing only the worn pulley, since soon the entire part may fail.
- Worn pulley.
Pulleys are made from plastic, nylon or steel; their surface can be either smooth or have grooves.
Signs of a malfunction include nicks, cracks, and gouges on the smooth surface of the pulley. The surface with grooves must also be free of defects; the grooves themselves must be clean, free of wear and of excellent height. The ribs located on the sides of the plastic pulleys must also be free of cracks and chips. The cause of the malfunction is the belt cutting into the pulley.
The problem is solved by replacing the drive belt tensioner assembly. You should not limit yourself to replacing only the worn pulley, since soon the entire part may fail.
- Tensioner block misalignment.
The malfunction is noticeable by the incorrect location of the belt on the tensioner pulley.
The cause is a bent or misaligned mounting bracket, improper installation of the tensioner, or corrosion/contamination between the base and the mounting surface.
You can use a Gates DriveAlign® Laser to identify the problem. If it is not possible to eliminate the malfunction, the failed part will need to be replaced.
- There is noise in the tensioner.
The problem can be detected by creaking and crackling sounds coming from the tensioner.
The cause of the noise is a faulty bearing or hinge area.
To solve the problem, the tensioner must be replaced. To correctly diagnose accessory belt drive noise, consult the appropriate manual.
- Tensioner arm misalignment.
The malfunction is noticeable by the incorrect location of the belt on the tensioner pulley, shiny, smooth areas or grooves on its body or lever.
The reason is the contact of the metal of the lever with the metal of the spring housing.
In this case, we are talking about wear of the axle bushing; troubleshooting requires replacing the part.
- Strong beating of the tensioner lever.
It is characterized by the movement of the tensioner lever back and forth during operation.
The cause of strong vibration or constant beating is a breakage of the damping part or stretching of the spring. The second probable cause is a malfunction of the torsional vibration damper or alternator overrunning clutch.
The problem is solved by replacing the drive belt tensioner. During the process, pay attention to the condition of the torsional vibration damper and the generator overrunning clutch.
- The presence of squeaking and jamming when moving the tensioner lever.
To detect signs of malfunction, it is necessary to forcefully turn the tensioner full stroke using a wrench (from stop to stop). The movement of the lever should be smooth and free. If binding, sticking, or squeaking occurs, the tensioner arm needs to be replaced.
- Spring weakening.
You can detect a malfunction by moving the tensioner lever to full travel (use a wrench for this). You must apply a certain amount of force to perform the movement. Otherwise, we can talk about weakening the spring. This is also evidenced by the squealing of the belt when slipping and the lack of rotation of the elements driven by the belt.
The problem is solved by replacing the drive belt tensioner.
Recommended articles to read:
- Repair Citroen C4 sedan: diagnostic tips
- Automatic transmission Citroen C4 sedan: operating instructions
- Citroen Berlingo engine: review, modifications, possible problems
ALTERNATOR BELT TENSIONER
The comfort level of any car is determined by additional equipment that consumes energy, the main source of which remains only the engine. Electrical consumers in a car are low-power and therefore are powered by a generator. Driving attachments using electric motors would increase the price and weight of the machine. Therefore, the classic drive scheme for an electric generator, coolant pump, air conditioning compressor, power steering pump is a belt drive using a ridged belt from the crankshaft pulley.
Operating principle of the alternator belt tensioner
Ribbed belts form V-shaped “streams” on the working surface into the reciprocal projections of the drive pulleys. This achieves an increase in the friction surface and, accordingly, an increase in the transmitted power. The more grooves, the less belt slippage and the higher the transmission efficiency. For normal operation of the belt, a generator belt tensioner .
Alternator belt tensioner device:
- Structurally, it is a bracket with a roller at one end, fixed to the engine at the other end.
- The roller is pressed against the belt, tensioning it, with a spring.
- Inside the spring there is a shock absorber that performs the same function as a car.
- Due to its elasticity, longitudinal and transverse vibrations occur in the belt under variable loads from attachments. So the shock absorber dampens them. For this purpose, rollers called “parasitic” are additionally installed, acting as intermediate supports for the belt.
The operating conditions of the vehicle have a decisive influence on the reliability of the entire belt drive. Mud, water and stones do their job. The ribbed belt is subject to increased wear and tension weakens. This is evidenced by a loud squeak - the result of a belt slipping on the pulleys of the attachment. In this case, the first thing you need to do is check the alternator belt tensioner .
Destruction of the roller bearing protection is the root cause of such troubles as:
- poor battery charging,
- engine overheating,
- poor air conditioning performance,
- feeling of inadequate steering response.
In some engine models, the roller can be replaced. Regardless of this, during repairs it is recommended to completely replace the ridge belt tensioner.
For safe driving on our roads, constant monitoring of all components of the belt drive is necessary. Often troubles start not only with the tensioner. The crankshaft pulley or air conditioning compressor can cause premature belt wear. Therefore, periodic monitoring of these parts should be included in the mandatory regulations for the technical inspection of the car by the driver.
Selecting and purchasing a generator belt tensioner
In our online store Autocompas.ru you will find a large selection of alternator belt tensioners from various manufacturers. You can also select and purchase the following spare parts from us: Clutch basket, Stabilizer, Engine sump and any other spare parts that you need. Here you can easily select spare parts for Acura, Chery, Dodge and other makes and models of cars.
Pay attention to the following manufacturers of alternator belt tensioners: AUTOKIT, JP GROUP, TREVI AUTOMOTIVE and others.
We wish you successful shopping and pleasant trips in a working car.
How to change the alternator belt tensioner pulley?
As an example, consider the Chevrolet Lacetti. This car is quite popular in Russia. It can be found on many trading platforms. In addition, this car has a typical design compared to other cars. The Chevrolet Lacetti is equipped with a self-adjusting tension roller with a bracket.
To replace the roller, you will need the following set of tools: a set of open-end wrenches and sockets with gates. The installation sequence is presented below:
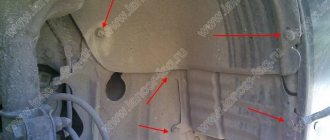
- The air filter housing is removed from the engine. This is done to provide access to the belt.
- The power steering pump is unscrewed. After this you can get to the video itself. To get to its mounting bolts, it is necessary to remove the exhaust manifold protective screen from the engine.
- After the screen has been removed, the power steering pump bolts are unscrewed. The pump moves to the side to provide access to the roller. After unscrewing, you can remove the belt from its pulley. The pipes going to the pump do not need to be removed.
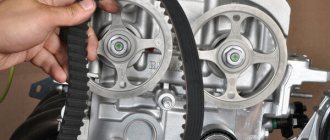
- Before unscrewing the roller, it must be brought into the mounting position. To do this, the roller moves, overcoming the force of the spring before the locking holes on the bracket body are aligned. Next, the roller is locked in the same position using a bolt or splitter installed in the hole.
- The bolts securing the bracket and roller are unscrewed. The roller is removed. The new element also needs to be moved into its installation position. After this, it is installed in the structure and secured with bolts.
- The power steering pump together with the protective screen are secured and installed in place. The belt is put on the pulleys. To do this, use a photo with the correct position of the belt.
- The locking bolt or cotter pin is removed. This is done so that the spring produces the necessary belt tension.
On other models, replacing the alternator belt tensioner pulley may be slightly different. Most often, on cars with eccentric rollers, tensioning is carried out using a special key. With this wrench, the roller is rotated around the pin for tension purposes.
Alternator belt tensioner roller and its replacement
The generator is one of the most important elements of the vehicle's electrical supply system, as it generates electric current to power on-board electrical appliances. It is driven from the crankshaft of the power plant, which ensures constant operation of the generator while the power plant is operating. A belt is used to drive this element.
The main condition for the normal functioning of the generator is the complete transmission of rotation from the motor. In order for this element to generate the required amount of electricity, it must rotate at high speed.
Types of alternator belt tension rollers
Therefore, in such cars, a special tension roller is used to tension the drive belt. In this type of drive, the generator is no longer movable, and adjustment is performed by moving this roller.
Such a roller is an ordinary bearing, on the outer race of which there is a plastic lining, its surface is a working one - the belt moves along it. There is a landing sleeve inside the roller.
There are two types of rollers by design and they differ in the method of fastening and tension adjustment.
- One of the types is eccentric. This is a very simple design, in which there is nothing except a bearing, a plastic lining and a bushing. The bushing has a through hole, which is offset to the side relative to the center of the roller. Through the hole, the roller is put on a special pin mounted on the engine. To tighten it, just rotate the roller relative to the bolt.
- The second type of roller involves a bracket in the design. This design is somewhat more complicated, but at the same time it is the same in reliability as the eccentric version. The roller is fixedly fixed on this bracket. Fastening to the power plant of this design is carried out using bolts. Tension adjustment is carried out by moving the bracket relative to the engine.
Securing the generator roller using a bracket
Some automakers use a roller with a spring bracket. Such an element is self-regulating, that is, the spring independently regulates the tension.
Whatever design the tension roller has, it has a weak point - the bearing. It constantly operates under load, and over time it wears out until it breaks completely. Therefore, it is recommended to change it every time the belt is replaced.
But often the rollers break before they are replaced.
Types and design of drive belt tensioners
The design of any drive device tensioner includes two parts - a tensioner that creates the required force, and a roller that transmits it to the belt.
In some cases, a damper is used, thanks to which, in addition to ensuring the necessary belt tension, the intensity of its wear is reduced. In this case, the pulleys of the units are also subject to less depreciation when operating in transient engine conditions.
The tensioner consists of one or two plastic or metal rollers that have a smooth surface through which the belt passes. The rollers are fixed to a tensioning device or a special bracket using a rolling bearing (ball or roller; single-row models are mainly used, but units with double-row bearings can also be found).
Most often, the rollers have a smooth working surface, but in some cases there may be collars or special protrusions on the surface, thanks to which the belt does not slip when the engine is running.
To fasten the rollers, either the tensioning devices themselves or various brackets are used.
Depending on the method of adjusting the belt tension, all devices are divided into two groups:
- the first is represented by devices with manual adjustment;
- the second includes units with automatic adjustment.
Mechanisms of the first category, consisting of eccentric and slide tension devices, have a simpler design. Eccentric units are rollers whose axis is offset. Making a revolution around it, the roller passes closer or further from the belt, due to which the force of its tension changes.
The design of the slider device is a roller that is attached to a movable slider that moves along the groove of the guide (bracket). The movement and fixation of the roller in a certain position occurs due to the screw; the guide itself is installed perpendicular to the belt, thus, moving along it, the roller changes the force of the belt tension.
Modern engines are rarely equipped with mechanisms for manually adjusting belt tension, since they have a serious drawback - the need to change the degree of tension during initial installation and subsequently as the belt stretches. Such devices are not able to ensure the proper degree of tension throughout the entire life of the vehicle; it is not always possible to correct the situation using manual adjustment, and the drive parts wear out much faster.
In this regard, the engines of modern cars are equipped with devices with automatic adjustment.
Depending on the design and operating principle, the mechanisms can be divided into three groups:
- which are based on torsion springs;
- based on the work of compression springs;
- with dampers.
Due to their compactness and efficiency in performing their functions, mechanisms whose operating principle is based on the use of torsion springs are most often used. The design is based on a large-diameter coiled spring placed in a cylindrical glass.
One of the outer coils of the spring is fixed in the glass, and the opposite one is fixed on a bracket with a roller. The glass and bracket rotate to a certain angle, which is limited by stops. During the production process of the mechanism, the glass and bracket are slightly rotated and fixed in this position using a safety device (pins).
When installing the structure on the engine, the pin is removed, as a result of which the bracket on which the spring acts is deflected. Thus, the roller rests against the belt and at the same time provides it with the desired degree of tension. During subsequent operation, the spring maintains the specified level of tension, so that there is no need for its adjustment.
Mechanisms based on the principle of compression springs are less commonly used, since they require more space, but at the same time their efficiency is somewhat lower. Such a device consists of a bracket with a roller, which is hingedly connected to a coiled coil spring. The second end of the spring is attached to the engine, thereby ensuring the required belt tension. The degree of tension of the spring is set during its manufacture, and during the installation of the mechanism the pin is released or another fuse is removed.
The next stage in the development of tensioners is represented by mechanisms with dampers. The design of such a device is similar to those described above, but instead of a spring, a damper is used, attached to a bracket with a roller and motor lugs. The damper is a compact hydraulic shock absorber and a coil spring, and the shock absorber can not only be placed inside the spring, but also serve as a support for its outer coil.
Thanks to the damper, the drive element receives the required level of tension, while belt vibrations are smoothed out when the engine starts and operates in transient conditions. By using a damper, the service life of the drive of mounted units is increased and greater efficiency of the engine is ensured.
Signs of failure
There are several signs of problems in the operation of this element:
- the generator does not fully charge, or no electricity is supplied to the on-board network at all;
- squeak from the side of the belt;
- increased hum;
- strong vibration of the roller or belt when the power plant is running;
- play in the roller;
- belt wear on one side;
It is worth noting that some symptoms are also inherent in malfunctions with the elements that the roller operates. For example, a hum or squeak can also be the cause of wear on the bearings of the power steering pump, air conditioning compressor and the same generator.
Video: Repairing the generator belt tensioner pulley
Replacing the tensioner and tension roller
If during the inspection it is possible to establish the cause of the symptoms described above, you should proceed directly to the repair and replacement of worn-out mechanisms.
The first immutable rule is that during a planned replacement, it is necessary to diagnose the bearing; in normal condition, the tensioner roller rotates quietly, easily, without play or jerking. If it is clear that the life of the roller is exhausted, it is necessary to change this unit.
Actions necessary to independently replace the alternator belt or tensioner, which do not require special devices and tools:
- de-energize the car body by disconnecting the terminals from the battery;
- secure the crankshaft against possible rotation using the necessary devices or a simple pry bar;
- Having unscrewed the bolt responsible for the tension force, loosen the generator belt;
- remove the belt and tensioner pulley, if a bracket is provided, unscrew the bolts securing this mechanism;
- replace failed components and install new components in the reverse order.
The tension force of the newly installed belt after repair should be given special attention. If it turns out to be overtightened, then the load on the bearing will contribute to its rapid wear. The required tension can be checked using a suitable device or manually. In the case of manual testing, the belt should turn ninety degrees without force, with lateral influence.
Diagnosis of the condition
Therefore, if any of the symptoms appear, you should also diagnose the condition of all specified elements in order to identify which element is faulty. It is done quite simply:
- First, a visual inspection of the belt and the equipment that it powers is carried out. To do this, it is enough to start the power plant and see if there is vibration in the belt and pulleys and roller;
- Then the tension of the generator belt is checked. With the engine stopped, at the largest span between the pulleys, you need to take the belt and try to turn it clockwise. If, when twisting, you can turn it 90 degrees, then it is tensioned normally. If the rotation angle is greater or less, adjustment is required;
- The next stage is removing the belt, assessing its condition, and checking for play on the pulleys and roller. Removing the belt is very simple - loosen the tension roller nut to relieve the belt tension. Afterwards it is removed from the pulleys. But before that, you need to remember the position of the belt between the pulleys so that it is positioned correctly when installing. There should be no cracks or peeling on the belt, and it should wear evenly. If at least one of these defects is noticed, the belt must be replaced. Particular attention should be paid to one-sided wear. If it is present, it means that the bracket or the roller mounting stud is bent, which is why there is a misalignment. If it is not eliminated, the new belt will not last long.
- Then the play on the pulleys is checked. You should also rotate the roller and make sure there are no jams or wedging of the roller. If there are any, this indicates severe wear of the bearing and the need to replace the roller. It is also worth inspecting the working surface of the plastic lining; it should be smooth without any grooves. Otherwise, the video changes.
- If after changing the belt and roller the hum and squeaking noise remains, the problem lies in one of the elements driven by the belt.
Diagnostics of the drive belt tensioner
The drive belt tensioner must be checked for serviceability when at least one of the above symptoms appears. Other structural elements also need diagnostics. Diagnostics is performed in several stages:
- It is necessary to visually familiarize yourself with the belt and the equipment driven by it. To do this, start the power plant and check whether there are vibrations of the belt, pulley or roller.
- Check the tension of the alternator belt. To do this, stop the engine. Next, on the largest span between the pulleys, take the belt and try to turn it clockwise. If you can turn it 90 degrees, then its tension is fine. Otherwise, the rotation angle will be smaller or larger, and then adjustment will be required.
- The next step is to remove the belt and check its condition. It is also necessary to check the pulleys and rollers for play. Removing the belt is quite simple. To do this, you must loosen the tension pulley nut. After this, it must be removed from the pulleys. Before doing this, remember the position of the belt between the pulleys, because you will then have to put it back on. It is recommended to take a photo of the position with a mobile phone camera. After removal, check that there are no cracks or peeling on the belt. Belt wear should be even. If any of these defects are detected, feel free to change the belt. Note wear on one side. When such wear occurs, the roller mounting stud or bracket becomes bent, causing misalignment. If this misalignment is not corrected, the belt will not last long.
- The play on the pulleys is checked. Rotate the roller and make sure that there are no jams or jams. If they are present, there will be severe wear of the bearing, and the generator belt tension roller will need to be replaced. Also carefully inspect the working surface of the plastic pad: there should be no grooves on it. If the surface is uneven, the drive belt tension roller must be replaced.
- If after replacing the belt the hum and squeaking does not disappear, then the problem must be looked for in other elements. The drive of these elements occurs due to belt tension.
This is interesting: The essence of how hydraulic compensators work: 10 causes of knocking and ways to fix the problem
Replacing the alternator belt roller using the example of a Chevrolet Lacetti
For clarity, let’s look at how to replace a belt and roller on a Chevrolet Lacetti. This car has a self-adjusting tension roller with a bracket.
Video: CHEVROLET LACETI. REPLACING THE BELT TENSIONER ROLLER
To change the belt and tension element, you will need a set of open-end wrenches and sockets with cranks. The sequence of work is as follows:
- We remove the air filter housing from the engine to provide access to the belt;
- To get to the roller, you need to unscrew the power steering pump. And in order to get to the bolts securing it from the engine, we dismantle the protective screen of the exhaust manifold;
- After removing the screen, unscrew the bolts of the power steering pump and move it to the side to provide access to the roller. After unscrewing, you can remove the belt from its pulley. In this case, the pipes going to the pump do not need to be removed;
- Before unscrewing the roller, it must be moved to the mounting position. To do this, we move the roller. Overcoming the spring force until the locking holes on the bracket body are aligned. Then we lock the roller in this position using a bolt or cotter pin, which is installed in the hole;
- We unscrew the bolts securing the roller bracket and it is removed. The new element must also be moved to the mounting position, then installed on the car and secured with bolts;
- We install and secure the power steering pump and protective screen. After this, we put the belt on the pulleys, ensuring that its position is correct;
- We remove the locking bolt or cotter pin so that the spring tensions the belt;
On other cars, replacing the roller and tensioning the belt may be done slightly differently. For example, on a car with eccentric rollers, tensioning is done using a special wrench, with which the roller is rotated around the tensioning pin.
But still, the work of replacing the tension roller of attachments is not complicated, and even a novice car owner can do it.
How to replace the drive belt tensioner
It is necessary to change the tensioner only to the types and models recommended by the manufacturer (especially important for cars under warranty). Other designs may have other characteristics that differ from the original ones, and therefore may cause changes in the belt tension force and deterioration in the functioning of the drive of mounted units. Despite the lower cost, such a replacement of the drive belt tensioner is possible only as a last resort.
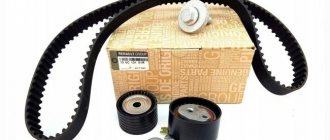
When purchasing a tensioning device, pay attention to the presence of the necessary components for it (if not included in the kit, they are purchased additionally) - fasteners, brackets, springs, etc. In some cases, you can buy not a complete mechanism, but repair kits consisting of rollers with installed bearings, brackets, dampers assembled with springs, etc.
The drive belt tensioner is replaced in strict accordance with the vehicle repair and maintenance instructions. Depending on the design of the drive and the placement of the belt, work can be performed with the belt mounted or removed.
In any case, spring tensioners are installed in the same way - the device and the belt are placed in the intended place, the pin is removed (to release the spring and obtain belt tension). Incorrect installation of such a unit will significantly complicate its re-installation.
Replacing the drive element or tensioner of the generator can be done independently, and no special devices or tools are required:
- Disconnect the terminals from the battery to de-energize the vehicle.
- Using the necessary tools or a regular pry bar, secure the crankshaft to prevent it from turning.
- Unscrew the bolt that controls the tension force, loosening the alternator belt.
- Remove the belt and tensioner pulley, and if there is a bracket, unscrew the bolts securing it.
- Replace faulty elements, install new ones, proceeding in reverse order.
The selection of a suitable device and its correct installation guarantee the normal functioning of the drive units and reliable operation of the engine.
Pay attention to the tension of the newly installed belt. If you tighten it too much, you will increase the likelihood of rapid wear due to increased load on the bearing. The required tension is checked both manually and using an appropriate device. In the first case, the belt should rotate 90° without effort when subjected to lateral influence.
A number of cars are equipped not with several belts (power steering, air conditioning, alternator, etc.), but with one, adjustable automatic tensioner.
In this case, the condition and degree of belt tension affects the charge level of the generator, the operation of the cooling system, and the condition of the power steering. The main element of such a tensioner is a spring, thanks to which the desired degree of tension is maintained.
If it is necessary to replace the belt, the entire automatic tensioner must be replaced, regardless of the condition of the bearing, since this unit cannot be repaired in parts.
Replacing the drive belt tensioner on a Citroen
The video shows how to replace the Citroen C5 drive belt mechanism:
Video about replacing the power steering belt tensioner pulley on a Citroen Berlingo:
From the video you will learn how to replace the alternator drive belt and pulley on a Citroen C4:
Alternator belt tensioner - how it works and how to replace the tensioner yourself
Hello, dear motorists! An axiom that everyone understands: driving a car can only be fun if all its components and mechanisms are in full working order.
Even a minor breakdown of an element that is insignificant at first glance can cause a lot of inconvenience. If, while driving, irritating factors appear in the form of creaks, whistles, tapping, or metallic ringing, you must immediately look for the cause of the breakdown.
Otherwise, driving a car will turn into a test for the nervous system, and possibly fraught with large costs for repairs in the future. The problems that sometimes arise with the alternator belt are known to almost every car enthusiast.
As soon as the belt starts to whistle or breaks, we quickly rush to replace the alternator belt and wait for it to end there. Imagine our surprise when the problem does not disappear.
A new belt, a new roller with a new bearing, compliance with all canons and rules when repairing a generator belt drive may not give positive results if the generator belt tensioner is not examined.
This is exactly the detail that service specialists almost never pay attention to, considering it eternal. Experience shows that problems can arise even after the car leaves the assembly line.
How does the alternator belt tensioner work?
There are a large number of car components that a car enthusiast who does not have special knowledge and repair skills should not disassemble on their own.
The alternator belt tensioner has a very simple design and can be repaired even by not very experienced drivers. Each automaker creates tensioners at its own discretion, but most of them have the following components:
The bracket itself is attached to the engine using 3-4 bolts or studs with nuts.
It is believed that the most vulnerable point of the tensioner is the bearing. Indeed, being in a constantly stressed state and performing a huge number of rotations, the bearing exhausts its service life and needs to be replaced.
Once the alternator belt is removed, the condition of the bearing is very easy to diagnose. A serviceable bearing has no play. The bracket with the roller bolt can cause no less problems.
Over time, the bracket may bend slightly, displacing the roller from the plane where the belt is located. Such a curvature of the bracket leads to the following consequences:
- one side of the belt experiences greater stretch, which leads to premature wear;
- If there is significant curvature, the belt may fly off.
This defect is observed not only in cars with a significant mileage. Sometimes a crooked alternator belt tensioner can be found on completely new cars, which indicates a factory defect.
Replacing the alternator belt tensioner yourself
It’s unfortunate, but if you have already discovered that the bracket is bent, then the only way out is to completely replace the alternator belt tensioner.
The bracket is usually made in the form of a monolithic structure and cannot be restored. Even if you try to align it, no one can guarantee that the roller will be installed again in its normal place, and the bracket itself will not bend again.
Replacing the alternator belt tensioner is fairly quick. You just need to do the following:
- disconnect the battery contacts;
- loosen the tension on the roller and remove the alternator belt;
- unscrew the bracket nuts and remove it;
- install a new bracket with a roller;
- put on the alternator belt and tighten it.
In order to prevent breakdowns in the future, you need to follow only two rules. Firstly, when replacing the alternator belt, it is necessary to check whether the crankshaft, alternator and tensioner pulleys are in the same line, and secondly, do not allow the belt to be too tight.
How to replace the alternator belt tensioner yourself
If you find a deformed bracket, you will have to replace the tensioner. In most cases, the bracket cannot be restored. You should not even try to align this part, since you will not be able to be sure that the roller will be positioned correctly. And the bracket itself may bend again after a while.
Replacing the generator belt tensioner does not require special tools or special skills. The sequence of actions looks like this:
- Disconnect the battery terminals.
- We loosen the tension of the roller and pull out the generator belt.
- Unscrew the nuts that secure the bracket and remove it.
- We install a store-bought bracket with a roller.
- We put on the alternator belt and tension it.
To prevent further damage, it is important to adhere to two recommendations. First of all, when replacing the alternator belt, you need to make sure that the alternator, crankshaft and tensioner pulleys are aligned. In addition, do not over-tighten the belt.
For more information on how to replace and tension the alternator belt using the example of a Lada Priora car, read the link - https://avtopub.com/kak-zamenit-i-natyanut-remen-generatora-na-lada-priora/
Tensioner device
The tensioner design includes the following elements:
- belt;
- video clip;
- bracket;
- connecting bolts and nuts.
The roller is a bearing with a seating sleeve inside and a plastic coating on the outside. The belt moves along the roller. The roller is mounted on a bracket, which, in turn, is attached to the car engine using bolts and nuts.
There are two modifications of the tensioner:
- Eccentric. Includes bearing, plastic cover and bushing. The bushing has a through hole that is offset from the center. This hole is used to secure the roller to the car engine. To obtain the required belt tension, the eccentric is rotated and then the result is secured with a bolt.
- Bracket. In this modification, the roller is fixedly mounted on a bracket. The structure is attached to the power plant using bolts. To adjust the belt tension, the bracket is moved relative to the engine. This modification is more complicated than the eccentric one, but this does not make it any less reliable.
Some car factories install rollers with a spring bracket in their cars. In this design, the spring independently regulates the belt tension, that is, the unit is self-regulating.
Whatever device the belt tensioner has, the list of its main elements remains unchanged.
ATTENTION: The weak point of any tensioner is the bearing, which is constantly under load and wears out quickly. It is recommended to change this element every time the belt is replaced.
Purpose and functions of the generator belt tensioner roller
The alternator belt tensioner ensures uninterrupted operation of the vehicle's alternator, which is the main source of electrical power for the vehicle. Normal operation of the generator drive is ensured only taking into account the required tension of the generator drive belt.
On most domestic and foreign cars, a special device is used to ensure proper tension - a belt tensioner. The specified generator belt tensioner is characterized by a simple design, is attached to the internal combustion engine block using a separate bracket and is based on the following basic elements:
- tension roller with bearing;
- tension roller bolt;
As for mounting the bracket, this element is mounted on the engine using several bolts, and can also be secured using studs that are tightened with nuts. In fact, it is the tension roller in the design of the entire tensioner that regulates the degree of tension of the alternator belt. On different engines you can find different solutions. The simplest is considered to be a roller with an offset center, which is secured with a bolt. The belt is tensioned at the moment of rotation of the eccentric.
Another common option is a tension roller, which is placed on the above movable bracket with tension using a bolt. In both the first and second cases, the condition of the generator belt tensioner roller must be monitored, as well as timely replacement of worn elements. It is optimal to carry out monitoring at moments when it is necessary to loosen the tension of the generator belt during repair work or for the planned replacement of the generator belt with a new one.
Troubleshooting
The following signs indicate a malfunction or wear of the alternator belt tensioner:
- the headlights shine dimly;
- The indicator lights on the dashboard do not seem as bright as usual;
- interior heating works intermittently;
- the car siren has become duller and lower;
- the operating intervals of windshield wipers and turn signals have increased;
- There are no battery charging indicators;
- The alternator belt tensioner assembly makes a whistling sound, hum or squeak;
- When the engine is turned on, the roller or belt vibrates.
If at least one of the above symptoms is present, we diagnose the condition of the alternator belt tensioner. We perform all operations in a certain sequence.
Step 1. Open the hood of the car and conduct a visual inspection of the unit. If cracks, traces of rust, or misalignment of the tensioner block or tensioner arm are detected, we replace, adjust, or adjust the worn parts.
Step 2. Start the engine and observe the operation of the unit. We pay attention to vibration, noise (creaking, crackling, whistling), resistance during rotation, beating of the lever during operation and other deviations from the norm. If extraneous sounds are heard from the unit, we try to understand which part is causing them.
Step 3. Check the serviceability of the video. To do this, remember the position of the generator belt and remove it from the unit, having first loosened the adjusting nut. Next, we proceed to inspect the video. Its surface should be smooth, without deep nicks and other damage that contribute to belt wear. We rotate the roller and make sure that the rotation is free and that the roller does not jam. If the roller is in order, we install it in its original place.
Step 4. Check the integrity of the belt. There should be no peeling or cracks on its surface, in the presence of which the belt must be replaced. We pay special attention to the uniform wear of the belt. If there is wear on one side, inspect the bracket or stud for attaching the roller. These parts may be bent or askew. If the misalignment is not corrected, the new belt will not last long.
Step 5. Check the belt tension. To do this, with the car engine stopped, we grab the belt and try to turn it 90 degrees clockwise. If the belt rotation angle deviates from 90 degrees, it needs to be adjusted.
ATTENTION! Experts recommend checking the tension of the generator drive belt at least once a week, and constantly having a new belt in your emergency supply.