Carburetors of the Solex family have almost the same design (body, cover). But they have different jets (with different performance), since they are used on engines of different sizes. Let's compare the performance of fuel and air jets of the main carburetor systems of the Solex family. This information can help when checking whether the markings of the jets installed on a particular carburetor correspond to the nominal value or when setting the carburetor to an economical operating mode by selecting jets or a more powerful mode.
Fuel jets GDS carburetors Solex
| Carburetor models | 1st camera | 2nd camera |
| 2108-1107010 | 97,5 | 97,5 |
| 21081-1107010 | 95 | 97,5 |
| 21083-1107010 | 95 | 97,5 |
| 21073-1107010 | 107,5 | 117,5 |
| 21051-1107010 | 105 | 110 |
| 21083-1107010-31 | 95 | 100 |
| 21083-1107010-35 | 95 | 100 |
| 21083-1107010-62 | 80 | 100 |
| 21412 | 95 | 95 |
Location on carburetor
Air jets GDS carburetors Solex
| Carburetor models | 1st camera | 2nd camera |
| 2108-1107010 | 165 | 125 |
| 21081-1107010 | 165 | 135 |
| 21083-1107010 | 155 | 125 |
| 21073-1107010 | 150 | 135 |
| 21051-1107010 | 150 | 135 |
| 21083-1107010-31 | 155 | 125 |
| 21083-1107010-35 | 150 | 125 |
| 21083-1107010-62 | 165 | 125 |
| 21412 | 160 | 100 |
Location on carburetor
Fuel jets for the idle system of Solex carburetors
| Carburetor models | 1st camera | 2nd camera |
| 2108-1107010 | 39-44 | — |
| 21081-1107010 | 39-44 | — |
| 21083-1107010 | 39-44 | — |
| 21073-1107010 | 39-44 | — |
| 21051-1107010 | 37-43 | — |
| 21083-1107010-31 | 38-44 | — |
| 21083-1107010-35 | 38-44 | — |
| 21083-1107010-62 | 50 | — |
| 21412 | 35-41 | — |
Location on carburetor
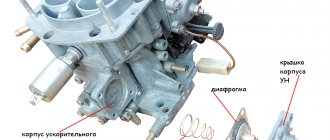
electromagnetic valve EPHH of a Solex carburetor with fuel jet CXX
Air jets for the idle system of Solex carburetors
| Carburetor models | 1st camera | 2nd camera |
| 2108-1107010 | 170 | — |
| 21081-1107010 | 170 | — |
| 21083-1107010 | 170 | — |
| 21073-1107010 | 140 | — |
| 21051-1107010 | 140 | — |
| 21083-1107010-31 | 170 | — |
| 21083-1107010-35 | 170 | — |
| 21083-1107010-62 | 160 | — |
| 21412 | 150 | — |
Location on carburetor
visible elements of the CXX carburetor 2108, 21081, 21083 Solex with the cover removed
Fuel jets of the transition system of the 2nd chamber of the Solex carburetor
| Carburetor models | 1st camera | 2nd camera |
| 2108-1107010 | — | 50 |
| 21081-1107010 | — | 50 |
| 21083-1107010 | — | 50 |
| 21073-1107010 | — | 70 |
| 21051-1107010 | — | 50 |
| 21083-1107010-31 | — | 50 |
| 21083-1107010-35 | — | 80 |
| 21083-1107010-62 | — | 50 |
| 21412 | — | 80 |
Air jets of the transition system of the 2nd chamber of the Solex carburetor
| Carburetor models | 1st camera | 2nd camera |
| 2108-1107010 | — | 120 |
| 21081-1107010 | — | 120 |
| 21083-1107010 | — | 120 |
| 21073-1107010 | — | 140 |
| 21051-1107010 | — | 150 |
| 21083-1107010-31 | — | 120 |
| 21083-1107010-35 | — | 150 |
| 21083-1107010-62 | — | 120 |
| 21412 | — | 150 |
Fuel jet for GDS carburetor actuator 21083-1107010-62 Solex
| Carburetor models | 1st camera | 2nd camera |
| 21083-1107010-62 | 85 | — |
Notes and additions
— Solex carburetor jets are interchangeable. That is, you can install jets from another Solex carburetor on your carburetor without any problems, but, for example, with higher or lower performance.
— The transition system of the first chamber of the carburetor does not have its own jets; it is structurally combined with the carburetor idle system.
— The fuel and air jets of the gas pumping system, the fuel jet of the idle system can be unscrewed and replaced, the rest cannot.
More articles on the Solex carburetor
Tell me (only from personal experience - they write a lot on the Internet and in books and it’s different everywhere) there is a Solex carb jets cost 1 chamber 95/165 2 chambers 97.5/125 Idle speed 38 or 40 (I don’t remember) The elephants were in one chamber - I changed it as from the factory two (previous throttle response has dropped). Tell me, can we change the jets in 1 chamber and return the elephants back to one chamber? It’s just that the consumption in the city has increased to 13.5 liters (maybe because you have to press the trigger harder - the throttle response has dropped)
Comments 81
Under the accelerator pump (elephant) there is also an overflow valve, take it out and if the ball is rusty, change it...
97 in the first shove will be normal
Maybe the membrane of the economizer of the power modes has leaked and is eating.
I set 97.5/165 and 97.5/125, normal, in the city 9-10l, elephants in different chambers
I mailed 97.5/155 and 97.5/125 elephant and put the Nivovsky 45 in the first chamber. The flight is normal in all modes...
Solex carburetor 21083: device, adjustment, configuration
For a long time, front-wheel drive VAZ 2108-09-099 cars were equipped with carburetor engines, and only closer to the beginning of the 2000s, a fuel injection system began to be installed on VAZ cars.
This article will discuss the Solex 21083 carburetor: device, adjustment, configuration of the unit, its features, as well as main malfunctions.
Video lectures about the Colex carburetor
How to correctly adjust the position of the secondary camera flap in the garage if it has already been touched?
For throttle spraying: what diameter hole should I drill in 21083? At what distance from the edge of the damper should the edge of the hole be, that is, how wide should the “bridge” be?
For Alexey: We adjust all sizes without haste until an acceptable result is obtained.
I am very glad to have new knowledge! Thank you BAM. Everything is simple and clear! But at my VAZ I have a problem with fuel consumption, it has increased from 6.5 to 18. I can’t find the problem. Karb did it, I don’t know the reason.
I’ve been fiddling with them a lot, now it’s just become clear what’s what, I’ll go throw out number 4, and for knowledge of this material at the service station they’ll charge 2000 rubles for adjusting the carburetor
put the new 21083 on the classic 1.5 with the screw fully tightened, the quality of the engine does not stall
I have a Lexus on a Mitsubishi Mirage! The transmission is automatic, but I can’t get it right, and our craftsmen can’t help!
A lot became clear to me and it helped. THANK YOU.
Thank you very much, the information is great, I’m looking forward to more information on tuning the Lexus car
Everything is great, thank you. The question is, the wire is not connected to the idle sensor, the engine does not stall, the rpm is 2000.
Kpacavchik! Thank you very much, live long and prosper.
I drive around the city without problems, but as soon as I drive around the roundabout, there is no idle speed at the first traffic light. BCE RESOLVED.
Is it possible to put it on 2 liters? engine and how to choose jets?
Installing the Moskvichevskaya frog on Golf 2 revealed a problem with the damper freezing. It is most optimal to leave the air box from the 2E2 carburetor with minor modifications and, accordingly, with a working air flow distribution system. Thank you very much for the accessible and detailed information, good luck to you.
Tell me, I installed a carburetor on the B3 with 2.l.d. 21083, but the idle speed after high speeds drops to zero while driving
Please tell me what the problem is. I remove the wire, epxx engine does not stall, epxx cheeks are present
Hello, please tell me what jets should be installed, engine 1.5
How to fix the problem of floating idle speed on a classic, 1.2 liter. costs 8x8, repair kit 2108.
Pyslan. As I understand it, the problem is that either the needle does not normally block the flow of fuel (there is debris or burrs inside), or the jet itself is not fully screwed in (it may be damaged) and the fuel is running out gives into channel XX through the slot. Another option is that gasoline finds its way into the collector some other way. For example, through the main system, the throttle may be slightly open.
Please tell me. On the 83 carburetor what jets should be installed. According to the video, everyone was talking about 73. Thank you in advance.
Please tell me. How to connect the solenoid valve if the car was initially running without the solenoid valve, but now it is simply broken and works without it? BAZ 2106 with engine 1.6. There was a factory carburetor. I installed SOLEKC 83, now I want to connect the solenoid valve to the power supply, but I don’t know how, because... There was no electric valve at home, so there is no wire for it. How to conduct it and from where? Thank you!
Mikhail. Connect the wire from the valve to the ignition relay, as soon as you turn on the ignition the valve turns on. It is possible to install EPXX for a small saving of gasoline, but here you already need to know the circuit and buy an EPXX electronic control unit
what jets to screw into the 83. Moskvichevsky 412 engine volume 1.8
Audi 100 dv.1.8 dc carburetor SOLEKS main fuel jets from Nivsky carb. Is it possible to install relatives to reduce consumption? Thank you.
Thank you very much for the video lessons. Everything is set up, it works great
I installed the Solex 21083 on a Mazda 626 2.0 liter, 8 valves. I bought it at the disassembly for 1000 tenge (5 tenge - 1 rub.), the seller swore that the carb was good and did not deceive the devil, but before installing it I took it apart, washed it, adjusted the elephants and I realized that the main fuel jets cannot be removed constructively. It is stamped on the carb: made in USSR. Is this possible or did I not understand how to unscrew them?
Please tell me what kind of jets should be installed, carb. Lex 83, engine 1.5
Tell me: let’s start from the beginning, I bought a 1.5-volume Solex carburetor for a VAZ 2107, installed a 1.6 engine, everything was super traction, acceleration, but then, when I pressed the gas hard, the engine started running. starts to get choked up as soon as he lets go and starts to exasperate again. I went into the garage and figured it out, the first camera works well, and when the second camera opens, it feels like someone is holding their ass. I can’t find the reason, tell me what could be. I changed the accelerator pump diaphragm, blew out the jet, and all to no avail.
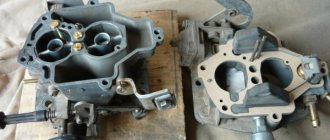
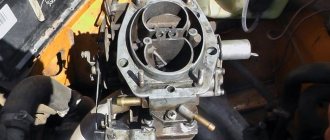
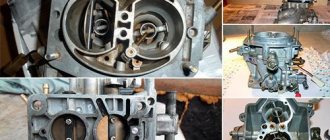
Solex 21083 carburetor design
Solex-type carburetors began to be used on Russian (Soviet) cars from the mid-80s of the last century; at first they were installed on the VAZ-2108 car. The first carburetors were designed to work with engines of 1100 and 1300 cm³, and they were labeled DAAZ-2108. Later, the Solex 21083 model was developed, and the digital index means that the device is intended for installation on 1.5-liter VAZ-21083 engines.
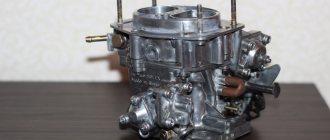
The carburetor serves to prepare the fuel mixture on which the engine runs and ensures uninterrupted, stable operation of the power unit at any speed and load. Solex-21083 consists of the following main parts:
- the main body, which contains diffusers, the main dosing system (GDS), the idle system, the economizer and the accelerator pump;
- covers with an air damper, floats, a solenoid valve, and a cold internal combustion engine starting device.
The Solex carburetor is a two-chamber carburetor, the GDS fuel jets are located in the middle of the chambers in the very depths of the main body, and the GDS air jets are installed on top of them. The Solex 21083 carburetor is equipped with a heating unit for the air-fuel mixture, to which the cooling system hoses are connected. The throttle valves are located at the bottom of the main body and open sequentially; the opening of the valve in the second chamber is ensured by the drive levers.
There are two pipes in the cover - one of them is designed to supply fuel to the carburetor, the second is a return pipe and serves to return excess fuel to the gas tank; also, due to the “return”, the pressure in the fuel system is reduced.
Basic faults of Solex 21083
There are malfunctions that are most typical for Solex carburetors:
- clogging of the fuel jet of the GDS;
- the entry of debris into the idle system; the XX jet in the solenoid valve is especially often clogged;
- deformation of the lower surface of the main body due to overheating;
- failure of the accelerator pump diaphragm;
- solenoid valve defect;
- loose fit of diffusers in the housing.
If the body is deformed, air is sucked between the carburetor and the intake manifold, and the engine begins to operate intermittently, as the air-fuel mixture becomes leaner. The idle speed is difficult to adjust, and to correct the defect it is necessary to grind the surface on an emery wheel. If the surface warping is significant, grinding will no longer help; the housing must be replaced.
Over time, the accelerator pump diaphragm can crack, lose elasticity, and ruptures appear in it.
Checking the condition of the diaphragm is quite simple; it does not require removing the carburetor. To get to the diaphragm, you need to unscrew the 4 screws of the accelerator pump cover and remove the part. The condition of the diaphragm is checked by external inspection.
Didn't find the information you are looking for? on our
forum
.
If you find an error, please select a piece of text and press Ctrl+Enter.
Solex 21083 carburetor: jets, types and selection
For 21083 carburetors, the industry provides repair kits that include fuel and air jets for the primary and secondary chambers. Depending on the size of the diffuser cross-section, there are different repair kits designed to work with engines 2108, 21081 or 21083, so the jets in the kits have different cross-sections.
Often VAZ carburetors are installed on other brands of cars (for example, UAZ, Volga GAZ-31029/3110), and if you leave the “original” GDS jets, their cross-section will not be enough, since the air-fuel mixture will enter the cylinders in the wrong proportion and the quantity required by the engine.
How to choose jets for Solex?
With proper selection of jets for the Solex carburetor, the engine will operate smoothly and stably even under frequent loads. At the same time, you will also be able to save up to 35% of gasoline in city mode. First of all, you should decide on the main element, and then you can move on to the air element. Moreover, engine size is of great importance when selecting. If it is large, then it is better to use secondary jets of small cross-section. The diameter of parts with calibration holes in the first and second chambers may differ slightly.
You can easily find special tables that indicate the optimal ratio of fuel and air jet indices for Solex, and also predict the resulting mixture and even the behavior of the car. For example, if you take a fuel cell of high productivity, and an air cell, on the contrary, of low efficiency, then there will be an over-enriched mixture that will not ignite. A table will help you in the selection, which indicates the optimal diameter of all jets depending on the type of engine and brand of carburetor.
Jet index ratio table
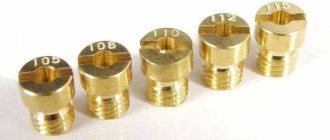
It is very important to decide on the type and size of jets for Solex, but you also need to buy them. At this stage, you need to know what information is hidden by the numbers printed on the top of the elements. It is not uncommon when two designations are applied to the surface of a part, and a certain parameter is hidden in each of them. For example, the numbers “21” and “23” correspond to the outer diameter of the dosing element. By seeing the designation “95” or “97.5” on the main fuel jets, you can judge the performance, since this designation characterizes the throughput of the element. Air elements also indicate their capacity, but this value is usually between “125” and “155”.
Adjusting the Solex 21083 carburetor
The Solex carburetor has several types of adjustments, and you can adjust:
- gasoline level in the float chamber;
- number of minimum idle speeds;
- qualitative composition of the fuel mixture (FC) using the idle speed screw (IQ).
Adjusting the quality of the vehicle is very simple, and any car owner can do the adjustment with his own hands. To do this, you need to warm up the engine well and set the speed screw to 800-900 rpm. Then:
- tighten the quality screw until the internal combustion engine begins to operate with some interruptions and reduce the number of revolutions;
- We unscrew the screw so that the motor starts running smoothly again, usually one turn is enough. If the screw is loosened too much, fuel consumption will increase.
In other cases, you have to loosen the quantity screw more, since dips appear in the engine’s operation.
One of the most common idle problems is the inability to adjust the Solex 21083 carburetor using a quality screw - when it is tightened and unscrewed, the engine speed does not change. There are several reasons for this malfunction:
- the jet in the solenoid valve is clogged;
- the XX channel, which is located under the “quality” screw, is clogged;
- The solenoid valve (EC) itself is faulty.
It’s quite easy to check the functionality of the EC itself; we do it as follows:
- with the engine not running, remove the wire from the valve;
- unscrew the EC;
- we remove the fuel nozzle from it, it is pulled off by hand;
- turn on the ignition;
- We connect the wire to the EC - at the moment of contact, a dry, clear click should be heard, and the valve stem is recessed. If there is no click and the rod does not move, such an EC must be replaced.
It is also necessary to immediately blow out the nozzle - in some cases, such a small speck gets into it that it is practically invisible. There is also a problem with Solex - the idle channel under the quality screw becomes so clogged that it is impossible to clear it.
You can check the performance of the EC in another way - while the internal combustion engine is idling, you need to pull the wire from the solenoid valve - if the engine stalls, it means that the solenoid valve is working properly.
If the XX channels are clogged, the engine starts to work intermittently at minimum speeds and stalls when the gas is released. When you don’t have time to do repairs, but you need to get to your destination urgently, there is one way to make the engine run stably at idle. To do this, while the internal combustion engine is running at idle, we loosen it with a 13 EK key and find the position in which the engine operates most stably. But you shouldn’t drive like this all the time - with this position of the solenoid valve, fuel consumption increases sharply, since the idle system bypasses the XX fuel nozzle.
Replacement in every detail
Having selected the Solex carburetor jets by numbers, you can begin to replace them; unlike boring, it is quite possible to carry out this operation yourself at home. By the way, the reason is not always an incorrectly selected element; very often during operation, these parts wear out and become clogged, which leads to a change in the diameter and composition of the mixture with all the ensuing consequences. In addition, car owners in this way increase the power of their “iron horse” or, conversely, reduce gasoline consumption. In general, replacing jets is quite suitable in the category of vehicle tuning.
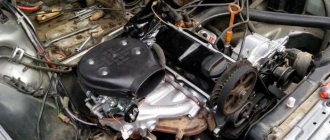
To remove the Solex jets, you will have to dismantle the engine and, of course, disassemble it. Before removing the power unit, be sure to disconnect the negative cable from the battery, and then remove the air filter housing. Prepare a clean rag and a solvent, such as white spirit, in advance to clean the surface of the motor from dirt. Now you need to find the place where the drive cable is attached to the air damper and slightly loosen the screw securing these parts. Do the same with the bolt securing the cable sheath. An open-end wrench is perfect for this purpose. After disconnecting the cable from the carburetor, remove the crankcase gas supply hose from the pipe.
Removing jets from Solex
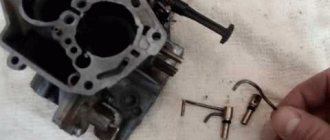
To disconnect the fuel hose from the fitting, in addition to a wrench, you will also need a Phillips screwdriver. First, loosen the fastening clamp, then remove the hose and use an M8 bolt to plug the hole in the latter. It is necessary to remove the vacuum regulator hose. The wire terminal is also disconnected from the solenoid valve terminal. We take a flat-head screwdriver and use it to press out the end of the throttle linkage, and then remove it. Now it is possible to remove the return spring.
To remove the carburetor you need to prepare a spanner and open-end wrench set to “13”. The first to unscrew are 3 nuts, through which the part is attached to the inlet pipeline, and the second is the fastening nut. Take this opportunity to inspect the carburetor gasket; perhaps it could use replacement. If the unit will be removed for a long time, be sure to plug the inlet pipe with a rag. To replace the jets in the carburetor, it remains to remove the cover from it. Take a flathead screwdriver and unscrew these parts. First we remove the fuel jets, then the air jets. In the rings of the last parts you will find emulsion tubes; to pull them out, you should pry them off with a file.
Replacing the carburetor gasket
The main fuel element of the secondary chamber is designated by the letter “A”, and the primary one by “B”. Then we proceed to removing the air jets, marked “B” and “D” for the secondary and primary chambers, respectively.
Replacement should not be done blindly. Visually assess the condition of the jets. The presence of marks, scratches and irregularities on their inner surface is unacceptable, since these defects reduce throughput. Contamination of parts with resins also has a negative impact. Before installing new jets, it is advisable to check them on a special stand, so you can see how well the specified throughput of the elements corresponds to real indicators.
Installation of new Solex parts
If you have already started disassembling the carburetor, then it would be a good idea to study the condition of its other parts; perhaps replacing the jets is not the only need for this unit. We unscrew the accelerator pump screw and remove the latter along with the valve and o-rings. Then we remove the rings and diffusers of both chambers from their original location. To remove the channel from the accelerator pump, you need to unscrew the fixing screw.
Next, remove the fuel nozzle along with the housing and take it out. You can dismantle the diaphragm after you open its cover and remove the spring. Having unscrewed the bolted connections, we disconnect the carburetor body and the throttle valve. Now you have access to the thermal insulation element and cardboard spacers. Remove the cover along with the adjusting screw, then remove the latter with the sealing ring. All parts with defects must be replaced; the remaining parts are thoroughly washed in a special product. We blow out the jets and other holes with compressed air. Reassemble in reverse order.
Expert opinion
Ruslan Konstantinov
Automotive expert. Graduated from Izhevsk State Technical University named after M.T. Kalashnikov, specializing in “Operation of transport and technological machines and complexes.” More than 10 years of professional car repair experience.
There are a lot of other equally useful features when it comes to setting up Solex. Selecting jets is far from the only way to modify the carburetor and ensure stable engine operation. For example, you can set the level in the chambers. True, this will require special templates, since the positions of the floats are adjusted differently, it all depends on the type of carburetor cap. Do not think that the optimal level was initially set by the manufacturer. By bending the float tongues, you can avoid overflow and excessive loads on the needle. After setting the correct level in the float chambers, you can adjust the idle speed by rotating the screws responsible for the quality and quantity of fuel. Some go even further and modernize the unit even more sophisticated. For example, they make a hole in the damper, seal the emulsion tubes, etc. But this is already unnecessary. But the selection of jets for the correct setting of the carburetor is even necessary and useful. If everything is done correctly, you can ultimately achieve economical fuel consumption and good accelerator responsiveness.
- Author: Mikhail
Rate this article: (41 votes, average: 2.7 out of 5)
Fuel level in the Solex 21083 carburetor
In order for the carburetor to work smoothly, it must be adjusted; first of all, the level in the float chamber should be set. To make this adjustment, it is not necessary to remove the entire carburetor; it is enough to remove only the top cover of the unit.
On a VAZ-2109 car we adjust the fuel level as follows:
- stop the engine, remove the air filter housing;
- disconnect the solenoid valve wire, release the suction cable;
- unscrew the clamps and pull off the fuel hoses (main and return) from the carburetor cover;
- unscrew the five screws that secure the cover;
- remove the cover and turn it over, hold it horizontally, look at the gap between the floats and the horizontal surface of the cover itself - it should be within 1.0-1.5 mm;
- We adjust the required gap by bending the plate holding the floats. When adjusting, you need to achieve the same location of the floats above the surface of the cover.
According to the book instructions, the fuel level in the Solex 21083 carburetor is measured using a caliper - the distance between the upper surface of the main body and the level of fuel in the chamber is determined, it should be 24-26 mm. The measurement should be made immediately after removing the carburetor cap, since gasoline evaporates quickly.
Jet markings
When choosing jets for a carburetor, inexperienced car enthusiasts are often perplexed by the presence of several numbers in the jet markings. These symbols are deciphered as follows:
- The Solex 21083 carburetor as standard is equipped with jets marked 21 (for the first chamber) and 23 (for the second chamber). The numbers indicate the diameter of the dosing elements.
- On the bottom of the “original” fuel jets there are numbers 95 and 97.5 (the first and second chambers, respectively). This data displays the throughput of the jets.
- The air jets are marked in exactly the same way as in the previous example, only in this case they will be marked 155 and 125, indicating the performance of the parts. Naturally, these numbers will change on jets with different throughputs.
The marking of carburetor jets is quite simple, but simply recognizing the numerical values is not enough - you also need to understand how and what these indicators influence.
How to replace the rear wheel hub bearing can be found in our material.
See how to independently adjust the amount of light from your car headlights. Read more here.
An important parameter that affects the operation of the jets is the ratio of the amount of air and fuel in the chamber. The normal ratio is 14.9:1, at which fuel consumption and power are in balance. To determine the combination suitable for a particular driving style, it is enough to understand what the ratio of air and fuel in the combustible mixture will be.
The factory fuel jets of the Solex 21083 carburetor are designed for economical driving and have a fairly small cross-section . The original jets do not need to be changed unless there is a particular need to increase engine power. In addition, as a result of replacing the jets, the mixture may become too lean, and the engine simply will not have enough combustible mixture for normal operation.
If the engine is not running smoothly, and the problem clearly lies in the composition of the fuel mixture, you can think about the options: different configurations of fuel and air jets make it possible to choose the most efficient scheme and use it in your car to achieve suitable results.
Setting up the Solex 21083 carburetor
All of the above adjustments relate to the settings of the Solex 21083 carburetor, and the nature of engine operation and fuel consumption depend on how well the unit is adjusted. There are some other settings that you should also pay attention to.
The solenoid valve contains an idle jet, and the diameter of its cross-section can be different - from 39 to 42 mm; there are also accelerator pump nozzles with different cross-sections of “spouts” (35x40, 40x40, 45x40, 35x35). By selecting the required diameter of both elements, you can achieve carburetor operation without failures and good throttle response. It is difficult to recommend anything specific here; each specific case requires an individual approach, and the best result is achieved by trial and error. By the way, the “spouts” of the sprayers can be directed:
- both into the primary chamber;
- one sprayer goes into the first chamber, the other into the second.
When installing a carburetor, many motorists often make one mistake - the choke cable is not installed accurately, and therefore it is problematic to start the 21083 engine when cold, especially in frosty weather. After securing the choke cable, before installing the air filter, it is necessary to check whether the air damper is closed completely using the cable. If the damper remains slightly open when the choke is pulled out, it is necessary to secure the cable braid in a different position.
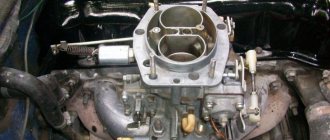
Removing and installing Solex
In order to repair or purge (flush) the carburetor, it must be removed. Removing the unit is quite simple; almost any motorist can do it independently. We remove the device as follows:
- turn off the ignition, first of all we remove the air filter housing;
- remove the return spring from the throttle valve actuator;
- disconnect the throttle cable;
- unscrew the fastenings of the choke cable;
- unscrew the four nuts on which the carburetor body itself is attached; dismantle the unit.
Installation is carried out in reverse order.