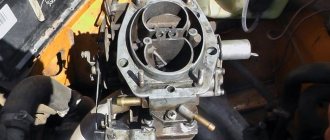
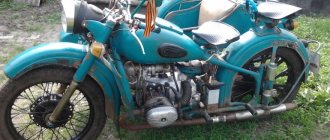
We are finalizing the Tru car ZAZ 968M. I’ll tell you about the installation of a two-chamber carburetor DAAZ 21081 under a Solex license in Zaporozhets. This practice is widespread and widely discussed on the Internet, but my method differs from the descriptions that I have seen. It is distinguished by the absence of an obvious collective farm. To install, we will need the carburetor itself (cost 4000 rubles)
Intake manifold from a 50-horsepower ZAZ (ZAZ 986B)
I need it for another project and I left the original intake manifold.
And I used an adapter to install two-chamber carburetors on a regular ZAZ 968 manifold.
The adapter, if you leave the original thick ZAZ textolite gasket, fits with the fairing without any modifications. But why do we need so many gaskets? Therefore, we remove the gasket. Between the collector and the adapter we put a regular cardboard (or paranite). Before installation, generously coat it with LITOL24 lubricant. In general, before installation, all gaskets should always be lubricated with LITOL24. This grease does not dissolve in oils, which prevents leaks (because a gasket impregnated with LITOL can no longer be saturated with oil), makes the gasket elastic and it (the gasket) is better compressed, does not stick, and when disassembled, the assembly is freely separated (unlike gaskets installed on dry or oil-soaked) and after disassembly the gasket retains its integrity (the gasket can be reused, which is indispensable in field repairs). The mounting studs are designed for a thick gasket and carburetor mounting. Therefore, without this thick gasket, they protrude unnecessarily and reduce the useful volume of the adapter. In addition, they are located almost opposite the chambers of the carburetor being installed and will prevent the normal passage of the mixture. To prevent this from happening, turn out the studs and shorten them to the maximum possible distance - the height of the fastening nuts and washers.
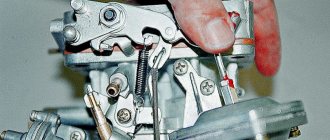
Having adjusted everything in place, we try on the carburetor. There are two options for mounting the carburetor - the drive is on the left, like the ZAZ carburetor (This is where someone gets into a lot of things. What I haven’t read and what I haven’t seen enough. And the guide wheels are welded to stretch the drive cable, and the fairing is sawed, and the pyramids gaskets are being built.) and the drive is on the right. If we install the “drive on the left”, then all the adjusting bolts will be hidden from us. Of course you can crawl up to them, but somehow it’s not right. We set the carburetor to normal. The drive will be on the right in the direction of travel of the car. Since the gasket has been removed and the adapter sits directly on the intake manifold, the lower part of the carburetor rests against the upper fairing of the cooling system. If you put the carburetor in reverse (drive on the left), then there will be no such problems, it stands up. But we have a right-hand drive, so the fairing needs a little modification. We expand the hole for the adapter with a grinder, and pull off the fairing shapes that interfere with the carburetor with a hammer directly on the engine. Those. the fairing must be installed and secured. The fairing is made of tin and stretches easily. Periodically trying on the carburetor and modifying it with a hammer, we give it the desired shape. To fasten the carburetor, select bolts of suitable length (taking into account the textolite) and nuts with washers. We insert the bolts into the adapter and then screw it on. Fairing before modification.
Fairing after modification. You can see the straightened part from the generator side.
Let's try on the carburetor. Doesn't stick or touch anything.
Now we need to solve the issue of the throttle valve drive. The simplest and most correct way is to make a similar factory bracket for attaching the cable to the fairing. You can cut off the original one and weld it on the right side, but I decided to make a new one and leave the original one in place. I cut a plate (2.5mm thick) from a piece of an old hinge from an electrical cabinet. Well, I couldn't find a strip of the right size. I had to cut it out.
From this strip we make a bracket. Be sure to drill a hole. Through it, the bracket is welded to the fairing, and if someone doesn’t have welding, you can screw it onto a bolt - drill two holes and screw it onto 2 bolts so that it doesn’t spin.
Now we prepare the gaskets -LITOL24!- (which with two holes is cut out of thick cardboard) and install the carburetor.
Now you need to properly secure the throttle cable. For this purpose, I bought it at a motorcycle store for 50 rubles. cable boss with bolt.
Next, remove the plastic damper drive from the carburetor and drill a hole in it to match the diameter of our boss. So that it rotates freely in the hole, but does not dangle.
It should look like this.
But that is not all. The groove for the cable is not pass-through and is designed that the cable in the original is in the boss and will end and should not stick out. Our cable is long and goes right through the boss. Therefore, we also finish the cable groove a little.
We install the drive in place, adjust the cable and install the spring.
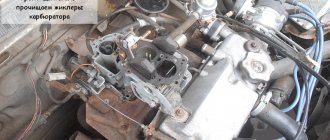
After installation, start the engine and make preliminary adjustments to the carburetor. Check the cable tension and the gas pedal travel. When everything is set up and adjusted, you need to install the air duct (turtle) from the Muscovite 2141, the corrugation and the dry air filter from the same. Filter housing 800 RUR, turtle 160 RUR, filter 80 RUR, corrugation - (I don’t remember how much) RUR. There are two types of turtles. For the 2106 engine (I have one) and in the opposite direction for the Moskvich engine. Which side to install the air filter on will depend on which side you buy. I have not yet decided which position is the most advantageous and chose the right one, like the ZAZ in the original. In this position, access to the distributor remains open. We turn the original air mount away from the rocker arm and remove it completely. During the fitting, the turtle began to crawl into two halves. It was glued together as if with a soldering iron. I disconnected it completely and re-glued it with COSMOPHEN.
I bought factory bolts to secure the turtle. They are with internal thread. The length seems normal, but at the beginning of the bolt there is a deep groove and the thread starts far away. They don't reach the carburetor studs. I returned the bolts to the store - saving 100 rubles. The question arose - how to attach the turtle? Either sharpen longer studs and, again, buy the same bolts, or sharpen other bolts. I turned out the bolts. I decided not to go to the turner. They've gone completely crazy lately. They ask from 500 rubles. per hour and even for 5 minutes of work min. hourly pay. Fuck them. I don’t have my own lathe yet. Therefore, I sharpen all the little things in a vice with dies and taps. Here too, I bought a couple of M5 taps, 4.2 drill bits, and a new tap holder. A total of 400 rubles. I found suitable old 8mm bolts with stripped threads in a box. I generally don’t throw away old bolts and nuts. Periodically they gain a second life. I cut them to the required size, drilled and tapped them. And the tool justified itself and saved time on a trip to the turner. It turned out not as beautiful as it would have been in the machine, but it was just as reliable and there was no difference when screwed on. I selected suitable washers and cut out the rubber seals.
I cut the “double” rubber gasket of the turtle in half. So it became twice as thin and the turtle was screwed tightly and without warping. Next, it was necessary to properly secure the air filter housing. Moreover, do this in such a way that you can then install the snorkel. The snorkel will allow you to take air from outside the engine compartment and from above, and this is very important in Zaporozhets. When driving on dusty roads, the engine pulls all the dust into itself and the air filter quickly and heavily clogs. Those. The air filter housing must be secured taking into account future snorkel outlets and so that it allows the spare tire to remain in its original place. The air filter housing 2141 is much larger than the Zaporozhye one. Placing it taking into account all the requirements is not so easy. I decided to install it parallel to the valve cover. To do this, I made mounting clamps from a 1.5mm metal strip. A strip from the packaging of some household appliance such as a refrigerator.
Having made the clamps, I began making the tie rods. 200 nails are perfect for these purposes.
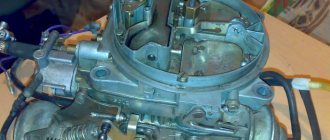
And this is what the new system looks like in finished form
After completely assembling and laying all the hoses, by the way, the return hose had to be replaced with a longer and thicker one, we make the final adjustment of the carburetor. The advantages of Solex are so enormous that it is impossible to describe them all. To understand, you need to ride both. With Solex xx became simply perfect. There was traction without failures. Almost completely without failures - you still need BSZ. The literature states an additional 5 hp with a two-chamber carburetor. 5 were definitely added there, but it felt like more. When you sharply press the pedal to the floor (the second chamber opens), the front of the car rises. When going uphill, the speed no longer drops. Theoretically, fuel consumption should drop, but I can’t say for sure yet. ZAZ began to please even more.
What kind of carburetor was Zaporozhets equipped with?
Depending on the model range and year of manufacture, the ZAZ could be equipped with a K-127 or K 133A carburetor. If you carefully study them, you can find huge differences from the same K 133. These devices were not equipped with idle economizers, and the float chamber is made in such a way that it is connected to the atmosphere and is clearly balanced.
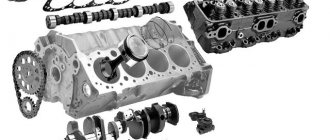
The ZAZ 968m carburetor consists of 3 main parts:
- Mixing chamber with lower pipe;
- Float chamber;
- Float chamber cover.
All the necessary mechanisms are located in the lid. Among them are the accelerator pump nozzle, air dampers, the needle valve of the float chamber, as well as the idle jet.
The float chamber and diffuser are pressed into the middle part. It also contains a float and a float chamber valve.
The air damper control button is located in the floor tunnel of the vehicle. It is connected to the throttle control rods and when opened, it also opens slightly by 1.6 mm. The manufacturer adjusted these values at release, but over time they may lose their settings.
K-133 carburetor design
The carburetor consists of three main parts: the float chamber cover, the middle part with the float chamber and the lower pipe with the mixing chamber. The cover houses the air damper, fuel filter, fuel float valve, accelerator pump nozzle, idle air jet and parking imbalance valve. The air damper is hinged to the throttle valve and is actuated by a rod whose button is located on the floor tunnel. With the air damper completely closed, the throttle valve opens by 1.6-1.8 mm, which achieves the best mixture formation when starting the idle engine.
K-133 carburetor design
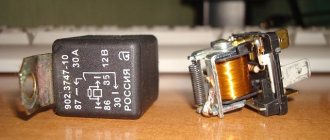
The middle part forms a float chamber and an air channel with diffusers pressed into it. The middle section contains the float, accelerator pump, economizer valve, accelerator pump check and discharge valves, main system air jet, idle jet and main jet. The mixing chamber contains a throttle valve, the drive of which is connected by a rod to the accelerator pedal. In addition to the throttle valve, the mixing chamber contains a forced idle economizer (EFES). The economizer consists of a housing closed with a lid, inside which a diaphragm is installed. A screw is installed on the cover, which regulates the amount of mixture entering the engine and limits the stroke of the valve with the diaphragm. The economizer is the main regulating element that controls the vacuum that occurs in the intake pipe. The microswitch is attached to the bracket with screws. The effectiveness of the EPHH depends on the correct installation of the microswitch. The electro-pneumatic valve is located on a horizontal shelf to the right of the ignition coil and is designed to turn on and off the supply of vacuum to the valve diaphragm. The electronic control unit is installed on the right side of the engine compartment wall. It controls the operation of the electro-pneumatic valve, adjusting it depending on the crankshaft speed.
Reasons for adjusting the ZAZ 968M carburetor?
No carburetor adjustment is made unless necessary.
Therefore, it is performed if the car has the following list of faults:
- Unstable idle;
- Increased or decreased speed;
- High fuel consumption;
- Low engine response;
- Engine after major overhaul.
All this can be caused by an unregulated carburetor or ignition system.
Many lovers of LuAZ or ZAZ cars perform this procedure to increase power, but it must be remembered that when performing such a setting, fuel consumption can seriously increase, and the engine life will be reduced. Our task is to consider the standard, most economical carburetor adjustment while maintaining the required internal combustion engine power.
Installing a VAZ Carburetor
The Zhigulev carburetor can be installed on the Zaporozhets engine.
A small batch of ZAZ-968M was even produced with the DAAZ-2101-20 carburetor. In Fig. 1170 shows an adapter, floor-mounted two-barrel carburetor. As the experience of car enthusiasts shows, on a Zaporozhets it is better to rotate the carburetor 90°, for which the adapter must be made according to the dimensions shown in Fig. 1171. This makes it easier to fit the air filter, but will add several simple parts for the throttle valve drive
Fig1171. Adapter for DAAZ carburetor, rotated 90°. It is better to leave the old air filter. There is too little space in the engine compartment for the Zhiguli. In this case, an adapter is also required for the air filter. With the MeMZ engine, it is best to use the DAAZ-2105 carburetor. The result of this modification is increased engine power, better throttle response, and easier starting in cold weather. But it should be noted: installing a DAAZ carburetor does not reduce fuel consumption; at best, it remains at the same level specified in the factory instructions (Fig. 1172).
Fig1172 1 bracket; 2 - square; 3 - traction; 4 - drive cable.
Carburetor DAAZ 2101-20 (last update: 2001-01-06 17:10:51)
The DAAZ 2101-20 carburetor (Fig. 35), installed on the MeMZ-968GE and MeMZ-968BE engines (45 and 50 hp), is not interchangeable with the VAZ 2101 carburetor of the Zhiguli car. The carburetor is secured to the intake pipe with four studs and nuts.
The DAAZ 2101-20 carburetor is a two-chamber vertical carburetor with sequential opening of the throttles. The secondary chamber throttle drive is mechanical and is carried out by a system of levers from the primary chamber throttle axis. The carburetor is equipped with an automatic starter and a diaphragm accelerator pump. A spool valve for the engine crankcase ventilation system is installed on the throttle axis of the primary chamber. This design allows for greater engine power combined with good efficiency, stable operation in all modes and reliable starting. Basic technical data of the DAAZ 2101-20 carburetor
source
Preparatory work before adjusting the carburetor ZAZ 968M
Before adjusting the device, you need to make sure that the motor is in full working order. Otherwise, the whole procedure will be meaningless. To do this, pay attention to the clearances in the valve mechanisms. They must be nominal. If necessary, adjust them.
The next element is the correct operation of the ignition system. The advance angle should be set as required, and the ignition coil, cables and spark plugs should be in good condition. If necessary, these elements must be replaced.
It is best to put the car in a warm garage if the work is carried out in winter. It should stand on level ground. The gearbox is in neutral and the wheels are locked with the parking brake.
When preparing the ZAZ 968M carburetor for maintenance, the carburetor should be adjusted after the appropriate air and fuel jets have been purchased.
FUEL PUMP
It is rarely necessary to remove the fuel pump, not only because the Zhiguli pump is quite reliable, but also because access to its working elements (valves, diaphragm) is provided by disconnecting the cover or upper housing from the lower pump housing. The fuel pump assembly is usually removed when the timing gear cover needs to be removed. Unscrew the two horizontal stud nuts and the pump is free. When working with a fuel pump on a car, you have to remember that the fuel level in the tank is almost always higher than the level where the pump is located. Therefore, when the hose coming from the gas tank is connected, you must either plug it with something or blow into it so that gasoline completely flows from the hose into the tank. You can also tie the disconnected hose so that the gasoline level in it is below the edge of the hose.
Pump malfunctions are most often caused by valves not fitting tightly to the seats or a diaphragm rupture.
If a defect in the valves is discovered, it can be corrected by grinding the valve to the seat with lapping paste.
To remove a faulty diaphragm, after removing the pump housing, press on the diaphragm and turn it 90°. This
the diaphragm rod shank will be released from the drive lever.
The faulty diaphragm is replaced with a new one, and if it is missing, a plastic film can be temporarily laid between the layers of the old diaphragm.
When disassembling and assembling the fuel pump, try to mark the relative positions of the individual parts: lower housing, upper housing, cover. This will ensure the same tightness of the connections.
It happens, however, that you simply removed the cap to clean the filter, put it back in place, and gasoline flowed out from under the cap. In this case, you need to try, by turning the lid, to find a position at which the leak will stop.
One more thing. When pumping manually, gasoline does not always reach the carburetor. Here you need to listen: the characteristic “slurping” of the pump says that everything is in order. Otherwise, you need to turn the crankshaft at least half a turn with the starting handle so that the pump rod does not rest against the upper part of the camshaft eccentric.
Setting up the carburetor ZAZ 968M
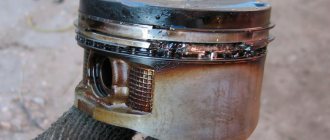
To begin, remove the unit from the car; it must undergo complete disassembly, cleaning and further assembly, taking into account certain requirements. The first is the gap between the throttle valve and the mixing chamber. Ideally, it should be in the range of 1.6 mm to 1.8 mm with the damper fully open. To set these values, you need to bend the rod in the desired direction. When the flap is closed, it should fit very tightly. Otherwise there will be excess air leaks. Adjust the gap by grinding or by bending the rod.
K-133A carburetor throttle valve (correct and incorrect position): a - incorrect; b - correct; 1 — outlet of the idle emulsion channel; 2 - air channel; 3 - emulsion channel; 4 — mixture quality adjustment screw; 5 — screw for adjusting the amount of mixture.
Now you can install the carburetor on the car. The installation must be accompanied by strict compliance with safety regulations. The next step is adjusting the air damper. To do this, the control lever is fully extended and the flap is closed. In this position, the cable must be tightened. It’s easy to check the operation - if you press the lever, the damper is completely closed, if you pull it out, it opens all the way.
The throttle valve control drive is adjusted in a similar way. After this, all the springs and rods of the carburetor system are assembled. The operation of the mechanism must be checked by simulating its operation.
K-133 carburetor diagram
K-133M carburetor diagram
The starting device contains a pneumatic corrector 14 and a system of rods that form a semi-automatic drive system for the air damper 7.
In the carburetor cover 1 there is a valve (tube) 5 for unbalancing the float chamber 18, a fuel valve 19 connected to the float 20, fittings 15 and 17 for fuel supply and bypass, respectively, and a fuel filter 16.
In the body of the float chamber 1 there is a main air channel with a small diffuser 8, with a gasket 9, a latch 32 and a large diffuser 6. In the jumper of the small diffuser there are channels that play the role of nozzles of the main dosing system and the economizer.
The main metering system consists of fuel 25 and air jets 11 and an emulsion tube 10.
Read also: Astra h heat exchanger gaskets
The idle system contains fuel 12 and air 13 jets, as well as a screw 26 for exhaust gas toxicity.
The accelerator pump and economizer are combined by a common drive 2, kinematically connected to the throttle valve drive 28, rotating on an axis 29. The accelerator pump contains a check valve 33, a spray nozzle 3 with a discharge valve 4. The carburetor is equipped with an EPH with valve 27 and a screw for the amount of combustible mixture, an electronic pneumatic valve 23, microswitch 22 and electronic idle speed sensor 21.
The float chamber housing 18 houses an economizer valve 34, connected through a channel to the sprayer, and a float 20, kinematically connected to the fuel valve 19.
The housing 31 of the mixing chamber contains a throttle valve and a fitting 30 for supplying crankcase gases.
How to adjust the idle speed of a ZAZ 968M carburetor?
The next important step is setting the idle speed. The fuel consumption of the car depends on it. The level in the float chamber is not set. You can configure it using the two most common options. The manufacturer has provided both methods.
First, start the engine and warm it up to nominal temperature. It is quite possible that the speed will be incorrect - this is normal, because the idle speed has not yet been adjusted. The quality screw is then tightened all the way, but not tightened. The engine should stall. Now we turn it out two turns and start it again, and with the quantity screw we set the speed corresponding to the value of 900-950 rpm.
You can finish here, but there is a second option that will allow you to achieve the most efficient operation of the device. Turn the quality screw again so that the speed is at its maximum. After this, the quantity screw is tightened to the nominal value. This loop can be performed twice. As a result, you will get a fairly high-quality adjustment to preserve the maximum amount of fuel. The same is true for the LuAZ automotive power system.
That's all. As you can see, adjusting the carburetor with your own hands is not such a difficult job. This procedure must be performed at every vehicle maintenance to avoid problems with it in the future.
ZAZ 968. AIR FILTER
Disassembling and assembling the air filter is easy.
But after assembly, an oil leak is often discovered from its sump. This is not an assembly defect, but simply a loosening of the fasteners that hold the pan to the air filter housing. The leak can be eliminated by replacing the standard locks with screw ties. To do this, the hooks on the filter body, to which the lock loops were hooked, are unbent, and a hole with a diameter of 5.5 mm is drilled into them.
An M5 screw is inserted into the hole, and a nut (preferably a nipple from the spoke of a motorcycle wheel) is inserted into the mounting bracket of the hinge lever on the pallet. The screws are tightened with a screwdriver until the pallet is pressed as required (Fig. 13).
Rice. 13.
Attaching the air filter pan:
/ - air cleaner housing, 2 - M5 screw, 3 —
straightened hook,
4 —
old lock, 5 — nut (spoke nipple), b — pallet
ZAZ - repair and operation
How to set up a carburetor on a Tavria
I put everything in place, stretched everything...
The first time it didn’t start, and after 3 attempts to start, my battery died. It charged all night while I was at work. When I came home from work I saw that the xx sensor wire was not connected. After connecting it started up with half a turn. Warmed it up, did not change the quality of the mixture. I just reduced the amount of mixture.
Manual for setting up and repairing carburetors syst. Solex, author Erokhov
A well-illustrated publication with the theory of operation of carburetors, each system separately, and specifically how it all works in Solex. Year of release: 2004 Publisher: Behind the wheel Format: PDF Quality: Scanned pages Number of pages: 94 Size: 17 MB Download from depositfiles.com
A book by the Ukrainian publishing house Ranok, illustrations and detailed advice. The old manual appeared in two editions. year of release unknown quality PDF - scanned materials, average quality number of pages 256 Size: 24 MB Download from depositfiles.com
How to set up a VAZ carburetor
The engine is often called the heart of the car, and the carburetor is the heart valve. A lot depends on the correct setting of the carburetor: fuel consumption, acceleration dynamics, and CO level, etc.
Posting sponsor PG Articles on the topic How to adjust the carburetor of a VAZ How to adjust the carburetor How to install a carburetor 2108 on a VAZ 2107 How to improve the carburetor of a VAZ 2107
To properly adjust the carburetor, you need to have sufficient knowledge and skills. There are two screws for adjusting the carburetor. The first adjusting screw is responsible for the number of revolutions, and the second for the quality of the mixture. With their help, the engine speed is adjusted at idle, as well as the CO content in the exhaust gases.
Tavria carburetor
Compatibility: Tavria 1102, Slavuta 1103, Pickup 11055
in the spare parts store on Veresnevaya 24.