Home › Miscellaneous ›
Passenger cars are equipped with different types of engines; power units may differ in volume, power, and design.
Depending on the manufacturer, each engine has its own specific resource - the most basic serious failures are considered to be failure of the crankshaft or piston group.
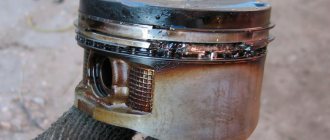
If oil consumption in an engine increases, the most common reason for this is worn or broken piston rings; replacing them is quite labor-intensive work, and also requires certain plumbing skills.
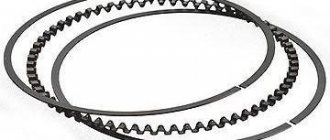
Engine piston rings
In an internal combustion engine (ICE), piston rings (PR) serve as a seal between the cylinder walls (liners) and the piston, due to which compression is created in the cylinders. If you forget to put the PC into the engine during assembly, the engine will not start, since the necessary compression of the working air-fuel mixture will not be ensured.
In passenger cars, three rings are standardly installed on each piston - two compression rings and one oil scraper ring, and oil scraper rings can be stacked, that is, consist of several elements.
Compression piston rings (CPRs) are used to create compression in the cylinders and are always made of high-strength cast iron with various additives.
The upper CPC has the greatest strength, since it operates in the most severe temperature conditions and experiences maximum loads.
Engine oil piston rings (OPRs) are needed to drain oil from the cylinder walls; if the rings do not perform their function, the engine will consume oil. MPKs can be either cast iron or steel, and cast iron PCs are almost always made in one piece, but steel oil scraper rings can only be assembled (composite). Steel MPC for one cylinder consists of:
- two spring steel rings;
- axial expander;
- radial expander.
Thermal clearance of piston rings
PCs are spring discs with one cut - when installed on the piston, they expand, and in the sleeve they are pressed tightly against its walls.
In order to achieve maximum compression of the working mixture, the cylinder walls must be as smooth as possible (without defects), and the shape of the internal cavity must be perfectly round.
On the piston, the PCs are placed in special grooves, moreover, they are not seated tightly, and on a cold piston they move freely in the grooves.
Piston rings have thermal clearances:
- between PC and groove;
- at the junction.
The clearances must be certain; if they are larger or smaller than the required value, the piston group will quickly fail. One should take into account the fact that when heated, the metal expands, and if the thermal gap of the PC is too small, the piston group will begin to overheat. With large gaps, tightness is not ensured and power losses occur.
For passenger cars, as a rule, the following clearances are established:
- between the grooves and the PDA - from 0.02 to 0.08 mm (for the upper ring the gap should be slightly larger);
- between grooves and MPC – from 0.05 to 0.06 mm;
- at the junction - from 0.25 to 0.5 mm.
As wear occurs, the gaps in the PC increase, and they should not exceed:
- between the ring and the groove – 0.15 mm;
- at the junction – 1.0 mm.
VAZ piston rings
The Volzhsky Automobile Plant produces engines for front-wheel drive and rear-wheel drive cars; piston rings for VAZ engines were originally supplied by the Michurinsky plant.
The Michurins produced a lot of defects in their products, and since 1986, their own production was established in Tolyatti.
Currently, there are many different manufacturers that produce PCs for VAZ engines, in particular, these are:
- AVTOVAZ (Tolyatti);
- STK (Samara);
- GOETZE (Germany);
- MAHLE (Germany);
- NPR EUROPE (formerly SM, Japan).
Signs and causes of wear (breakage) of piston rings
On VAZ cars, the engine wears out during operation, and the PCs also fail. Rings can:
- break into two or more parts;
- wear out in thickness;
- have general wear and tear.
Parts often break down due to overheating of the internal combustion engine; in this case, compression in the cylinders decreases and the engine loses power. Signs of a faulty PC are:
- bluish smoke from the muffler pipe, especially often it appears after a long period of idling when the gas pedal is sharply pressed;
- increased engine oil consumption;
- drop in power, the motor stops pulling;
- coking of spark plugs.
If there are signs of a malfunction in the piston group, the piston rings are replaced first. But replacing a PC does not always give the desired effect; often after repair the engine continues to smoke and consume oil.
The reason for this is simple - there is wear in the cylinders themselves.
In the block, the liners usually wear out unevenly - they take on an oval shape; due to wear, the piston rings do not fit tightly to the cylinder walls and do not provide a tight seal.
Piston ring sizes: table (VAZ)
VAZ-produced cars are equipped with engines of the following types:
- 2101/2103/ 2105/2106 (VAZ classic);
- 21213/21214/2130 (Niva);
- 2108/21083 (VAZ 2108-09-099);
- 2111/2112 (VAZ 2110-11-12);
- 21114 (VAZ 2113-14-15);
- 11186 (Lada Granta);
- 11194 (Lada Kalina).
There are also many other modifications of internal combustion engines, all VAZ engines are four-cylinder in-line, with a total number of valves of 8 or 16. VAZ engines have several standard cylinder sizes:
For each size, a repair increase of 0.4 and 0.8 mm is provided; factories produce repair pistons and rings of the first and second repair sizes. Piston rings with a diameter of 76 millimeters are available for engines:
- 2101;
- 2103;
- 2108;
- 1111(Oka).
The first repair size of the PC for these motors is 76.4 mm, the second repair size is 76.8 mm. Pistons, as well as 79 mm piston rings, are produced for internal combustion engines:
All these motors also have two repair PC sizes - 79.4 mm (first repair) and 79.8 mm (second repair). The most common PC size is 82 mm; many modern VAZ cars use a piston group of this exact size. Piston ring diameter 82 mm can be found on engines:
- 21083;
- 21213;
- 21214;
- 2130;
- 2123(Chevrolet Niva);
- 2111;
- 21114;
- 11183 (Kalina and Granta);
- 2112;
- 21124;
- 21126(Priora);
The VAZ internal combustion engine also has deviations from the typical dimensions, for example, on the 11194 engine with a volume of 1.4 liters, pistons and PCs with a diameter of 76.5 mm are installed; this internal combustion engine is equipped with the Ladv Kalina. There is also a non-standard power unit 1800 cm³ VAZ-21128 with a nominal cylinder diameter of 82.5 mm, but the engine is not mass-produced by AvtoVAZ.
Replacing piston rings
On VAZ cars, as well as on all other models of passenger cars, it is advisable to change only the piston rings only if:
- there is no exhaust in the cylinders;
- there are no signs of damage to their inner surface.
If the liners are significantly worn, they need to be bored, and if the last size was already used before, the cylinder block needs to be relined. You can replace the PC on any VAZ engine without removing the internal combustion engine; this will require removing the cylinder head and oil sump. PCs are replaced if the gap at the joints does not exceed 1 mm.
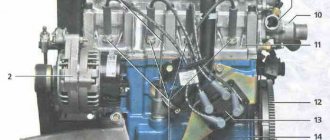
For example, let's consider replacing piston rings on a VAZ-2114 car with an 8-valve internal combustion engine; such work must be carried out on a pit or a car lift:
- turn off the ignition, put the gearbox in neutral, disconnect the negative terminal from the battery;
- drain the antifreeze, remove the air filter housing along with the pipe (injector corrugation);
- remove the valve cover, camshaft, loosen the timing belt and move it to the side;
- disconnect the wires and cooling system pipes from the cylinder head, unscrew the head bolts;
- unscrew the nuts of the exhaust pipe of the muffler;
- We completely free the cylinder head from all fasteners that prevent it from being removed, and we remove the cylinder head;
- if there is protection under the engine, remove it;
- place a container under the engine sump, unscrew the plug on the crankcase, drain the oil;
- remove the lower hatch of the gearbox housing (three bolts);
- Using a 10 mm wrench or a socket wrench, unscrew all the oil pan bolts;
- dismantle the pan, remove the oil receiver;
- Unscrew the connecting rod nuts, remove the lower connecting rod caps, and carefully knock the pistons and connecting rods upward. Pistons should be knocked out through a soft metal drift or through a wooden block. First, you need to carefully knock out the connecting rod bolt without damaging the threads on it, then place the drift on the end of the connecting rod - in no case should you hit the bearings or the seat underneath them;
- It is recommended to remove the connecting rods one at a time, and immediately attach the caps to them; the caps should not be confused with each other, they are placed back strictly in their places, and a lock to the lock is required;
- remove the PC from the pistons, use a piece of the old ring to clean the piston grooves to bare metal. Be sure to check the cleanliness of the groove all around; there should be no coke left in it;
- We install new rings in the grooves, start with the lower MPC, then install the middle compression PK, and lastly the upper one. For installation, you can use a special device, but it is still more convenient to install the rings by hand. If the MPCs are cast iron, they cannot be bent along their axis, they can only be carefully moved apart. Compression rings also need to be bent carefully, to a minimum;
- we install the piston in place using a special mandrel, hammer it in with a wooden hammer handle or a brass or bronze drift;
- We install one piston-rod at a time, and immediately attach a connecting rod cap to each one. The connecting rod nuts should be tightened with a torque wrench, force - from 4.5 to 5.5 kg;
- then we put everything in place - the oil receiver, the engine sump, the cylinder head. We fill the radiator with antifreeze, oil into the crankcase, and start the engine to check. After replacing the PC, the internal combustion engine may initially smoke and consume oil - the engine needs to be run in for approximately 2 thousand km. It happens that despite the seemingly normal condition of the liners, the internal combustion engine continues to smoke even after replacing the rings after break-in. In this case, you will have to bore the cylinders and install a repair piston group.
The principle of installing piston rings on a VAZ 2107 car
When all the steps are completed and the connecting rod along with the piston are removed, it is necessary to clean them of carbon deposits and dirt. After a preliminary inspection, you need to remove the piston rings. It should be noted here that the rings will have to be replaced, so you should not be afraid of breaking the parts that came off. Now installing new rings, you need to start with the oil scraper ring.
First of all, install the expansion ring, which is made in the form of a flexible spring with a rod or an octagon-shaped plate. When a new ring is installed on the piston, you should gradually push it through and periodically measure the gap, because it must be a certain distance.
If at the extreme point the gap is more than 0.4 mm, then the ring must be changed, and if it is less than 0.25 mm, then the whole problem is in the lock and it should be sharpened. If the gap size is normal, then install the ring. Moreover, it should be taken into account that the locks should not coincide, but rather have a difference of 90 degrees between themselves. This procedure should be performed with all rings on all pistons.
When the replacement is complete, before installing everything back, pay attention to the gaskets and also clean the engine. These operations will improve the performance of the engine.
If compression is insufficient, the VAZ 2106 engine loses power and begins to consume excessively not only gasoline, but also oil. In the best case, you can get by with a simple replacement of the piston rings, in the worst case, a complete overhaul of the engine, starting from turning the cylinders, replacing the piston group and ending with repairing the car’s crankshaft.
If you decide to change the rings yourself, there should not be any special problems when performing this repair. Of course, you will need a considerable list of tools to do this as quickly and conveniently as possible. And also, it is necessary to perform a number of preparatory work to get to the pistons:
- Remove the cylinder head of the VAZ 2106
- Remove the pan to gain access to the crankshaft and connecting rod mountings
Personally, I carried out this procedure with the engine removed, since the car was almost completely disassembled. But everything can be done even with the engine installed, but then it is most convenient to carry out repairs on a pit or a lift.
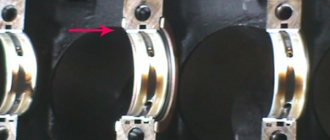
So, after the pan cover is removed, you can take a 14mm socket with a wrench and unscrew the two nuts securing the connecting rod cover. This is shown more clearly below:
When both nuts are unscrewed, you can remove the cover by hand; it can usually be easily removed without any problems:
Then, with a certain force, you need to press the connecting rod bolt with your hand or even with the handle of a hammer:
Until the piston comes out from the back of the cylinder. It will roughly look like this:
This should be done quite carefully so as not to damage either the piston itself or the cylinder walls:
Next, you can begin to remove and replace the piston rings if the cylinders are not yet worn out. To do this, carefully pry the edge of the ring with your fingernail or finger and remove it from the piston groove:
And carefully turn the ring until it is completely free from the groove:
After all the rings, both compression and oil control, have been removed, you can measure the clearance by inserting them into the cylinder and inserting a feeler gauge into the hole between the two edges:
If the values exceed the nominal values, we replace the rings with new ones. After which you can install all the parts in the reverse order of removal. It is worth paying special attention that when installing the rings, their locks should be directed in different directions for greater tightness of the cylinder.
One of the main parameters of an internal combustion engine is the displacement. How high-torque and torquey the car will be depends on the volume. With an increase in engine displacement, driving in the city becomes more comfortable, because torque and power increase significantly and reach their peaks at lower revs. Increasing the working volume can be achieved in three ways: increasing the diameter of the cylinders, increasing the crankshaft stroke and increasing the number of cylinders. The third method, as you understand, is impossible in a garage and requires a huge number of complex modifications to the engine. The other two have become quite widespread and, when applied to VAZs of the classical model, can be implemented quite easily. Formula for calculating the volume of four-cylinder engines: V=D2*3.1416*L, Where V is the working volume, D is the diameter of the piston (cylinder), L is the stroke of the piston (crankshaft). If a major engine overhaul is on the horizon or you simply decide to increase the power of your car, this article may be of interest to you. In it I will try to most fully and accessiblely describe ways to increase the engine capacity of rear-wheel drive VAZs and Nivas. To begin with, I will list the configurations of AvtoVAZ serial engines that can easily be placed under the hood of a Lada: 1. The so-called “penny” 2101. The progenitor of all other classic engines. Cylinder diameter 76 mm, piston stroke 66 mm. Volume 1197 cm3. Installed on VAZ-2101, 21013, 21035. Power according to the passport is 59 hp. 2. “Eleventh” 21011. Differs from 2101 in cylinders with a diameter of 79 mm. Piston stroke 66 mm. Volume 1294 cm3. Installed on VAZ-21011, 21021, 21033, 21063. Its variety is the 2105 engine, the main difference of which is the timing belt drive. Installed on VAZ-2105, 21072. Power 64 hp. 3. “Triple” 2103. The main difference from 2101 is the increased height of the cylinder block and the crankshaft stroke of 80 mm. Cylinder diameter 76 mm. Volume 1452 cm3. Installed on VAZ-2103, 21043, 21053, 21061, 2107. Power 71 hp. 4. “Six” 2106. Differs from 2103 in cylinders with a diameter of 79 mm. Piston stroke 80 mm. Volume 1569 cm3. Installed on VAZ-2106, 21074, 2121 Niva. Power 75 hp 5. 21213. Differs from 2106 in cylinders with a diameter of 82 mm. Piston stroke 80 mm. In addition to the cylinder block, it differs from other classic engines in the cylinder head, carburetor and ignition system of a different type, etc. There is also a modification 21214 with a fuel injection system. Installed on VAZ-21213 and 21214 Niva. Volume 1690 cm3. Power of the carburetor version is 80 hp. 6. 2130. Differs from 21213 in the height of the cylinder block increased by 2 mm and the piston stroke increased to 84 mm due to the installation of a different crankshaft. Installed on VAZ-2130 “Niva” 5 doors. and 2120 "Hope". Volume 1774 cm3. When modifying the engine, you can use both serial and tuning components, but still, first of all, you should focus on serial parts, because their cost is significantly lower than that of non-serial ones. List of serial pistons: 76, 79, 82 mm. Non-serial: 84, 88 mm. Serial crankshafts: 66, 80, 84 mm. Non-serial: 86, 88, 90 mm. Now let's talk specifically about what can be done with the engine at hand. 1. If you have a “penny” block on hand. Increasing the cylinder diameter - we sharpen the cylinders to 79 mm, install 21011 pistons. We get a volume of 1294 cm3. Increasing the piston stroke - the pistons are the same, we buy a crankshaft 2103 or 21213 with a stroke of 80 mm, but 2103 is better, because 21213, although it is more balanced due to additional counterweights, there is a risk that the counterweights may catch on the pistons. If you are not afraid to cut to the quick, you can buy any of them. Next, you purchase connecting rods shortened by 7 mm (it’s impossible to find in Lugansk, it’s better to order on the Internet). The volume is 1452 cm3. If we combine the operations described above, we get a volume of 1569 cm3. When modifying the “eleventh” engine, the cylinders can be bored to 82 mm, i.e. this turns out to be 1394 cm3 of volume. And the procedure for increasing the piston stroke is the same as in the case of the 2101 block. If we combine both, we get a volume of 1690 cm3. 2. If you have a “three” or “six” block, the most accessible way to increase the volume is to bore the cylinders by 3 mm. Those. we get 1569 and 1690 cm3 of volume, respectively. Because these blocks have a piston shortfall of 2 mm to the upper edge; they can easily install a crankshaft with a stroke of 84 mm, the price of which is about 5-6 thousand rubles. The resulting volumes are: piston diameter * crankshaft stroke 76 * 84 = 1524 79 * 84 = 1647 82 * 84 = 1774 When installing such a crankshaft on these blocks, the compression ratio increases excessively, which will entail a transition to higher octane fuel. In this case, the compression degree will need to be checked by bleeding, followed by adjustment if necessary. 3. 21213 block can already be safely sharpened to 84 mm, while the volume is 1773 cm3. 4. The 2130 block is also easily sharpened to 84 mm, which, together with the crankshaft with a stroke of 84 mm standard used on this engine, gives a volume of 1862 cm3. Almost any of the blocks can be equipped with crankshafts with a stroke of 86, 88, 90 mm. In this case, it is necessary to select appropriate shortened pistons or connecting rods. The budget and labor intensity of such improvements significantly exceeds those described above.
Replacing the piston group on a VAZ 2106
After a certain mileage, oil consumption increases and compression in the cylinders decreases. This indicates wear of the piston group. In this case, the piston will need to be replaced. When replacing pistons, it is necessary to take into account the dimensions of the piston group of the VAZ 2106. The article describes how to correctly select and change all the components of the piston group on the VAZ 2106.
The connecting rod and piston group on the VAZ 2106 consists of a piston, connecting rod, piston rings and piston pin. Piston rings differ in purpose: compression and oil scraper. The former prevent gases from penetrating the combustion chamber into the crankcase.
Oil scrapers, removing residual oil from the cylinders, prevent its penetration from the crankcase into the combustion chamber. When free, the rings have a larger diameter than the inner diameter of the cylinder. Therefore, the ring has a cutout called a lock.
High quality cylinders use narrow rings to reduce friction and prevent vibration at high engine speeds. But due to the heavy load, they quickly wear out themselves and accelerate the wear of the cylinders.
Therefore, wide rings are more popular, as they are more reliable. A special feature of piston rings is that after millions of cycles they must remain elastic and provide a seal.
Therefore, for their manufacture, a material with low friction and wear coefficients should be used.
Replacement piston ring set
The first products began to be made from malleable cast iron, which has good performance characteristics due to its porous structure. The next material used was ductile cast iron, which elastically deforms, making it easier to fit products onto the piston.
Another material from which rings are made is cast iron coated with hard chrome. These products must be carefully selected when replacing, as they have low ductility.
But at the same time they have high wear resistance even under conditions of high pressure and high temperatures. They are used on forced engines.
There are also stainless steel rings, which have similar characteristics to chrome parts, but have a longer service life.
Loading …
In addition to the material, the efficiency of the ring is affected by its location and design. If the product is slightly twisted, then it grinds faster with the cylinder walls. Compression rings with an L-shaped section contribute to the development of additional force applied to the cylinder walls at high pressure.
Thus, when deciding which piston rings to install on the VAZ 2106, you need to take into account the following factors:
- width;
- material;
- design.
Replacing pistons
Before carrying out repair work on the VAZ 2106, you must first thoroughly wash the engine to prevent small particles and dirt from getting inside. It is better to place the dismantled motor on a reliable shelf located at a convenient height. The replacement tools you need to prepare are:
- sets of spanner and socket wrenches;
- set of heads;
- torque wrench;
- special removable device for rings;
- a set of flat probes;
- calipers;
- bore gauge;
- hammer.
When disassembling, you should carefully remember the location of all parts of the VAZ 2106, make notes, and better yet, take photographs.
Stages of work
- First you need to remove the cylinder head.
- The next step is to remove the pan to provide access to the crankshaft and connecting rods.
- Then, using a key set to “36”, you need to turn the crankshaft until the connecting rod nuts are extended as far as possible.
- Next, using a “14” socket, unscrew the two nuts holding the connecting rod cover and remove the cover.
- To pull out the piston, you need to press the connecting rod bolt with your hand or using the handle of a hammer. The piston should come out from the opposite side. Disassembly must be done carefully so as not to damage the piston and cylinder wall surfaces.
- Next, remove the rings from the pistons by prying them with your finger or nail and removing them from the groove.
We turn the product until it completely leaves the groove.
Open the gap with your fingers - After removal, all parts must be washed with kerosene and the grooves thoroughly cleaned. All surfaces need to be wiped and checked for defects: scratches and cracks.
- Using a bore gauge, wear measurements are taken: in four planes in perpendicular directions. If wear exceeds 0.15 mm or there are scratches, the block is bored until they are completely removed, and the required dimensions are adjusted.
- Next, connecting rods and piston pins are selected for replacement. After selection, they need to be inserted. To do this, you need to heat the connecting rod head and put the piston on the connecting rod. The finger should be inserted with a mandrel. In a vertical position, the connecting rod pin should not fall out.
- To determine the need to replace parts, you need to measure the gaps between the rings and the cylinder. To do this, the products are inserted into the cylinder and the gap in the lock is measured; it should not be more than 0.45 mm.
How to measure the gap correctly - Next, the piston rings are installed sequentially using a special device.
- The lock of the first ring must be set 30 degrees from the axis of the finger. On the rest, the locks are installed at 120 degrees relative to each other.
Product layout diagram - Before installation, parts must be lubricated with machine oil. Assembly is carried out in reverse order.
When replacing the piston group on a VAZ 2106 yourself, you should carefully monitor the installation sequence.
Video “Assembling a piston group for a VAZ 2106”
This video shows the intricacies of assembling the crankshaft and piston group of the VAZ 2106.
Was this article helpful?This article was helpfulPlease share the information with your friends
Source: https://avtozam.com/vaz/2106/zamena-porshnevoj-gruppy/
Replacing piston rings on a VAZ 2107 car
A rag will be useful for repairs, because there are still oil residues in the system (even if you drain everything first). It’s also worth adding a few liters of kerosene to your arsenal (to clean parts from coking oil deposits) and a few metal brushes.
First of all, you need to remove the engine from the car, this will take around several hours. Then he removes the remaining parts one by one. It should be noted that except for the ignition distributor, the parts will not need to be unscrewed, which greatly facilitates the work. Having gotten rid of unnecessary spare parts, all that remains in front of you is the engine.
We unscrew the nuts along the entire perimeter of the engine in order to remove the upper valve cover. Here, be sure to remember that the cover washers have a specific shape, so it’s absolutely not worth losing them! Because they can only be replaced with similar ones, which you will have to buy at a car store.
The valve cover and cylinder head can now be removed. It should be remembered that the bolt that secures the head is hidden under the shaft housing, so it is necessary to loosen the chain and gears in advance. Once the camshaft is loosened, the cylinder head can be unscrewed and removed. Since it is constructed of aluminum, you must remove it very carefully to avoid scratching or damaging it.
After all the operations performed, the cylinder block will be open and the bottom of the pistons will be visible. Thus, it will be possible to immediately visually assess the condition of the entire mechanism. Now let's move on to the bottom part, because there is no need to remove anything from the top. Here you have to unscrew 19 bolts that secure the engine to the sump. In addition, do not forget about the original washers, which again must be preserved. You should be especially careful when removing the pan, because there is an oil pump intake nearby, which can be very easily damaged, and this is exactly what you do not want.
Piston sizes VAZ 2106 - Size tables
home ⇒ equipment ⇒ pistons ⇒ vaz
The VAZ 2106 car engine is equipped with a piston stroke of 80 (mm) and a compression ratio of 8.5 units.
- An engine piston is a cylindrical part that serves to ensure the tightness of the combustion chamber and convert fuel energy into mechanical work of the engine.
- The material for the manufacture of pistons on the VAZ 2106 is an alloy of aluminum and tin.
- Piston parameters for VAZ 2106 1.6 MT:
- Piston stroke: 80 (mm);
- Compression ratio: 8.5;
- Piston diameter: 78.93 - 78.97 (mm);
- Years of production: 1976 - 2006.
Important: some modifications of this model, for example, the VAZ 21063 1.3 MT, have a 66 (mm) stroke piston installed.
The 4-door sedan VAZ 2106 was also produced under the names VAZ 1600 and Lada 1600.
Years of production: 1976-2006.
vaz 2106 pistons - detailed dimensions
General parameters of VAZ 2106 pistons Drawing General General view of pistons Models Total number of presented models Modifications Total number of all modifications of all VAZ models presented in our database
| (drawing) | 5 units | 10 units |
VAZ 2106 pistons parameters Parameter Piston parameter Data are presented in millimeters (mm) Value Parameter value in (mm) 2106 1.6 MT (1976 - 2006) 21060 1.6 MT (2003 - 2006) 21061 1.5 MT (1976 - 2006) 21063 1.3 MT ( 1976 — 1993) 21065 1.6 MT (1976 - 2006)
| Piston stroke | 80 (mm) |
| Compression ratio | 8.5 |
| Piston stroke | 80 (mm) |
| Compression ratio | 8.5 |
| Piston stroke | 80 (mm) |
| Compression ratio | 8.5 |
| Piston stroke | 66 (mm) |
| Compression ratio | 8.5 |
| Piston stroke | 80 (mm) |
| Compression ratio | 8.5 |
Caution: the above data are the official figures of the manufacturer, however, please note that the information is for reference only and does not guarantee absolute accuracy.
Source: https://razmery.info/tehnika/porshni/razmery-porshney-vaz-2106.html
We check the gap between the piston and cylinder ourselves
At the moment of starting a cold engine, you suddenly heard a sound reminiscent of a knock, and when the engine warmed up it disappeared or decreased, then it’s time to check the gap between the pistons and cylinders.
That is, it’s time to grab a torque wrench and start unscrewing the cylinder head. During proper operation of the engine, a natural process occurs and the gap between the piston and cylinder narrows. This occurs based on the conditions of constant operation in high temperature conditions of parts.
In addition, the reason for the narrowing of the gap between the piston and the cylinder may be improper adjustment of moving parts, temperature overload or misalignment of the cylinders. It should not be forgotten that cylinder blocks are increasingly made of aluminum materials, which have double the expansion coefficient compared to alloy cast iron.
The reduced clearance between the piston and cylinder leads to semi-dry friction and, as a result, the temperature of the cylinder block parts increases. Gradually, lubrication stops altogether and the disappearance of the gap results in the first scuff marks on the piston.
Almost always, the result of diagnosing the condition of the cylinder block is the repair of the cylinders and elements of the engine piston group. It is possible to fully determine the extent of defects in pistons, liners and other parts only after disassembling the cylinder head.
Having reached the piston group, we begin to troubleshoot the cylinders and pistons. The main measuring instruments for measuring diameters are: a micrometer - for pistons and a bore gauge (indicating gauge) for measuring the diameter of the cylinder.
Standards for compliance of pistons and cylinders
First of all, when you start repairing a piston group, you should know that there are groups of piston diameters, and tables of nominal sizes of cylinders and pistons. It is this information that you need to focus on in the future.
The diameter of the pistons is classified according to the outer diameter into 5 classes: A, B, C, D, E every 0.01 mm of size. Plus categories for the diameter of the hole for the piston pin every 0.004 mm. This data in the form of a number (orifice category) and a letter (piston class) is marked on the piston bottom.
There are design standards that the gap between the piston and cylinder must correspond to. For new parts it should be 0.05 - 0.07 mm. For used parts, the gap between the piston and cylinder should not exceed 0.15 mm.
Actually, this is why the gap between the piston and the cylinder is measured. To either purchase pistons of the exact same class as the cylinders. If the operating engine has a gap between the piston and cylinder exceeding 0.15 mm, then you need to begin selecting pistons for the cylinders, as close as possible to the design size.
What is the permissible thermal gap in the piston ring lock?
The cylinders must first be bored as close as possible to the closest repair size. Plus, you need to remember to leave an allowance of about 0.03 mm for honing the cylinder surface after boring. But now we can go for the pistons.
When honing, it is necessary to maintain the diameter so that when installing the piston, the gap corresponds to the permissible maximum gap for new parts - 0.045 mm.
Pistons are measured with a micrometer, and cylinders with a bore gauge. The diameter of the cylinder is measured in four zones and two perpendicular planes.
When selecting pistons for cylinders, in addition to the nominal or repair size, it is necessary to take into account the weight of the pistons. It can be normal, increased or decreased by 5 grams. In addition, repair rings, also of repair sizes, are selected for the pistons of the repair group.
Having determined the gap between the piston and the cylinder, you can easily select the required dimensions, and after boring the cylinder (if necessary), install the piston.
Good luck determining the piston to cylinder clearance.
Replacing pistons for VAZ 2106
- We remove the piston with connecting rod from the cylinder block.
- Steel-aluminum liners are installed in the lower heads and connecting rod caps.
- They are prevented from turning by locks inserted into the slots of the beds.
We clamp the connecting rod in a vice and, unclamping, remove the upper and lower compression rings.
When installing them subsequently, the “TOP” or “TOP” mark should be directed towards the piston bottom.
There may not be an inscription on the ring, but the lower compression ring is always installed with the chamfer facing down.
- Remove the oil scraper ring with the expander.
- Having installed the piston on a wooden mandrel with a hole or holding it suspended, we knock out the pin.
- We assemble the connecting rod and piston group in the reverse order.
We select a new piston. The piston class is indicated by a letter, and the pin category is indicated by a number (see table of mating parts).
The gap between the piston and cylinder for new parts is 0.05–0.07 mm. When worn, the maximum allowable gap is 0.15 mm.
A correctly selected finger, lubricated with engine oil, should fit into the piston holes under the force of the thumb and not fall out of the piston in a vertical position.
↑ Installation of piston rings
Having installed the ring in the cylinder, use a set of feeler gauges to check the gap in its lock. It should be 0.25–0.40 mm for all rings. If the gap is increased, the rings must be replaced.
We also check the gap between the ring and the piston groove with a set of feeler gauges. For the upper compression ring it should be 0.045–0.077, the lower one – 0.025–0.057, the oil scraper ring – 0.020–0.052 mm. The maximum permissible wear gap is 0.15 mm.
We install the rings in the piston grooves, then orient them as follows:
- We orient the upper compression ring lock at an angle of 45° to the piston pin axis;
- turn the lock of the lower compression ring relative to the lock of the upper ring in the opposite direction;
- We set the oil scraper ring lock at 90° relative to the locks of the other rings. In this case, the joint of its expander should be on the opposite side of the lock of the ring itself.
↑ Finger installation
- We heat the upper head of the connecting rod to 240°C, holding it in a vice.
- The finger can be pre-cooled in the freezer.
- We put the piston on the connecting rod and, using a mandrel, quickly press the pin.
↑ Markings on the piston, connecting rod and cover
The numbers on the connecting rod and its cover, indicating the cylinder number, must be on the same side and coincide.
The “P” mark on the piston should be directed toward the front of the cylinder block.
↑ Do-it-yourself replacement of VAZ 2106 pistons video
Source: https://ovaze.ru/260-zamena-porshnya.html
VAZ 2106: do-it-yourself engine tuning (photo):
In a VAZ 2106 car, engine tuning will not only increase the power of the unit and the speed of the car. Proper modification will make operation more pleasant and comfortable. Below you will learn how to improve the engine of your faithful assistant.
What should you prepare for?
Full tuning of the VAZ 2106 engine is a rather expensive undertaking. After all, you will have to not only change the piston group, connecting rods, crankshaft, fuel supply and exhaust gas manifolds.
All these parts must be carefully adjusted and balanced. There is no way to do this without turning to specialists who have special expensive equipment at their disposal and, most importantly, experience in carrying out such work.
It should also be understood that the cost of increasing the power of the VAZ 2106 (engine tuning) will entail a complete rework of the gearbox and exhaust system. We'll have to make more efficient brakes.
If a carburetor is installed on the car, improvement work will affect both it and the ignition system. In this case, it seems advisable to completely replace the fuel injection with an injector.
The engine will receive new technical characteristics, which will lead to the need to re-equip the suspension - the original springs and shock absorbers will not work adequately with a faster engine. It wouldn’t hurt to install additional struts to increase the rigidity of the body part.
Without these changes, increasing engine power will not have a sufficiently pronounced effect. In addition, driving such a car will become more dangerous than before the intervention in the heart of the VAZ 2106.
Engine tuning: installation of forged pistons
When working to increase engine power, the original cast pistons are often replaced with forged ones.
This is done for one purpose - to reduce the load. A forged piston is lighter than a cast piston. In addition, under heavy loads (the higher the speed, the higher the load on engine parts), casting behaves an order of magnitude worse than forged metal.
Along with replacing the pistons, it makes sense to change or lighten the connecting rods. This process is more complex - the accuracy of removing excess metal must be at least 0.1 grams.
But this procedure is less profitable than a complete replacement with H-shaped forged connecting rods, which are longer than the original ones.
Such a part is much lighter and stronger, and the latter factor will increase the compression ratio in the combustion chamber. With a long connecting rod, it is recommended to use pistons with a reduced compression height. The result of such work is boosting the engine.
Crankshaft balancing
Having lightened the connecting rod and piston group, it is necessary to balance it with the flywheel, pulleys and preferably with the clutch basket. In this case, it is better to replace the original crankshaft with a fully counterbalanced one - it is heavier, but for this part the more important parameter is strength.
The lack of balancing of this system will not allow full operation of the updated VAZ 2106 engine. Engine tuning must be carried out taking into account the complete coordination of the new parts with each other, otherwise the replacement will not lead to the desired result, but will only cause disappointment.
Many things can be done yourself - this will reduce the cost of conversion and give you the right to say that you did everything yourself. But such tuning of the VAZ 2106 engine with your own hands can only be done by a limited circle of motorists, so do not hesitate to contact them for those works where accuracy is important.
Expansion of fuel supply channels
When converting the lower part of the engine, you should not ignore the camshaft and valves. The power of the motor directly depends on the quality operation of this unit. For a more productive supply of the fuel mixture, it is necessary to expand and polish the channels through which it flows.
First, the intake manifold is bored, then the supply channels in the cylinder head itself are bored. As you bore deeper into the head, it will be necessary to cut off the guide pins and polish the channel. After carrying out this procedure with all channels, it is necessary to polish the supply line from the valve seat side.
Assembly of connecting rod and piston group
To assemble the connecting rod with the piston, you need to match the piston pin to the bushings of the upper head of the connecting rod and the piston bosses. To connect to the connecting rod, the piston is heated in oil or in an electric heater to a temperature of 55 °C. In this case, the finger should enter smoothly into the hole of the heated piston boss using the force of the thumb of the right hand. In such a connection, after cooling the piston, the required interference of 0.0025 ... 0.0075 mm appears.
Then you need to check the serial numbers of the pistons and connecting rods. The connecting rod is secured in a vice, the piston is installed, and their connection is fixed with a finger. When assembling the piston with the connecting rod, it must be installed so that the mark on the piston bottom is directed towards the front of the engine. The boss stamped on the connecting rod for the left bank of cylinders should also be directed towards the front of the engine, i.e. in one direction with the mark on the piston. For the right group of cylinders, when assembling the piston with the connecting rod, the connecting rod boss should be directed towards the rear of the engine, and the mark on the piston crown should be directed towards the front.
After connecting and checking the connecting rod-piston group, you should secure the pin in the piston bosses with retaining rings, then carefully wipe the piston rings selected along the grooves and fitted to the cylinders and install them on the pistons using a special device. The pistons and connecting rod assembly must be checked for weight. Parts of a kit installed on one engine should not differ in weight by more than 12 g, i.e. The connecting rods must correspond in weight to one group. To install pistons with connecting rods into the cylinders of the block, you need to perform the following operations:
- turn the engine block, install it vertically on the stand, with the front part up;
- sequentially, one after another, take the pistons and connecting rods assemblies;
- thoroughly wipe the bed under the liners in the lower head of the connecting rod with a napkin;
- unscrew the nuts and remove the connecting rod cover;
- install the connecting rod with the piston.
In this case, it is recommended to put special caps made of brass or copper on the connecting rod bolts, which protect the cylinder liner mirror from damage.
Then you need to check and blow out the hole in the lower head of the connecting rod, which serves to spray oil onto the cylinder walls, insert the liners into the connecting rod and into the cover, wipe the upper connecting rod liners and the piston with a napkin, install the rings on the piston, placing the internal groove upward, move the joints of the compression rings apart piston circumference by approximately 120°. After installation, separate the joints of the compression rings by 180°.
Next, wipe the cylinder liners of the block and the connecting rod journal with a napkin, lubricate the surface of the connecting rod bearing, piston, piston rings and cylinder liners with clean oil used for the engine, insert the piston with the connecting rod into the cylinder, pointing the mark on the bottom of the piston to the front of the engine using a special fixtures, bring the connecting rod bearings to the crankshaft journal, moving the piston along the cylinder using a wooden mandrel, lubricate the shaft journal with oil and tighten the lower head to it, remove the safety tips from the connecting rod bolts and replace the lower connecting rod cover, securing it with connecting rod nuts.
Before completing assembly, you need to check the total axial clearance between the ends of the connecting rods and the crankpin of the crankshaft using a feeler gauge and finally tighten the connecting rod bearing bolts with a torque wrench. After tightening each pair of connecting rod bearings, rotate the crankshaft. The rotation torque of the shaft with correctly selected radial clearances in the bearings should be no more than 100 Nm. Similar operations must be carried out when installing the remaining pistons with connecting rods into the cylinders.
Selection of piston for cylinder VAZ 2107 Zhiguli
- Repair manuals
- Repair manual for VAZ 2107 (Zhiguli) 1982+.
- Selection of piston to cylinder
The calculated gap between the piston and cylinder (for new parts) is 0.05–0.07 mm. It is determined by measuring the cylinders and pistons and is ensured by installing pistons of the same class as the cylinders. The maximum permissible gap (if parts are worn) is 0.15 mm.
| Rice. 3–25. Main dimensions of piston, connecting rod, piston pin and piston rings |
| NOTE The piston diameter is measured in a plane perpendicular to the piston pin, at a distance of 52.4 mm from the piston crown (see ). According to the outer diameter, the pistons are divided into five classes (A, B, C, D, E) every 0.01 mm, and according to the diameter of the piston pin hole - into three categories every 0.004 mm. The piston class (letter) and the piston pin hole category (number) are stamped on the piston bottom |
If a used engine has a gap exceeding 0.15 mm, then it is necessary to re-select the pistons to the cylinders so that the gap is as close as possible to the calculated one.
Spare parts include pistons of classes A, C, E. These classes are sufficient to select a piston for any cylinder, since pistons and cylinders are divided into classes with some overlapping sizes.
↓ Comments ↓
1. Vehicle operation and maintenance
1.0 Operation and maintenance of the vehicle 1.1. Vehicle operation 1.2 Vehicle maintenance
2. General information
2.0 General data 2.1 Technical characteristics of vehicles 2.2 Controls and monitoring devices 2.3. Ventilation control and interior heating
3. Engine
3.0 Engine 3.1 Removal and installation of the engine 3.2 Disassembling the engine 3.3 Possible engine malfunctions, their causes and methods of elimination 3.4 Engine assembly 3.5 Bench tests of the engine 3.6 Checking the engine on a car 3.7. Cylinder block 3.8. Pistons and connecting rods 3.9. Crankshaft and flywheel 3.10. Cylinder head and valve mechanism 3.11. Camshaft and its drive 3.12. Cooling system 3.13. Lubrication system 3.14. Supply system
4. Transmission
4.0 Transmission 4.1. Clutch 4.2. Gearbox 4.3. Cardan transmission 4.4. Rear axle
5. Chassis
5.0 Chassis 5.1. Front suspension 5.2. Rear suspension 5.3. Shock absorbers
6. Steering
6.0 Steering 6.1. Inspection, check and adjustment of steering 6.2. Steering mechanism 6.3. Steering rods and ball joints 6.4. Swing arm bracket
7. Brakes
7.0 Brakes 7.1. Checking and adjusting the brakes 7.2 Possible malfunctions of the brakes, their causes and methods of elimination 7.3 Bracket for the clutch and brake pedals 7.4. Vacuum booster 7.5. Brake master cylinder 7.6. Front brakes 7.7. Rear brakes 7.8. Rear brake pressure regulator 7.9. Parking brake
8. Electrical equipment
8.0 Electrical equipment 8.1 Electrical equipment diagram 8.2. Battery 8.3. Generator 8.4. Starter 8.5. Ignition system 8.6. Lighting and light signaling 8.7. Sound signals 8.8. Windshield cleaner 8.9 Headlight cleaner 8.10. Heater electric motor 8.12. Control devices
9. Body
9.0 Body 9.1. Doors 9.2 Possible body malfunctions, their causes and methods of elimination 9.3. Hood, trunk lid, bumpers 9.4. Body glazing 9.5. Windshield and headlight glass washers 9.6. Instrument panel 9.7. Seats 9.8. Heater and ventilation of the body interior 9.9. Body frame repair 9.10. Paint and varnish coatings 9.11. Anti-corrosion protection of the body
10. Modification and equipment of VAZ-2107 cars
10.0 Modification and equipment of VAZ-2107 vehicles 10.1. Car VAZ-21072 10.2 Car VAZ-21074 10.3. Car VAZ-21073-40
11. Applications
11.0 Appendices 11.1 Appendix 1. Tightening torques for threaded connections* 11.2 Appendix 2. Tools for repair and maintenance* 11.3 Appendix 3. Used fuels and lubricants and operating fluids 11.4 Appendix 4. Basic data for adjustment and control 11.5 Scheme
What you need to know about VAZ piston rings
Passenger cars are equipped with different types of engines; power units may differ in volume, power, and design.
- 1 Engine piston rings
- 2 Thermal clearance of piston rings
- 3 VAZ piston rings
- 4 Signs and causes of wear (breakage) of piston rings
- 5 Piston ring sizes: table (VAZ)
- 6 Replacing piston rings
- 7 Decarbonization of piston rings 7.1 Related articles: