Characteristics
| engine's type | petrol |
| Power | 135 - 170 hp (99 - 125 kW) |
| Torque | 195 Nm |
| Volume | 2.0 L (1988 cc) |
| Design | in-line |
| Fuel type | petrol |
| Fuel mixture | Intake manifold/Carburetor injection |
| Supply system | suction device |
| timing belt | DOHC |
| Timing drive | Toothed belt |
| Cooling type | liquid |
| Compression | 10 : 1 |
| Cylinder diameter | 75 mm |
| Piston stroke | 75 mm |
| Number of cylinders | 6 |
| Number of crankshaft bearings | 7 |
| Number of valves | 24 |
Service schedule 1G FE 2.0 l135 l. With.
The following intervals for replacing consumables are provided for the 1G FE engine:
Replacing the 1G FE belt
The first version (1988 - 1998) is considered more reliable, the second version (1998 - 2005) is economical, high-torque and torquey. In rear-wheel drive cars, with filter replacement, you will need 4.0 liters of SJ/SL class lubricant exactly, and in all-wheel drive cars, 4.2 liters of 5W20, 5W30, 10W30 oil.
In the DIS-6 ignition system (since 1998), spark plugs, all other things being equal, will last longer than 30 thousand km instead of 20.
Replacing the timing belt with 1g-fe (toyota crown). how to change a timing belt with your own hands
Car: Toyota Crown Engine: 1G-FE Manufacture: 1994 Vehicle mileage: 98.486 km
The 1G model engine available on the Toyota Crown car is also equipped in cars such as Toyota Mark II, Toyota Cresta, Toyota Chaser. And so let's get started. Disconnect the negative terminal from the battery. We remove the air duct and, accordingly, the air filter.
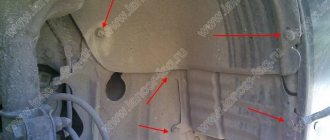
Remove the retainer from the fan casing. In the photo, the lock is marked with a white arrow. The next steps are to remove the protection from the bottom of the car. The arrows in the photo indicate the mounting bolts that need to be unscrewed.
View of the bottom without protection. The arrow in the photo points to the radiator drain. If you twist the drain plug from the radiator, all the antifreeze or antifreeze will flow out of it. Place a bucket or other container under the radiator if you want to drain the coolant from it. Draining the liquid from the radiator is done so that when dismantling the hose of the cooling system outlet pipe, you are not flooded with this liquid.
Next you need to remove the fan shroud. You must first remove the hose of the car cooling system outlet pipe. Mark an arrow on the hose to indicate one of the ends. This is done so as not to tangle the ends of the hose when you get ready to put it back in place.
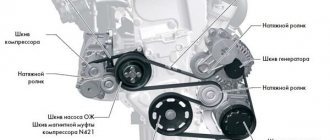
Remove the fan casing. Then you need to remove all the drive belts. Then loosen the impeller thermal coupling bolts. Unscrew the four nuts and remove the impeller from the thermal coupling.
Then, in order to dismantle the generator drive belt, you need to loosen the locking nuts on the generator itself.
The power steering pump is secured at the top and bottom with bolts. If you want to replace the water pump, then there is no way to do it without dismantling the power steering pump.
It will be useful: Ssangyong new actyon gasoline reviews
If you nevertheless decide to drain the antifreeze or antifreeze, then by this time it will already be all glass from the radiator. The photo shows us what the radiator drain valve ring looks like. Why did we get the drain valve? Yes, in order to change this ring on it. If this replacement is not made, then most likely, after we close the valve back, coolant may flow out of it.
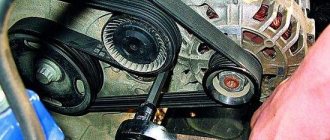
The photo shows when the drive belts are removed. In order to get to the timing belt, we also need to dismantle the cover, which is secured with four bolts. We twist them all.
The photo shows when the drive belts are removed. In order to get to the timing belt, we also need to dismantle the cover, which is secured with four bolts. We twist them all.
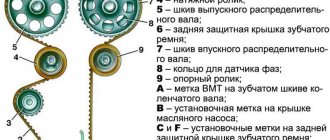
Before you decide to remove the timing belt, rotate the camshaft timing pulley to the top position so that the hole on the pulley star axis aligns with the mark on the bearing, as shown in the photo.
Remove the crankshaft pulley (unscrew the axle mounting bolt). Now remove the timing belt. Before doing this, you can remove the belt guide from the crankshaft timing pulley. If you want the timing belt to be removed quite easily, then you need to loosen the bolt on which the tension roller is attached and move it to the left. It turns out that the timing belt tension will be weakened. Then, put on a new belt. Move the tension roller to the right to adjust the timing accordingly, and tighten it. And repeat all the described operations in reverse order. Just pour antifreeze or antifreeze through the neck of the radiator, there is no need to blow it through the drain hole.
Design Features
The 1GR inline 6-cylinder engine is built on a cylinder block made of gray cast iron. The use of such material made it possible to do without liners; the working surface of the cylinders is the processed metal of the block. Early versions have a 12-valve aluminum cylinder head with 1 camshaft. Later, internal combustion engines began to use a part with 24 valves and 2 shafts to drive the intake and exhaust valves, respectively.
On an early engine with 1 or 2 camshafts, the mechanism is driven by a belt. In 1988, a block head that was reduced in width was developed. The reduction in size was achieved by changing the drive circuit - only 1 shaft rotated from the belt. To drive the other, helical gears were used. Timing marks applied on the camshaft gears allow you to correctly set the valve timing. On all engine modifications except Beams, a broken belt does not damage the valves and pistons.
To supply fuel, distributed injection with an electronic controller (EFI system) is used. The cooling system fan is equipped with a special clutch that turns on when the temperature threshold is exceeded. The ignition system of early modifications includes 3 ignition coils connected to cylinders numbered 1-6, 2-5 and 3-4. Beams engines began to use individual coils located in spark plug wells.
How to change the timing belt on 1G-FE?
. There are so many belts, I don’t understand what needs to be removed, tell me, plz.
Also take the rollers and oil seals for the knees and camshafts and change them right away. and you yourself will change.
Well, there’s only one timing belt, it’s hidden under the cover
Yes, I want it myself. so what is being filmed for?
Once again I am posting the story of the TANKIST. Where is he? Interesting, completely lost in MSC
Well, the timing belt on 1G-FE is generally easy to change.
1) remove the air filter intake pipe.
2) remove the fan casing with the expansion tank by unscrewing two bolts.
3) Loosen the fan impeller bolts
4) remove the attachment drive belts (3 pieces)
5) remove the fan impeller
6) using the tool, unscrew the crankshaft pulley mounting bolt. We made the device by analogy with the VAZ one, the principle is the same. On the pulley there are two diametrically opposite technological holes into which the “whiskers” of the device fit.
the handle of the device rests through the extension on the right spar (because if you are not Hercules, then you won’t have enough strength to hold it)
The bolt is tightened with very great force, so it is advisable to use a “power” head with an extension (since the bolt is quite deep inside the pulley) and a lever.
7) That’s it, as soon as the bolt is broken, then it turns easily
 Using the tool, remove the pulley. This is fundamental; you can remove the pulley without a tool, but it takes a long time and there is a risk of damaging the tracks.
10) Put the pulley back, slightly tightening it. Remove the upper timing belt cover. We put marks on the “pulley - lower timing belt cover” and “camshaft drive gear - camshaft bed”.
It will be useful: Changing the oil in the Mazda 3 2.0 engine
11) Remove the pulley. We unscrew the bolts securing the lower timing belt casing and try not to lose them. We remove the casing.
12) We look at the condition of the rollers (tension and parasitic), but it is most likely or advisable to change them. Loosen the tension roller bolt. Loosen the belt.
13) Remove the timing belt.
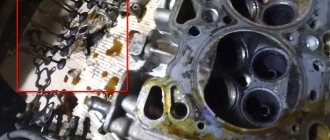
14) Because we have opened access to the front part of the engine; it is advisable (if the mileage is more than 150,000 km) to replace the seals (front crankshaft; oil pump; camshaft seal)
To replace the front crankshaft oil seal, you must remove the timing gear on the crankshaft. Be extra careful. The rear guide collar of this gear is very fragile; if you apply uneven force, you will definitely break or break it. Those. pull carefully.
15) Install a new belt. We control its tension “by eye”.
16) Install the lower timing case. We attach the pulley.
17) Slightly loosen the tension roller and make 3-4 full revolutions of the crankshaft. Try to rotate evenly.
18) Set the marks. In my case, it turned out that the marks were “gone”. They need to be adjusted. To do this, align the marks on the camshaft gear. We will rotate the crankshaft. Loosen the tension roller. We disengage the timing belt from the camshaft gear. Trying to keep the belt under constant tension (so as not to jump on the crankshaft), rotating the crankshaft, we move the belt along the camshaft gear to the required number of teeth (determined experimentally, but usually 1-2 teeth).
19) repeat the procedure again, turning the crankshaft and checking the marks.
20) if the marks are normal. Turn the crankshaft slightly (so that the belt is tensioned) and tighten the tension roller.
21) Reassemble in reverse order. There may be problems with tightening the pulley bolt, because... conventional torque wrenches are not designed for such a force (about 200 N/m)
But we’ll wait as long as we can. Then the bolt will tighten itself during operation.
Passport details
The FE version appeared in 1989. This engine already had a twin-shaft head, 4 valves, coil ignition and a MAP sensor. And in 1992, production of GE was discontinued, and the role of the primary engine in the line of in-line 6-cylinder Toyota engines passed to the 1G FE. Table 1 contains basic information on this engine.
Table 1. Specifications
| Parameter | Meaning | |
| Manufacturer | Toyota Motor Corporation | |
| Version 1G FE and engine type | 1G-FE/petrol | 1G-FE BEAMS/petrol |
| Release period | 1988 - 98 | 1998 - 2005 |
| Cylinder configuration | 6-cylinder in-line (R6) | |
| Volume, l | 2,0 | |
| Compression ratio | 9,6:1 | 10,0:1 |
| Total number of valves | 24 (4×6) | |
| Head Configuration | DOHC, belt drive | DOHC, belt drive + VVTi |
| Cylinder operating order | 1-5-3-6-2-4 | |
| Maximum power, l. With. | 135 (140) at 5600 (5750) rpm | 160 at 6200 rpm |
| Maximum torque, Nm | 180 (185) at 4400 rpm | 200 at 4400 rpm |
| Fuel supply | Multiport injection (EFI) | |
| Ignition system | Distributor | From individual coils (DIS-6) |
| Fuel | Unleaded gasoline with octane rating 92 or 95 | |
| Environmental parameters | – | EURO-3 |
| Unit weight (approximate), kg | 180 | |
| Resource mileage (approximately), thousand km | 300 | |
Note: data in parentheses is for units produced in 1996 - 98.
The maximum consumption in mixed mode, indicated in the passport data of various car models, does not exceed 10 liters per hundred, which, in principle, corresponds to reality.
1G service regulations
Technical characteristics of the Toyota Land Cruiser Prado Toyota Land Cruiser Prado 2.7 AT 163 hp 4WD
The power units of the 1G series were unpretentious, did not require expensive oils and high quality fuel, systematic maintenance of these engines made them indestructible. All the owner had to do was perform the simplest steps described in the manual. The correct selection of oil and its timely replacement are important; the filter element must also be replaced at each oil change.
Thus, the maintenance of this engine should be like this:
Replacing timing belt 1G-FE BEAMS
Review of faults and repair methods
Power plants of the 1G series do not cause any special problems to the owner; basically, all malfunctions appear due to untimely maintenance and wear.
Choosing the right timing belt
Choosing a timing belt, which is the most important element of the engine, is an important and responsible matter. Incorrect selection of a belt according to technical parameters or skimping on quality can lead to serious problems and costly repairs.
If the belt breaks or its teeth are critically worn, there is a high probability that the pistons will hit the valves and bend them. Therefore, when choosing a new timing belt, it is important to adhere to the following recommendations:
- Do not save money and do not buy the cheapest belts
(you can choose the average price). You should especially not save money if the car is operated in extremely harsh conditions. A high-quality, reliable belt will pay for itself many times over.
The best option is to buy the original, which was installed by the engine manufacturer.
For greater reliability when choosing, in order to avoid mistakes in the size and shape of the teeth, it is better to remove the old belt and show it to the seller in the store so that he can select the same one. Particular attention should be paid to the width, length and shape of the belt teeth. If it is not possible to buy the original, select an analogue that is closest in quality and parameters to the original.
The belt should feel smooth and free of roughness to the touch.
, and also should not have small potholes or pores. The belt teeth must be free of sagging, only small burrs are acceptable.
An important property of a timing belt is its elasticity
. The more elastic it is, the longer its service life will be. When purchasing, you can compare the elasticity of several different belts and determine which one is the most “oaky” (hard).
If possible, compare the catalog or article number of the old belt with the numbers on the new product
. They should be on the back (smooth) side of the belt.
A large number of fakes are sold on the automotive spare parts market.
. To protect yourself from purchasing a low-quality part, it is better to buy a belt at retail outlets owned by official dealers. It is also recommended to purchase a complete set: a belt with rollers in one sealed package, with instructions. The most frequently counterfeited products are those from Gates. To check, you can compare the numbers (on the back) of several identical products - the numbers should be different. If the numbers on all products are the same, then you are dealing with a fake.
It will be useful: Lubricating battery terminals - 10 products that can be used to lubricate against oxidation
- Today, online shopping is common, but making the right choice of timing belt over the Internet is very difficult
.
Tuning
The engine design is not suitable for modifications. The only version suitable for tuning is the GTE series engine. A controller is installed on the unit, allowing the boost pressure to be increased to 1.1-1.2 bar. To cool the compressed air, a front radiator is used, mounted in front of the heat exchanger of the cooling system. Increasing the boost requires the use of a more efficient fuel pump and injectors; it also requires replacing the injection control unit with a modernized one.
The maximum power of the modified engines is 300 hp. while preserving the resource and the possibility of everyday use of the car. Further refinement involves the abandonment of 2 compressors in favor of 1 with increased productivity. To ensure performance, it is necessary to install a new piston group, which will reduce the compression ratio. The disadvantage of this modification is the high labor intensity and cost.
Source