Timely replacement of the timing belt on a Mitsubishi Lancer 9 with a 1.6 liter engine is one of the most important maintenance operations for the power unit of this vehicle.
The peculiarity of the model is that the engine here is “plug-in”. This term means that if the timing belt breaks, the pistons collide with the valves, causing the latter to bend.
Motors on which the valve bends are found on various brands and models of cars, including the Mitsubishi Lancer 9 with a 1.6-liter power unit, which will be discussed below.
Replacement frequency
In order to prevent the Lancer 9 from breaking the timing drive and subsequent serious and expensive repairs, the belt should be replaced every 90 thousand km (according to the recommendation of the car manufacturer). But in reality, it is better not to reach such a mileage and change the drive a little earlier - at 70-80 thousand km.
We also note that you should not rely on the high quality of the belt and be sure that it will serve the required period, and periodically inspect it.
Delamination, small cracks, severe wear of the teeth, traces of leaks of technical fluids on the drive surface are reasons for premature replacement, since a belt with such damage can break at any time.
We select replacement parts
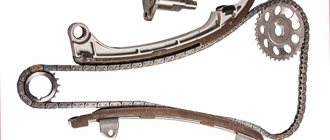
Along with the timing belt on the Mitsubishi Lancer 9 1.6, the tension roller must also be replaced, so you also need to purchase it. You can choose both original spare parts and their analogues.
Original for Lancer 9 are Mitsubishi belts with indexes MD342154 and 1145A051.
Analogs for them are consumables:
- Gates (5535XS);
- Contitech(CT1008);
- Sun (A343YU100).
As for the roller, the original spare part bears the Mitsubishi MD356509 index.
As an analogue, you can use NTN JPU57-008A-4 or NEP57008A6 rollers.
It is also worth noting one fact - the automaker Mitsubishi does not produce consumables - rollers and belts - on its own. Because of this, a situation often occurs that a car owner orders an original, and receives analogues - a Sun belt and an NTN roller.
In fact, these spare parts are original - they are what the automaker installs on engines from the factory, so it doesn’t make much sense to look for parts with only the Mitsubishi label, and you can safely install Sun and NTN products on your car.
How to tighten the timing belt on Mitsubishi Lancer 9 and 10
There are dozens of components in the engine of any car. Each of them is needed for a specific purpose. One of the extremely important parts that ensure the correct operation of the engine is the timing belt. This abbreviation stands for gas distribution mechanism. The task of any driver is to ensure that the timing belt tension is sufficient.
What else can be changed together with the timing drive?
In the process of replacing the timing belt on a Mitsubishi Lancer 9 1.6, you have access to a number of other consumables and components, which allows you to change them at the same time, rather than dividing the work into two separate stages.
So, while servicing the timing drive, you can simultaneously replace:
- cooling system pump;
- drive belts for engine attachments (generator, power steering);
- crankshaft and camshaft oil seals;
- crankshaft sensor (if necessary).
But these elements can be replaced every second time when replacing the timing belt. That is, we install only a new timing belt and pulley once, and at the next replacement we also install the above-mentioned spare parts, and this is every 140 - 180 thousand km. mileage
The situation with the selection of attachment belts is the same as with the timing drive - there are both original consumables and their analogues.
Original consumables should be looked for by the following indices - Mitsubishi MD375935 (power steering) and MN183019 (generator).
As for analogues, for replacement you can purchase belts from two companies - Mitsuboshi (5PK1065 - power steering, 5PK905 - generator), and Gates (5PK1063 - power steering, 5PK903 - generator).
How to replace the timing belt on a Mitsubishi Lancer 9 1.6 with your own hands
Engine bolt tightening torques
M8 - 17 - 25 Nm
Further in the photo report, see more detailed instructions on how to remove/change the belts of attached units (generator and power steering), as well as the timing belt and its rollers on Lancer 9.
Let's get started with replacing the timing belt on the MITSUBISHI Lancer IX 1.6 .
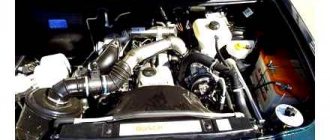
On this car, under the hood, near the timing drive there is a lot of hose and wires, but they do not interfere with replacing the timing belt and pulley. Therefore, there is no need to remove anything additional.
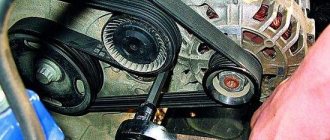
Let's start removing the drive belts. The power steering belt is tensioned by the power steering . First, unscrew the power steering bolts indicated by the side arrows. 12 mm wrench And then we unscrew, using the same key, the power steering , indicated by the bottom arrow. Having loosened the belt tension, we pull out the belt itself.
We remove the generator drive belt by unscrewing the central bolt of the generator tension bar ( 14 mm ) and unscrewing the tension bolt ( 12 mm ), loosening the belt tension.
But before removing the belt, we recommend loosening the bolts securing the water pump pulley. For this we use a 10 mm wrench.
Remove the generator belt and unscrew the pump pulley.
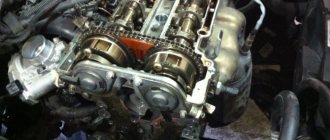
Before moving on to disassembling the car from the wheel side, remove the upper timing belt casing. Unscrew the two casing mounting bolts using a 10 mm .
And one more bolt, near the engine mount, on the left.
And remove the upper timing case . Having removed it, we move down the car. We jack up the wheel or put the car on a lift.
Using a wheel wrench or a 17mm socket, unscrew the bolts and remove the wheel.
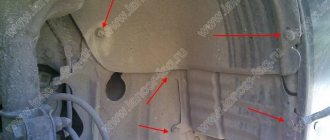
Behind the wheel we see a side engine guard that protects the engine belt drive from dirt. We remove it by unscrewing the two upper mounting bolts using a 12mm wrench. And pulling out, using a screwdriver or a special puller, three fastening pistons.
It is also necessary to remove another piston securing the lower protection to the side protection.
After removing all the fasteners, pull out the side protection, freeing access to the engine. And we continue to get to the timing .
Using a pneumatic impact wrench and a 19 mm , unscrew the central bolt that holds the crankshaft pulley. If there is no impact wrench, then you need to figure out how to stop the engine. We can offer two options. The first and easiest way is for an assistant to get into the car, engage fifth or fourth gear at the gearbox and press the brake pedal. The second way is to get to the flywheel and insert something between the flywheel teeth, for example a screwdriver.
Having unscrewed and removed the crankshaft pulley, we proceed to unscrew the bolts securing the lower protective casing of the timing . 10 mm wrench .
After unscrewing the fasteners, pull out the lower belt protection.
Next we need to remove the engine mount. To begin, we unscrew the pillow from the car body using a 14 mm .
Next, we need to place a support under the engine. In order not to remove the lower engine protection, we installed a piece of wooden board between the protection and the engine pan.
Having propped up the engine, you can safely unscrew the cushion from the engine bracket. We unscrew the three fastening nuts, also using a 14 mm . And remove the pillow.
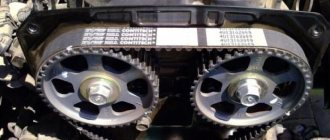
Next we need to set the engine according to the marks. We screw the central bolt into the crankshaft to make it convenient to crank the engine.
We turn the engine until the key on the crankshaft sprocket aligns with the protrusion on the front engine cover.
And the camshaft star mark should stop opposite the mark on the cylinder head.
We also recommend using a corrector to set your marks on the camshaft and crankshaft sprockets, relative to the timing .
After installing the engine according to the marks and setting your marks, you can safely proceed to removing the timing belt and pulley . 12 mm wrench, unscrew the central bolt securing the tension roller and remove it.
Tools
Replacing the timing belt on a 9th generation Mitsubishi Lancer with a 1.6 liter engine is an operation of average complexity, but it can be done in a garage.
To carry it out, you don’t need any special tools or devices; it’s enough to have:
- A set of open-end wrenches (required - 10, 12, 19);
- Set of heads and cranks with ratchet mechanism;
- Pliers;
- Rags;
- Marker (crayon);
- Jack;
- Time and patience.
To carry out the work, it is not necessary to have an inspection hole; everything can be done by placing the car on a flat area with a hard surface. It is also better to perform the replacement with an assistant.
About the car
The Mitsubishi Lancer 9 first rolled off the assembly line in 1973. At first there were 12 modifications with engine capacities from 1.2 to 1.6 liters. In the 70s, Lancer 9 was produced with a coupe body. Then the car began to be produced with four doors and engines of 1.6 and 1.8 liters.
Lancer 9 is the ninth generation and, under an agreement with Mitsubishi, it was produced in our country from 2007 to 2015. Over 8 years, 145 thousand copies of the model were sold in our country at a price starting at 760 thousand rubles.
Work technology
Algorithm of actions:
- Remove the power steering drive belt. To do this, loosen 3 fastening bolts (you can get to two of them through the technological holes in the pulley), and then unscrew the adjusting bolt, after which the power steering pump will move, which will allow you to remove the belt;
- Jack up the front of the car on the right side (in the direction of travel), remove the wheel;
- Remove the protective cover on the fender liner to gain access to the crankshaft pulley;
- We dismantle the generator drive. Loosen the bolt securing the unit to the engine (located at the bottom of the generator) and the adjusting bolt lock. Then unscrew the adjusting bolt a little and remove it from the bracket. We feed the generator towards the engine and remove the belt;
- Unscrew the bolt securing the pulley to the pump and remove it;
- We dismantle the crankshaft pulley. To do this, ask the assistant to turn on the 5th gear at the gearbox and hold down the brake pedal, thus stopping the engine, which will allow you to tear off the pulley mounting bolt;
- Unscrew the 3 mounting bolts of the upper protective cover of the timing drive and remove it;
- We dismantle the lower timing cover by unscrewing its 5 fasteners;
- We set marks on the crankshaft and timing belt. To do this, turn on the 5th speed at the gearbox, put the wheel on the hub, and turning it, align the marks with the special ridges on the engine. We make sure that the marks on the knees and camshafts coincide with the sagging marks;
- Using pliers, remove the end of the roller tension spring from the groove and remove it. We unscrew the bolt securing the roller and dismantle it. After this, turning the crankshafts and timing gear is strictly prohibited, so as not to displace the marks;
- We install a stop (a wooden beam of suitable height) under the power unit;
- Unscrew the motor mount (mount). Moreover, you should unscrew its fasteners both to the body and to the engine. Remove the support;
- We unscrew the bolts of the jumper installed between the landing pad of the engine support and the power steering pump. Don’t forget to lubricate the contacts with graphite grease;
- Remove the timing belt;
- Install a new roller and secure it with a bolt;
- We put on a new belt, correctly placing it behind the roller;
- Install the tension spring.
After this, we check that the marks match correctly. To do this, after installing the new belt and tensioning it with a roller, turn on 5th gear again and install the wheel.
When turning the wheel, we make two revolutions of the crankshaft, align it with the mark and see if it coincides with the influx on the camshaft.
You can turn the gear off with the key.
If the location of the marks is not violated, we assemble the power unit in the reverse order. For convenience and correct assembly, it is advisable to mark some elements and parts with a marker or chalk during disassembly.
How to tighten the alternator belt on Lancer 9 and 10
As mentioned earlier, the car owner should check the belt tension. But what if you find that it does not have the necessary tension? Then you should tighten the belt. Many motorists believe that this is a complex and labor-intensive process that only specialized car service workers can handle.
If you have the necessary tools and sufficiently detailed instructions, you can personally solve this problem in your garage. You will need a 17mm wrench (or a 17mm socket wrench), as well as a wrench-shaped design with two pins that can be used to turn the top gear.
The instructions contain the following points:
1. Remove the belt from the camshaft, then align each shaft according to the marked marks.
2. Always start from the right side when putting the belt on the top gear. Pull the belt and place it over the teeth. Don't forget to place the belt behind the roller.
3. If the belt does not hit the teeth, you can turn the gear a little. Since the engine will not start, tighten the timing belt. This is necessary so that it does not slip on the crankshaft.
4. Take a wrench with two pins, insert them into the corresponding holes in the camshaft, and then manually make a full revolution of the shaft. Make sure that the marks are installed correctly after this.
5. Place marks on the flywheel. Then inspect the position of the marks on the camshaft. If they deviate by one or two teeth, remove the belt itself, and then rotate the gear to the desired position. Then repeat all steps starting from step 2.
6. Afterwards you need to loosen the belt. Unscrew the nut on the roller a little.
7. Holding the roller with a key, press the belt to the left on the right side. It should go one centimeter to the side.
8. Once you have moved the belt to the left side, loosen the roller a little and tighten the bolt.
This technique will save you several thousand on car service. Anyone can tighten a timing belt. The main thing is to strictly follow the instructions and also have patience. Correct tension will prevent increased wear of the teeth and loosening of the roller stud.