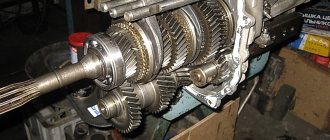
Gearbox disassembly
Elimination of individual gearbox defects involves its partial or complete disassembly. When disassembling, perform the following basic operations:
- disconnect the compressor (if equipped) from the gearbox housing;
- remove the top cover with the gear shift mechanism;
- unscrew the bolts, remove the front cover and remove the drive shaft with the bearing;
- unscrew the back cover and remove the driven shaft with the bearing;
- remove the driven shaft gears, axle and reverse fork from the gearbox housing;
- remove the locking plate of the reverse axle and the intermediate shaft axle and knock out the axles (for ZIS-5 and ZIS-150 cars, unscrew the intermediate shaft bearing caps);
- remove the reverse gears and the intermediate shaft or gear block from the crankcase.
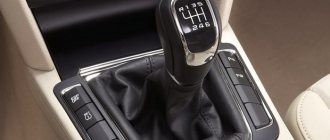
Manual transmission - features
Many owners of cars with manual transmission claim that manual transmission allows you to better feel the car and the road surface. And this is not the only advantage of this type of transmission.
Pros of a manual transmission:
- optimally high maneuverability;
- does not require frequent oil changes;
- fuel demand control;
- simplicity of design, unpretentiousness of maintenance and service;
- economical fuel consumption, even in urban driving;
- the ability to drift;
- the ability to tow a car;
- ability to drive at maximum engine speed.
There is a myth that manual transmissions break down more often than automatic transmissions or robots. This statement is unfounded and incorrect, since the mechanical design is highly reliable. A manual transmission can withstand a load 1.5 times greater than an automatic transmission. At the same time, repairing gearboxes is cheaper and gives long-term results.
Our workshop has been repairing manual transmissions for many years. Using innovative equipment, we provide conservative transmission “treatment” at no extra cost. While most competitors advise replacing the box completely. Despite the increased complexity of repairs, we try to preserve the “original” transmission. Which has a positive effect not only on the technical condition of the car, but also on saving your money.
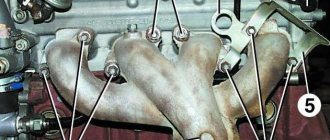
Repair of gear teeth, splines and shafts
Gear teeth are subject to normal wear as a result of friction, and accelerated wear as a result of improper shock shifting, incomplete tooth engagement, jerking or poor quality lubrication. In this case, the teeth chip, chip, and sometimes break.
The condition of the teeth is controlled by external inspection, a template, or measuring the thickness of their teeth with a caliper along the initial circumference of the gear.
Gear teeth that have burrs and small wear are cleaned with abrasive stones (stone). Gears with chipped or broken teeth are replaced with new ones. To obtain proper tooth engagement, the mating gears (pair) must be replaced at the same time. Replacing one gear is allowed when installing not a new one, but an already working gear, which, due to its wear and tear, can be allowed for further use.
If necessary, worn and chipped teeth can be restored by metal surfacing followed by thermal and mechanical treatment. Surfacing of teeth by gas welding is carried out with sormite No. 2 (hard alloy) or rods made from discarded connecting rod bolts and valve springs.
Rice. Installation of gears when surfacing teeth: a - when surfacing the end surface; b - when surfacing the side surface.
When surfacing the end surface of the teeth, the following operations are performed:
- Place the gear in a bath of water so that the teeth are immersed in water 1/3-1/2 of their length (Fig. a).
- Heat the surface of the tooth with an acetylene-oxygen torch until it sweats (without bringing the metal to melting), apply flux (borax) and apply sormite in drops until the worn part of the tooth is filled. After surfacing all worn surfaces, the gear is left in the bath until it cools. When surfacing rods from connecting rod bolts and valve springs, the teeth are hardened by lowering the gear into a bath. Clean the deposited teeth with an abrasive stone.
- When surfacing the side surface of the teeth, the gear is placed in a bath of water on the rod vertically (Fig. b) and the second tooth is deposited, counting from the surface of the water. When the deposited tooth has cooled to a cherry color, it is immersed in water by turning the gear, then the next tooth is deposited, etc.
After surfacing of all teeth is completed, they are cleaned. Worn gear splines are rarely repaired, since gears are usually rejected earlier due to tooth wear. Splines can also be repaired by welding metal. Worn splines on shafts are sometimes restored by expansion followed by machining. In addition to worn splines, transmission shafts may be bent and the ball and roller bearing seats may be worn.
The shaft is checked for runout using an indicator in the centers of the lathe.
A bent shaft is straightened without heating under a press.
Worn seating areas of bearings on shafts are restored by surfacing metal by welding, chrome plating, metallization or grinding of journals, followed by pressing on steel bushings.
Common problems with gearbox operation
Although such a unit can last up to 250 thousand kilometers, breakdowns often occur much earlier than planned. Malfunctions may be associated with accelerated wear due to untimely oil changes
, aggressive driving style, incorrect gear shifting, and other factors. Manual transmission does not like driving with slipping, increased mechanical loads on parts when driving on broken and dirty roads.
Transmission repair
may be required for the following common reasons:
- Bearing wear. Most often, the input shaft bearing fails; its problems can be detected by a characteristic hum.
- Wear of shafts, gears and other components. Part surfaces are damaged more quickly when contaminated or low-quality oil is used. The problem in the initial stages is often manifested by extraneous sounds in the gearbox.
- Worn seals, which leads to oil leakage.
- Damage to the linkage, resulting in problems with gear shifting.
- Knockout of gear due to wear of gear teeth and other reasons. In case of such malfunctions, it is necessary to seek professional help as soon as possible in order to prevent a decrease in the car’s controllability.
Order from our workshop in Moscow
free diagnostics to accurately identify the causes of gearbox malfunctions. After inspection, the repair will be completed as soon as possible.
Gear shift mechanism repair
Defects in the gear shift mechanism parts are:
- bent or worn forks;
- wear of sliders;
- wear of locks and stoppers;
- gear shift lever wear.
These defects cause spontaneous disengagement of gears, simultaneous engagement of two gears, incomplete engagement of gears and the lever coming out of the fork socket.
When disassembling the gearbox shift mechanism, you must:
- undo the cotter pins and remove the fork mounting bolts;
- remove the slider of the first and second gears, as well as the lock and stopper (the remaining sliders must be in the neutral position);
- remove the reverse slider, stopper and lock;
- remove the third and fourth gear slider and its stopper;
- Unscrew the cap or the locking bolt of the cover and remove the lever with the spring up (GAZ-51 car) or down (ZIS-150 car).
The bent of the fork is determined on a test plate, and it is corrected in a cold state under a press. After straightening and secondary inspection, the fork is carefully inspected and, if cracks are detected, replaced with a new one.
Worn fork cheeks (encompassing the gear carriage) and the socket for the ball end of the gear lever are restored by welding the metal. The deposited areas are processed on a milling machine.
Worn grooves on the slides for stoppers and locks are corrected with an abrasive stone. In this case, it is necessary to ensure that the center of the recess is not displaced.
Worn balls of stoppers and locks, as well as weakened springs, are replaced.
Reasons for difficulty engaging manual transmission gears
The reason for the occurrence of a problem can be either serious or not very serious. Clutch problems are considered to be a particularly important group. The problem could be in the kit itself, or in the release bearing or fork. In the category of cheap factors - a stretched rocker cable, unsmooth running of the bushings at the junction of the cables with the gear shift mechanism, lack of lubrication in the area of the ball mount of the cable.
Each of the reasons has its own nature of occurrence. At the same time, they are subject to classification and are divided precisely according to the circumstances of the manifestation of the problem.
The engine is running - the lever moves tightly, the engine is stopped - the gears change easily
In this state of affairs, car owners prefer to immediately change the clutch assembly + release bearing. It must be recognized that such costs for spare parts and repairs are often not justified - the malfunction does not go away. The right way is to start by adjusting the cable.
The procedure for tightening it varies from car to car, but not significantly. Usually, to make adjustments, it is enough to find a cotter pin on the side of the rocker and remove it. Then take out the central part and carefully move it along the cloves forward. Typically, 5 mm of movement is enough for the comfort of controlling the “mechanics” to resume again.
For your information. A cracked release bearing bracket can also lead to a similar outcome.
The gear shift lever moves either tightly or easily
A distinctive feature of this case is the fact that indistinct gear shifting is observed both with the engine running and with the engine stopped. In general, this is a sure sign that there is no lubrication in the shift mechanism hinge to which the rocker cable is attached.
The treatment method is universal - lubricate the hinge with WD-40. Everyone has their own technology for applying lubricant. If the design allows you to gain direct access to the hinge (open the lid, etc.), then you don’t need to invent anything - just attach the extension included in the kit to the WD-40 canister and direct a stream of lubricant directly into the hinge.
On some cars, the hinge is packaged in a rubber boot and there is no direct access. In this case, lubrication is done with a syringe. The procedure is as follows:
- Remove the pusher from the syringe.
- Pour WD-40 into the syringe.
- Return the pusher to its place.
- Holding the syringe with the needle up, insert the needle between the cable jacket and the ball mount in the engine compartment.
- Lubricate the hinge.
The method for solving the problem under these circumstances has been tested on more than one car and helps out instantly. The free play of the gear shift lever returns literally five minutes after the end of the treatment procedure.
Stiff gear shifting is observed only on a hot engine (a few minutes after starting to move)
New cars are often affected by this disease. There is only one reason - the tight movement of the bushings on the gear shift mechanism, to which the rocker cables are attached. The fact is that when choosing a bushing material, automakers often move away from metal in favor of fluoroplastic or even plastic.
The properties of the replacement material vary from batch to batch. In fact, it turns out that certain bushings expand longer than expected, take up the entire gap in the hinge and the movement becomes especially tight. When cooled, the bushings compress, the clearance returns and gear shifting becomes easy.
You can put up with this, or fix it yourself:
- Disconnect the cables from the shift mechanism.
- Remove the bushings and lightly sand them with sandpaper to remove carbon deposits.
- When reassembling, treat the hinge with graphite lubricant.
Gearbox assembly and testing
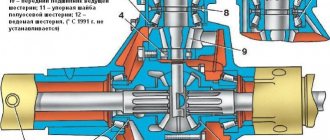
Rice. GAZ-51 car gearbox: 1 - spacer sleeve; 2 and 6 - cylindrical roller bearing; 3 — gear block axis; 4 - drive shaft; 5 — drive shaft bearing cover; 7 — rear cover of the driven shaft; 3 - driven shaft; 9 - flange; 10 — speedometer gear; 11 — ball bearing; 12 — locking plate; 13 — carriage with reverse gears.
When assembling a four-speed gearbox (GAZ-51 car), you must:
- lower the carriage with reverse gears 13 into the box housing and insert its axle;
- install cylindrical roller bearing 2, spacer sleeve 1 and a second cylindrical roller bearing into the gear block;
- lower the gear block into the crankcase, pass axis 3 of the gear block and secure it with locking plate 12 together with the reverse axis;
- Press a ball bearing onto drive shaft 4 and secure it with a retaining ring;
- insert the bearing thrust ring into the crankcase socket and install the drive shaft;
- put the bearing cover 5 with a gasket on the drive shaft and bolt it to the crankcase;
- install a cylindrical roller bearing 6 into the groove of the drive shaft and insert the driven shaft 8, on the front end of which put a thrust ring, and on the rear end - a thrust ring, an oil deflector, a ball bearing 11 and a speedometer gear 10; when installing the driven shaft, carriages with gears of the first and second, third and fourth gears should be put on it at the same time;
- install the gasket and screw the rear cover 7 of the driven shaft;
- Assemble the gear shift mechanism (in the reverse order of disassembly), install the cover with the gasket on the crankcase, inserting the forks into the corresponding gear carriages, and screw it to the crankcase.
Rice. Gearbox of the ZIS-150 car: 1 - power take-off gear hatch; 2 and 7 - nuts; 3 - thrust washer; 4 and 6 — lock washers; 5 — power take-off gear; 8 — fourth gear gear; 9 — clutch for easy engagement of fourth and fifth gears; 10 — fifth gear gear; 11 — third gear gear; 12 — second gear gear with internal teeth for third gear; 13 — first gear and reverse gear; 14 — thrust ring of the ball bearing; 15 — speedometer gear; 16 — cylindrical roller bearings; 17 — reverse gear block; 18 — hatch of the reverse gear unit.
When assembling a five-speed gearbox of a ZIS-150 car, you need to:
- install keys into the grooves of the intermediate shaft and press in the gears of the third and fifth gears, the gear for the power take-off and the gear of constant engagement with the drive shaft (the gears of the first, second and reverse gears are forged with the shaft);
- put thrust washer 3, cylindrical roller bearing, lock washer 4 on the front end of the intermediate shaft, tighten nut 2 and bend the washer onto the nut;
- install the outer ring of the roller bearing into the crankcase;
- lower the intermediate shaft into the crankcase, press a ball bearing with a thrust ring onto the rear end, put on the lock washer, screw in the nut and bend the washer onto it;
- lift the intermediate shaft, install it in the crankcase sockets and screw on the covers with gaskets;
- install two cylindrical roller bearings 16 into the reverse gear block 17, insert the block from the left side through hatch 18 into the crankcase with the larger gear forward and pass the axle, which is secured with a locking plate with a bolt; screw the hatch cover;
- press a ball bearing with a thrust ring 14 and a speedometer gear 15 onto the rear end of the driven shaft;
- lower the first gear and reverse gear 13, second and third gears 12 into the box housing and pass the driven shaft through them; then put a thrust washer on the shaft, third gear gear 11 (constant mesh) with the rim backwards, insert rollers (42 pcs.) into it, put on the thrust washer, fifth gear gear 10 with a bronze bushing, gear hub, easy engagement clutch 9, lock washer 6, tighten nut 7 and bend the washer onto it. Place a thrust ring and a cylindrical roller bearing on the front journal of the shaft;
- press a ball bearing with a thrust ring onto the drive shaft, put on the lock washer, tighten the nut and bend the washer onto it;
- insert the drive shaft into the crankcase socket, put on the bearing cap with a gasket and screw it in with bolts;
- insert the driven shaft into the groove of the drive shaft and bolt the rear cover with the gasket;
- Assemble the gear shift mechanism, install the cover with the gasket on the gearbox housing, insert the forks into the gear carriages and screw the cover.
Running in the gearbox
After repairing the parts and assembling the gearbox, it is run in on a stand to break in the parts and to determine the ease of gear shifting, the absence of noise, knocking, heating and oil leakage.
The running-in procedure is as follows:
- Install the gearbox on the stand, tell the drive shaft 1200-1500 rpm and change gears, working in each gear for 2-3 minutes.
- Fill the gearbox housing with oil to the normal level and check the operation of the gearbox in all gears under load for 30-40 minutes.
- After eliminating the identified defects, replace the lubricant and flush the crankcase with kerosene.
Gearbox replacement
In some cases, a complete overhaul of a worn-out gearbox will require too much expense; it is more profitable to buy a gearbox
and replace it completely. You can purchase a new or refurbished gearbox from us to eliminate all problems and guarantee trouble-free further operation.
On sale at a bargain price
New and
used
gearboxes are presented: purchasing remanufactured parts will reduce
the cost
of repairs. To discuss repair conditions and find out upcoming costs, call the numbers provided.
A specialized service workshop repairs a manual transmission
. Despite the widespread use of other types of transmission, manual transmission continues to be popular: it is a reliable and easy-to-use unit that allows the car owner to control the car in any driving situation and independently switch the speed mode. Mechanical breakdowns occur as a result of natural wear and tear of parts or due to incorrect actions by the driver: in any case, the unit requires the help of specialists. Book your car for a free diagnostic in our workshop and order qualified repairs.
Questions on the topic
Filter:AllOpenSolvedClosedWaiting for response
What oil should I fill in a Citroen C5 with automatic transmission? OpenUser answered 4 years ago • Gearbox
671 views 1 answer. 1 vote.
Gearbox failure on a Nissan Almera 2008 OpenGrey asked 3 years ago • Gearbox
186 views 0 answer. 0 vote.
How to change the clutch in a 7 DSG gearbox yourself? Answered by User answered 4 years ago • Gearbox
309 views 1 answer. 0 vote.
Why did the Mazda 6 experience shaking (jerking) when starting off in first gear? AnsweredArkady answered 4 years ago • Gearbox
377 views 2nd answer. 0 vote.
Why does the gearbox howl on LADA (VAZ) 2107? AnsweredIlya answered 4 years ago • Gearbox
1491 views 2nd answer. 0 vote.
Ask a Question