Replacing the timing chain and adjusting the phases on the Opel Corsa D (Z12XEP)
In this article we will look in detail at the procedure for replacing the timing chain on an Opel Corsa D, as well as adjusting the valve timing; our engine is a 1.2 liter Z12XEP, but on the 1.4 Z14XEP and Z10XEP everything is the same.
On the Z12XEP somewhere I found the recommended mileage at which the chain needs to be changed is 130,000. But it usually changes when extraneous noise appears, since the work is not cheap. We climbed here for a different reason, the cylinder head gasket had broken, so we left the old chain, but this does not change the essence of the matter, the procedure is the same. Since this is an Opel, here we will need a set of TOREX wrenches and sockets, as well as a standard set of ring wrenches and sockets. Before starting repairs, it is necessary to purchase gaskets for the water pump, valve cover and, of course, a gasket for the timing gear cover, a crankshaft oil seal, the actual timing kit, oil and oil filter, and a great desire to get into it yourself.
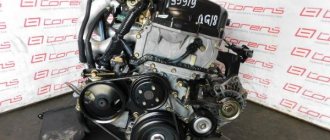
Actually, our car itself looked like this.
Under the hood is a small but powerful 1.2-liter engine. It’s really dirty as a pig, you can immediately see that they’re just looking under the hood to add anti-freeze.
Replacing timing chain Opel Corsa z14xep
On the new generation of Opel engines, the developers gave preference to a chain drive of the gas distribution mechanism rather than a belt drive. In this regard, many car enthusiasts are wondering how and when the timing chain is replaced on an Opel Corsa. These are not idle questions, and we will try to answer them as fully as possible.
It doesn't matter whether you are going to service a 12 or 16 valve engine. Regardless of the type and volume of the power unit installed on your Opel Corsa, the technical regulations determine the chain life at 130,000 km. This is a deadline, exceeding which can cause serious damage. Sometimes, due to malfunctions, this operation has to be performed earlier.
Replacing the timing chain
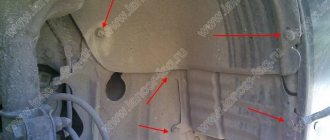
So, first of all, drain the antifreeze and remove the air filter with pipes.
We jack up the engine and unscrew the front cushion, as well as all the connectors and pipes on the front cover and pump. We dismantle the engine mount by unscrewing the three bolts securing it to the cylinder block.
We release the automatic tensioner. Using the E14 head, we turn it clockwise by the bolt, thereby loosening the belt.
We fix the tensioner with a suitable drill or nail. Shown on removed part.
It should look something like this. Unscrew the three bolts of the coolant pump pulley.
And remove it by unscrewing nine bolts. The main thing is to remember where the long bolts were and where the short bolts were, so that there would be no trouble during assembly.
We remove the tensioner by unscrewing two bolts and unscrewing six crankshaft pulleys.
Remove the valve cover.
Set the top dead center
We turn the crankshaft bolt, always clockwise, so that the slots at the end of the camshafts line up in one line, above the edge of the cylinder head. This will be top dead center.
We insert the camshaft retainer, in our case the forty-fifth corner. If suddenly, when the crankshaft rotates, the slots in the camshafts do not line up and you can’t insert a corner, it means the chain is stretched or the valve timing is off; how to adjust them is described at the end of the article. Then we continue without fixing the camshafts.
The marks on the crankshaft pulley and the front timing cover must match. Shown on the removed parts, as it is not possible to photograph there.
Unscrew the crankshaft pulley bolt and remove the oil pump bushing. I don’t know why, but we still marked the location of the bushing, it’s a habit.
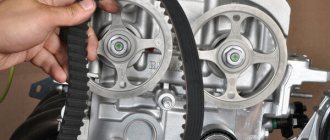
We unscrew the fifteen bolts from the end and four from the bottom securing the timing cover and remove it. We mark the position of the chain, no matter whether you change it or remove it for other reasons like us. These marks will be useful to us in the future. One mark on each camshaft.
Two marks on the crankshaft.
We mark with the usual clerical touch. Then we release the timing chain tensioner. We press the tensioner shoe with our finger until the plunger is completely inserted and fix it with a suitable object with a diameter of two millimeters. Remove the tensioner by unscrewing two bolts.
Then unscrew the two bolts and remove the tensioner. We unscrew the tensioner shoe axle bolt and the three damper bolts and remove them. Then remove the timing chain and cover gasket. The picture should look like this.
We install a new gasket.
To easily install a new chain, we resort to a little trick: lay two chains on top of each other and transfer the marks from the old chain to the new one, so that the number of links between the marks remains the same. Then we install a new chain according to the marks. We put the damper and tensioner with the shoe in place. We remove the clamp from the tensioner and the plunger will tension the chain.
Replacing timing chain Opel Corsa z14xep
On the new generation of Opel engines, the developers gave preference to a chain drive of the gas distribution mechanism rather than a belt drive. In this regard, many car enthusiasts are wondering how and when the timing chain is replaced on an Opel Corsa. These are not idle questions, and we will try to answer them as fully as possible.
It doesn't matter whether you are going to service a 12 or 16 valve engine. Regardless of the type and volume of the power unit installed on your Opel Corsa, the technical regulations determine the chain life at 130,000 km. This is a deadline, exceeding which can cause serious damage. Sometimes, due to malfunctions, this operation has to be performed earlier.
Phase adjustment
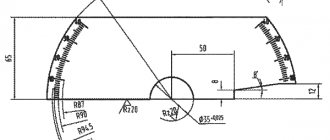
First, we check the crankshaft mark and unscrew the plug from the timing cover, it is marked with a square in the photo above where the tightening sequence is shown. Using a suitable thin object, we press the tensioner shoe through the chain until the tensioner plunger is sunk to the maximum and insert our clamp with a diameter of two millimeters through the hole in the cover. It will be difficult to get in. We loosen the bolts securing the camshaft sprockets and, turning the camshafts slightly, install a retainer (angle) in their grooves. We remove the tensioner clamp, thereby tensioning the chain. We check the crankshaft mark; if it is gone, return it to its place. After that, we install the master disk according to our protractor so that the beginning of the window is at the “60” mark and tighten the bolts of the camshaft sprockets. We remove the clamps. We turn the crankshaft two turns and check the marks and position of the drive disk. If everything is normal, then install all the removed parts in the reverse order of removal.
We act consistently
Well, it seems like you haven’t forgotten anything? Then let's get started...
- Disconnect the battery.
- Drain the coolant (by unscrewing the lower radiator pipe).
- Very carefully (so as not to damage) we dismantle the air filter housing along with the mass air flow sensor and the inlet pipe.
- The ignition module and spark plugs are out.
- We remove the generator (most likely it will get in the way).
- Remove the valve cover.
- Disconnect all cooling system pipes from the pump.
- We loosen the fastenings of the right (in the direction of the car) engine mount. We jack up the engine and remove the cushion (three bolts to the cylinder block).
- We remove the poly-V belt by using an E14 socket or a spanner to loosen the tensioner (by turning the bolt clockwise).
- The tensioner itself, using a metal rod, nail or drill, must be fixed through the hole in the bracket (at the base of the spring).
- After unscrewing the three bolts, remove the pump pulley.
- Then remove the pump itself. To do this, you will have to unscrew 9 bolts of different lengths, marking and remembering their location (otherwise it will not be possible to assemble).
- Tensioner down - 2 bolts.
- Remove the crankshaft pulley - 6 bolts.
- We take out the oil pump bushing (marking its position).
- Rotating the crankshaft (by the nut, clockwise), set the marks. If everything is correct, then if the marks on the crankshaft and the timing cover coincide, the slots on the rear ends of the camshafts should line up. If this does not happen, then two options are possible:
- The chain is stretched.
- The valve timing adjustment is off.
- In any case, the situation will have to be corrected later, but now continue without fixing the camshafts.
- By inserting a corner or a specially made device into the slots, we fix the camshafts.
- We put a mark on the camshaft sensor rotor so that it does not get erased. It should indicate the interface plane between the valve cover and the timing cover.
- We unscrew the timing cover mounting bolts - 15 from the end and 4 from the bottom. Remove the cover.
- Use a rag to close the gap that has formed, through which foreign objects can get into the oil pan.
- We mark the position of the chain relative to the crankshaft and camshaft.
- Discharge the timing chain tensioner.
- We press our finger on the shoe until the plunger is completely sunk and, using a metal rod with a diameter of 2 mm, fix the plunger. Remove the tensioner (2 bolts).
- Remove the tensioner shoe (1 bolt) and the damper (3 bolts).
- We remove the chain.
- Unscrew the bolts and remove the sprockets.
- Remove the valve cover gasket. We install a new one in its place.
- We install and screw in new stars. We just tighten the bolts on the sprocket with the drive disk.
- We place the protractor so that its lower cut rests on the upper cut of the timing cover, and the imaginary center coincides with the center of the camshaft. In this case, the left (if you look at the engine from the timing side) edge of the window should point to the 60 degree mark. Tighten the bolt.
- We put on a chain. At this point, you can make your life a little easier by combining the old and new chains and moving the marks (after making sure that the number of links between the marks matches).
- The damper, the shoe, the tensioner - we install it in place. We remove the clamp from the tensioner. The chain should be taut.
- Make sure that the camshaft sensor rotor is positioned correctly.
- Remove the rag from the tray hole.
- We install the cover and tighten its bolts.
- Install and tighten the pump.
- Tighten the cover evenly (not forgetting the bottom bolts of the pan).
- We remove the corner or fixing device from the grooves.
- We make sure that all the marks are in their places (to do this, it is recommended to turn the crankshaft several turns).
- We complete the assembly by replacing the missing parts.
- We fill the cooling system with fresh antifreeze.
Only after this can the engine be started. If everything is done correctly, it will start without problems.
As can be seen from the description, replacing the timing chain on an Opel Corsa with your own hands is not an easy task. Before you take on it, weigh everything carefully and decide whether you can handle it yourself, or whether it is better to entrust the work to a specialist.
» data-lazy-type=»iframe» src=»data:image/gif;base64,R0lGODlhAQABAIAAAAAAAP///yH5BAEAAAAALAAAAAABAAEAAAIBRAA7″>
Previous
CorsaNew or used? We buy a used Opel Corsa or go for a new one
Next
Corsa Opel Corsa engines with a displacement of 1.0 liters. Review of models X10XE, Z10XE, Z10XEP, A10XEP
Specifications 1.4 Twinport
| Volume | 1364 cc cm |
| Power/torque | 90 horsepower / 125 Newton meters |
| Piston stroke | 80.6 mm |
| Environmental standards | EURO-4 |
| Supply system | Injector (an electric fuel pump is installed in the tank, plus a fine gasoline filter is used) |
| Crankcase cooling and ventilation | Liquid cooling, closed crankcase ventilation system (the cooling jacket is cast and surrounds the cylinders in the block) |
| Lubrication system volume | 3.5 l |
| Operating temperatures | 90 to 95° |
| Fuel | Gasoline AI-95 |
| Combined fuel consumption | From 5.9 to 6.6 liters per 100 km (depending on model) |
Z14XEP design
The naturally aspirated gasoline engine is built on a cast-iron cylinder block with a diameter of 73.4 mm. The sixteen-valve cylinder head is made of aluminum, uses two camshafts and four valves for each cylinder. There is no need to adjust the valves thanks to hydraulic compensators. To drive the gas distribution mechanism, a chain is used, which, despite the manufacturer’s instructions, it is advisable to change at least once every 150 thousand km.
The main feature of the Z14XEP is the intake tract, which has variable geometry. This system is called Twinport, and is used by other automakers, but under a different name and with certain modifications. The introduction of Twinport together with EGR allowed engineers to minimize consumption (gasoline savings - 6%), reduce the amount of harmful emissions, improve the efficiency of the internal combustion engine and the knock resistance of the air-fuel mixture. What is an intake tract system that has variable geometry?
Typical breakdowns of 1.4 Twinport
1) Check Engine error caused by a malfunction of the sensor that monitors the position of the dampers. When connecting diagnostic equipment, it displays error P1113. The reasons lie in the breakdown of the sensor itself or incorrect operation of the damper drive mechanism. Less often, the dampers hang in one position, which is associated with contamination of the intake tract. It is easy for the owner to recognize the problem by characteristic dips when driving at low or high speeds. Often during repairs it is necessary to change the manifold assembly and clean the intake channels of deposits. If you turn off the Twinport system, the mixture formation will be disrupted, so this solution cannot be called rational.
2) Floating speed, the car stalls and accelerates poorly. The problem is presumably caused by a dirty EGR valve that needs to be cleaned or plugged.
3) A leaking sensor that monitors the oil pressure in the system. It is best to replace it with an original analogue.
4) Increased noise (characteristically the timing chain rattles, which stretches with a mileage of about 150 thousand km).
5) Leaking valve cover. To eliminate the defect, you need to change the gasket.
6) Failure of the oil pump, thermostat, ECU control unit. ECU failures manifest themselves in different ways. For example, in the Opel Corsa, this block influences the operation of the injectors in accordance with the current valve timing. They turn on every time the crankshaft makes a 720° turn. In dynamic operating mode, fuel is supplied asynchronously.
If the ECU breaks down, the functioning of the fuel supply system is disrupted, although other, no less serious defects also occur.
7) Increased oil consumption. According to the regulations, normal oil consumption should not exceed 0.6 liters per 1000 km. But these are maximum figures; if such an amount of oil is wasted, it is advisable to make a diagnosis. Perhaps switching to an oil of a different viscosity or from a different manufacturer will help reduce its consumption; sometimes decarbonization helps.
If you neglect the oil intake and use frankly poor lubrication, the hydraulic chain tensioner is likely to break, followed by its slipping, the valves meeting the pistons, and the need for major repairs. For most Opel owners with a Z14XEP engine, it takes up to 700 g of oil from replacement to replacement.
Tuning Z14XEP
Upgrading the 1.4 Twinport engine to improve technical characteristics is pointless. It is possible to plug the EGR, remove the catalyst, and reflash the ECU. This is irrational, as it will only give a power increase of 10–20 horsepower.
More can be achieved by regrinding the camshafts, installing a different intake manifold, and performing chip tuning (the average power increase fluctuates around 12%). It will be expensive and therefore financially unjustified. It’s better to immediately think about replacing the Z14XEP with a 1.8 XER with 140 horsepower.
Replacing the timing chain on an Opel Astra G
During routine maintenance, it is recommended to replace the chain on the Astra G 1.4 TwinPort at a mileage of 150,000 km. Although many car owners of such a car dispute this figure and claim that the car can travel 250,000 km - 300,000 km on one chain.
When changing the chain, it is necessary to change all the sprockets, stabilizers, shoe and chain tensioner. To fix the shafts and set the correct camshaft timing, you must use the special tool JTC-JW0456 or its equivalent. Without this tool, it is better not to start replacing the chain yourself! Therefore, it is very difficult to do this with your own hands, and it will also take quite a lot of time.
Installation of HBO
In order to save money, many owners of Opel with a Z14XEP engine decide to install gas equipment. The procedure has certain subtleties, which is associated with the Twinport system. It is important to insert the fittings correctly; setting up does not cause any difficulties.
It often uses fourth-generation gas equipment with a compact cylinder with a capacity of about 40 liters, which is installed instead of a spare tire. Consumption on gas, subject to correct settings, is only 1-2 liters more than on gasoline. This is an obvious saving, although the car is not particularly power-hungry anyway.