Power mode economizer on Solex
#1 Guest_DevNul_*
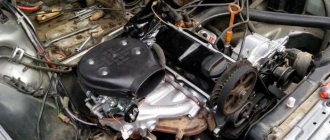
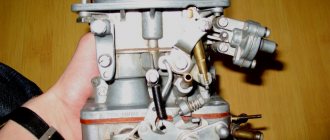
At one time I installed it on my 21074 Solex in Carbtuning. I felt the difference immediately, and I must say, I liked it (the difference). Everything would be fine, but the infection began to eat 14-15 liters per hundred. I went back to the guys a couple of times, they tried to select jets, but the consumption changed slightly. I went for a service in Nagatino. They checked everything there again, did something, but the consumption remained the same. I decided to figure it out myself. I started doing calibration, installed obviously smaller jets, leaned the mixture until noticeable dips appeared, burned the tank and measured the flow rate. All the same, the car is already barely moving, and the consumption is below 13 liters. doesn't fall at all. In short, any of my attempts to lean the mixture even in the smallest limits by varying the air and/or fuel nozzle of the first chamber led to noticeable dips and a deterioration in dynamics. Then I decided to look for non-standard ways - I bought a lid for the tank with a lock), checked the entire line, the tank, for leaks, the valve, in short, everything I could. Everything is impeccable, and, most importantly, the engine works great, the infection is dragging on, I don’t want to switch to Ozone again. Well, as a last resort, I decided to try to drown out the so-called. “Power mode economizer” on the carburetor - Solex, if anyone doesn’t know, has a diaphragm with a fuel nozzle on the side and a ball valve, which, according to the plan, should further enrich the mixture as the load on the engine increases, when the pressure in the intake manifold drops below some level. Why did I remove the return spring from it? And, oh, miracle! Consumption dropped sharply to the required 9-10 liters on the “thickest” jets, despite the fact that the engine’s throttle response increased significantly (apparently this infection greatly overfilled with each increase in engine load, i.e. pressing the gas pedal, in addition to the accelerator pump) . I drove around, I was happy, but doubt gnawed at my soul: after all, somehow it should still work? Hence the questions for the guru:
1. There was information here that there are formulas for approximate calculation of jets for both Solex chambers (steam - air fuel). Is it possible to fuck them? 2. How to configure the above-mentioned device (there is a fuel jet set at 40) and at what pressure in the manifold should it open the valve? How to try it on and set it? 3. If you do tune it, will the dynamic characteristics of the engine deteriorate, relative to its stopped state, because as I understand it, even if it works normally, then at low loads on the engine, a rather lean mixture is supplied to it at all speeds when it is running first chamber, but the enrichment process still takes some time? 4. Does it provide significant fuel savings to make it worthwhile? By the way, the fuel jet is 40, which is a bit too big (although in the description it is exactly that) - after all, when the valve is opened, the total performance of the main jet (I have 115) and this one will already be equivalent to a 155 jet, and this is clearly too much?
Thanks in advance for the answers from the enlightened public))
Source
Solex carburetor accelerator pump does not work, reasons
The accelerator pump (AP) of the Solex carburetor does not work - a malfunction that occurs on cars during long-term operation (with a mileage of more than 100,000 km), or after carburetor repair.
Signs of a not working Solex accelerator pump
— “Gaps” in engine operation after sharply pressing the gas pedal
— Reduced throttle response of the car engine (weak response when pressing the gas during start and acceleration)
— Fuel leaks on the UN body, the smell of gasoline under the hood
Causes of the malfunction - “Solex carburetor accelerator pump does not work”
— The diaphragm in the accelerator pump housing is leaking
When the car is moving, the accelerator pump diaphragm makes thousands of movements every time the driver presses the gas pedal. As a result, over time, it wears out and becomes unusable. Cracks and breaks appear.
As a result, fuel leaks appear on the UN body, as gasoline penetrates behind the diaphragm, and there is a persistent smell under the hood.
At the same time, the efficiency of gasoline supply to the UN atomizer decreases, since a torn diaphragm cannot create the required pressure in the accelerator pump system. “Disruptions” occur in the engine after sharply pressing the gas pedal.
— The diaphragm return spring is damaged or “settled”
Spring failure most often occurs on cars with a long service life. “Settlement” or damage to the spring leads to a decrease in fuel pressure in the accelerator pump system and, accordingly, to a decrease in the efficiency of its operation.
— The accelerator pump nozzle of the Solex carburetor is clogged
During long-term operation of the car, especially when using low-quality fuel, the nozzles (nozzle on 21073 and similar Solex) of the accelerator pump nozzle, its body with the discharge valve, gradually become clogged with deposits. The jets from the holes become weaker and “shoot” away from the throttle valve, and the efficiency of the UN system decreases. Again, a “failure” occurs and a decrease in engine response.
A clogged accelerator pump or its inaccurate firing are the main reasons for its malfunction
In some cases, the operation of the Solex carburetor on a worn engine affects it. In such a situation, the nozzle becomes clogged with soot thrown from the engine cylinders into the carburetor.
— The sealing ring on the UN atomizer body is worn out
When the rubber sealing ring on the nozzle body wears out, fuel begins to press through its seat. The pressure of the jets from the spray nozzles decreases, the accelerator pump does not fully perform its functions.
— The channels and suction valve of the accelerator pump are clogged
The accelerator pump channels, as well as the suction valve, clogged with silt and sediment do not allow fuel to enter the accelerator pump system in the required volume. The symptoms listed above appear.
Fuel channel outlet UN
— The Solex carburetor accelerator pump drive is faulty
Over time, the pressure cam UN wears out, and the spring pusher on the diaphragm also fails. As a result of mechanical damage or some kind of tuning, the pump pressure lever may be deformed. All this affects the operation of the accelerator pump for the worse.
The Solex accelerator pump drive is faulty
What to do if a malfunction occurs - “the Solex carburetor accelerator pump does not work”?
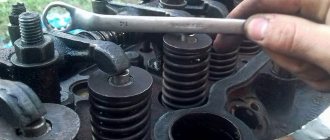
It is necessary to check the operation of the accelerator pump, visually assessing the power and duration of the fuel jets emanating from the nozzles of the nozzle, check its performance, check the drive and the diaphragm with the spring. A detailed procedure for checking the UN and troubleshooting its elements is available in the article “Checking and repairing the accelerator pump of the Solex carburetor.”
Notes and additions
— To the list of malfunctions leading to the failure of the accelerator pump, we can add a decrease in the efficiency of its operation as a result of too low a fuel level in the carburetor float chamber. This level should be checked and adjusted.
— The reasons listed above apply to various modifications of the Solex carburetor (2108, 21081, 21083, 21073, 21053, 21051, etc.) since the design of their accelerator pumps is identical. The only difference can be in the number of spray nozzles.
Twokarburators VK - More information on the topic in our VKontakte group, on Facebook Twokarburators FS and on Odnoklassniki - Twokarburators OK
More articles on the Solex carburetor accelerator pump
— Diagram: accelerator pump device for Solex carburetor 21083 (2108, 21081)
— Accelerator pump device for Solex carburetor 21073
— Checking the performance of the Solex accelerator pump
— Options for modifying the accelerator pump of the Solex carburetor
— The principle of operation of the accelerator pump of the Solex 21073 carburetor
— How to eliminate the failure when the car starts moving smoothly?
Electronic power economizer for carburetor
In carburetor systems, the composition of the mixture is determined by the cross-sections of the jets and the design of the carburetor. However, the design of SOLEX carburetors allows for electronic control of a number of carburetor systems based on analysis of engine load parameters, which allows for more flexible control of the mixture composition. Such control can be carried out both by systems with feedback, operating on the basis of information about the actual composition of the mixture received from the lambda probe, the description of which is given in the section “Reducing harmful emissions into the environment”, and by systems without feedback, implementing the required characteristics on based on electric or electronic control of fuel jet cross sections. A description of such a system is discussed below.
One of the main systems that require control is the power mode economizer system, which provides additional enrichment of the mixture at high load modes. Electronic control of the economizer of power modes is in many ways similar to the electronic control of the mixture composition in electronic mixture control systems and, from the point of view of the carburetor, is carried out using the same actuators - carburetor actuators. Electronic control of the economizer of power modes is especially relevant for systems with two carburetors, since it provides simultaneous control of changes in the mixture composition synchronously in both carburetors, which is difficult to achieve in individual carburetors when controlling the economizer with vacuum from the intake manifold.
Adjusting the Solex carburetor
- Autonomous “idle” system (hereinafter referred to as “x/x”) with double emulsion.
- The secondary chamber throttle valve is pneumatically actuated.
- Availability of a forced “x/x” economizer.
- Equipped with automatic starting and warming up of the power unit.
However, there was no Solex carburetor model that had all of the listed devices at the same time. There were several models equipped with them in various variations. And now, having understood the design differences, we begin to solve the question of how to adjust the Solex carburetor.
Carburetor design
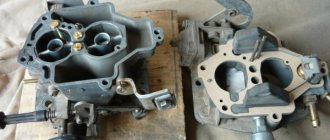
Most modern carburetors are of a similar design with minor differences. Their operating principle is completely identical to each other. Solex carburetors are the most widely used. These models are represented by a wide family and are characterized by a simple design of dosing elements.
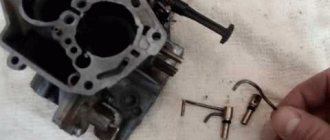
Diagram of the carburetor accelerator pump: 1 - nozzles; 2 — fuel supply ball valve; 3-pump diaphragm; 4 - pusher; 5 — drive lever; 6 — pump drive cam; 7 — throttle valve of the first chamber; 8 — check ball valve; 9 — throttle valve of the second chamber.
Solex began to be produced in the USSR (Dimitrovgrad) in the mid-80s for the VAZ 2108 Sputnik model. Subsequently, almost the entire line of VAZ cars was equipped with the new carburetor, from classics to front-wheel drive 2109-099 Samara and Niva. The Solex design includes several systems that are responsible for various engine operating modes. Let's briefly go through the groups.
Instructions for setting up a Solex carburetor
Adjusting the fuel level in the float chambers
List of activities performed:
- We warm up the engine for 3-5 minutes, sometimes gently accelerating. Pressing the accelerator pedal sharply will cause “shots” in the carburetor or exhaust system.
- We turn off the power unit.
- We remove the fuel supply hose, taking precautions against spilling gasoline.
Attention! The ingress of gasoline from the hose into the chambers distorts the accuracy of measurements, and therefore the result of adjustment.
- Unscrew the screws securing the carburetor cover (5 pcs.) and disconnect the choke cable.
- Raise the lid (strictly horizontally!), avoiding damage to the floats.
- We measure the distance from the surface of the fuel to the carburetor cover. It should be 24.0+1.0 millimeters (in each chamber). If the actual dimensions do not correspond to the indicated ones, we correct them by pressing the float tongues.
- Reassembling the carburetor is carried out in the reverse order.