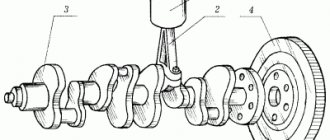
Timing drive
Timing chain cover
Removal
Note
: – To avoid damage to painted surfaces, use protective shields. – To avoid damage, disconnect the connection clamps carefully, holding the clamp with your hand. – Label all wires and hoses to avoid errors when reconnecting. – When removing the injection pump, high pressure fuel line, fuel supply line and injector, there is a risk of injury due to high pressure fuel leakage. Therefore, it is prohibited to carry out repair work immediately after stopping the engine.
1. Remove the drive belt (for more details, see the corresponding section in this chapter).
2. Remove the intermediate roller of the drive belt (for more details, see the corresponding section in this chapter).
3. Remove the generator (for more details, see the corresponding section in the Engine Electrical Equipment chapter).
4. Remove the generator bracket (for more details, see the corresponding section in the Engine Electrical Equipment chapter).
5. Remove the lower engine compartment cover.
6. Remove the crankshaft vibration damper pulley (for more details, see the corresponding section in this chapter).
7. Remove the water pump (for more details, see the corresponding section in the Cooling System chapter).
8. Remove the air filter housing assembly (for more details, see the corresponding section in the chapter Intake and exhaust system).
9. Remove the injection pump (for more details, see the corresponding section in the chapter Power supply and engine control system).
10. Remove the cylinder head cover (for more details, see the corresponding section in this chapter).
11. Remove the motor mounting bracket.
12. Remove the timing chain cover (A) as shown in the figure below.
Installation
1. Install the timing chain cover, to do this:
1) Before installation, remove the hard sealant from the surfaces of the cylinder block and crankcase.
2) Apply gasket sealant (TB 1217H or LOCTITE 5900H) to the surface between the cylinder head and cylinder block. Width: 3 – 5 mm.
3) Apply THREE BOND 1282B or THREE BOND 1216E gasket sealant to the contact parts (A) of the water pump and timing chain cover, and apply THREE BOND 1217H or LOCTITE 5900H gasket sealant to the remaining parts (B) as shown in the figure below.
Note
: Install the cover within 5 minutes after applying the sealant.
Width: 3.5 – 4.5 mm.
Note
: Make sure there is no oil or dirt on the surfaces.
4) Align the cylinder block locating pin with the oil pump holes.
5) Tighten the timing chain cover bolts (A). Tightening torque: 18.6 – 23.5 N∙m (M8 Bolts), 9.8 – 11.8 N∙m (M6 Bolts).
2. Next, installation is carried out in the reverse order of removal.
Timing chain
Removal
1. Turn the crankshaft pulley clockwise and align its groove with the timing mark on the timing chain cover as shown in the figure below.
2. Remove the timing chain cover (for more details, see the corresponding section in this chapter).
3. Align the CVVT sprocket timing marks with the top surface of the cylinder head so that the No. 1 cylinder is at top dead center.
Note
: Make sure the crankshaft dowel pin is currently facing towards the top of the engine.
4. Remove the timing chain (A) as shown in the figure below.
Note
: Before removing the tensioner, secure the tensioner piston with a pin in the hole (B) at top dead center.
5. Remove the timing chain tensioner arm (A) and guide (B) as shown in the figure below.
6. Remove the timing chain (A) shown in the figure below.
Checking technical condition
1. Check the CVVT sprocket teeth and crankshaft sprocket teeth, hydraulic tensioner, chain guide, tensioner arm for wear, cracks or damage. Replace if necessary.
2. Check the contact surface of the chain tensioner arm and chain guide for wear, cracks or damage. Replace fuses if necessary.
3. Check the hydraulic tensioner piston stroke and the operation of the hydraulic tensioner ratchet mechanism. Replace if necessary.
4. Inspect the timing chain for stretched areas, excessive wear, or damage. Replace if necessary.
Installation
1. The crankshaft locating pin should be installed at a slope of approximately 3° from the vertical center line, as shown in the figure below.
2. Align the top dead center marks of the CVVT sprockets with the top surface of the cylinder head so that the No. 1 cylinder is at top dead center, as shown in the figure below.
3. Install new O-rings (A) as shown in the illustration below.
4. Install the guide (A) and timing chain (B). Tightening torque of fastening bolts: 9.8 – 11.8 N∙m
Note
: When installing the timing chain, align the timing marks on the sprockets with the timing marks on the chain.
5. Install the chain tensioner lever (A). Tightening torque: 9.8 – 11.8 N∙m.
6. Install hydraulic tensioner (A) and remove pin (B). Tightening torque: 9.8 – 11.8 N∙m.
Note
: Check the crankshaft and camshaft top dead center marks.
7. Install the timing chain cover.
–>
The timing belt is a rubber product that ensures the interaction between the crankshaft and camshaft in the engine compartment of the vehicle. Considering the popularity in our country of a car such as the Kia Sportage 2, many car enthusiasts are looking for an answer to one very important question - is it possible to change this product on their own, without using the services of hired specialists?
Replacing the timing belt on a Kia Sportage 2 with your own hands is quite possible - just carefully read the material below and strictly follow the step-by-step instructions.
Content
Changing the timing belt G4GC
Before removing the drive belts of the attachments, you need to loosen the four “10” bolts that secure the pulleys of the G4GC pump. The fact is that if this is not done immediately, then it will be extremely difficult to stop the pump.
Loosen the upper and lower power steering bolts (link)
Having loosened the upper and lower bolts of the hydraulic booster, it is necessary to move it towards the engine. The generator is located under the hydraulic booster.
Unscrew the adjusting bolt as much as possible
Having loosened the lower bolt of the clamp , you need to unscrew the adjustment bolt .
Remove the alternator and power steering belt. Unscrew the bolts securing the pump pulleys and remove them. (link)
Now you can remove the G4GC alternator and power steering belt. By unscrewing the bolts that secure the pump pulleys, you can remove the latter. Having previously remembered in what sequence they were located, and which side they were turned to the pump.
We unscrew the four bolts on the ten upper sewn-in timing cover. (link)
By removing the four “10” bolts from the timing cover, you can remove the protection and jack up the G4GC engine.
We remove the protection and jack up the engine. Unscrew the three nuts and one bolt securing the engine mount. (link)
Remove the cover and support. (link)
By unscrewing the three nuts and bolt that secure the engine support, you can remove both the cover and the support .
Remove the front right wheel and unscrew the plastic mudguard. (link)
Then you can remove the right front tire and unscrew the plastic mudguard .
In front of us is the crankshaft pulley and the air conditioner belt tensioner pulley. (link)
Now the crankshaft pulley and the Conder belt tension roller become visible.
Unscrew the tension bolt until the air conditioner belt loosens and remove it. (link)
All that remains is to unscrew the tension bolt until the strap loosens, and you can replace it.
Markings and TDC setting
Next, you need to set the so-called “top dead center” . turn the crankshaft clockwise using the bolt so that the marks on the pulley and the mark with the letter T on the timing cover coincide.
There is a small hole on the top of the camshaft pulley, not a cylinder head groove. It is necessary that the hole is opposite the groove. (link)
There is a small hole on the top of the camshaft pulley; it is worth mentioning right away that this is not a groove in the cylinder head. It is required that this hole be placed just opposite the groove . It’s not very convenient to look at it, but you can check if it’s correct: insert a suitable metal stick (for example, a drill) into the hole. Looking from the side, it remains to understand how accurately the target is hit.
Unscrew the crankshaft pulley mounting bolt and remove it along with the protective cap. (link)
After unscrewing the crankshaft pulley fixing bolt , you need to remove it, along with the protective cap. To block this part, you can use a self-made stopper.
Unscrew the four bolts holding the lower protective cover. (link)
All that remains is to unscrew the four bolts that hold the bottom protective cover in place and remove it. The mark on the crankshaft should be in the right place.
Remove the protective cover. The mark on the crankshaft should match. (link)
Rollers and timing belt installation G4GC
Having unscrewed the tension roller , you can safely remove it. You just need to first remember how it was installed, so that you can then correctly return it to its place.
Unscrew the tension roller and remove it. (link)
Next, you can remove the G4GC timing belt, and at the same time remove the idler roller, which is located on the right side, in the middle part of the cylinder block. You can install new parts.
We are putting on new videos. The tension roller has tension directions indicated by an arrow and a mark to which the arrow should reach for correct tension. (link)
On the tensioner, the direction of tension is indicated and there is a mark , which the arrow (indicated earlier) must reach if the tension is correct. It is important to make sure that absolutely all marks match.
And only now is it possible to install a new timing belt. This must be done in the following sequence : starting with the crankshaft, continue to the idler roller, then to the camshaft and finish at the tension roller.
The lowering branch of the belt must be in a tense position. To ensure it, you need to turn the camshaft pulley clockwise a couple of degrees, then put on the strap and return the part to its previous position. To be sure, you need to again make sure that the marks are placed correctly.
Use a hex key to turn the tension roller until the arrow aligns with the mark. (link)
Use a hex key to turn the tension roller until the arrow aligns with the mark. Next, you need to tighten it and, turning the crankshaft a couple of turns, again make sure that the marks match.
In addition, it is worth checking the tension of the timing belt in the direction of the arrow. Experts say that the procedure is carried out correctly if a load of a couple of kilos is applied to the strap, and it sags no more than 5 mm. Of course, it is difficult to imagine how to do this. Yes, in addition, you also need to take measurements. But, if all the marks match and the tension does not raise any doubts, you can put the G4GS mechanism back together.
When should such repairs begin?
Any repairs must be carried out in a timely manner. Therefore, it is important to know the signs that will allow the owner of a Kia Sportage 2 to understand that the timing belt installed on his property has become unusable. There are several of them, and all can be identified only by visual inspection of the product:
- Observation of cracks and tears that threaten to lead in the future to complete rupture of the belt.
- Detection of fringes and cord breaks.
- The appearance of traces of machine oil on the belt, lack of teeth.
In all these situations, it is recommended to immediately replace the belt with a new product, since its complete rupture threatens serious problems with the Kia Sportage 2 power unit, which may be damaged in such a development.
There are also plenty of reasons for the rapid wear of this important element of the car:
- Poor or, on the contrary, excessive tension of the product;
- Long-term operation;
- Severe overheating of the belt for any reason or misalignment.
That is why it is important not only to visually check the integrity of the rubber product, but also to monitor its correct operation, which will increase the shelf life of the timing belt on the Kia Sportage 2.
Advantages and disadvantages
The naturally-aspirated petrol engine G4GC has had some shortcomings during its operation:
- complex arrangement under the hood, for example, to remove the intake manifold, the entire cylinder head must first be dismantled along with this assembly, and the oil pan can be removed only after removing two pillows;
- the CVVT sprocket of the intake camshaft has 2 marks, so the position can be mixed up during assembly;
- the pistons bend the valve when the timing belt breaks
- to ensure Euro-4 environmental standards, the cross-section of the exhaust manifold on the conveyor is narrowed, resulting in a reduction in power;
- The settings for the thermal clearances of the valves are lost; they need to be adjusted every 15–20 thousand kilometers.
On the other hand, the internal combustion engine device includes several advanced design solutions, but in moderation. By maintaining the volumes of the combustion chambers, you can increase performance by 10% by simply changing the software version of the on-board computer.
An important feature remains the reduction of fuel consumption, ensuring a service life of 350,000 km and increasing operational parameters.
Self-replacement technology
Before the process itself, it is recommended to prepare in advance all the tools necessary for the work; fortunately, not so many of them will be required:
- Assorted keys and sockets;
- A device for lifting a car (jack) and a torque wrench;
- Ordinary rags.
Replacing the timing belt on a Kia Sportage 2 is as follows:
A Korean vehicle is completely de-energized by disconnecting the negative terminal from the battery. Additionally, the candles are unscrewed. This will secure and facilitate further stages of the planned process.
- The next step is to drain the coolant through a special hole in the machine system;
- The belts of the suspended units, the cooling fan and the bracket are dismantled;
- To remove the crankshaft pulley, you will need to unscrew the mounting bolts;
- Protective covers are removed from the drive;
- Before continuing work, you should align the crankshaft to the mark corresponding to the camshaft;
- The roller is loosened, the damaged product and the tensioner itself are removed.
At this moment, a pre-prepared rag will come in handy to help clean the system of contaminants. Installing a new element occurs in the reverse order. During this procedure, it is important to remember several important points:
- The tension roller must be mounted according to a specially marked mark.
- The belt should be put on from the camshaft gear, moving further clockwise.
- Before final tensioning, it is necessary to check all marks for complete alignment.
Returning the remaining previously removed elements to the place of operation should not cause any special problems even for the least experienced car owner.
Kia Sportage 3 vehicles use chain and bushing chains as a means of transmitting torque from the timing belt. Chain transmission has a number of important advantages, the main one of which is the durability of such a mechanism and its resistance to various types of loads. An interesting fact is that the manufacturer does not indicate the standard timing for replacing chains. They should be repaired or replaced if necessary during the next periodic service inspection. In practice, problems rarely occur until 100,000 km of circuit production.
You can select a suitable chain for your car based on the parameters and model of the engine installed on it. It makes no sense to search for products by serial number or other characteristics; you need to know the article number and name of the engine model in the manufacturer’s model range. In particular, chain drives are used on the following types of engines:
- Petrol standard 2.0 liter – 150 l/s;
- Gasoline forced 2.4 liters;
- A 2.0-liter turbodiesel unit with a capacity of 136 l/s, as well as its forced equivalent with 184 l/s.
Thus, if you are looking for a timing chain for a car, first of all you need to determine what type of gasoline or diesel engine is used in the car and what name it has. Further, choosing the right products will not be difficult. To simplify your search, we recommend contacting a direct dealer or other company representative.
We install a new timing belt
First we put it on the crankshaft pulley, idler pulley, camshaft pulley and tension roller. The descending branch of the belt must be tensioned; to do this, turn the camshaft pulley clockwise one to two degrees, put on the belt, and turn the pulley back. Let's check all the marks again. Use a hexagon to turn the tension roller until the arrow aligns with the mark. Tighten the tension roller. We turn the crankshaft two turns and check that the marks match. We also check the timing belt tension according to the arrow on the tension roller. The smart book says that the tension is considered correct if, when a load of two kilograms is applied to the belt, its sag is five millimeters. It is difficult to imagine how to do this, much less measure it.
If all the marks match and the tension is normal, we proceed to assembly. I had to struggle with the pump pulleys, although they have a centering groove, it is very inconvenient to hold them and at the same time attach the bolts, since the distance to the spar is about five centimeters. Reinstall all parts in the reverse order of removal. Fill in all the liquids that have been drained. We start the car and, with a feeling of deep self-satisfaction, set off towards adventure. Here is a relatively simple procedure for replacing the timing belt on a Tusan.
When to replace
Replacing the timing chain for Kia Sportage 3, depending on the type of engine and the chain used, is recommended after driving 100-150 thousand kilometers. However, it is worth paying attention to the condition of the timing unit much earlier, during routine inspection and other preventive maintenance to achieve 50,000 kilometers or more.
An urgent replacement procedure can be carried out if knocking noises appear in the engine, which are especially obvious at a particular rotation speed. As a rule, this indicates that either the level of chain tension has decreased due to a broken tensioner, a tooth is broken, or one of the gears of the mechanism is worn out.
The urgency of the repair is explained by the fact that a chain torn from the shafts can cause serious damage to the timing mechanism. Engine cylinders will also fail at high speeds due to reduced rotational force. As a result, instead of replacing the chain, you will have to carry out a full engine repair.
Preparing for replacement
Before carrying out work to replace the timing chain, make sure to buy an original repair kit or the chain itself separately. The price of these components will depend on the place of purchase, but usually the original kits are quite inexpensive.
Make sure to provide easy access to the car from all sides of the hood, since in the process of disassembling the engine and dismantling other elements, a lot of work will have to be done. The layout of the Kia Sportage 3, due to the desire to place everything quite compactly, is not very convenient for work.
Considering the location of the side timing cover and the bolts on its surface, you will need to remove the front right wheel by placing the car on a jack. This will greatly simplify access and allow some dismantling and installation work to be carried out faster.
To carry out the necessary work, you will need a standard set of car mechanic tools, the main components of which are:
- Set of wrenches;
- Ratchet with a set of attachments;
- A hydraulic or electric impact wrench, preferably with an impact function (if they are not available, you will need a hammer and a mallet, which can be used to knock out the key and fasteners that have become burnt to the surface during long-term use);
- Chisel and minus screwdriver.
Before starting work, it is mandatory to drain the oil from the engine and antifreeze from the radiator, as well as any other technical fluids that can interfere with the work being carried out.
Step-by-step instructions for replacing the timing belt
Service belt diagram.
Before removing the accessory drive belts, loosen the four ten bolts securing the pump pulleys. If this is not done now, then after removing the belts it will be very difficult to stop it. Loosen the upper and lower power steering bolts and move them towards the engine.
There is a generator under the hydraulic booster, it was not possible to photograph it. Loosen the lower mounting bolt and unscrew the adjustment bolt as much as possible.
Remove the alternator and power steering belt. Unscrew the bolts securing the pump pulleys and remove them. We remember that there was a small one at the bottom and which side they stood towards the pump.
We unscrew the four bolts on the ten upper sewn-in timing cover.
We remove the protection and jack up the engine. Unscrew the three nuts and one bolt securing the engine mount.
Remove the front right wheel and unscrew the plastic mudguard.
We saw the crankshaft pulley and the air conditioner belt tensioner pulley.
We unscrew the tension bolt until the air conditioner belt loosens and remove the latter.
Now comes the fun part.
Setting the top dead center
Using the crankshaft bolt, be sure to turn the crankshaft clockwise so that the marks on the pulley and the mark with the letter T on the protective cover coincide. It’s very inconvenient to photograph, so we’ll show you the details we took.
There is a small hole on the top of the camshaft pulley, not a cylinder head groove. It is necessary that the hole is opposite the groove. Since it is very inconvenient to look into it, we check it this way: insert a piece of iron of suitable size into the hole, I use a thin drill. We look from the side and see how accurately we hit the mark. In the photo, the marks are not aligned for clarity.
Unscrew the crankshaft pulley mounting bolt and remove it along with the protective cap. To block the pulley we use a homemade stopper.
Unscrew the four bolts holding the lower protective cover.
Let's take it off. The mark on the crankshaft should match.
Unscrew the tension roller and remove it. Let's remember how he stood.
We remove the timing belt and the idler pulley, which is located on the right in the middle of the cylinder block.
We are putting on new videos. The tension roller has tension directions indicated by an arrow and a mark to which the arrow should reach for correct tension.
We check the coincidence of the milestones.