If the starter does not click or turn, what should the owner of a VAZ-2106 do in such a situation?
There can be many reasons for this problem. The simplest and most common is a battery that is grounded to zero. Recognizing the source of the problem in this case is not difficult. You just need to turn on the headlights. If they do not light up, it means the battery is completely discharged. In this case, you can start it “from the pusher” or ask your neighbors in the garage for a “light.” By the way, the headlights can shine at full intensity. That is, the battery is not completely dead, but the starter does not have enough energy. In this case, the retractor, if everything is in order with it, will make itself felt with a click.
If the battery is charged normally, then you need to continue searching for the source of the problem. We check the integrity of the fuses. If everything is in order here, we look further. By the way, the fault may well be in the ignition switch itself. To check this version, you should carry out a simple manipulation. In particular, you need to try to start the car directly by connecting the necessary wires to each other. If after such manipulation the starter comes to life, it means that the problem is really in the lock, and it should be replaced.
However, before doing this, also check the ignition contact group - it is quite possible that a break has occurred there.
Next, carefully inspect the wiring for breaks. If everything is in order here, then we continue the search. The absence of clicks from the solenoid relay may indicate:
- contact between the rotor “mass” and the positive charge of the stator;
- jammed bushing or shaft of the electric motor.
Without removing the starter, it will not be possible to determine the exact cause. It is quite possible that the absence of clicks is due to the short circuit of the rotor or stator winding. To understand the reason, in any case, you will need to remove the starter and disassemble it.
After this, carefully inspect the retractor terminals. It is likely that they need cleaning (or replacement) after which the problem disappears. If this procedure does not help, check the relay winding. The presence of a malfunction will be indicated to you by a characteristic burning smell. The problem can also be caused by a loose fit between the brushes and the commutator, or too much wear on the commutator. It is quite possible that you just need to replace the retractor.
One point is worth noting - if you have already disassembled the starter, found a specific malfunction, and fixed it, then still conduct a visual inspection of the entire device. This kind of preventive maintenance is extremely useful in preventing future malfunctions. If you see that a part is clearly reaching the end of its service life, replace it immediately. This will eliminate the need to disassemble the starter again after some time. That is, in this case you are doing a kind of prevention.
Design and technical characteristics of the VAZ 2106 starter
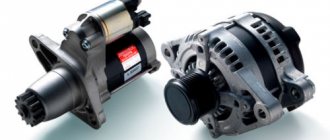
On the VAZ 2106, the manufacturer installed two interchangeable types of starters - ST-221 and 35.3708. They differ slightly from each other in design and technical parameters.
The first VAZ 2106 were equipped with ST-221 type starters
Technical characteristics of VAZ 2106 starters
Until the mid-80s of the last century, the manufacturer installed an ST-221 starter on all classic VAZ cars. Then the starting device was replaced with model 35.3708, which differed from its predecessor in the design of the collector and the fastening of the cover to the body. Its technical characteristics have also changed somewhat.
Since the mid-80s, starters 35.3708 began to be installed on the VAZ 2106
Table: main parameters of VAZ 2106 starters
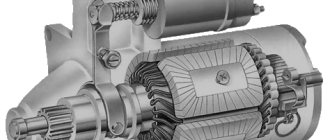
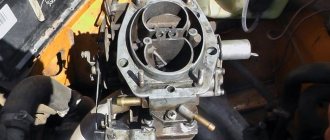
VAZ 2106 starter device
Starter 35.3708 consists of the following elements:
- stator (housing with field windings);
- rotor (drive shaft);
- front cover (drive side);
- rear cover (collector side);
- traction electromagnetic relay.
Both covers and the starter housing are connected by two bolts. A four-pole stator has four windings, three of which are connected to the rotor winding in series, and the fourth in parallel.
The rotor consists of:
- drive shaft;
- core windings;
- brush commutator.
Two cermet bushings, pressed into the front and rear covers, act as shaft bearings. To reduce friction, these bushings are impregnated with special oil.
The design of the starter 35.3708 is practically no different from the design of a conventional electric motor.
A drive consisting of a gear and an overrunning clutch is installed in the front cover of the starter. The latter transmits torque from the shaft to the flywheel when the engine starts, that is, it connects and disconnects the shaft and the flywheel crown.
The traction relay is also located on the front cover. It consists of:
- housings;
- core;
- windings;
- contact bolts through which power is supplied.
When voltage is applied to the starter, the core is retracted under the influence of a magnetic field and moves the lever, which, in turn, moves the shaft with the drive gear until it engages with the flywheel crown. This closes the contact bolts of the starter, supplying current to the stator windings.
Video: principle of operation of the VAZ 2106 starter
Gear starter
Despite the low power, the standard starter of the VAZ 2106 copes with its tasks quite well. However, it is often replaced with a geared analogue, which differs from the classic one by the presence of a gearbox, which significantly increases the power of the device. This allows you to start the engine even with a discharged battery. Thus, a gear starter for classic VAZ models produced (Belarus) has a rated power of 1.74 kW and is capable of spinning the crankshaft up to 135 rpm (usually 40–60 rpm is enough to start the power unit). This device works even when the battery is discharged to 40%.
The gear starter has a special gearbox that significantly increases the power of the device
Video: gear starter VAZ 2106
Choosing a starter for VAZ 2106
The starter fastening device for classic VAZ models does not allow installing a starting device from another domestic car or foreign car on the VAZ 2106. Adaptation of such starters is very labor-intensive and expensive (the exception is the starter from the VAZ 2121 Niva). Therefore, it is better and easier to purchase a new starting device. A stock starter for a VAZ 2106 costs 1600–1800 rubles, and a gear starter costs 500 rubles more.
Manufacturers are recommended to give preference to well-established brands:
- "Elektromash" (Kherson, Ukraine);
- KZATE (Samara, Russia);
- "Atek" (Vitebsk, Belarus).
The design of the starting device and where the starter relay is located on the VAZ-2114
The “fourteenth” starter is a conventional DC electric motor, consisting of:
- housings;
- four-pole armature (rotor);
- Bendix (overrunning clutch);
- solenoid (traction) relay.
The device body is closed with two covers. In the design of an electric motor, it plays the role of a stator. Inside it there is a four-pole armature (shaft with windings), rotating around its horizontal axis. The shaft is supported by two support bearings located in the motor housing.
The Bendix, or overrunning clutch, is a mechanism that engages the armature gear with the crankshaft flywheel ring. It is located at the front of the rotor.
Where is the starter relay located on the VAZ-2114? It is located right on it. Above. In fact, this is not an ordinary, in our understanding, device that closes contacts. It performs two functions at once. It closes the contacts of the armature winding and also drives the bendix and gear.
Common starter problems and their causes
Regardless of whether a gear starter is installed on a VAZ 2106 or UAZ, the problems are similar. If the car does not start, the VAZ 2106 starter does not turn well, first check the quality of battery charging. In addition, you should check how well the terminals are secured. If everything is fine with the charging and terminals, then the cause of problems with starting the engine may be in the starter.
VAZ 2106 starter circuit
The following malfunctions of the VAZ 2106 starter are possible:
- The device turns on, but the traction relay does not work: the traction wire is broken, the tips are not tightened well, there is a short circuit in the traction windings or to ground, the contacts have oxidized, the retractor armature is stuck.
- After switching on, a click occurs, the traction relay works, but the armature does not function or it rotates too slowly, the starter does not turn: the fastening bolts on the retractor are not tightened well, the brushes are worn out or stuck, the commutator plates are short-circuited or are burned out, the windings are damaged.
- When starting, the relay clicks, the armature works, but the crankshaft does not rotate: the buffer spring is broken, the clutch slips, slips out of the axle, or the clutch engagement lever is broken.
- The starter does not turn off when the engine starts: the relay or drive lever is stuck, the contacts are stuck together, the mechanism is skewed, the ignition switch return spring is faulty.
- Increased noise during startup: the unit is poorly secured, the bushings are worn, the teeth on the gears are broken.
How to start a car - the starter does not turn
If the starter is faulty due to the solenoid relay, then the car engine can be started if the contacts are closed forcibly. This is an emergency measure, but it is sometimes used when there is an emergency.
Let's look at an example of how to start the engine of a VAZ-2110 car.
- Place the gearshift lever in neutral position.
- Pull out the handbrake handle.
- Turn the ignition key and open the hood.
- Remove the air cleaner from its seat and move it to the side to provide access to the starter.
- Disconnect the plug from the contacts.
- Connect the two contacts of the pull-in relay together with a metal object or thick wire.
- If the other components are working properly, the engine should start.
Install the air filter and connect the wires. In many cases, the engine then starts without problems using the ignition key. But the problem has not disappeared, so you need to contact a workshop soon.
There is another method that is suitable for an urgent emergency start. It can only be used for cars with front-wheel drive and manual transmission.
Procedure:
- Raise the car with a jack so that one of the front wheels is suspended.
- Turn the raised wheel all the way.
- Wrap a rope or cable around the tire 3 turns, leaving an end 2 meters long.
- Turn on third speed.
- Turn on the ignition by turning the key.
- Pull the cable sharply, spinning the wheel and running away.
- After starting the engine, place the gearbox lever in the neutral position. You don't have to press the clutch pedal to do this. Wait for the wheel to stop.
- Use a jack to lower the car to the ground.
Attention! The described method requires caution and safety measures. Otherwise, you may damage the vehicle and injure yourself.
This method is similar to starting with a handle on old cars, for example, Moskvich-412, or VAZ-2101. The raised wheel powers the gearbox and then the engine.
Close the starter directly
An example of a launch is considered on a VAZ 2110 car:
- The transmission lever in the cabin is set to the neutral speed position. The parking brake lever is raised.
- The ignition system is activated by turning the key in the switch. The engine compartment of the car is opened, the following steps are performed under the hood.
- The air filter device is being dismantled. It is retracted to the side so that the driver can gain access to the contact elements of the starter assembly.
- The chip that goes to the contact component is turned off.
- Using any metal product, for example, a screwdriver, the contact components of the starter assembly terminals are short-circuited. You can use a piece of cable.
- After closing the contacts, the starter mechanism should begin to rotate, which will lead to the engine starting. It is important that the battery is charged when performing this task.
After completing the action, the chip is put back in place, and the filter device is mounted back. Such steps will allow you to start the power unit in the future. But since the problem remains, it will still have to be solved.
Wheel spin
The implementation of this method is only possible on front-wheel drive vehicles equipped with a manual transmission:
- The car is placed on a jack, one of the front wheels must be suspended.
- The suspended wheel is turned outward until it stops. If it is the left wheel, then it turns to the left, the right wheel, respectively, to the right.
- A cable is wound around the surface of the tire, which is used for towing. If it is not available, a strong rope may be used. It is necessary to wind 3-4 layers, while at least one meter of rope or cable must remain free.
- The gearshift lever is moved to the third speed position.
- The key turns in the ignition switch.
- Then you need to strongly pull the end of the rope or cable, this is done to unwind the wheel. It is not recommended to perform this task while standing in one place; you should take a short run-up.
- If the vehicle's power unit starts, the neutral speed is activated. To do this, it is not necessary to depress the clutch pedal. You have to wait until the car wheel stops.
- Then the jack is loosened and the wheel is lowered to the surface of the ground.
This is interesting: Decoding and causes of error P0443 on a car
From the pusher
The implementation of the “old-fashioned” method from the “pusher” is performed as follows:
- An assistant will be needed to complete the task. You can act on your own if the car is on a descent.
- The parking brake handle is lowered.
- The key is turned to the ignition mode, the transmission selector is set to the third gear position.
- Then the car must be pushed. If there is an assistant, the driver sits in the cabin and waits until the speed is at least 10-30 km/h. The clutch pedal on the car must be depressed.
- After increasing the speed, the pedal is carefully lowered, while the driver presses on the gas. When the engine starts, you can put the gear in neutral and stop to wait for it to warm up.
VAZ 2110 does not start: the starter does not turn, but clicks and other faults
All cars use a starter to spin the crankshaft when starting the engine. The power of this device allows the crankshaft to overcome compression in the cylinders and frictional forces. If the starter does not turn, then the engine cannot start, as a result, the car stands still. For a motorist, the worst situation occurs when, when turning the key, he hears clicking sounds in the power plant or silence.
By the “silence” of the engine it is impossible to determine what exactly is not working. It’s good if it’s a starter, since repairing or replacing it won’t be as expensive as repairing a VAZ 2110 engine. There can be many problems with this element; this article contains the main faults and ways to solve them. If you want to repair or replace it yourself, then this will require a connection diagram, since the starter is an electrical device.
Self-test of the starter relay
To begin with, before checking the solenoid relay, you need to check the starter itself, since these checks have their own nuances and they must be performed in order to figure out what exactly is not working.
To do this, turn on the ignition switch and turn the key; if the starter does not work, but characteristic clicks are heard, then the relay is working, but the starter is not.
Without removing the starter, if you can get to it, of course, you can check it by jumping the two contacts (copper bolts) on the back cover of the traction relay. If the mechanism spins, the retractor is faulty.
When independently checking, disassembling or repairing various parts, be careful and careful, as this can lead not only to parts breaking, but also to various injuries.
If for some reason you were unable to check it on site, then you will have to dismantle it. When checking, be careful, since the rotation of the mechanism is quite strong, so that it does not break out and cause injury.
Place it near the battery, or preferably on the ground, and use a wire to connect the relay contact terminal to the positive terminal. Using another wire, connect the battery ground to the starter ground.
After the wires touch the terminals, the relay should operate, making a sharp and quick click. If you feel that the relay operates too slowly, then the contacts may be burnt.
On our website you will find:
- current information about Lada, new products in production and news related to the brand;
- statistical data on sales and the place of the Russian automobile industry in both the local and international markets;
- useful tips on operation, repair and maintenance of VAZ cars;
- all the most important information that will help you when repairing VAZ cars;
- reviews of the most common problems faced by machines.
If you have any questions regarding the repair of your car, materials and spare parts for it, you can get advice from a specialist. To do this, go to the CONTACTS section and send your question. You will find this and much more about the features of domestic cars on our portal OLADE.RU
Reasons why the starter does not turn
Low battery level
If, when you try to start the engine, you hear something clicking under the hood and at the same time your entire dashboard begins to “blink”, then this means that you do not have enough battery charge (the required battery charge to start the engine must be more than 12 Volts ).
Poor contact
If your battery is working properly and charged, but something clicks under the hood, then perhaps the power from the battery is not reaching the starter. The reason is poor contact.
Starter solenoid relay malfunction
When voltage is applied to the solenoid relay, it does not operate. In some cases, it makes a clicking sound.
Bendix malfunction
The starter works, but does not rotate the flywheel, and the retractor relay does not bring the starter bendix into the operating position. In this case, the bendix or flywheel crown may wear out.
Short circuit in the starter winding
If there is a short circuit in the starter winding, the solenoid relay will operate and turn the starter very hard (slowly), or will not turn the flywheel at all.
Starter bearing failure
The starter turns the flywheel with difficulty, while making extraneous sounds and grinding noises. If this malfunction is not corrected, the bearings may eventually jam and then the starter will completely fail.
Features of mechanism diagnostics
Starter for VAZ 2106
The starting unit is checked using a tester. After turning on the device, the voltmeter reading should not be higher than 8V, and the current should not exceed 23A.
You can check the windings using a tester; if it lights up, it means there is a short circuit. To perform a visual inspection of the starting unit, it must be removed and cleaned of dirt (video author - Irina Kuzilova)
When disassembling the device, each part should be visually inspected. Scores and scratches can be removed using sandpaper. Broken and worn parts must be replaced. It is also necessary to replace the VAZ 2106 starter bushings if they are badly worn.
A faulty collector cannot be repaired; it is advisable to replace it. The height is checked on the brushes. More than 12 mm is considered optimal, otherwise the brushes must be replaced.
Reasons for a cold or hot system
Since system temperature can affect the causes of starter problems, it is necessary to test its operation in both states - cold and hot. In the first case, the following problems may appear:
- thick oil
- reduction in battery efficiency.
In a cold system, such a set is extremely small, because the low temperature here is dangerous only for liquids. However, when hot, the following problems are possible:
- bushing wedge;
- crankshaft failure (rubbing of liners, axle displacement, etc.);
- bushing wear.
Such problems more often arise on a well-developed system where the temperature has risen. If such a tendency is observed, it is recommended to check the system at a car service center. There may be problems with the crankshaft, which can lead to expensive car repairs.
If there is no difference between the operation of the starter in both cases, then it is recommended to look for reasons among the general ones. Most often, the problem is in the starting device itself or the power system.
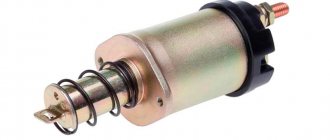
Starter solenoid relay
The design of the relay in the starter of a VAZ 2106 car is considered to be quite simple, and every even slightly enthusiastic motorist can easily disassemble and assemble it independently. However, removing and then reinstalling the solenoid relay turns out to be an impossible task for many. However, professionals can handle this without difficulty.
If you suspect that the solenoid relay in your car is broken, you should definitely check it. The relay in the VAZ 2106, as in other car models, works as an electromagnet. In order to check its serviceability, you need to close it with a metal object, for example, a screwdriver. If the starter starts to rotate, then the fault is indeed in the relay. If you hear clicks from the retractor relay, but the starter does not start to rotate, then you need to look for the breakdown in it itself.
Why might the starter relay stop functioning? There may be several reasons. Firstly, materials can deteriorate due to age. Secondly, the winding may burn out. And finally, thirdly, the nickels inside the relay itself can burn out.
Video “Reassembling the mechanism at home”
Find out how to rebuild the starter yourself from the video below (the author of the story is the onotole channel).
Has your car broken down? We'll fix everything! +7 (961) 014-5673 +7 (915) 732-0659 Call!
The solenoid (correctly: traction) relay in the car takes current from the battery and transmits it to the starter, simultaneously pushing out the bendix to engage the flywheel. The principle of its operation is based on ordinary electromagnetism. In this article you will learn how the solenoid relay works, why it breaks and what to do if this happens.
Brushes and winding
Inside the starter housing there are 4 steel cores (shoes) with a winding that is connected into a circuit.
Healthy! Some cars do not use cores with windings, but magnets, which is much more convenient.
The current to the winding comes from the central input, and the output is output to two copper-graphite positive brushes that go to the commutator. Also connected to it are negative brushes that come from the starter mass. All brushes are constantly pressed using small springs. But, since graphite is not the most durable material, these elements tend to wear out quite quickly. When brush wear reaches a critical level, the solenoid relay stops receiving current.
In the event of such a breakdown, the starter will not make any extraneous sounds. To repair, you will need to disassemble it and evaluate the condition of the brushes. If everything is in order with them, then we look at the windings. If they burn out, the layer of varnish that is applied to them will also burn out. Also, instead of copper color, the windings will be black. An unpleasant burning smell also indicates a problem. In this case, the best thing would be to replace the entire assembly, although you can get by with new windings.
VAZ 2106 starter repair
Most faults in the VAZ 2106 starter can be fixed on your own - all the necessary elements for this are available for sale. Therefore, if the symptoms described above appear, you should not immediately replace the starter with a new one.
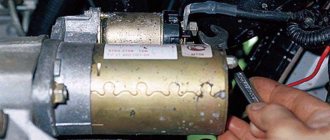
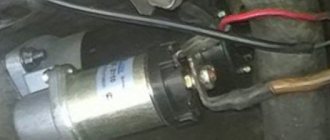
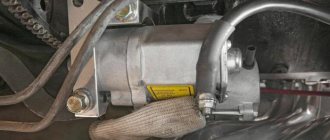
Removing the starter
To remove the VAZ 2106 starter you will need:
- wrench 10;
- socket wrench or 10mm socket with extension;
- wrench 13;
- screwdriver with a Phillips blade.
The starter itself is dismantled in the following order:
- Use a Phillips screwdriver to unscrew the clamp screw on the air intake hose.
Remove the hose from the air filter pipe and move it to the side. The hose is attached to the air filter housing pipe using a worm clamp - Using a 13 key, loosen first the lower and then the upper nut securing the air intake by 2–3 turns.
To remove the air intake you need to unscrew two nuts - We remove the air intake.
- Using a 10mm wrench, unscrew the two nuts securing the heat-insulating shield.
The thermal insulation shield in the engine compartment is secured with two nuts - From the bottom of the car, using a socket wrench or a 10mm socket with an extension, unscrew the lower nut securing the shield to the engine mount.
At the bottom, the heat-insulating shield is held on by one nut - Remove the thermal insulation shield.
- From the bottom of the car, using a 13mm wrench, unscrew the bolt of the lower starter mounting.
The lower starter mounting bolt is unscrewed with a 13mm wrench - In the engine compartment, using a 13mm wrench, unscrew the two bolts of the upper starter mounting.
The starter is attached to the top with two bolts. - Holding the starter housing with both hands, we move it forward, thereby providing access to the tips of the wires connected to the traction relay.
To provide access to the wire ends, the starter must be moved forward - We remove the control wire connector on the traction relay by hand.
The control wire is connected to the traction relay through a connector - Using a 13mm wrench, unscrew the nut securing the power wire to the upper terminal of the traction relay.
To disconnect the power wire, you need to unscrew the nut with a 13mm wrench. - Grasping the starter housing with both hands, lift it up and remove it from the engine.
To remove the starter from the engine, you need to lift it slightly
Video: dismantling the VAZ 2106 starter
Disassembly, troubleshooting and repair of the starter
To disassemble, troubleshoot and repair the VAZ 2106 starter you will need:
- key to 8;
- key to 10;
- key to 13;
- Phillips-blade screwdriver;
- slotted screwdriver;
- hammer;
- pliers;
- calipers;
- special mandrels for pressing in starter bushings;
- ohmmeter
The work is performed in the following order:
- Using a 13mm wrench, unscrew the nut securing the wire to the lower terminal of the traction relay.
To disconnect the power wire from the starter, you need to unscrew the nut - Remove one spring and two flat washers from the terminal.
- Disconnect the starter winding wire from the relay output.
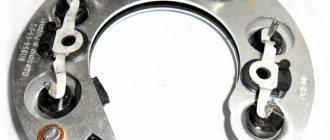
- Using a slotted screwdriver, unscrew the three screws securing the traction relay to the starter cover.
- We remove the relay.
To remove the traction relay, you need to unscrew three screws - Remove the spring from the relay armature.
The spring can be easily pulled out of the anchor by hand - By lifting the anchor up, we disengage it from the drive lever and disconnect it.
To remove the anchor, you need to move it up - Using a Phillips-head screwdriver, unscrew the two screws on the casing.
- We remove the casing.
To remove the starter housing, you need to unscrew two screws - Using a slotted screwdriver, remove the ring securing the rotor shaft.
You can use a slotted screwdriver to remove the retaining ring. - Remove the rotor washer.
- Using a 10mm wrench, unscrew the tightening bolts.
The main parts of the starter are connected using coupling bolts - Separate the starter cover from the housing.
After unscrewing the coupling bolts, the starter cover is easily detached from the housing - Using a slotted screwdriver, remove the screws securing the windings.
The screws securing the windings are unscrewed with a slotted screwdriver. - We remove the insulating tube from the housing.
The insulating tube is pulled out of the starter housing by hand - Disconnect the back cover.
The starter's rear cover can be easily removed from the housing - We take out the jumper from the brush holder.
After unscrewing the screws securing the windings, the jumper is removed - Using a slotted screwdriver, remove the brushes and their springs.
To remove the brushes and springs, you need to pry them off with a screwdriver - Using a special mandrel, press the bushing out of the rear cover of the starter.
If there are signs of wear on the bushing, install a new one in its place and, using the same mandrel, press it in. The bushings are pressed out and pressed using a special mandrel - Using pliers, remove the cotter pin of the starter drive lever.
The cotter pin of the starter drive lever is pulled out using pliers - We remove the lever axis.
The axle of the drive lever is pushed out with a thin screwdriver - We remove the plug.
- We disengage the lever arms.
- Remove the rotor along with the coupling.
To disconnect the rotor from the cover, use a thin screwdriver to disengage the arms of the drive lever - Remove the drive lever from the front cover.
After disconnecting the shaft, the drive lever can be easily pulled out of the front cover - Use a slotted screwdriver to move the washer on the rotor shaft.
The washer on the rotor shaft is moved using a slotted screwdriver - Unclench and remove the fixing ring.
Disconnect the coupling from the shaft. The locking ring is opened using two screwdrivers - Use a mandrel to press the front bushing out of the cover.
We inspect it and if signs of wear are detected, we install and press a new bushing with a mandrel. The front cover bushing is pressed in using a special mandrel - Using a caliper, measure the height of each brush (charcoal).
If the height of any brush is less than 12 mm, replace it with a new one. The height of the brushes must be at least 12 mm - We inspect the stator windings.
They should not have any traces of burnout or mechanical damage. The stator windings must have no traces of burnout or mechanical damage. - We check the integrity of the stator windings. To do this, connect the first ohmmeter probe to the terminal of one of the windings, and the second to the housing. The resistance should be about 10 kOhm. We repeat the procedure for each of the windings. If the resistance of at least one of the windings is less than specified, the stator should be replaced.
The resistance of each stator winding must be at least 10 kOhm - We inspect the rotor manifold. All its slats must be in place. If we find traces of burning, dirt, or dust on the collector, clean it with fine sandpaper. If the lamellas fall out or there are signs of severe burning, we replace the rotor with a new one.
- We check the integrity of the rotor winding. We connect one ohmmeter probe to the rotor core, the other to the commutator. If the winding resistance is less than 10 kOhm, the rotor should be replaced with a new one.
The rotor winding resistance must be at least 10 kOhm - We reassemble the starter in reverse order.
Video: disassembling and repairing the VAZ 2106 starter
Signs of a malfunctioning retractor relay
For clarity and ease of understanding, all common (and not so common) malfunctions of the solenoid relay with symptoms and causes are collected in the table below. The method for checking the starter solenoid relay is described below.
| Breaking | Sign |
| Break in the pull-in winding | The rod does not retract and the drive gear is connected to the flywheel, and the switching unit does not work - the starter is silent |
| Break in the holding winding | Clicking sounds are heard - this is the gear being engaged with the flywheel, but not fixed, but returns back under the influence of a spring |
| Interturn closure of the pull-in winding | It manifests itself in the fact that the retractor does not have enough strength to connect the starter to the engine, but very soon due to overheating the winding goes into a regular break |
| Interturn closure of the holding winding | The starter clicks, but does not turn, the solenoid relay gets terribly hot, and later the winding breaks due to overheating |
| Melting or oxidation of the switching unit | Due to the melting of the contact plates, the resistance of the power circuit increases, the starter turns hard or does not work at all |
| Switch node sticking | The starter continues to operate after the ignition key is released |
| Clogged or worn operating rod | Due to dust, dirt, dried lubricant, the winding force is not enough to sufficiently move the rod from its place, and accordingly, the starter does not turn the engine |
| Solenoid relay freezing | When turning the ignition key, the voltage on the on-board network drops sharply, but nothing happens - the retractor rod is jammed with ice (including water could get in and freeze in the drive mechanism) |
| Bad contacts | It manifests itself in different ways - the starter may work, but it is slow, or it does not work at all |
We finally move on to how to check the starter solenoid relay.
VAZ 2106 starter does not work on a hot engine
- To the beginning of the forum
- Forum Rules
- Old design
- FAQ
- Search
- Users
Yes, I haven’t changed anything, and the protection is in place. It all started slowly, i.e. sometimes it didn’t work when hot the first time, then more and more often, and now it’s not possible at all
It happened to me too. Until the starter turned on while driving. The contacts on the retractor are screwed on with a nut, it is unscrewed, the contact dangles - it does not work the first time. Then it completely unscrewed, the contact fell and closed.
Just try changing the retractor.
The contacts are definitely tight - I just recently changed the brushes and checked everything. Are there any other options?
Have you taken it apart (retractor) or something? If it’s collapsible, you have to solder it there, you won’t be able to get there easily. And if it’s non-separable, how did you take it apart? Now they install only non-separable ones.
In principle, even non-dismountable things, after a fair amount of fucking, can be disassembled and reassembled, in the absence of money and time. But it's better to install a new one. And the comrade’s problem is definitely in the retractor.
Source
Other relay
We figured out where the starter relay is located on the VAZ-2114 and how to replace it. But in the engine starting system there is another part with the same name. Yes, yes, it is also called the “starter relay”. Only extra. And its function is completely different. An additional starter relay serves to ensure the safety of the entire starting mechanism. Without it, the brushes and armature windings would burn almost every time it was started.
You will ask again, where is the starter relay located on the VAZ-2114? On the first models of the “fourteenth” it was located in the engine compartment at the top on the partition separating the engine compartment and the interior. On the new VAZ-2114 it is not there. And some “experts” foam at the mouth and prove that cars of the Samara-2 family do not have it at all.
In fact, there is an additional relay, but it is located under the steering column. Just remove the bottom part of the plastic casing and you will immediately see it. This is a regular four-pin relay labeled 98.3777-10 that protects the starter circuit. If you have problems starting the power unit, do not be lazy to check it too.
Price issue
Many owners are interested in how much this device costs and which starter is best to choose for the VAZ 2110. A standard unit from AvtoVAZ will cost about 5,000 rubles. Imported analogues are also suitable for the VAZ 2110. For example, you can take the BOSCH model, which costs about 10 thousand rubles.
There are also budget freelance models on the automotive market; they can be purchased for 3 thousand rubles. Whatever the starter, it should come with a warranty. Of course, the imported version works better, but the standard device has an excellent price-quality ratio.
Assembly
After diagnosing starter problems and identifying breakdowns, the faulty parts are replaced with new ones. The starter is assembled in the reverse order. Before the unit is installed on the car, it is checked using the battery. The driver must remember that such a procedure is recommended even in the absence of obvious problems, and then the service life of the VAZ-2105 starter will be much longer.
Source
- Tuning VAZ 2105 - tuning the interior, engine, bumper, radiator grille of the VAZ 2105
- VAZ 2105 engine: characteristics, malfunctions and tuning
- Repair of distributor on VAZ 2101-07 and VAZ 2108-09 cars
- Starter repair for VAZ 2108, VAZ 2109, VAZ 21099
Dismantling and replacement
To make it more convenient to replace the relay, it is recommended not to be lazy and still remove the starter itself. This will allow you to simultaneously check the condition of the starter while replacing the relay.
Article on the topic: Installation of ventilated brake discs on a VAZ 2114
First, disconnect the negative terminal from the battery. Otherwise, you will be seriously shocked. There is little pleasure in this. Plus, this will lead to burnout of the wiring, which will be extremely difficult and time consuming to change.
The removal procedure described below concerns an assembled relay, which has the ability to replace individual structural elements.
- Disconnect the negative terminal from the battery.
- Disconnect the red terminal from the relay. This is a red wire.
- Using an 8 mm wrench, unscrew the nut securing the brush assembly. You will find it behind the relay.
- Remove the contact that this nut held in place.
- Unscrew the fastening of the solenoid relay to ground. We are talking about coupling bolts.
- Next, you need to dismantle the power wire, after which the relay itself is pulled out.
- The fastening nuts are unscrewed from the end part, which allows you to remove the upper part of the relay.
- It is advisable to immediately replace the relay core with a new one.
- Install a new relay.
- Proceeding strictly in reverse order, reassemble the assembly, which will allow you to complete the replacement of the unit.
- When separating the relay into its two component parts, be sure to ensure that the core does not slip out and the spring does not jump out.
We can say that replacing the gearbox on a VAZ 2114 is not so difficult. It is much easier to replace a non-separable relay, since to replace it it is enough to unscrew all the fasteners in the same way and disconnect the contacts.
Bushings
Bushings (aka bearings) are located in front and behind the starter. They are responsible for rotating the device shaft. If these elements are worn out, the starter will start clicking, but will not turn. Problems with bushings can also be caused by the fact that the starter is installed incorrectly, that is, it does not occupy the desired position along the axis. Or the winding could short-circuit. In this case, see the previous paragraph.
Healthy! Also, problems with the bushings will be indicated by “heavy” cranking of the starter, even if the engine is well warmed up.
Although many do not consider bearing failure to be a serious failure, they need to be replaced. Otherwise, the starter shaft will jam, which in turn can cause a fire.