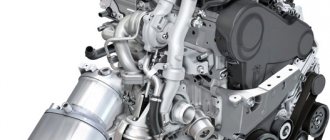
Design and purpose
The engine oil pan is a metal structure usually made of aluminum, but in older cars it could be made of steel. The shape of the oil pan resembles an elongated rectangular basin; it is attached to the cylinder block from the bottom side through a gasket on studs or bolts. There is a plug on the bottom or side surface designed to drain oil from the engine.
The pan is designed, firstly, to protect the oil receiver, crankshaft, and other parts of the engine crankcase from mechanical damage, dirt and dust. Secondly, it serves as a container for motor oil. It is from this that the oil pump delivers it upward through a filter - to the cylinder head, from where, having lubricated the parts of the gas distribution mechanism and connecting rod-piston group, it flows back.
Removing and installing the oil pan
1 Disconnect the ground cable from the battery.| If the car radio in your car is coded, make sure you know the code before disconnecting the battery. |
2. Drain the engine oil as described in the Maintenance , then install and tighten the drain plug using a new washer. 3. Jack up the front of the vehicle and place it on axle stands. Remove both front wheels. 4. Drain the liquid from the cooling system as described in the Chapter Maintenance . 5. Loosen the clamp and disconnect the upper radiator hose from the thermostat housing. 6. Remove the brackets and mounting screws and remove the right front wheel arch liners. 7. Disconnect the oxygen sensor wiring, then remove the catalytic converter and the front exhaust pipe of the muffler/converter as described in the Head of the Power supply system, exhaust . 8. Mark the position of the main selector rod on the front fork in the transmission, then loosen the pinch bolt and separate the two parts of the rod. 9. Disconnect the tie rod end from the left steering knuckle lever, as described in the Chapter Suspension and Steering . 10. Remove the three bolts securing the left drive shaft inner boot to the transmission. 11. Remove both bolts securing the left suspension strut to the steering knuckle. Please note that there are grooves on the edge of the bolt head, and the bolt must be knocked out after unscrewing the nut. 12. Carefully separate the left drive shaft internal connection from the transmission. Tie the drive shaft to the side. 13. Remove the upper bolt securing the right suspension strut to the steering knuckle. Please note that there are grooves on the head of the bolt, and after removing the nut, the bolt must be knocked out. 14. Loosen (do not remove) the lower bolt securing the strut to the steering knuckle. 15. Using a suitable drift, drive out the roll pin securing the right drive shaft to the transmission output shaft. Tilt the steering knuckle as you release the drive shaft from the slots on the output shaft. Tie the drive shaft to the steering mechanism. 16. Remove the bolts securing the engine to the transmission bracket/flywheel cover. 17. On the front side of the subframe, remove the nuts from the front engine mounts and remove the plate from the right mount. 18. At the rear of the engine, unscrew and remove the nuts from the bolts securing the rear engine mount bracket to the transmission and the rear mount pinch bolt nuts. Do not remove the bolts at this stage. 19. Unscrew the bolts and remove the reinforcing rod between the domes of the front suspension strut. 20. Unscrew the ground cable from the right side of the bulkhead. 21. Remove the spring clip and speedometer sensor from the rear of the transmission. 22. Remove the bolts or separate the power steering reservoir from the engine and place it on the engine. Disconnect the brake booster hose from the intake manifold. 23. Disconnect the carbon adsorber hose from the inlet pipe. 24. Where necessary, disconnect the crankcase ventilation hose. 25. Disconnect the wiring from the throttle potentiometer. 26. Disconnect the fuel supply and return hoses from the fuel pressure regulator and fuel line. Refer to the Head of the Power System, Exhaust , if necessary. 27. Attach the winch to the engine and transmission assembly and lift the engine slightly. 28. Where applicable, release the clutch cable in the engine compartment. 29. Carefully lift the engine and transmission assembly just enough to remove the rear mount and bracket bolts. 30. Continue lifting the assembly until the power steering hydraulic pipes can be released from the holders on the subframe. 31. Raise the assembly until there is a 26 cm gap between the bottom edge of the cylinder block and the subframe. Make sure that the engine wiring is not pinched between the transmission and the side frame.
| 32. Remove the bolts securing the pan to the cylinder block, but leave two diagonally opposite bolts until the pan is separated (refer to the accompanying illustration). |
33. Using a putty knife, separate the pan from the base of the cylinder block. Do not use a screwdriver as it may damage the contact surfaces.
| 34. Remove the two remaining bolts and lower the pan. First you need to lower it, then move it towards the transmission and remove it (refer to the accompanying illustration). |
| 35. Remove the rubber seals from the grooves in the left main bearing caps. |
| 36. Remove the rubber seals from the grooves in the right crankshaft main bearing caps or from the curved parts at the ends of the pan. Clean the cylinder block and pan from sealant and wipe them dry (refer to the illustrations). |
Possible faults
Malfunctions of this part do happen, and it is dangerous to ignore them, since loss of oil threatens serious and expensive repairs of the internal combustion engine. They can be easily diagnosed by oil leaks - a characteristic small puddle that remains on the asphalt after an overnight stay and a wet sump. The causes of leaks may be:
- loose oil pan bolt;
- gasket wear;
- loose drain plug;
- cracks in the metal.
Cracks in metal are a much more serious problem than a poorly tightened bolt. They can appear as a result of impacts with large stones, curbs, etc. Even if protection is installed under the crankcase, it can crack due to non-compliance with the bolt tightening torques recommended by the manufacturer. A crack can also occur if the drain plug is overtightened after an oil change or repair. It has a slightly conical shape, is made of a harder metal, and can tear the pan. Such a crack is difficult to see, and some service workers, trying to eliminate the leak near the plug, tighten it even more, which subsequently aggravates the situation.
It is worth noting that a slight “sweating” around the oil drain plug, in the absence of drops or streaks, is normal.
Engine sump: repair
You can often repair or restore the engine oil pan yourself.
When a leak occurs in the area of the gasket between the crater pan and the cylinder block, first of all it is worth checking the tightness of the mounting bolts/nuts. It is necessary to tighten the bolts according to the tightening torques recommended by the manufacturer, otherwise you can strip the threads or cause a crack to appear - then you will have to make more complex and expensive repairs, restoring the tightness of the engine crankcase.
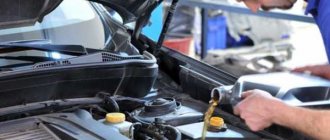
If tightening the bolts does not eliminate the leak, the gasket must be replaced. In this case, you cannot do without removing the pallet. This is not difficult to do from a viewing hole, on an overpass or a lift. We will look at how to remove and install the engine sump yourself below.
The most easily corrected malfunction can be considered a poorly tightened drain plug; they could simply have forgotten to tighten it well after the next maintenance. It is tightened using the appropriate key, by hand, without using additional levers or pipes.
But if you have diagnosed a crack in the oil pan in your car, then the best way to repair it is to completely replace it. However, there are situations when a car of a rare model or a new part is quite expensive, there are several ways to restore its integrity. For example, using glue, dry welding or argon welding.
Removing and installing the engine oil pan
Rice. 15.3. Screw in the plug
Removal
1
Jack up the front of the car and place it on stands (see 'Jacking the car and placing it on stands').
2
Remove the engine protection.
3 Place a suitable container under the engine, unscrew the drain plug of the pan and drain the oil from the engine into the container, □clean the surface adjacent to the plug and screw it into place (Fig. 15.3). Remove the dipstick to check the oil level.
4
Install the front fascia of the body in the repair position in the engine compartment without disconnecting the hoses from the radiator or disconnecting the electrical wiring. First, remove the front bumper as described in Chapter 11, disconnect the sound insulation and disconnect the air intake installed between the front trim and the air filter. Unscrew the fasteners of the power steering heat exchanger, disconnect the electrical wiring on the left side of the radiator. Remove the bolts securing the front trim/front beam to the body. Remove the 2 bolts securing the top front trim to the vehicle's fenders (one on the front/top of each fender and one on the side of each headlight). Remove the bumper guides under each headlight and disconnect them from the fenders. Disconnect the cable connector on the driver's side, use a screwdriver to open the connector and disconnect the two parts of the cable from each other. With an assistant, move the front trim as far forward as possible. Screw in the threaded rods to secure the front trim in position.
5 Remove the accessory drive belt. On vehicles with air conditioning, mark the direction of rotation of the compressor drive belt, unscrew the tensioner pulley fastener and remove the belt.
6
Remove the viscous clutch fan. In a nutshell, this is done like this: insert a bolt from the rear side to keep the clutch from turning, and use an Allen wrench to unscrew the mounting bolt from the rear side.
7
Unscrew the front torque rod bracket to the engine (vehicles with air conditioning) or to the subframe (vehicles without air conditioning).
8
On cars with air conditioning, unscrew the fasteners of the longitudinal strut, unscrew the fasteners of the reaction rod support and its bracket to the engine.
9
Cut the starter wiring fasteners (clamps) under the engine mount.
10
On turbocharged engines, loosen the clamp and disconnect the hose from the air duct on the front fascia.
11
Unscrew the bolts and remove the rear intake manifold bracket.
12
Disconnect the left rear engine mount.
13
Mark the installation of the engine mounts on each side and remove the lower nuts. Remove the left support.
14
If necessary, remove the top engine cover.
15
Install a hoist or hoist above the engine compartment and sling the engine. Raise it as high as possible without tearing off hoses, electrical wiring, etc.
16
Support the front subframe on both sides with jacks. Outline the subframe so that it is installed exactly as it was installed: this is necessary in order not to disturb the alignment of the front wheels. Unscrew first the 2 front subframe mounting bolts, and then the rear bolts. Lower the subframe with anti-roll bar.
17
On vehicles with manual transmissions, unscrew the left gearbox support nut until its end aligns with the end of the bolt (this is approximately
4
turns).
18
On vehicles with automatic transmissions, loosen the rear bolt of the left transmission mount a few turns. Remove the front bolt.
19
On all vehicles, loosen the rear right transmission mount bolt a few turns. Align the front bolt.
20
On turbocharged engines, remove the flange bolts and disconnect the turbocharger oil drain pipe from the engine sump. Remove the gasket.
21
If necessary, disconnect the electrical connector of the temperature/oil level sensor. Remove the pan bolts. Note that on cars with manual transmissions, you can get to the two rear engine sump mounting bolts through the cutouts in the flywheel - turn the flywheel (Fig. 15.21, a, b).
22
Remove the pan and gasket. If the pallet is “stuck”, then tap its end with a soft metal drift (Fig. 15.22, a, b).
Rice. 15.21.8. Unscrew the bottom bolts of the pan (flywheel removed)
Rice. 15.21.6. Unscrew the main bolts of the pallet through the cutouts
Rice. 15.22, a. Remove the pan...
Rice. 15.22.6. ...and gasket
Rice. 15.25. Apply sealant in the places where the body of the front and rear cuffs are adjacent to the pan
Installation
23
Thoroughly clean the contact surfaces of the cylinder block and engine. On AHL, ANA and ARM engines, it is recommended to remove the sealant with a wire brush attached to an electric drill.
AH L, ANA and ARM engines
Caution: Do not apply too much sealant to the pan, assuming that the more you use, the better it will seal the joint. Excess sealant can come off, get into the engine oil line and clog the valves.
24
Apply a strip of sealant
2...3
mm wide to the contact surface of the pallet. The strip should go around the bolt holes from the inside. Immediately after this, install the pan and tighten the bolts by hand.
Note: If the engine and transmission are removed, make sure that the bracket ends are flush with the intermediate plate. If the plate is removed, then take its thickness equal to O.B mm and install the pallet so that after installing the plate they would be flush with each other.
Immediately tighten the pan bolts to the required torque. Read the packaging of the sealant about the time it takes for it to fully set. Usually it is about thirty minutes. After this you can add oil.
To install the pallet easily and immediately in its place, screw as many MB studs into the holes for the pallet bolts. After this, screw on the bottoms of the pallet, unscrew the studs and screw the bolts into these holes.
ADP engines. ADR, ANB. AEB, APT, APU and ARG
25
Apply a little sealant to the surface in the places where the surfaces of the front and rear engine cuff housings are adjacent to the pan (Fig. 15.25).
2 6
Install a new gasket on the pan, install the pan and tighten the bolts. No sealant required. Tighten the bolts in a diagonal sequence to the required torque.
27
Install the bracket securing the gearbox to the engine and tighten the bolts.
Note: If the engine and transmission are removed. then make sure that the end of the bracket is flush with the intermediate plate. If the plate is removed, then take its thickness equal to O.B mm and install the pallet so that after installing the plate they would be flush with each other (Fig. 15.87).
All engines
28
The remainder of the installation is done in the reverse order of removal.
Tighten the fasteners specified for the tightening torques to the required torques. When finished, fill the engine with oil .
Rice. 15.27. Align the pan with the back of the engine using a straight edge
How to remove and install the oil pan yourself
This is not a complicated procedure, and most car enthusiasts can do it, although it does require some repair skills and tools. Depending on the brand of the car, nuances are possible. For example, in VAZ cars of the classic family, with a longitudinal engine, you need to lift the engine. Therefore, before you start disassembling it yourself, read the repair manual for your car.
Procedure for removing the oil pan:
- Prepare a clean container - it can be a canister with a wide neck or a cut one. Its volume must correspond to the amount of oil in the engine of your car;
- Drive onto an inspection hole or overpass; it will be more convenient for you if it is deep enough so that you can stand under the car at full height;
- Warm up the engine to a temperature of 50-60 degrees, the engine oil will become thinner and more fluid;
- If the engine compartment protection is installed, remove it; it is usually secured with 3-4 bolts;
- Carefully unscrew the drain plug, placing a previously prepared container under it, be careful - the oil will definitely flow onto your hands and possibly somewhere else;
- Unscrew the oil filler plug. After unscrewing the filler plug, the flow of escaping oil will increase sharply, make sure that it flows into the canister and losses are minimal;
- Wait until all the oil has drained and begin unscrewing the fastening bolts/nuts;
- If all the bolts are unscrewed and the oil pan cannot be removed by hand, this means that the parts have been glued together. You need to tap it with a rubber hammer, carefully pry it with a screwdriver or other flat object, but so as not to damage the joints. Scratches may cause leaks in the future.
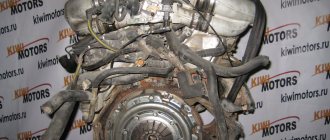
Now that the pan has been removed, you can carry out repairs and also see the crankcase structure.
Installation is carried out in reverse order. The drain plug must be screwed into the pan immediately, and oil must be poured through the filler hole last. It is recommended to combine pan repair with an oil change. It is important to ensure that the bolts and plug are properly tightened, as already mentioned.
Pad
It is the gasket that ensures a tight connection between engine parts. When purchasing, be sure to match the article number. It is not possible to repair a worn gasket. It is recommended to replace it after each removal of the oil pan during installation. In this case, you need to carefully and very carefully clean the surfaces that will be in contact from the remnants of the old gasket and sealant.
To improve the properties of the gasket, you can use graphite lubricant, a special sealant for the engine crankcase, or any heat-resistant silicone-based sealant.
Graphite lubricant is applied to both sides of the gasket in a thin layer; after assembly, it fills micro-cavities, and hardens under high temperatures.
It is preferable to use a special sealant; it is applied in a thin, uniform layer over the entire contact area, on the pan and on the cylinder block. After assembly, the sealant will dry and, as it were, glue the surfaces, ensuring a tight fit and sealing.
Some craftsmen use sealant instead of a gasket, in which case its layer should be thicker, but it is better to leave this method in case the car is so rare that it is difficult to find the right gasket for it.
Oil pan - removal and installation
Removal
1 Apply the parking brake, then jack up the front of the vehicle and install safety stands. Remove the lower protective cover from the engine.
2 Drain the engine oil and remove the oil filter (see Chapter 1 B). Pull out the oil dipstick.
3 Disconnect the wiring connector from the oil level sensor (see Fig. 12.3).
Rice. 12.3. Oil level sensor outside the engine oil pan
4 After unscrewing the mounting bolts, remove the engine oil pan. If it is “grown” to the block, carefully pry it off with a small screwdriver or plastic knife, pushing it into the joint (see Fig. 12.9). When removing, try not to damage the mating surfaces of the pan and the block, so as not to cause leaks.
5 If necessary, unscrew the mounting bolts and remove the oil level sensor and its gasket (see Fig. 12.5).
Rice. 12.5. This is what the oil level sensor looks like inside the oil pan
Installation
6 Using a soft scraper, remove any traces of old gasket and sealant from the mating edges of the block and pan, then wipe them with a rag soaked in lacquer thinner or acetone.
7 If removed, install the oil level sensor along with a new gasket and tighten the mounting bolts.
8 Apply a strip of sealant 4-7 mm wide to the mating flange of the pallet, bypassing the bolt holes from the inside (see Fig. 12.8, a, b).
Rice. 12.8, a. Apply sealant to the oil pan mounting flange...
Rice. 12.8b...as shown in this diagram
9 Carefully install the pan onto the engine block and tighten the mounting bolts. Starting from the center, gradually tighten the pallet mounting bolts to the torque prescribed in the Specifications (see Fig. 12.9).
Rice. 12.9. Installing the oil pan
10 Install the remaining components in the reverse order of removal. Fill with oil and install a new oil filter. Start the engine and check for leaks.
Cold welding
The cheapest way to repair a crack is by cold welding. It is no different in terms of reliability, because it is not brewing, but rather caulking/sealing. Cold welding, as a rule, consists of two components, which are mixed together, applied to the damaged area and allowed to harden. Before doing this, be sure to degrease and thoroughly clean the damaged area. In the case of a small crack, you can try to seal it without removing the pan. When choosing cold welding, pay attention to the temperature at which it retains its properties - it should be at least 200 degrees.
Argon welding
Argon welding is the most effective way to remove damage. This type of welding can be used to weld both aluminum and any other non-ferrous metal alloys. A good welder can easily fix a crack or weld a small hole, and the seam will not affect the functionality in any way. The disadvantage of such repairs is the high price. You can, of course, save money if you remove the part yourself and contact welding specialists directly. But in the case of common brands of budget cars, it will cost less to replace the oil pan with a new one.
Why was the crankcase damaged?
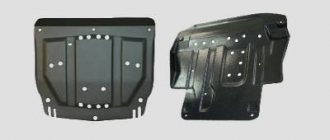
A metal protective sheet located on the bottom of the car protects the crankcase from damage. But an occasional hole on the road or an unnoticed stone off-road can bend the protection. Even at low speed, such an impact can form a crack on the surface of the crankcase. Through a small hole, the car will lose two to three liters of oil in a few days.
It is recommended to check the underbody of the car after hitting potholes and rocks!
Another reason why oil leaks is due to wear on the crankcase gasket. The cardboard or rubber gasket may lose its insulating properties over time, or become dislodged due to crankcase impact. The defect can be easily eliminated by tightening the pallet mounting bolts.
In any case, the cause of the leak must first be identified. You can do this yourself. But you need a pit or a lift, free time and experience. The work is very dirty and requires tools. Moreover, the leak may be for a completely different reason. It is safer to contact specialists.