(Japanese: 短刀
tanto
, lit. “short sword”) - a samurai dagger.
“Tan to” sounds like a phrase to the Japanese, so they don’t perceive tanto as just a knife (knife in Japanese is hamono (Japanese 刃物hamono
)).
Santoku knife: what is it for, what does it cut, how is it used
The shape of the Santoku knife makes it possible to perform monotonous up/down slicing movements for a long time, so it is needed for chopping cabbage, and for cutting hard fruits into cubes, and for cutting fish and meat.
The tool is used as standard, but for convenience it is important to learn a special technique for gripping the knife:
- Hold the blade of a Santoku knife between your thumb and index finger.
- Use your working hand to grasp the handle of the tool.
There is no need to squeeze the knife tightly with your fingers - your fingers and the entire palm should not be under physical tension. At the same time, you should not relax your fingers while slicing food. That is why the handle of the knife should immediately fit comfortably into the palm, and the grip itself should be located as close as possible to the blade.
When slicing, it is worth using different parts of the knife in the process - for example, the tip of the blade and its length to the middle are excellent for chopping small products, the middle part of the blade is optimal for working with hard food.
Advantages and disadvantages
The expressed advantages of using a Santoku knife include the following:
- cutting food into strips, cubes, half rings;
- cutting meat and fish;
- grinding fillets into minced meat without applying excessive physical effort;
- replacement of all other knives - narrow, wide, with a pointed tip of the blade or a blade that is short in length.
If you compare a Japanese tool with a classic European-made chef’s knife, you will immediately see the advantages of the first:
- the length of the chef's knife blade is 33 mm, while the santoku is only 12-19 mm;
- the weight of the “Japanese” is greater, and this makes it possible not to strain the muscles when working;
- The chef's knife has a small height, while the santoku has an impressive height, which simplifies the work process.
Experienced chefs note only 2 disadvantages of cutting tools from Japan:
- the weight of the blade is impressive, so you won’t be able to work with the knife for too long;
- the absence of a sharp tip of the blade - there is no way to remove the core of fruits or the seed pods of vegetables, however, there are other tools for this.
Parameters of a short Tanto knife
Modern tanto knives differ from the canon in almost all respects:
| Parameter | Traditional Tanto sword The sketch is so detailed that you can even make a real Tanto sword yourself | Modern tanto knife This type of American tanto resembles a kitchen knife, but costs 10 times more. |
| Blade shape | slightly curved tip | Straight bevel at 45° |
| flat | With stiffening rib | |
| Type of sharpening | one-sided | Single or double sided |
| blade length | 17-30.3 cm | 10-30 cm |
| total length | 35-50 cm | 22-50 cm |
| thickness | 5-7 mm | 2,5-7 |
| material | sponge iron steel | A variety of steels, including Damascus |
| Handle | Removable | non-removable |
| Attaching the handle to the shank | Bamboo pin | There are no bamboo pins in sight |
| Garda* | Round | Flat, round or none |
In pursuit of a spectacular appearance, modern knives have acquired serious disadvantages:
However, the tip strength of modern tantoids is very high, so sticking them into something hard is much safer - and it will turn out much better than with other knives.
Decline in popularity of eroi-doshi
After 1603, with the start of the Tokugawa Shogunate, samurai no longer wore full armor on a daily basis. The most common knives were tanto, hamidashi and aiguchi, any of which could be used as a complement to the katana and wakizashi. Towards the end of the Tokugawa period, many schools of tanto-jitsu began to emphasize the cut-and-cut style of knife fighting, which differed from the earlier method of delivering the final blow through armor. One school that still teaches this martial art is Yagyu Shingan-ryu in Japan.
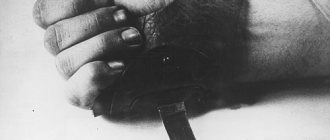
The technique involves throwing the opponent off balance, then plunging the knife into a weak spot in the armor, which is much easier said than done. As with any complex tanto-jitsu, the trick is to control the opponent during the strike. This is especially difficult to do because the loose fit of the hero does not provide a secure hold in the hand, let alone its normal resistance to penetration.
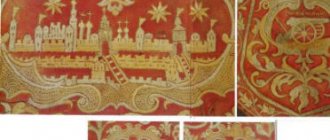
Tanto blades in Japanese culture
Historically, Tanto blades are not a knife, but a sword, so they were most often worn in a sheath:
- for warriors - behind the belt, on the right;
- for women - in the sleeve, fan or behind the obi belt.
Samurai until the 14th century. armed with a pair of swords - daisho (“big-small”):
- Daito (“big tanto sword”) - the main one, more than 66 cm.
- Shoto (“small sword”) - additional, 33-66 cm.
Sometimes the Japanese tanto sword was used instead of the shoto.
In the 14th century The samurai's weapons have changed:
- instead of daito - tachi, then - katana;
- instead of shoto - wakizashi, sometimes - tanto.
Over time, the tanto became part of the military set on a permanent basis, as the third item. It was regarded precisely as a military weapon, and therefore was used accordingly:
- to finish off the enemy;
- for battle in close quarters;
- for cutting off heads;
- for suicide (warriors-men, women, children);
- for self-defense (traders, artisans, monks and other travelers).
Now tanto is a cultural heritage.
The only permitted uses are:
- wedding ceremonies of the imperial family;
- oriental martial arts.
Kaiken
This is a women's fighting dagger. It was used by representatives of the aristocracy as a suicide knife in cases of attack on their honor. A kwaiken (or kaiken) is a "pocket knife" or "sleeve knife" originally carried by women. The name means "womb knife". It later became part of samurai equipment.
It was a small knife that was worn in the inner pocket of a kimono sleeve or in the lapel. It was used for cutting threads, small improvised works, and also in emergency situations for self-defense. Another use came from the samurai tradition: it was used by women for ritual suicide. With its help, the veins and arteries of the neck were quickly cut through.
When to sharpen a knife
Japanese-made devices are sharp. They can easily handle raw meat and fish, and can easily turn vegetables and herbs into small strips or cubes. However, like every item that is actively used, it needs care.
Sharpening a Japanese knife
If you notice that the original factory sharpness has disappeared, and the products have begun to give in less easily, this means it’s time to sharpen the blade. During active use, this procedure is performed approximately once a month.
The process of sharpening Japanese knives
The blade of the devices that came to us from the Land of the Rising Sun differs from the usual European one.
Here it is important to consider some rules on how to sharpen Japanese knives:
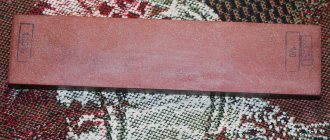
- You need to buy a special water stone.
- First, the tool is treated with a stone with an index of 400–700 units. It removes mechanical damage and prepares for the further process. Mentally divide the entire length into 3-4 parts, process each one in turn. Beginners can use special holding mechanisms. The movements are directed towards the butt, while a burr is formed on the reverse side. When the entire edge is processed and has the same length, you can proceed to the second side.
- The main sharpening is done with a stone with an index of 700–2000 grit. If there is no severe damage, then you can start from the second stage. As a result of the work, the sharpness of the blade is restored and the results of the preparatory stage are leveled out. The principle remains the same.
- For finishing you will need a bar of 2000–5000 units. The actions remain the same, the only difference is that now a burr will not form. To check the sharpness, turn the knife with the blade towards your face. A perfectly sharpened edge cannot be seen. If there are glares, the manipulations continue.
- This step is optional. When using fine-grained stones with an index of 5 thousand to 20 thousand units, polishing is performed. However, you should be extremely careful, because it is at this stage that you can nullify the efforts made and spoil the previously achieved result.
Frequency of knife sharpening and types of deformations
Factory sharpening lasts for approximately one year. If the owner follows the recommendations for care and storage, then only periodic editing will be required - once a month. But you shouldn’t overdo it, because intense and fairly frequent exposure gradually thins the blade, shortening its service life.
There are 3 types of deformations:
- Incorrect cutting direction. At the same time, the severity remains unchanged. To solve the problem, just straighten the blade - no sharpening is required.
- Dull cutting edge.
- Chips and burrs are corrected using complex repairs followed by sharpening.
Errors when processing Japanese blades
In Japan, sharpening is considered an art. You can entrust the job to a specialist in a workshop or sharpen it yourself. However, when choosing the second option, you must adhere to the rules for sharpening Japanese kitchen knives:
- You cannot use only one stone. It is recommended to adhere to stages;
- incomplete sharpening will lead to rapid dulling. Check the cutting edge for glare;
- The preparatory stage cannot be ignored - thoroughly wash the tools and dry them;
- excessive pressure can cause destruction of the stone and will not increase the speed of the process;
- Violation of the factory corner is also unacceptable.
Basic rules for choosing a knife sharpening angle
The sharpening angle of the knife is selected depending on the purpose of the tool; in everyday conditions, it is customary to take the parameter as a basis at 30-45 degrees. But if you constantly use only average values, the service life of the knives will decrease. The most important rule for choosing a knife sharpening angle is that the smaller this parameter, the sharper the blade. But in this case, you will have to edit and re-sharpen the blade much more often.
How to measure
You can measure the desired parameter at home:
Using scissors. The blade requiring sharpening is placed between 2 blades of scissors, and the angle is measured with a protractor.
Before starting the procedure, it is important to make sure that the bolt connecting the scissors blades is tightly tightened
- Ruler-square. It occurs in two stages. The first is to insert the blade between the blades of the scissors, attach the latter to a sheet of paper and trace them with a pencil. The second is to use a square ruler to measure the distance between the drawn contours on paper. The results obtained will be the required parameters.
- Using a board and paraffin. Place a cutting board (new) on a flat and hard surface and grease its surface with oil. The edge of the board is lubricated with a thick layer of warm/liquid paraffin. As soon as the coating begins to harden, a knife blade is stuck into it, which should be sharpened.
- After the paraffin has completely hardened, the knife is pulled out and a photograph of its “print” is taken. The resulting image will clearly show the desired sharpening angle, which can be measured with a protractor when enlarging the photo.
Knife descent angle
Most often it is not necessary to select the angle of descent of the knife, because this parameter is set by the manufacturer. It is only necessary to control it during the process of restoring the sharpness of the blade. The only nuance that should be taken into account: the higher the descent, the sharper the blade will be, and it will be easier to cut even hard materials with the knife.
Eroy-doshi - “dagger of mercy”
These blades first appeared at the end of the Kamakura period (1185–1333), but most were made during the Muromachi period (Sengoku jidai or Warring States period, 1336–1573) in response to the need for good weapons that could be used when fighting against clad warriors. armor by opponents. The eroi-doshi has a blade that tapers to a tip that resembles a spike, slightly angled toward the tip. The blade of the blade was, as a rule, triangular in cross section.
Until the 17th century, this knife with a reinforced edge was used by samurai to pierce enemy armor. It was sometimes used by ashigaru (foot soldiers). But they were mainly the weapons of the samurai, who struck at their opponents' weak points, combining them with empty-handed fighting techniques in a style called eroi-kumi-uchi (literally "armor fighting").
This knife is somewhat reminiscent of a tanto, but with a stronger and thicker blade. Heavily armored samurai were somewhat limited in mobility and speed, but they were virtually immune to unarmed attacks since the armor covered their entire body. Empty-handed jujutsu techniques were initially limited to grabbing, pushing, off-balancing and throwing, although some used empty-handed strikes on certain areas that were not well protected by armor, such as the armpits. Thus, the eroi-doshi was designed to penetrate armor or strike between small gaps in armor. And it was also used to finish off the wounded.
Choosing a stone for sharpening a knife
Choosing a suitable tool for sharpening an expensive branded product is not an easy task, because every owner wants to maximize its service life. There are several main types known:
- Japanese whetstone is a universal option. They can easily correct surface defects and will last as long as possible. They do not become greasy and have different abrasiveness levels;
- ceramic ones have undeniable advantages - high-quality processing, affordable price, unpretentiousness, durability. In this case, you will have to put in a lot of effort;
- Diamond ones are easy to use, perform the task efficiently, and are durable. However, if you do not follow the technique, you can ruin the product once and for all.
For Japanese knives, water stones are often chosen because of the visible advantages over others. In addition, the procedure itself for bringing the cutting edge to perfection is interesting and entertaining.
Technology of using water stone
What could be easier than sharpening a knife? But each tool used has its own rules:
- During the preparation stage, the stones are soaked in water. When using several options of different abrasiveness, it is recommended to place them in different containers.
- You shouldn’t put in a lot of effort - the sharpening won’t get faster or better, but there will be a chance of deforming the stone itself.
- During operation, you cannot change the factory sharpening angle.
Waterstone grain size
Grit size from 90 to 400 is necessary to correct gross deformations and chips.
Full, high-quality sharpening is performed using 3 main types of stones. First, use models with large grains, gradually moving to fine ones.
For initial sharpening, use bars with coarse abrasive - 400–1000 grit. Next, you will need an average level of 1000–3000 grit, and fine-grained ones will help carry out the final stage. Their indicator should not be less than 4000, while anything over 7000-800 is suitable for polishing the product.
Choosing a Japanese water stone for sharpening knives
When choosing a stone, you should rely on 3 indicators:
Hardness - the higher it is, the better. To check, you can apply a few drops of water and wait about 5 minutes. If the water has not yet been absorbed, you have a quality product in front of you. You can also tap on the surface. A loud knock indicates hardness, and a dull knock indicates softness. Density, consistency. The texture should be uniform and dense. The indicators are easy to check. To do this, you need to look closely at the stone: it should have a uniform color over the surface without visible stripes or spots
Pay attention to its reflection - it should be uniform. Presence of deformations. There should be no inclusions, chips, or cracks on the surface - they can ruin the knife.
About storing and caring for water stones
It is recommended to thoroughly dry the bar after each use and place it in a plastic container. If used frequently (once a week), it is permissible to store them in water.
The stone does not tolerate strong drops in temperature. This can affect the texture of the knife and lead to external deformations.
If the stone itself is thin, then it can be glued to a wooden or plastic block, and to prevent chipping, you can install a chamfer on the edge at an angle of 45 degrees.
Sharpening angle of kitchen and hunting knives: the importance of care
The sharpening angle of kitchen knives ranges from 30-35 degrees, but for hunting knives you will need to select them taking into account the following nuances:
- if you have to sand the prey and make thin cuts, then the sharpening angle should not exceed 15 degrees;
- Sharpening of a hunter's universal weapon is carried out at 25 degrees (maximum);
- Rough cutting of the prey carcass is performed with a knife with a sharpening angle of 45 degrees.
Reasons for rapid wear
Kitchen knives become dull quite quickly, this happens for the following reasons:
- cutting boards made of stone, glass, hard plastic are used in the work - such materials round the cutting edge of the blade;
- bones and tendons of meat often get under the blade - the high density of these parts negatively affects the cutting capabilities of the tool;
- the knife is used to clean the scales and cut the bones of fish;
- sand, tiny stones, lumps of earth come into contact with the blade - this often happens when working with vegetables and fruits, so they need to be washed thoroughly before work;
- violation of the rules for storing knives - they should not come into contact with any hard objects.
Blades that cannot be sharpened
There are knives on the market with blades that cannot be sharpened - ceramic ones. They have high quality characteristics and do not lose their sharpness even with prolonged use.
Ceramic blades have the following advantages:
- do not oxidize when interacting with any aggressive environment;
- do not change color;
- do not absorb food odors (even very specific ones).
Such knives are sharpened once every 5-7 years, but it is impossible to do this work at home - you need a special professional tool and certain skills.
You cannot sharpen self-sharpening blades, the peculiarity of which is the presence of tiny teeth on the cutting edge.
Manufacturing materials
The handle is an important part of all types of knives; different types of materials are used for its manufacture: wood, leather, metal, birch bark, plastic, synthetic fibers, bone. The most common are:
- Wood - fits nicely in the hand, light in weight, attractive in appearance. This is a wear-resistant material that does not allow moisture to pass through due to its density. Among the advantages are low weight and easy processing. The disadvantages include moisture absorption and the inability to withstand strong impacts.
- Plastic is durable and practical to use. Electrical insulating plastic is shock resistant. The rubberized one fits tightly to the hand and does not get cold in winter.
MetalWoodPlastic
Leather
Bone
Steel is usually used to make blades; ceramics are also used for kitchen knives. Unlike other models, ceramic knives do not become dull for a long time, do not change the taste of food, and are light in weight. Their main disadvantage is chipping from strong impacts and the difficulty of sharpening at home.
As for steel, it can be stainless, carbon, single-layer or multi-layer. Stainless steel models are easy to care for, but hold an edge less well. Today, many manufacturers offer stainless steel blades with a fairly high hardness rating on the Rockwell scale.
Carbon steel is harder, it holds an edge well, and has high cutting properties. Its main drawback is its poor corrosion resistance, which is why the blade requires maintenance. Carbon steel knives are most often used in professional kitchens.
Laminated steel is made by welding and re-forging multiple layers of steel to create patterns on the blade. The central layer of this steel is high-carbon, so the knife does not become dull for a long time. The outer layers have a higher chromium content to prevent the blade from rusting. The only disadvantage of such blades is their high cost.
SteelCeramics
Types of sharpening
There are several types of knife sharpening:
| Types of knife sharpening | Description | Example |
| Lenticular | The edge of the blade is sharpened, and the bend of the blade can also be processed. With such sharpening, blades are distinguished by a high level of cutting ability; they are able to “work” even on thick material, and, if necessary, serve as a chopping or piercing tool. Lens-shaped sharpening is carried out exclusively by hand, therefore it is used only in the production of professional knives - kitchen, hunting, tactical. | |
| Razor sharpening (flat) | It is carried out at a minimum degree (10-20) and is suitable for processing only surgical instruments, razor accessories, and blades for fine cutting. In everyday life, such sharpening is done for hunting knives for special purposes - for example, skinning knives, fishing knives. | |
| Wedge sharpening | It is rarely used, because after it the cutting ability of the tool increases, but the strength of its blade decreases. During the process, the side surfaces of the blade must be grinded and polished, but at home this is quite problematic. | |
| Pentagonal sharpening | It is widely used for kitchen and travel knives; even household devices for this process often perform just this type of knife sharpening. After it, the blade slightly loses its tactical abilities, but its service life does not decrease. | |
| Double-sided asymmetric sharpening | Combines enhancing the tactical and physical abilities of knives. The result will be ease of cutting even the hardest products, flawless chopping of material without any effort. This type of sharpening is often used in the manufacture of Japanese kitchen knives, which are of high quality. A special feature of knives with double-sided asymmetric sharpening is that the edge of the blade does not enter the cut on the product, but is constantly held on top. |
There are many ways to sharpen knives, they will differ depending on the tool used for this.
The technology of sharpening at home with a whetstone by hand
At home, sharpening can be done in the simplest way - with a whetstone by hand, step-by-step instructions for the process:
- The block is placed on the table in such a way that it does not slip or move. To do this, place a kitchen towel or any other textile napkin under the stone.
- Moisten the surface of the bar with water. There is no need to fill it, just spread a few drops and this will help not only to easily sharpen the knife, but also to completely clean the block of metal particles at the end of the work.
- Place the knife across the block and begin to move it away from you, imitating the movements when sharpening a pencil. In total, you need to perform about 50 movements on one side to achieve a slight roughness (burr).
- Turn the knife over and do the “procedure” for the other side of the blade, also moving along the block at least 50 times until a characteristic burr appears.
It is important to remember two nuances:
- as you sharpen, you need to maintain the angle of contact of the blade with the block;
- You need to continue the process until (changing sides of the blade) until the formed burr completely disappears.
Only after the last condition is met can you stop sharpening and proceed to grinding. To do this, you will need a stone/block with a finely abrasive surface; the movements are the same as before, but to achieve the desired result, it is enough to repeat them 20 times on each side.
How often should you sharpen?
It is believed that knives need to be sharpened as they become dull, but experts recommend this “event” be carried out at least once a week. In this case, it will be possible to maintain the cutting ability of the tool, and the sharpening itself will take place quickly and efficiently.
If we are talking about manual/mechanical sharpeners with wheels or musat, then they can be used at least every day - the knife will be sharp, but not for long. These devices are needed for straightening the knife, and not for fully sharpening it.
History of the tanto knife
Tanto is a knife that belongs to the category of short-bladed weapons and is included in the set of basic weapons of the Japanese samurai. If you classify a knife according to the European system, then it is classified as a standard dagger, but in Japan, experts are sure that it is an ordinary sword, but slightly shortened.
The Japanese do not pronounce the name of the knife the same way Europeans do. They say “tan that”, which means “short sword”.
Historically, the tanto knife was intended for Japanese warriors to fight. The first mention of this type of bladed weapon dates back to 800-1200 years, when knives were made of low-quality steel and were quite rough. Further, until 1868, there was a peak in the production and popularity of tantos, they became a real work of art, and the most “expensive” master for making such knives was Yoshimutsu - he made weapons for samurai.
After 1868, the demand for the tanto began to decline, and as a result, the presence of a knife of this type remained only as a tribute to tradition. During World War II, active production of weapons began again to supply the Japanese army.
In 1950, a law was passed in the Land of the Rising Sun, according to which the tanto knife became the historical, cultural property of the people; it had to be protected from destruction. The only caveat: the weapons that were produced in 1940-1945 were subject to destruction due to the poor quality of the metal.
After the 50s, the history of the Japanese tanto knife “stopped”, but found its continuation in... America. It was this country that began mass production of the American version of Japanese edged weapons in the 80s of the last century.
Higonokami
It was one of the most popular combat knives in Japan, losing its position after World War II. Following an incident in 1961 in which a mentally disturbed 17-year-old boy publicly killed the leader of the Socialist Party with a sword, an intense anti-knife campaign was launched across the country. Since then it has been prohibited to carry these weapons.
Almost all blacksmiths needed to find another job, because their profession remained unclaimed (sword production was banned after World War II). The love for Higonokami was maintained by people with nostalgic feelings and childhood memories. Today it has lost its popularity, and young people in Japan hardly know what higonokami is.
It is called the younger brother of the katana. In fact, this knife is a trademark. Some blacksmiths still make such tools, but they are just replicas and not classic higonoks. From the entire pre-existing guild that had the right to make this knife, only one blacksmith remained: Motosuke Nagao from Miki. He represents the fourth generation of blacksmiths.
The historical, classic Higonokami blade can be recognized by several features:
- Folded brass plate handle with kanji stamp indicating maker's name and blade steel: sanmai with aogami edge (blue paper).
- The presence of a chikiri (lever) on the blade to open the knife.
- No locking system.
- The blade disappears completely into the handle when the knife is closed.
- The knife is always packaged in a blue and gold box.
The history of the Higonokami folding knife is much longer than one might imagine at first glance. It goes back to the beginning of the era of the samurai.
The design of modern combat knives
In recent years, so-called tactical knives have become increasingly popular among sellers and consumers. Many experts in the field of old-school edged weapons believe that this term is not entirely correct. A tactical knife is a weapon that can be used not only as a combat weapon, but also to perform household or household tasks.
Today, one of the trends in the development of combat knives has been the introduction into their design of the most successful technical solutions taken from the so-called survival knives. Another noticeable trend is the maximum simplification of knife design. In addition, a modern combat knife must be adapted to various conditions of use and be versatile. That is, to perform not only combat functions, but also to be suitable for various tactical actions, without which it is difficult for a fighter to do in combat conditions.
A combat knife must be able to quickly cut a cable or wire, remove branches or other obstacles, deal with a lock, dig a shelter, or open a can of canned food.
Before we talk about the most popular Russian and foreign combat knives, a few words should be said about the design of knives and the terminology that is used to describe them. And also about the most common blade shapes and methods of sharpening them.
Any knife consists of two parts: a blade (1) and a handle (2). The blade ends with a tip (3), and the handle ends with a pommel (10). At the bottom of the blade there is a blade or cutting edge (4). On the side of the blade opposite to the blade there is a butt (6). A bevel, descent or grind is a surface that tapers towards the blade blade (5). Such a surface is called a false bevel if it does not end with a blade (for example, on the butt). It is designed to lighten the blade. For the same purpose, small grooves are made on the side surfaces of the blade - valleys (7). In addition, they improve the balance of the knife by moving its center of gravity closer to the handle.
Both fullers and false bevels are not very necessary for small and medium-sized knives; often the manufacturer makes them for aesthetic reasons.
The unsharpened part of the blade, located directly next to the handle, is called the heel of the blade (8). In this part the blade resembles an ordinary metal rectangle. The main part of the handle, by which the knife is held, is indicated by the handle; between it and the blade there is a cross (9), it is often (and incorrectly) called the guard. Previously, the guard served not only to protect the hand in a duel, but with its help it was possible to block the enemy’s weapon. However, today, even if a knife has a guard, it is of a decorative nature.
The part of the blade inside the handle is called the tang. There are several types of attachment of the handle to the shank. The back of the handle is called the pommel or head. Sometimes a hole is made in the head and a lanyard is inserted into it.
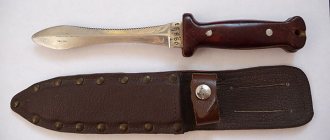
Aiguti
In Japan, aiguti (aikuti) is a dagger that did not have a tsuba (an analogue of a guard that protects the hand). It was considered a reserve weapon, which was used if it was necessary to engage in combat during a battle. In addition, this knife, ranking in importance after the tachi, katana and wakizashi, was also used by the samurai warrior to commit suicide.
It was sometimes made from longer broken blades or from blades that, after going through the yaki-iri (hardening process), were not of a high quality suitable for a katana. Changing the shape of the Japanese fighting knife aiguchi was achieved by trimming the tip and changing the configuration of the blade using polishing stones. Thus there was no need to put it through the forge a second time. Most Japanese combat knives of this type have handles made of bone or horn, decorated with carvings.
Collectors sometimes call aiguchi hocho tetsu, or “kitchen steel.” This is the most derogatory term used in relation to blades. However, the aiguti served its purpose as a “last line of defense” and also had artistic value due to its unique carvings.
What can a combat knife be used for?
A modern combat knife is not only a weapon, but also a tool designed to perform various tasks. As experience shows, most often a soldier needs a knife not to wound or kill an enemy, but for more prosaic operations.
Firing position equipment. This is the most important task in a combat situation, which must be performed competently and as quickly as possible. Using a tactical knife, you can quickly remove various obstacles that block the shooting sector or block your view. These could be branches, curtains, awnings. A fighter can also use a knife when digging, but for this the strength of the blade must be high.
Release in extreme situations. During combat operations, a fighter may become entangled in ropes or cables; in such cases, his life depends on the knife. This can happen when descending from the wall of a house, from a helicopter, or during an airdrop.
Release from handcuffs. In recent years, not metal handcuffs, but those made of plastic are increasingly being used. They are usually cut using wire cutters. A good knife will also cope with this obstacle; knives with a wave sharpening are especially suitable.
Removing obstacles underwater. A good knife is very often a matter of life or death for members of special naval units. For underwater saboteurs and divers, fishing nets are one of the most dangerous threats. A knife can easily solve this problem, saving a person’s life.
https://youtube.com/watch?v=0LdtwqGjou0
Author of the article:
Nikiforov Vladislav
Manufacturing methods
Japanese blacksmiths used sponge iron (tamahagane) to make tanto blades. In this case, the blade had to have a hardening line (jamon) and be equipped with a removable handle, which was attached with a bamboo pin (menuki).
For safe wearing, tanto sheaths were made, thanks to which the owner did not risk losing it.
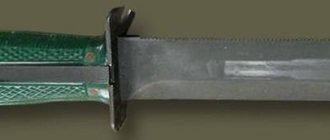
The manufacturing process is similar to creating a katana or wakizashi. The hira-zukuri method was used. This means that tanto combat knives did not have a stiffener, although there were exceptions. History knows the Japanese blade Moroha-zukuri - a sword sharpened on both sides. To penetrate the armor of the eroidoshi, a weapon with a thick triangular blade was used.
All over the world, Japanese swords were famous for their strength, and this was achieved through a specific method of heat treatment of the blade. With this technology, the blade acquired a special pattern, which testified to the painstaking work of the master. Most of the blanks did not become combat blades due to the specific nature of the steel hardening process.
Description of the Santoku knife: characteristic features, size, shape
The Japanese consider the santoku knife to be a universal tool, because its shape and size allow you to work with products using different cutting techniques. Translated, “santoku” means “three good things,” which directly indicates its versatility.
| Santoku knife blade length | Standard – 188 mm, but may vary |
| Blade shape | "Sheep's foot", this makes it possible to minimize the distance between the blade and the board |
| Blade width | Quite large, the heel and the tip of the blade are located on the same line, rarely have a narrowing |
| Material of manufacture | High quality, well tempered steel |
A Japanese Santoku knife, if it is truly original, is always perfectly balanced and sharpened. This allows you to cut not only vegetables and soft meat, but also fish with bones, hard fruits, and cartilage. The blade is sharpened more strongly at its nose, so cooks can begin the cutting movement by cutting through the top layer of the product, then move on to the “sawing” effect.
Regardless of the manufacturer, a knife can be classified as a Japanese santoku only if the following characteristic features are present:
- wide blade;
- a straight line from the butt to the end of the blade;
- blade length – about 180 mm;
- the presence of grooves on the surface of the blade;
- blade material – high-carbon steel (ceramics – interpretation of modern manufacturers);
- handle material – wood, rubber (plastic – options from companies).
What are these real Japanese knives?
Samurai swords were considered the sharpest and most dangerous, and were replaced by durable, sharp Japanese kitchen knives. They were created by hand, with many nuances and subtleties. At the very beginning, swords were made from a single piece of metal.
It was replaced by iron ore, which contained tungsten or molybdenum. They made them flexible, ductile, but at the same time durable. In blacksmith workshops they beat with a hammer.
The blacksmith first made a thousand blanks, bringing the metal to the thickness of a sheet of foil, and then joined it into one whole. This made it possible to obtain a durable blade. The polisher removed excess material, polished the surface, sharpened it, and gave the product a finished look.
The production technology itself, which was used in ancient times, has been preserved to this day. In production, craftsmen use two types of metal: high-carbon steel serves as the base, and low-carbon steel serves as the front, outer part. Having connected, the master hardens it several times in an oven heated to 900 degrees.
This is necessary for sintering the edges. After this, the workpiece is placed in straw ash, where it cools during the day. Afterwards, the blade is shaped, polished, sharpened, and hardened.
Next, the manufacturer’s logo is applied and a handle is selected. At the final stage, they are coated with an anti-corrosion substance, which helps to extend the service life.
Video
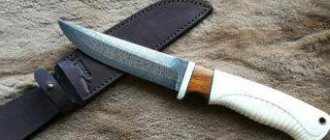
Greetings to all lovers of working with metal. I propose to consider the instructions for making a high-quality knife in the Japanese “tanto” style. In general, initially such knives were swords, but then the craftsmen liked this blade shape and began making knives in this style. Such knives are very convenient for woodworking; they can also successfully cut and chop; this blade profile has also been approved by some chefs.
Materials and tools used
List of materials:
- an old file; - wood for the handle; - epoxy with black dye; - rope; - copper tubes and sheet copper; - deer antler and a thick board (for the stand); - wood for the sheath; - oil for impregnating the wood.
List of tools:
- grinder; - drill; - files for metal and wood; - plane; - sandpaper; - hammer; - chisels; - forge and forging accessories; - hacksaw; - vice; - hammer; - gas torch; - clamps; - polishing paste or fine sandpaper.
Knife making process:
Step one. Manufacturing of the main profile
It should be immediately noted that it is impossible to simply process a file by hand, since the steel is hardened and very durable. Here you will either need a vacation, or you can simply use forging, as our author did. We heat the metal until it glows red and slowly, using a hammer and anvil, set the desired profile of the blade. The metal should not be overheated too much, as the alloying element may burn out and the steel will turn into raw material. It is advisable to perform forging as efficiently as possible, so you will then have less time for grinding.
Step two. Let's start sanding
Step three. Hardening
We proceed to hardening, since we previously tempered the metal. To do this, the author coated the blade with a heat-resistant compound so that the alloying elements remained in place. Well, then we heat the blade until it glows bright red and dip it in oil. After this, we check the blade by trying to scratch it with a file. If there are no scratches, great, that means the steel is hardened. As for such a moment as a vacation, the author did not do it, but it is recommended.
Step four. Bolster and stop
Step five. Butt plate and handle
The author also made a back plate for the pen, thanks to which it will last longer and looks amazing. The backplate is made from a piece of copper pipe and a piece of copper sheet. Both parts are welded together with a gas torch; they can also be soldered or glued with epoxy. The author goes over the stop and back plate with a hammer, making dents. This gives the impression that the knife is antique and looks beautiful.
Step six. Pin and decoration
Step seven. Finishing the handle
Step eight. Sheath and stand
Step nine. Assembling the knife and testing it
Polish all parts of the knife. To assemble it, the author did not use glue; everything is held on a pin, which is very precisely adjusted to its location. Thanks to this design, the handle can be quickly disassembled and polished or its parts can be replaced. If you use brass instead of honey, you can assemble everything with glue, because brass is much more resistant to oxidation.
That's all, now the knife is ready, all that remains is to sharpen it to the point of a blade and place it in its sheath on a luxurious stand made of horns. Everything looks amazing. That's all, the project is finished, I hope you liked it. Good luck and creative inspiration if you want to repeat it. Don't forget to share yours
Typical sharpening shapes
Wedge sharpening. A classic sharpening shape that is well suited for blades that experience significant stress. Such a knife can be used not only as a weapon, but also as a tool. The blade from the blade evenly thickens upward.
Dove sharpening. It is made in the form of a narrow and very thin blade that cuts perfectly and is highly sharp. This kind of sharpening is also called razor sharpening. However, there is also a negative side to this: such a blade is less durable than with a wedge sharpening. Typically, such knives have a massive spine, which ensures the strength of the blade. Knives with wedge-shaped sharpening are intended exclusively for cutting; using them as a tool is extremely problematic.
Sharpening in the form of a chisel. A similar sharpening is used in Japanese kitchen knives, and it is a single-sided wedge-shaped sharpening. There is controversy as to which side it is better to do it on, the right or left. When working, it is necessary that the sharpened side is on top. This is exactly how a carpenter works with a chisel. It turns out that such knives need to be made separately for left-handers and for those who are better with their right hand.
Convex sharpening. This type of sharpening is rarely used for combat knives; it is most often used when sharpening axes. Knives that use a convex sharpening are most often used as cleavers.
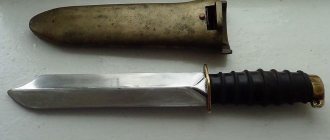
Evolution
This Japanese fighting knife can be either single-edged or double-edged. The length of the blade ranges from fifteen to thirty centimeters. Like most knives, it can be used as a piercing or slashing weapon.
The tanto first appeared between 794 and 1185 as a common weapon without artistic excess: a practical blade born of necessity. Between 1185 and 1333, higher quality and more artistic tantos began to be created. Interestingly, when new hostilities began from 1336 to 1573, the quality of weapons used for combat purposes increased again, and artistic decoration ceased to be as important and was used very rarely. Due to the mass production of the tanto during this time period, the blade was made narrower, saving material to produce more units.
These Japanese combat knives were, as a rule, forged in such a way that, unlike a katana, the zone hardening line of the weapon (hamon) was not visible on the blade. They were mainly worn by samurai warriors. Women used a smaller version of the tanto called a kaiken for self-defense. These Japanese fighting knives are divided into two categories: suguta tanto and koshirae tanto.