Home > Forging in the interior • Articles about forging > Medieval weapons and armor - forged decoration for your home
Forged weapons are now back in fashion. Today, military attributes in the interiors of premises are not uncommon. They tell about the hobbies and character of the owner of the house. Collectible items, stylized from different eras, often have, in addition to artistic value, their own destiny. They keep special memories and secrets, and also delight with their grace and splendor.
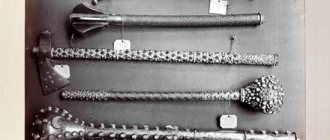
Type of swords: area of their use
Since we have already received the general concept of a weapon called a sword, it will be interesting to find out what types of it exist, of which there are actually many. A sword called Akinak
, is of ancient Scythian origin and is distinguished by its small size.
Enshakubo
is a sword similar in size to the akinaka sword, but comes from Japan.
Xiphos
- this sword became a real property of the ancient Greeks. But there are also swords, the shape of which, in a certain way, attracts attention.
Banya
- a sword that has a long and at the same time narrow blade, with an extension at the end (like a rhombus), India is considered its homeland.
On the contrary, a tapering blade, similar to a syringe with a needle, is characteristic of a sword called Anelas
, it belongs to medieval European culture.
Another interesting specimen of the sword, which also comes from India, is called Bhelkheta
, it has a very interesting handle, but, most importantly, the long narrow blade at the end goes into a guard, somewhat reminiscent of a bowl.
Brightsax
is the sword of the ancient English, it also gave its name to the Saxon tribes.
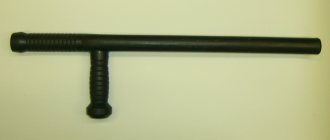
Jutte
is a Japanese sword that resembles a round stick and does not have a blade on the blade.
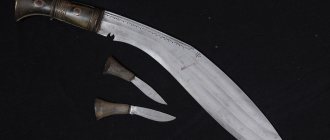
Pamdao
is a sword from Nepal that has a wide blade base and is curved in two directions.
The katana
is probably the most recognizable type of sword in the whole world. Its shape has a relatively straight blade base, and the handle is designed so that it can be grasped with two hands. And also a saw sword, a sword with a wave-shaped blade and many others.
As we see, almost every single nation has its own characteristics in approaches to edged weapons. And this is not a complete list of what we have listed, however, swords of various types are available on all continents of the Earth and they have their own separate history.
Katana with curved blade
It is as close as possible to a real katana in appearance - it has a curved shape, maintaining the proportions of a narrow sword. The beveled point is not cut off, but is bent inward, which makes the tip stronger. The sheets for the frame are first glued together with tape and then rolled into a tube - this approach makes the base uniform. In the handle area, several leaves rolled into a tube are added, the handle is wound on top - this gives the structure stability and reliability. The tsuba is voluminous and fixed with glue.
The use of swords in Ancient Rus'
It just so happened that Ancient Rus' was constantly drawn into some kind of military conflict. The Slavs used edged weapons, such as spears, maces, axes, etc. But the shield and sword gradually became the main and most significant attribute. Although, in fairness, it must be said that the sword was available only to heroes and governors (a privileged part of the population), but, in general, it personified the entire army of Rus'.
The most sophisticated swords of that time were considered to be the blades of the Carolingian group. Their base combined a steel blade welded onto a metal base. The length of such swords could reach almost a meter, although gradually they became shorter and shorter. These weapons were made by blacksmiths from Western Europe, belonging to the then Carolingian Empire (present-day part of France, Germany and Italy), and delivered to Ancient Rus'. In Rus', there were also blacksmiths who easily smelted steel and iron swords, but all this was not put into production. Wealthy warriors, feudal lords and other nobility of Ancient Rus' most often chose steel swords, and those who were poorer chose iron ones. Although in Rus' there was another type of bladed weapon, albeit less common, it was called a damask sword. Despite its bulky appearance, it was rarely used in battle; mainly, it served for beauty and grace, which is why patterns and ornaments were often drawn onto it. And all this continued until the 10th century, when sabers replaced swords in Ancient Rus'.
Getting a way of life
Melting kritsa in crucibles is not the only way to obtain steel from kritsa iron. Another way is to obtain the so-called raw steel, or structure. The method was as follows: soft iron was heated in a forge, in burning coal, saturating the surface of the ingot with carbon. Then the ingot was sharply cooled with water or snow, as a result of which the surface layer hardened and became brittle. Upon impact, this “shell” of carbon steel separated from the ingot in the form of plates. Then the kritsa was heated again and the above-described operation was repeated until the entire ingot was transformed into such plates. Then the plates were heated in a forge and welded together, obtaining a steel billet suitable for the manufacture of various products. The way of life was quite suitable for making edged weapons. To improve quality, such weapons were often manufactured using a batch design - as in our case. Most often, the number of packages was reduced to two: blades made of high-carbon steel, obtained by carburizing iron or raw steel, were welded (or welded) into the body of a blade made of mild or raw steel.
How to make a sword from wood
Many children, especially boys, love to play with swords (fake ones) on the street. To feel like a hero, to overcome evil - this is not the cherished dream of boys. This was the case in the USSR, and now in Russia. Children's stores today are full of plastic swords, one better than the other. But sometimes, for various reasons, some fans of “knighthood” become enthusiastic and want more realistic actions. A plastic toy in the shape of a sword is no longer interesting, and buying or smelting a sword from metal is expensive and tedious. In this case, there is only one option left - to make a sword out of wood. The advantage is that this type of pseudo-weapon can be made completely to your taste, as you want. A small child, due to his physiological state, is unlikely to be able to make a beautiful wooden sword, so it is best to turn to an adult for help.
All you need is a board (preferably level) with a solid base. Based on it, a sketch of the future wooden sword with measured edges is made. Then, either manually - using a hacksaw, or using a special machine - we cut out the outlines of the figure. The resulting imperfect material, of course, will have to be ground, and this applies to the entire base. A file or sandpaper is good for this. We remove all roughness and make the handle round and smooth. If it has a so-called “apple” (a bulge at the bottom of the handle), then it should also be sharpened. But, if this element is not there, then you can take some semicircular material as a basis and use a self-tapping screw to screw it to the handle of the sword.
We pay special attention to the blade - it should be a little flat from the original version and at the same time aligned at the ends of the edges. It is better to make the tip of the blade a little dull to avoid unpleasant consequences. The final phase may be coating the wooden sword with varnish, or painting it, for example, in a silver color to match a real sword. But in general, you can make a curved sword from wood, an analogue of a Japanese katana, and many other interesting things.
Once upon a time, a good sword or dagger was not only an object denoting the status of the owner. The life of its owner often depended on the quality of the blade. Nowadays, edged weapons serve more of a decorative function, but many people want to know how to make a blade.
A sword made by yourself can become an excellent interior decoration and the pride of its owner.
Diamond from cardboard
The host of the program “MaTiTa - Crazy Inventor” shares his skills in creating a short diamond sword from cardboard and paper. To work, you will need a piece of corrugated single-layer cardboard, two sheets of different colors (the author has orange and light green), scissors, a knife for cutting out the outline, felt-tip pens, regular glue and a glue gun. It’s easy to make, and a step-by-step demonstration of the process makes the task as easy as possible. The result is a voluminous short pixel dagger. This option has a sturdy construction as it consists of two pieces of cardboard glued together.
An easy way to make a sword at home
To make a blade at home, you will need the following tools and materials:
- sheet steel about 5 mm thick;
- Bulgarian;
- drill;
- electric sander.
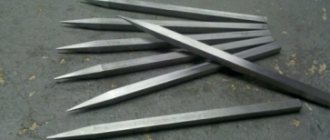
The outline of the template is traced with a marker on the forging and cut out on a grinding wheel.
The work begins with a sketch of the future sword on paper. After this, the contours of the blade are transferred to the metal, taking into account processing allowances.
- Using a drill, holes are drilled in the corners along the drawn contour if the shape of the sword is quite complex. This will make it easier to cut out the outline with a grinder. Make holes for attaching the handle.
- Cut the blank along the contour on the metal. If you don’t have a grinder, this operation can be performed using a chisel and hammer.
- Further processing is carried out using sandpaper or a file: excess metal should be removed, giving the product the shape of a sword, thicker towards the center and thin at the cutting edges. The relief on the blade in the form of fullers or other parts is made with the same tools.
- The blade is hardened and tempered. The process is described below, in a more complex method of making weapons with your own hands.
Return to contents
Double sheath
An origami virtuoso and host of the “Origami and DIY Crafts” broadcast demonstrates a 30-minute step-by-step creation of a double samurai sword in a sheath. It divides 3 sheets of A4 paper into main sections. Makes two blades with beveled edges and two rectangular tsubas by cutting holes in them and placing them on both sides of the blades. Between the tsubami, in order to bring the product as close as possible to the original, decorative inserts are used on the handle under the braid. A sheath is prepared for each blade. The master class stands out for its interesting sound effects, as well as the absence of any verbal accompaniment.
Greetings, brain brothers
! Here is a detailed guide on how to create a magnificent Barbarian sword. Not a decorative thing, but a high-quality and beautiful sword!
Since I decided to create the Barbarian sword for myself, I am a hunter by nature, and a lot of time has passed until its implementation. I think this happened not because of a lack of desire, but because a lot of time was spent acquiring materials, necessary equipment, and, of course, knowledge - this, I believe, is true for many projects.
This tutorial contains over 200 photos, so I won't go into detail about my steps, let the photos speak for themselves.
Design criteria: I wanted to make a beautiful sword, a little in the “fantasy” style, but without losing its properties, that is, it should be durable, functional, made of decent steel and with high-quality detailing of the elements. At the same time, the tools and materials used to make a sword should be accessible to many, and not expensive.
Roughing the Blade: Since I don't have a forge or anvil, I decided that I would carve rather than forge my sword from a strip of metal. As a base, I used 1095 high carbon steel, this is an inexpensive steel recommended for “knife makers.” In general, if you are planning to make a good blade, then it is better to use stainless steel, hardened steel, and if it is a “wall hanger”, then you can use less expensive grades of steel. And also, if you live in a humid climate, then take into account the carbon composition of the steel, since high-carbon steels rust very quickly.
Step 1: Gutter
A groove is a groove running along the length of the blade. You've probably heard another name for it - blood flow, this is not true, since its main purpose is to reduce the weight of the blade. In this case, it is a purely decorative element. I spent a lot more time learning how it was made than making it.
The depth of the groove is chosen relative to the thickness of the blade, and you should not deepen the groove too much, as this will weaken the craft. I made a groove on each side 0.16cm deep, while my sword is 0.5cm thick.
Step 2: Mounting Base
Now we will make a mounting base for the sword and will use it throughout the entire process of creating the sword. It allows you to process the knife more efficiently, grinding, shaping, etc. The blade blade is flexible and soft, so I don’t regret spending time on creating the mounting base, because with it I made a sword of excellent quality.
I made the base itself from scraps of lumber, just slightly shaped the board into a sword shape and installed fasteners.
Step 3: Blade
I sharpened the blade using “old school” technologies - by hand, with a file, without whetstones, grinders or other devices. I spent at least 4 hours on this whole thing, and I think if you do this constantly, you can save on the gym. So, brainiac
into your hands!
And a few tips: - if you plan to further harden the blade, then do not sharpen the blade until it is sharp, leave the cutting edge with a small thickness of 0.07-0.15 cm. This way you will avoid cracks and deformations during the heat treatment process.
— constantly check the correctness of the blade geometry. To do this, it is convenient to shade the initial blade with a marker and mark the boundaries of the blade. I marked the bevel at 45 degrees, and during the sharpening process, when the marker disappeared, I knew for sure that the required sharpening angle had been achieved.
- use different files, both coarse and fine, as some remove a lot and with grooves, while others remove smoothly, but the process is slow.
Step 4: Heat Treatment
As I mentioned, I don't have a forge, so I had to work hard to find a workshop that would temper my sword using the "differential hardening" method. This is an interesting method that is used by Japanese craftsmen to harden katanas. The bottom line is that the blade and the body of the blade are cooled differently, because the body of the blade is coated with clay, which slows down the cooling process. Thus, after heating and cooling, the blade becomes hard but brittle, and the body of the sword is soft and durable. Which is what you need for a great sword.
At least in theory.
Perhaps any boy, even if he had already grown up and started a family, imagined himself as a crusader, Robin Hood, Spartacus, Peter Pan or a fearless samurai. And what is a hero without a trusty sword? Nowadays, it is needed for a carnival costume, a collection of imitation weapons, battle reconstruction or fencing training. The necessary weapons can be purchased on specialized forums or made independently at home. In today's review from the editorial staff of the online magazine HouseChief, we will look at how to make a sword from wood and other materials for training, games or collection.
What boy didn’t imagine himself as a knight in shining armor and a sword PHOTO: andomir.narod.ru
Read in the article
How to forge a blade with your own hands?
To obtain the desired thickness, level the plane of the blade by moving it back and forth in a circle.
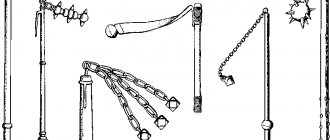
Forging involves the formation of a metal product by striking a hot material, which, due to exposure to high temperature, becomes plastic and soft. To make a sword using the forging method, you will need:
- low-carbon steel (rod or strip);
- hammer;
- anvil and forge
If you start forging from a rod, then the first step is to forge it into a square or rectangle along its entire length. Then a strip is cut from this blank, the thickness of which corresponds to the thickness of the intended product plus excess, which will be removed during further processing.
You should try not to cool the metal too much, since the inevitable bending during forging is better to straighten before the next heating of the workpiece.
The allowance along the butt is ground together with the debris and aligned with the side surface of the circle.
A distance is set back from the end of the strip that will be slightly less than the required length of the handle, taking into account that when this part is thinned, it will lengthen. Heat the workpiece until the metal glows red and break the shank. To do this, at the required distance on the edge of the anvil or on the backing tool, use the sharp end of a hammer to form a “step” - the shoulders of the blade body. The thinner part is called the shank. Pull the shank to a cone.
The body of the blade is given the desired contour. Slopes from the middle to the edges can be formed using sandpaper or forged by striking at a strictly defined angle from the edges to the center of the strip. The forger's elbow pressed to the body will help maintain a constant position of the hammer during forging. This way the blows will be delivered strictly vertically, and the inclination of the striker to the plane of the anvil will be controlled by fixing the hand in a certain position. The fullers on the blade are traditionally forged using a template.
Scale particles remaining on the metal make its surface uneven, covered with dents of varying depths.
To remove scale during the forging process, the hammer and anvil are periodically moistened with water.
The bottom of the blade is satin-finished along its entire length, then the transverse line of the heel is processed.
After the final finishing of the blade, it is annealed to eliminate internal stresses: it is heated to red and left to cool in the forge. Then start hardening:
- The blade is heated to a barely noticeable red glow as evenly and slowly as possible. The air flow from the blast should not hit the product. At the quenching temperature, it is kept for some time, which is calculated by a coefficient of 0.2 from the heating time.
- To quickly cool a heated blade, you need a large volume of cold water. It is completely immersed in the container vertically or at an angle.
- The blade section is cleaned to a shine and the blade is again placed in the forge for tempering after hardening. Heating is carried out until the cleaned area acquires a golden color. The sword is cooled in air.
Despite the fact that in the modern world firearms are widely used, cold weapons are still used - in daggers and bayonet knives. This is where the official combat use of edged weapons ends. and daggers became part of historical and national costumes. Role players and reenactors fight with gusto, using wooden, plastic, automotive steel and other materials in their battles.
In almost every school of hand-to-hand combat you can find a direction in fighting with sticks and training swords. Because fencing develops body balance, orientation, movement speed and muscle flexibility. A person who knows how to fence with a steel sword can easily do the same with any stick.
Softness and hardness
As a result of the above operations, we received three approximately three-kilogram blanks from different types of steel in the form of strips. However, the sword is still quite far from these stripes. According to Vasily, “these are not parts of the blade yet, but only the material from which they will be made.”
One of the ways to create a hard cutting edge of a weapon in the 13th century was carburization - surface hardening, that is, carburizing the surface of products made from relatively soft steel. The product was placed in a closed vessel filled with an organic substance - a carburizer, which most often was coal, crushed horns, or a mixture of both. Then the vessel was placed in an oven, where at a temperature above 900 C without air access, the carburizer was charred and the surface of the product was gradually saturated with carbon. This method was widely used for carburizing axes and blades (more or less mass-produced products). But cementation is the hardening of a surface layer of a certain depth; when this layer was worn away, the cutting edge ceased to hold an edge, and the weapon had to be subjected to a new cementation procedure. And with increasing depth of cementation, the risk of making the surface too brittle increased. So we rejected this method, since it still does not allow us to achieve the qualities we need. After all, the “perfect blade” of the 13th century (as well as of any other time) should be elastic, dampen vibrations during impacts, viscous and not brittle, but at the same time, the cutting edge of the blade should be hard and hold an edge well. It is almost impossible to create such a sword from a homogeneous material, so we decided to resort to the composite technology of that time, using a batch design and pattern welding. Our sword will be “built” from seven packages of three types, each of which performs its own task.
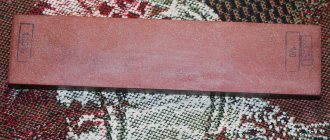
Historical steel Steel obtained by melting red iron in a clay crucible. A real ingot found during archaeological excavations of a settlement near Novgorod.
The first package is made of soft low-carbon (up to 0.3% carbon) iron. From elongated strips of this soft iron we make a six-layer “sandwich”, forge it (in this case the layers are welded into a single package), cut it and fold it in half, forge it again, repeating this process eight times and ultimately obtaining a package of relatively soft Damascus steel, numbering approximately 1500 layers. This package will be the “backbone” of our sword - its core. Such a viscous core works under compression, absorbs shock loads and dampens vibrations, preventing the sword from breaking under strong blows. It also links all surrounding packages that perform other tasks into a cohesive whole.
Preparing packages The steel obtained after remelting is used to assemble packages that will serve as parts of the blade. On the right is a forged high-carbon steel blade blank, hardened and then broken to evaluate hardness, brittleness and red brittleness.
The second package is the future blade. To make it, we used two types of steel we had previously obtained - medium-carbon and high-carbon. Alternating strips of these two types so that the medium-carbon material is “outside”, we put together a sandwich of seven layers and, pouring flux, weld them into a single package. Then we cut it, fold it in half and forge it again. We repeat the operation 14 more times. It’s easy to calculate that in the end with this folding we will get... more than 200,000 layers! Considering that the final thickness of the package is 6 mm, we can calculate the layer thickness to be about 30 nm. “Actually medieval nanotechnology! - Vasily laughs. “In fact, of course, these are very conventional ‘layers’ - with such mixing, the structure of the steel turns out to be close to homogeneous.” The blade should ultimately be hard and hold an edge well.
Package scheme Our blade will be assembled from seven packages, each of which performs its own task.
What types of swords are there?
There are several types of swords. The simplest and easiest to make are straight, one-and-a-half and two-handed. They differ in weight and type of combat with them.
Direct or Slavic - the smallest and most convenient to handle with one hand. In the second hand they usually take a shield or another similar sword. The handle of such a weapon is designed for one hand. To select the size, take the workpiece in your hand - the tip of the blade should touch the ground.
The one and a half sword is an intermediate sword between straight and two-handed. A fight with this is carried out either with two hands, or with one and a small shield, so that you can always help the second hand. This type of sword is very common in hand-to-hand combat schools, as it allows you to develop the upper shoulder girdle and strengthen the joints.
The heaviest and longest, if you rest it on the ground, the handle should reach your chin. This can only be handled with two hands. In training, it is good for muscle development.
All swords, one way or another, develop coordination of movement, especially if the battle is against several opponents.
What happened in the end?
Here's what!
That’s all for today, and we remind you that becoming the main character of the “Masters” section is very simple. You just need to send an email with a story about your workshop.
You must attach a link to photographs of your work to your letter. These are not necessarily swords or helmets. We are very interested in masters of carpentry, leatherwork, and tailoring. The main thing is that your work is of high quality and corresponds to historical finds!
That's it. We are waiting for letters))))
Making a wooden sword: what material to choose?
A wooden sword can be made from different types of material. Some advise taking dead wood or parts of boards from birch, hazel, oak, and aspen. This is suitable if you need wooden swords for training so that you don’t mind breaking them. If you're preparing for a role-playing game and want an impressive, durable sword that you can show off with, then it's worth picking up a fresh sapling. The thickness depends on the type of sword. You can take thicker wood, but then you need to choose the core as the strongest part.
Be careful when choosing the material; wooden swords with knots, rot and wood bugs do not last long. The selected workpiece must first be soaked until completely saturated with moisture, and then dried very slowly so that the wood does not crack. If you follow the wood drying technology, you will get a very durable and lightweight sword.
Sword at home: how to make?
A wooden sword, despite the pliability of the material, will require patience and skill in working with. Remove the bark from the workpiece with a plane, removing irregularities along the way and making the barrel straighter. Plane the trunk on both sides so that the blade is from 3 cm to 0.5 cm. There is no point in sharpening the wood, given the strength of the material. All sharp edges must be removed and the blade made oval. You should not make the handle round, otherwise during the fight the sword will spin in your hand; it is better to choose a rectangle with rounded edges as a shape. Between the blade and the handle, carve out a place for the guard. The guard can be made of wood, metal or nylon. We make two identical symmetrical parts and secure them with electrical tape.
The handle is also wrapped with electrical tape or wet leather. The balance of the sword should be at a distance of one or two palms from the guard to the blade; if this point could not be observed during the manufacture of the sword, then when winding the handle, lead inserts can be hidden under the winding. The tree itself should be strengthened with impregnating compounds, like epoxy resin. Your weapon will last you longer and will not be afraid of moisture. Wooden swords can also be made beautiful. Therefore, at the last stage all that remains is to decorate the sword to your liking.
Are you still wondering how to make a wooden sword? This is a simple product. But to improve your skill, you can start with a knife or a boat.
Assembling the sword hilt
to the begining
After I remade the crosspiece, I widened the hole in the pommel, shortened the tang to reinforce it, and made an additional recess at the top of the pommel.
First of all, I got the crossguard aligned with the sword's fuller. (See picture below) ..looks much better.
I also re-made the blackboard with wood lining and covered it with leather, but this will be covered in more detail later. Below in the picture is the original state of the pommel.
The next shot shows the pommel after I've milled out the hidden area for the tang.
The following illustration shows the pommel after I installed it (you can see the ugly blob). I probably nailed it too hard, but it turned out really strong. I'm sure everything is done very tightly.
Making a wooden shield
Based on the preferences of the Scandinavians and modern materials, the simplest thing is to make a board from plywood 6 mm thick. Using the markings, cut out a circle of the diameter you need. Cut a hole in the center for the fist. Using a wood knife or paint, you can imitate boards. For durability and a better look, coat the shield with stain.
Depending on the size of your hand, make a metal umbon to cover the hole. The shield handle is attached to two strips, which are attached to the entire diameter of the product. The handle is made of oak, birch or ash. They are fastened with nails, and the protruding parts are removed with pliers and riveted.
At the next stage, the shield is glued with leather or burlap. After this, the umbon is mounted. The shield is framed either with metal or leather. The metal is from 1 to 1.5 mm thick, and the leather when forging should be thicker, from 5 mm.
For ease of wearing, you need to make a leather strap. This addition will allow you to carry the shield on your shoulder or throw it over your back over your head.
The final stage - decoration - is left to your discretion. The shield was often depicted with a coat of arms, a unit sign, or simply a drawing aimed at intimidating the enemy.
Training with a wooden sword
In hand-to-hand combat schools, sword fighting training is often organized during classes. This perfectly develops coordination, reaction, and a sense of distance. And the painfulness of the blows allows you to believe in the reality of the battle. Wooden swords and shields are excellent weapons for such training. There are separate schools of sword fighting where they use heavy defense, and the fight is more like a show. But there is a drawback to such training: the fighter, getting used to strong armor, begins to expose himself to blows, and in the case of street stick fighting, this leads to injury.
But try to remove the protection, every blow leaves bruises. After a few lessons, students begin to dodge blows. When fighting a stronger opponent, they learn not to take the blow harshly, but to redirect it. In combat with several opponents, they develop coordination, speed of movement, thinking and intuition. Such skills will be useful in real life, and not just in the ring.
A wooden sword is cheaper and easier to make, so it is used for training. With its help, you can practice most movements, but when switching to other materials, you have to learn a lot again, since the weight changes greatly. Some trainers use very heavy and clumsy wooden swords so that students develop muscles, and the movements are practiced on metal.
Additional protection
When looking at photos of wooden swords and making your own, do not forget about protection. In the heat of a training battle, it’s easy to lose your composure and start hitting with full force. To avoid fractures, it is worth using additional protection for the arms, legs and head. The first defense is your own sword, then the sword guard. Fingers, wrists, and forearms are at risk. In mass battles, everything else falls into the risk zone. Therefore, it is recommended to protect your hands with gloves, and your wrists and forearms with sleeves. Cover the body with a thick leather jacket or quilt. You should put a thick knitted cap on your head; in case of a miss, it will soften and distribute the blow. To protect your teeth, do not forget about the mouthguard. Legs from the foot to the knee should be covered with high boots or boots with knee pads.
Samurai with scabbard
The author of the “Origami and DIY Crafts” channel in this lesson shows how to create a shortened sword and a sheath for it in 20 minutes. With just 5 pieces of A4 paper, glue, a pencil, scissors and dexterous fingers, he created a believable ninjato. The entire process is demonstrated to the viewer, so repeating it will not be difficult. Two sheets will be needed for a straight blade with a beveled sharp end, another one to create a rectangular tsuba. The final touch is the sheath into which the blade fits tightly to the handle.
Reenactors
The movement of role-players and re-enactors is popular in our world. Some use plots from fantasy books for their games, others reconstruct battles from our history. If the former can get away with not playing a very active role and not participating in mass battles, then the latter are better off having fencing skills, good physical fitness and dexterity, and also being able to fight in formation.
It’s always easier to buy a sword in a special workshop; it’s not difficult to find one among roleplayers, but if you decide to make a wooden sword with your own hands, then be patient.
If you can’t afford to buy a ready-made sword or you just want to make a homemade sword for a fancy dress or training, then it can be made from wood. To complete this project, a wooden block of the required length with a cross-section of 5x10 cm, which is quite affordable for purchase, is well suited. Determine the sword length that suits you. Turn a sword into the desired shape from a block. Finish the sword by sanding down any rough edges to give the sword a smooth, professionally crafted appearance.
Steps
Part 1
Determining the Ideal Sword Length
- Stand up straight.
Keep your back straight and your shoulders back. Your arms should hang freely at your sides. The hands and fingers should also be relaxed and directed towards the floor.
Determine your dominant hand.
The term “dominant hand” refers to the hand with which you are most comfortable performing fine manipulations. This is usually equivalent to identifying the hand with which you write, hold tools, or throw a ball.
- But in some cases it is more convenient to hold a sword in a hand other than the one with which you write or hold tools.
- To determine your dominant sword hand, try holding a straight wooden stick or something similar in shape. The length of the stick should be approximately equal to the length of the forearm. The hand in which you are most comfortable holding the stick will be the dominant hand for the sword.
- Measure the distance from the hollow between the thumb and index finger to the eye.
If you spread your fingers, a V-shaped depression forms between the thumb and index finger. Still keeping your hand relaxed with your fingers facing the floor, measure the distance between the base of the V-shaped socket of your dominant hand and your nearest eye.
- It may be difficult to accurately take this measurement without assistance. Therefore, you can try to recruit a friend or family member to help.
Typically, if you get a measurement that ends in 5, 6, 7, 8 or 9 mm, then you need to round it up to the next centimeter. When the measurement result ends in 1, 2, 3 or 4 mm, the measurement is rounded down to the nearest centimeter.
Trim away the excess wood to sharpen the outline of the sword blade.
It is best to use a special sharp woodworking knife for these purposes, but you can also use any other strong, sharp knife. Use it to cut off any excess wood to sharpen the blade of the sword.
- For a sword with a single-sided sharpening, the blade should taper towards the “sharp” edge, forming a triangular cross-section. In this case, the sword should become thicker from the opposite blunt edge.
A sword with a double-sided sharpening has a cross-section of the blade that resembles an elongated diamond. The thickest part of the blade will run through the center of the sword, and both of its "sharpened" edges will be thin.
It is best to make the hilt of the sword slightly oval in cross-section, and it should be somewhat narrower than the blade itself. The guard should also be a narrow horizontal bridge between the blade of the sword and the hilt.
Adjust the weight of the sword to the required level.
Take the sword in your hand. If it feels heavy, keep working with the knife and grind away any excess wood from the blade and handle.
- Some types of wood are heavier than others. To give a heavy wood sword a comfortable weight, it is necessary to carve a very thin blade and hilt.
Be aware that a sword blade or hilt that is too thin can affect its durability.
Part 3
Finishing the sword
- Sand the sword blade, hilt and guard with sandpaper.
Use medium-grit sandpaper (60 to 100 grit) to smooth out rough corners and uneven surfaces of the wood. When sanding wood, apply firm pressure.
- Wrap the hilt of the sword.
This will make the sword look more stylish and will also provide you with a better grip on the handle when using the sword. Use electrical tape to wrap the handle.
- Without a wrap, the sweat from your hand combined with the force of the sword hitting something can cause the sword to simply slip out of your grip.
As an alternative, instead of electrical tape, you can use sealing tape to wrap the hilt of the sword. This tape comes in different textures and colors that you can choose according to your preference.
From ore to critsa
Until the 14th century, the main process for obtaining iron was its reduction from ore in a cheese furnace (domnitsa). Such a furnace had a shape close to a truncated cone with a height of approximately 1.2 m and a diameter of 60-80 cm at the base and 30 cm at the top (flue) part, made of stone or refractory brick and coated with clay. The furnace was equipped with a tuyere - a pipe for supplying air from the bellows with a diameter of several centimeters, a hole for draining slag in the lower part, and sometimes a collapsible part for removing the iron ingot after the end of the process. After drying, the oven was heated with firewood to burn the clay, as well as to form ash, which later served as an underlying “non-stick” coating and acted as one of the constituent parts of the flux (ash contains soda and potash). This part of the technology did not cause us any particular difficulties, and after the construction of the house and the passage of several days, which were required for the clay to dry and fire, we began the first part of the process - the restoration of iron.
Coal, ore, fire and air A cheese furnace is a cone-shaped structure into which charcoal and charge - a mixture of ore and flux - are loaded in layers. Blowing air allows you to reach a high temperature, iron is reduced from ore and forms an ingot in the lower part of the furnace - kritsa. The hole in the bottom is used to drain slag.
As a starting material, we took rich (and also enriched) ore - magnetite (FeOFe2O3) from the Kursk magnetic anomaly region. The technology is quite simple: charcoal is half-loaded into the furnace, lit, and then a mixture of ore and flux is poured on top (for which we used a completely historically authentic mixture of dolomite flour, sand and soda). Another layer of coal is poured on top, and then as it burns, layers of ore with flux and coal are added. This cycle is repeated several (up to five) times. At the same time, constant air blowing with the help of bellows is required for several hours in order for the temperature in the furnace to reach 1400-1500 C (here we were forced to deviate a little from the technology, since we used electric blowing due to a lack of workers).
Several processes take place in a cheese oven. Firstly, the rock is separated from the ore at high temperature and flows down as slag. Secondly, iron oxides are reduced by carbon monoxide and carbon to iron, the grains of which are fused together, forming an ingot - kritsa. When the coal burns out almost completely, the slag is drained through a hole in the furnace, and then, after cooling, part of the wall is dismantled and the kritsa, a porous iron ingot, is removed.
Weapon
5 More Formidable Battle Axes
As iron ore, we used relatively rich magnetite from the region of the Kursk magnetic anomaly, previously enriched using magnetic separation. After reduction in the furnace, a kritsa is obtained - a porous ingot of raw iron, heterogeneously saturated with carbon.