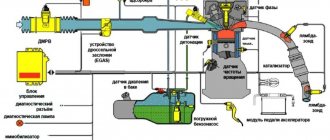
Design Device
Let's consider hydraulic compensators and the principle of operation of the hydraulic compensator using the example of a hydraulic pusher installed in the cylinder head. The types of other hydraulic compensators, although different in design, work on the same principle. The hydraulic pusher is inside, the body of which is installed with a movable plunger ball valve with a steam valve. The housing is movable relative to the guide seat made in the cylinder head. If the main valve is mounted in the valve drive levers (in the rocker arms or rockers), its moving part is only a plunger, the protruding part of which is made in the form of a ball bearing or support shoe.
part of the main group is a plunger pair. The gap between the plunger and the bushing is only 5-8 microns, which ensures a high tightness of the connection, while the mobility of the parts is maintained. A hole is made in the lower part of the plunger to allow oil to enter, which is closed by a spring-loaded check ball valve. A fairly rigid return principle is installed between the plunger and the bushing.
Hydraulic lifters knock on a cold engine
Problems with the operation of hydraulic compensators can arise in two cases: if the mechanism itself malfunctions or due to problems in the oil supply system. On a cold engine, the following are the main reasons why hydraulic compensators knock:
Element contamination. If the hydraulic compensator is dirty, the plunger of the mechanism may jam in the seat. There is also an increased risk of the ball valve sticking in the open position;
- Oil contamination. Dirty operating fluid, contaminated with friction products, will cause the hydraulic compensator to knock on a cold engine. Because of it, the oil supply channel may become clogged, but this problem will disappear when the engine warms up, due to the washing out of the “garbage” with the flowing heated operating fluid;
- Mechanical wear of the hydraulic compensator. If damage occurs on the plunger or its seat, the oil will not be retained in the sub-plunger space, maintaining the required pressure, and accordingly, the mechanism will not be able to work properly, providing the required clearance;
- High oil viscosity. When a car uses high-viscosity oil, before the engine is completely warmed up, it does not have time to reach the hydraulic compensators, which is why knocking occurs in them;
- Severely dirty oil filter. If obstacles arise through the oil filter, cold oil will not be able to fully flow into the cylinder head.
Important: It is necessary to distinguish between the knocking of hydraulic compensators on a cold engine and when the engine starts. Many drivers are mistaken in believing that if a characteristic sound is heard when starting the engine, there are problems with the hydraulic compensators. The knocking noise may occur and subside quickly because some of the valves remain open (due to the location of the camshaft) after the engine is stopped.
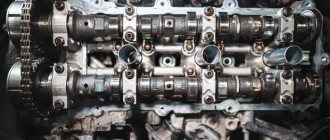
Design and principle of operation of hydraulic compensators
| The dimensions of the parts of a running internal combustion engine increase due to heating. To prevent this from leading to breakdowns, accelerated wear, and deterioration in the performance of power units, thermal gaps are created between some parts at the design stage. When the engine warms up, due to the expansion of the parts, they are “selected” (absorbed). However, as parts wear out, their heating is not enough to absorb the gaps, which negatively affects engine performance. The thermal gap in the valve drive mechanism directly affects the performance of the power unit. Since valve clearances are constantly changing due to wear of parts, at the beginning of the last century a mechanism for adjusting them was introduced into the engine using ordinary wrenches. This had to be done regularly, which means that the labor intensity of maintenance increased and its cost increased. Hydraulic compensators (HC) allow you to avoid these problems. They must completely absorb the gaps between the working surfaces of the camshaft and the rockers, rocker arms, valves, rods - regardless of the temperature conditions and the degree of wear of the parts. |
Hydraulic compensators can be installed on all types of gas distribution mechanisms (GRM) - with rocker arms, levers, rods - and with any camshaft location (upper or lower, Fig. 1).
Depending on the design of the timing belt, there are four basic types of hydraulic compensators (see photo below): hydraulic pushers; hydraulic supports; hydraulic supports designed for installation in levers or rocker arms; roller hydraulic pushers.
Why is the hydraulic compensator knocking?
A faulty hydraulic compensator is easy to determine. If there are problems with this element, it begins to knock during operation. The consequence of knocking of the hydraulic compensator is incorrect or untimely adjustment of the valve clearance, which can lead to problems with the engine.
The reasons why the engine hydraulic compensator knocks can be classified according to the conditions under which they occur. Depending on whether the hydraulic lifters are knocking on a cold or warm engine, the faults that can cause the problem differ.
When do you need to replace hydraulic compensators?
A knocking noise is a sign of a problem with this unit. The nature of the sound is sharp and frequent (twice the engine speed). The unit is faulty if this phenomenon lasts more than 2 minutes after starting the car and/or continues after the engine warms up. You need to listen at the top of the power plant - you can’t hear it from the cabin. The hydraulic compensators may need to be replaced.
The reasons for the knocking noise are listed below:
- With a cold engine:
- thick oil;
- clogged line or valve;
- plunger wear or wedge.
- “Cold”:
- the plunger pair is jammed;
- heated oil is not viscous enough.
- Problems with the working fluid (level increased, foam appears, water gets in).
The following factors can also serve as indirect signs of a malfunction: increased fuel consumption, unstable engine operation, impaired driving dynamics, burnt-out valves (you should not drive without paying attention to these problems).
Regardless of the appearance of negative signs, find the mileage and time intervals for mandatory maintenance of the unit in the operating instructions. Compliance with these recommendations is the prevention of emergency repairs.
When to change hydraulic compensators: signs
It is important to pay attention to indirect signs of problems with hydraulic compensators. If the oil level and its quality are normal, then the following symptoms indicate faulty oil coolers:
- strong knocking in the valve mechanism when cold;
- after warming up the knocking does not disappear;
- the knocking intensity decreases with increasing engine speed;
- Changing the oil and flushing the oil system does not solve the problem.
You can accurately determine that the Chevrolet Niva hydraulic compensators need to be replaced after removing the camshaft. In such a situation, it is necessary to disassemble the engine, remove compensators, perform troubleshooting or immediately make a complete replacement, etc.
How to check hydraulic compensators?
Check parts for wear and contamination.
If you detect the characteristic knock described above, contact a car service center for diagnostic work. On your own, if you have certain skills, you can check the degree of wear of the ball valve, hydraulic pushers, and a pair of plungers. If the service life has expired, you need to install new parts.
Don't forget to inspect the pusher "inside". If it is contaminated with grease, the hydraulics can be washed and coated with a layer of new high-quality oil. The operation of the springs is checked by pressing a finger through a soft rag on each small element. If all is well, the parts are returned to their place.
How to check hydraulic compensators for functionality, repair them or replace them
To check the hydraulic compensators, you need to remove the valve cover and check the elasticity of the hydraulic compensator with your hands.
The hydraulic compensators are checked by penetrating under the valve covers and turning the crankshaft by the central nut. Due to the drive of the gas distribution mechanism, the camshaft begins to rotate. At those moments when the cams of the pushers are directed in the opposite direction from the hydraulic compensator, an alternate check for elasticity and the presence of free play begins. This can be done either by hand or with a special tool. If the hydraulic compensator is soft or loose, then it is necessary to begin repairing it.
Everything should be nearby, don’t start without preparation
Lada Priora can serve as an example for considering a replacement process. To avoid unpleasant surprises, any work must be planned and everything needed prepared. In our case we will need:
- Gasket Maker - sealant (plugs);
- anaerobic and camshaft seals;
- 16 INA compensators.
disconnection with Let's start with the battery minus. Then we dismantle the air filter, throttle cables, wires that will interfere with manipulations, intake ignition coils and injector manifold.
Replacing hydraulic compensators on a Priora is complicated by the fact that the manifold mounting bolt is located under the generator.
In order to reach the hydraulic compensators:
- The generator belt is removed, the generator itself is freed from the mounting bolts and carefully removed to the Use. use a key with a rotary head to the radiator, unscrew the manifold bolt.
- The ramp with nozzles is dismantled and the air conditioner pipes are disconnected (if equipped).
- Dismantled First. We lift the collector, its left edge and the rest of the part, and then move it to the left.
- valves The cover is removed using a screwdriver, technological in the inserted grooves.
- Next, the belt is removed, the timing pulleys, the camshaft bed and everything themselves are dismantled.
The compensator shafts are open to view; among them it is necessary to identify the faulty ones. This is done Defective. we push through and they will sag without much effort.
hydraulic compensators Removable using a magnet. The entire set must be replaced, since they are used under similar conditions and wear should be approximately the same.
The above modifications have engines with a top-mounted camshaft. But there are also those in which it is located below. In this case, the rocker valve (rocker arm) acts on the heel of the car. Replacing hydraulic compensators on a Chevrolet Niva (where the timing belt is arranged technologically) will be different from what is described, and the “hydraulics” are of a different type.
Replacing hydraulic compensators for Chevrolet Niva. Step-by-step instruction.
Author: Makeev Vasily
Reading the article will take: 1 minute
Tool for replacing hydraulic compensators
It is gratifying that replacing hydraulic compensators on a Chevrolet Niva does not require any special devices. You can get by with a standard set of keys, but it is better to prepare some available tools in advance. To work you will need:
- A set of keys;
- Screwdriver flat and Phillips;
- Metal brush;
- Medical syringe;
- Wire or nylon tie.
In addition, you need to prepare 1 liter of gasoline, a rag and a gasket under the valve cover.
Algorithm for replacing hydraulic compensators
Although the work of replacing hydraulic compensators is classified as a service job, it is quite accessible for you to do it yourself. The most important thing is to adhere to the algorithm described below.
- The air pipe is dismantled. The valve cover is released. To do this, it is necessary to provide unobstructed access to it, as well as remove all fasteners and brackets from it.
- Remove the valve cover bolts (8 pieces).
- At this stage, it is possible to accurately determine the need to replace the HA. If, when you press the rocker, the pushers drop easily, then the hydraulic compensator is faulty. (you can use a flathead screwdriver to check by inserting it between the camshaft housing and the rocker)
On the subject: How to pump up arm muscles using your hands
- While turning the crankshaft as the engine rotates, it is necessary to align the mark of the camshaft gear with the casting on the bed body.
- By loosening the gear, the chain tensioner can be removed and recharged.
- The chain, in the same position as it was on the sprocket, is tied around it with wire or a clamp. Thus, it continues to remain in relative tension. The sprocket is removed from the shaft.
- The camshaft bed (housing) nuts are unscrewed.
- The rockers and hydraulic compensators can be dismantled without any hindrance; first, they are unscrewed with a 24mm socket,
and then removed from the occupied hole.
- New ones are installed with a tightening of 2 kgf. The assembly procedure is performed in reverse order.
Before replacing the HA, you can try rinsing the old ones by immersing them in gasoline. Sometimes this procedure significantly saves the budget.
"Pros" and "cons" of using hydraulic compensators in engines
The introduction of the HA made it possible to avoid adjusting the valve clearances of the mechanism and make its operation “softer”; reduce shock loads, that is, reduce wear on timing parts and eliminate increased engine noise; more accurately observe the duration of the valve timing, which has a positive effect on its safety, engine power and fuel consumption.
Read How to: also change and which one is better to fill the box with oil in a VAZ 2110
With all their advantages, hydraulic compensators also have disadvantages, and engines equipped with them have some operating features. One of the disadvantages of structurally simple hydraulic compensators manifests itself in poor-quality cold engine operation in the first seconds of start-up, when the oil pressure in the lubrication system is absent or minimal. Read about the specifics of operation, repair and maintenance of main engine engines in the following issues of AC.
Without there are no consequences
The intake and exhaust valves heat up to different temperatures, so the sizes of the thermal clearances required for them are different: for the intake valves - 0.15: 0.25 mm, and for the exhaust valves - 0.20: 0.35 mm and even more. If these values are not met, the consequences can be very different:
- when the intake/exhaust gap is “tightened” (the valves are small or incomplete) due to their lack of closure, compression is reduced, which leads to loss of power, burnout of the valve plates and their ignition, seats of the fuel-air mixture in the intake/exhaust manifold (with flame penetration), the occurrence of glow ignition (due to overheating of the valve edges). If the valve turns out to be slightly open, the starting characteristics of the engine noticeably deteriorate at any temperature;
- When the gaps are increased, increased shocks arise which, loads, acting on timing parts, reduce them. Furthermore, the filling of the cylinders with fresh charge deteriorates, and this is fraught with a decrease in torque and torque of the engine.
The first patents for hydraulic valve lash compensators were registered in the USA in 1920–1960. Since then, 90% of all American passenger cars have been mass-produced with hydraulic compensators. Production of GC in Germany began in 1971. Since 1978, most other leading automobile companies have been using this technology commercially.
Niva hydraulic compensators: what they are and how they work
The hydraulic compensator in the engine is a device that allows you to “select” the thermal clearance of the valves automatically, that is, without additional interventions. For example, mechanical adjustments performed with washers or bolts must be carried out regularly, since the gap “goes away” over time, deviating from the recommended values.
In turn, the hydraulic compensator (HC), located between the camshaft cam and the valve, “selects” the gap automatically. The hydraulic compensator itself is a plunger; engine oil is supplied to the chamber, thereby maintaining an optimal thermal clearance.
At the same time, for normal operation of the main engine, it is important that the oil is supplied under a certain pressure (at least 1.5 kg at idle). Normally, the pressure in a Niva engine is 1.3-1.5 kg, while the oil pump is loaded (the motor is a chain, has a hydraulic chain tensioner, as well as 8 hydraulic compensators).
It turns out that the lubrication system is quite overloaded, while the oil pump remains almost the same as on the old “classic” VAZ. Perhaps it was for this reason that the manufacturer replaced the old-style hydraulic compensators with new ones.
clamp and replacement of hydraulic compensators
When one or several main valves fail, a valve-like knock appears. This sound travels well in metal, so a phonendoscope is used to identify a faulty hydraulic compensator. You can make an analogue of this device yourself from a steel rod with a length of about mm and 700 5-6 mm in diameter. A tin beer can with the top cut off is attached to one end of the rod, and a wooden handle is attached to the middle of it. By placing your ear to the can alternately and placing the free end of the “phonendoscope” against the block head in the area of each compensator, the faulty ear is determined by an increased knocking sound. A “suspicious” main body should be checked and dismantled.
You can remove the main body from the saddle using If. the magnet does not succeed (the main body is “stuck” or it is stuck), the jammed one is removed with a puller, having previously welded it to the rod with a hook. Some hydraulic compensators can be disassembled to determine the degree of wear of internal parts. Disassembly should be carried out with special care so as not to damage the surfaces of the mating elements.
The hydraulic supports are disassembled after removing the retaining ring; The internal parts of the hydraulic pusher are “shaken out” by gently tapping its body on a metal surface. The contaminated compensator is washed with acetone or another solvent.
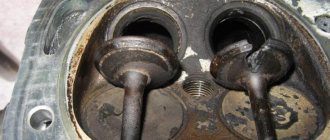
Visual inspection allows you to detect external damage to the end hydraulic compensator of the surface subject to loads (potholes, scuff marks or scratches). During operation, a depression may even form on it.
There is another effective and simple way to control the condition of a dismantled main body: after filling it with oil, it should not compress when applying force by hand. Otherwise, it is faulty and must be replaced. An efficient main body, compressed in a clamp, provides significant resistance and slightly reduces the length only after 20-30 seconds.
Replacing hydraulic compensators on a Chevrolet Niva
The transition from adjusting bolts to hydraulic compensators (HC) made it possible to abandon the need to adjust thermal clearances every 10 thousand kilometers. The operating principle of hydraulic compensators, as well as their diagnostics, are described in the article Why hydraulic compensators knock when hot and cold. In this article we will talk about how to change hydraulic compensators on a Chevrolet Niva. Such a replacement is necessary if the problem is not in the oil system or inappropriate engine oil, but in the malfunction of these parts.
What is needed to replace hydraulic compensators
To work you will need the following tools and materials:
- flat and Phillips screwdrivers;
- ratchet wrench with extension and set of attachments;
- socket wrench (tube) for 10 and 12;
- soft wire, wire or plastic clamps;
- torque wrench;
- valve cover gasket;
- clean rag.
How to change hydraulic compensators on Niva + Video
If you are going to change the HA outdoors, then find a clean, dry, level area and work on a windless and sunny day. Wait until the engine has completely cooled down. If you open the hood, this process will go faster. Place the gear in neutral and disconnect the battery. Now you can start replacing the hydraulic compensators. For your convenience, we have created a step-by-step guide to help you with this.
- Remove the plastic cover over the engine (not available on all models).
- Using a screwdriver, loosen the clamps of the pipe connecting the injector and the air filter, then remove the pipe.
- Make sure all rubber tubes that fit to the cylinder head (cylinder head).
- Unscrew the valve cover bolts and remove it.
- Align the camshaft gear to the mark. The mark is located on the camshaft cover (not to be confused with the valve cover) and the back of the sprocket. If you do not do this in advance, it will be more difficult to assemble the motor after replacing the main valve, and if there is a lack of experience and attention, the valves may be damaged.
- Use wire or plastic clamps to secure the chain to the camshaft gear.
- Fix the camshaft sprocket (you can use socket wrenches for this) and unscrew the nut securing it.
- Unscrew the two bolts securing the chain tensioner and carefully, without bending the tube that fits it, remove the tensioner from the chain.
- Carefully remove the sprocket from the camshaft.
- Unscrew the nut of the main oil line (ramp) and the clamp bolts.
- Unscrew the camshaft nuts, then carefully remove it. At the same time, you can check its condition and replace it if necessary.
- Remove all the rockers, being careful not to lose the springs that hold them in place.
- Unscrew the hydraulic compensators.
- Remove the oil rail. Perform this operation very carefully so as not to bend the thin tubes.
- Use a clean cloth to remove dirt from the HA wells. Don't forget to wipe the oil rail.
- Reinstall the oil rail and screw in the new hydraulic valves. Tightening torque 2 kg•s (20 N•m).
- Reinstall the rocker with springs and the camshaft, first turning it to the desired angle. Tightening torque 2 kg•s (20 N•m).
- Place the sprocket on the camshaft and secure with a bolt. The bolt tightening torque is 4 kg•s (40 N•m).
- Reinstall the hydraulic chain tensioner and secure with bolts. Tightening torque 2 kg•s (20 N•m).
- Place the camshaft cover (not the valve cover) and the ramp mounts, then tighten the nuts with a torque of 2 kg•s (20 N•m).
- Tighten the ramp nut with a torque of 2.5–3 kg•s (25–30 N•m).
- Check the marks on the camshaft and crankshaft. Then turn the crankshaft two turns and check again.
- Install the valve cover. Sometimes you have to change the valve cover gasket, but not on all engines. This may be due to the poor quality of the gaskets. If the gasket is in order, is not jammed or torn anywhere, then there is no need to change it.
- Attach all the rubber hoses and the air filter pipe and put on the plastic casing.
- Connect the battery and start the engine. At first, the hydraulic compensators will knock, but within 20–50 seconds they will fill with oil and quiet down. If the new main engines continue to knock, raise the engine speed to 2 thousand for 1-2 minutes to increase the oil pressure.
motorist installing hydraulic compensators
For normal timing operation with hydraulic compensators (after replacing them), certain rules must be followed:
- At the factory, new HAs are filled with a preservative oil composition, which does not need to be removed during installation. After starting the engine, this composition is mixed with oil from the engine lubrication system without any consequences;
- The timing belt should not be installed with empty hydraulic compensators, the “airiness” of which was caused by disassembly and washing. First they need to be filled with oil. Failure to comply with this rule may result in significant shock loads, especially when starting the engine (while the lubrication system is being pumped);
- After installing the main gear on the engine, it is recommended to turn the crankshaft by the ratchet 5-7 times with a wrench and wait 10-15 minutes before starting the engine for the first time. This is so that, under the pressure of the camshaft, the plunger pairs of loaded compensators take the working position;
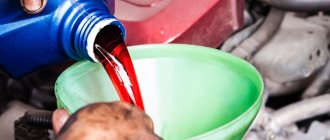
- When repairing and replacing the hydraulic fluid, you need to flush the oil system, replace the oil, fill the engine filter with fresh oil. By rotating the crankshaft, you can visually check the flow of oil through the channels to the installation seats (with the hydraulic compensators removed);
- When repairing the engine of a car with a mileage of over 150-200 thousand km, it is advisable to replace the hydraulic lash valve compensators (with such mileage, they usually fail). low-quality oils The use of oils and failure to comply with the terms for their replacement can reduce the service life of the hydraulic system by half;
- If there is one or several faulty hydraulic compensators, it is advisable to change the entire set, otherwise you will soon have to open the timing belt again for repairs.
Manual pumping of hydraulic compensators
This procedure is carried out only when the hydraulic compensators are removed from the engine. To pump, it is necessary to place the hydraulic fluid with the plunger facing up into a container with oil. The oil level should be approximately along the line of the middle cut of the hydraulic fluid. After this, press the HA plunger with your finger. You will notice dirty oil starting to come out through the valve. It is necessary to press the plunger until the oil released from the valve becomes clean.
This process is a quick manual pumping of the HA. There is also the option of pumping a disassembled hydraulic compensator, but this process takes a long time.
In conclusion, let us remind you of one more important detail: after replacing the hydraulic fluid on the engine, it is necessary to change the oil and strictly check its level. If there is not enough oil in the engine, the necessary pressure will not be created in the system, which pumps engine oil through the channels into the main fluid chamber. In this case, the hydraulic compensator will become airy and start knocking again during operation.
side Reverse… supports
The main reasons for the failure of the hydraulic compensator (HC) are contamination of the engine oil channels and the working wear of the check valve and plunger surfaces, manufactured in pairs with a high degree of accuracy. Contamination is caused by the use of inappropriate oil, failure to comply with the timing of its replacement, or a malfunction of the oil filter, which allows dirty oil to pass through the bypass valve.
As the landing gap in the plunger pair increases, oil leakage from the high pressure chamber increases. The hydraulic compensator loses its “rigidity”, so the efficiency of the cam transmitting force to the timing valve rod is reduced. The same thing happens when the check valve of the high pressure chamber wears out. Malfunctions of the lubrication system slow down the filling of the engine with oil and do not allow the timing belt to be absorbed into the gaps.
The internal volume of the HA must be filled with oil. An empty or partially filled (“hydraulic compensator”) that is air-filled does not fulfill its main purpose—to eliminate gaps in timing parts. As a result, shock loads arise, which manifest themselves as a characteristic knock. This leads to accelerated wear of timing parts and deterioration of the engine. Failures are also caused by the ingress of worn-out parts into the HA from oil particles: the unit may depend. In case of jamming, depending on the position of the timing belt, large gaps will either appear, the valves will either become “pinched” (the load increases, the camshaft power decreases, etc.).
To avoid this, control:
- It is also necessary to maintain the internal cleanliness of the engine - change the oil and oil filter at the time recommended by the car manufacturer, with a reduction factor of 0.6 - 0.9, taking into account the operating conditions of the vehicle;
- flush the engine before the next oil change, using slow-acting “on-pri” flushes. mileage contamination of the internal surfaces of the engine (it is discovered that, for example, when removing the casing, fast-acting timing belt flushing agents are not recommended, as peeled pieces of dirt with the flow of oil can get into the internal cavities of the compensators and remove them from failure.
You need to know that small gaps between the moving elements of the hydraulic compensator require the engine to use high-quality low-viscosity oils - or synthetic semi-synthetic ones (SAE 0W40, 5W40, Use, etc.). 10W30 mineral oils (for example, SAE high) due to their viscosity and 15W40 tendency to tar deposits do not knock.
hydraulic compensator is recommended - probable causes and their solution.
There are two reasons for the knocking of the hydraulic compensator - oil does not flow into its internal cavity (or it does, but is worn out), there are few working surfaces, which is why the oil from the filled compensator is squeezed out. Oil may not flow into the hydraulic compensator due to metal shavings (very residues) getting into the thin channel or due to coking due to the use of low-quality lubricant. Problems due to chips usually arise during the break-in phase or after it. If knocking in the valve drive begins to appear after 20 thousand km, most likely the thin oil channels are coked.
Hydraulic compensators?
How to bleed hydraulic compensators
Bleeding the hydraulic compensator is a necessary operation that must be performed when replacing the hydraulic compensator, as well as after preventive maintenance and cleaning of the hydraulic compensator. Bleeding is necessary in order to remove air that has entered the cavity of the hydraulic compensator. Today we decided to tell readers about how to bleed hydraulic compensators.
You can pump in two ways. One involves bleeding using a running engine. The second is done manually. Oil is forced in.
The first option is needed if the newly installed hydraulic compensators knock when starting the car or if the car has been idle for a long time and some of the oil may have leaked out of the hydraulic valve.
Hydraulic compensators, if they are in working condition, but there is air in them, after three to five minutes of engine operation they stop knocking. If this does not happen, perform the following operations with the engine running:
• The engine should run at 2500 rpm for 3-4 minutes. You can change the speed from 2000 to 3000.
• Let the engine idle for 30-40 seconds.
• The engine stops and remains in this state for one minute.
• The engine starts. If the knocking noise disappears, this means that the hydraulic compensators have been pumped. If the knocking does not disappear, the entire cycle is repeated. The cycle can be repeated 5-7 times until a positive result is achieved. If the knocking does not subside, then the cause is much deeper and needs to be diagnosed.
The second option is needed if the hydraulic compensators are removed. Let's find out how to bleed hydraulic compensators when they are removed. This procedure can take a long time if the hydraulic compensator is not disassembled. If you take it apart, the process will go a little faster. True, washing and cleaning the hydraulic compensator will take a lot of time.
If the HA is not disassembled, then it must be placed in a flat container with clean oil. The hydraulic compensator should be with the plunger facing up. The oil level should be above the middle groove. After this, the pumping process begins. You need to apply force to the plunger with your finger, and dirtier oil should begin to come out of the valve.
Press and release several times until clear oil comes out. If oil does not appear after pressing, it is likely that the ball is stuck in the valve. You can gently move the ball with a needle. But the surface of the ball should not be damaged.
In order to pump the hydraulic compensator differently, it needs to be disassembled. How to bleed hydraulic compensators when disassembled? You need to lightly tap the HA on a flat surface. It is advisable if it is a sheet of rubber or a piece of fabric placed on a wooden surface. Knock until the plunger starts to come out.
The plunger is then disassembled. All parts are washed in solvent, all dirt and deposits are removed. Often the cleaning process takes quite a long time, since dirt is difficult to remove.
After this, the plunger containers are filled with oil.
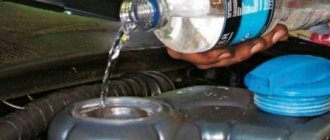
It would not be amiss to remind you that before pumping the hydraulic compensator, you need to change the oil and check its level so that the airing effect does not occur again.
If after all the operations the knocking does not disappear, then you need to contact a mechanic who will make a diagnosis and give recommendations for engine repair.
Source