What is a timing belt for?
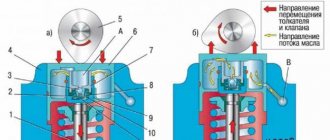
The timing belt is a rather complex unit in terms of design. It is based on a camshaft located in the cylinder head. With its help, the intake and exhaust valves are pushed. The valves, in turn, ensure the supply of a combustible mixture to the engine cylinders, and also help remove gases from the vehicle system. The operation of the camshaft is possible due to the presence of a crankshaft in the system. Thus, the mechanical force from the second to the first is transmitted using a drive belt.
A malfunction of the camshaft drive will disrupt the gas exchange process in the cylinders. The engine will not be able to function normally, and this is fraught with serious consequences for the main power unit
The belt is subject to temperature and mechanical influences; it is logical that sooner or later it will wear out. It stretches and cracks form on its surface, which negatively affects the operation of the entire system. Its slippage will affect the functioning of the valves: they will stop opening at the moment corresponding to the engine operating cycles. But the breakage of a rubber product is much more dangerous. During a break, the gas distribution mechanism remains inactive, therefore, the valves do not close until the piston rises, an impact occurs, after which the valves themselves bend, and defects form on the piston.
When is it necessary to replace the timing belt and set the marks?
Without exaggeration, a worn timing belt can be called a “ticking time bomb.” The importance of this element in the car system is difficult to overestimate. Usually it is made of high-quality rubber, the service life of which is designed for 50-60 thousand kilometers. But, if the vehicle is operated in unfavorable conditions, the replacement interval will be different.
Replacing a belt and pump is a labor- and financially expensive process. But all the work will cost much less than repairing a failed engine due to a broken gear mechanism. In no case should you save money and put off scheduled car maintenance “for later.”
In most cases, the replacement interval is indicated by the manufacturer in the documentation for the vehicle. In addition to the resource built into the belt, it is worth considering the following factors that shorten the service life of the rubber element:
Article on the topic: Express oil change in a car engine
- Engine oil getting on the surface of the timing belt
- Leakage of the front crankshaft oil seal
- Tension roller malfunction
- Pump jamming
As you can see, there can be a sufficient number of breakdowns in the car system that directly affect the service life of the belt. If the scheduled replacement time has come, or its resource has been prematurely exhausted, it is not enough to simply replace the old mechanism with a new one - you also need to take care of the correct installation. To successfully do all the work, it is enough to arm yourself with the necessary tools and know how to align the belt with the marks.
Why is it necessary to set the labels correctly?
For the correct operation of the gas distribution mechanism of a car, it is necessary that the closing and opening of the valves occur in a strictly defined sequence. The slightest inaccuracy in the operation of the camshaft and crankshaft leads to the fact that the gas exchange process in the cylinders is disrupted, and the engine stops working in the correct mode.
A timing belt is a rubber part that during operation can wear out, crack, tear, etc. Therefore, it is necessary to replace the element in a timely manner.
When installing a new one, you should set the labels correctly. This is necessary to ensure that the engine operates correctly from the first seconds of startup. If installed incorrectly, serious problems can occur, including engine failure.
Factors indicating the need to replace the chain
The timing chain, like other spare parts, has a specified service life, after which it must be replaced. It is possible to use parts beyond the service life allotted by the manufacturer; however, this will void the warranty and the manufacturer will not be liable for damage resulting from a breakdown.
Factors indicating the need to replace the ZMZ 409 timing chain:
- her physical condition;
- metallic sound in the engine compartment;
- The car's mileage has exceeded 80,000 km since the last replacement.
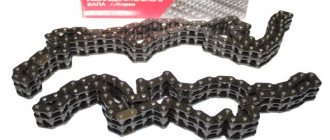
The double-row chain showed better performance and reliability than the single-row chain.
Tools needed for work
Installing marks is not an easy process and if done incorrectly, you risk spending a lot of time installing the part. And that's not the worst thing. There are cases when careless drivers break the engine and other mechanisms of the car.
First of all, stock up on the necessary tools:
- Socket head.
- Jack to raise the car.
- Keys No. 17 or 19 - depends on what kind of car you have.
Advice: it is better that you have all key diameters starting from No. 10.
Large flat head screwdriver.
Causes of timing belt breakage
- wear of the belt itself or its poor quality (shaft gears have sharp edges or oil from the seals).
- crankshaft jams.
- pump jams (the most common phenomenon).
- Several or one camshaft is jammed (for example, due to one of them becoming unusable - however, the consequences here are slightly different).
- The tension roller unscrews or the rollers jam (the belt becomes loose or overtightened).
Modern engines, since they are more powerful compared to their predecessors, have much lower survivability. If we consider the cause based on the valves, this problem arises due to the small distance between them and the piston. That is, if at the moment the piston arrives the valve is slightly open, then it immediately bends. Since for greater compression and contraction in the bottom of the piston there is no groove under the valve of the required depth.
Contact of oil or cooling liquid on the belt surface
As soon as traces of technical fluid appear on the product, the belt should be changed immediately. Otherwise, this can lead to slipping through the teeth, sliding off the pulley, and even breaking.
It is a serious mistake when drivers simply clean the dirty surface and continue to use this product.
Practice shows that if liquid gets on the belt, it is completely absorbed into the rubber. It loses its properties and begins to stretch.
Late replacement
Most timing belt manufacturers recommend changing their products approximately every 60 thousand kilometers. However, this figure may vary up or down, depending on the quality of the product.
Improper use
It happens that a product may jump due to errors during its operation. A common example is a weakened roller or tensioner. When the belt tension weakens, there is a possibility of slipping from the pulley grooves. In the opposite situation, if when installing the belt, it is overtightened, this will lead to its breakage.
Slippage can also occur when one of the pulleys has strong play. Therefore, it is very important to monitor the tension level of all parts of the mechanism.
External damage
Over time, various cracks and depressions may appear on the surface of the consumable, and the threads of the product may begin to peel off. With heavy loads on the belt, even the smallest defects will develop quite quickly. Therefore, they cannot be eliminated on your own. All you can do is replace it as soon as possible.
Low quality spare parts
There are very cheap “non-original” belts on sale. But don't be fooled by their price. Often the resource of such a product is only enough for 20 thousand kilometers. This is followed by either stretching or breaking.
Difficult operating conditions
Unlike a chain, a belt is very sensitive to high and low temperatures, high humidity and other weather conditions. They affect premature wear of the product. Therefore, more frequent replacement may be required.
Labeling
Before starting work, you need to understand that it is important that during the process of replacing the timing belt, the pre-set risks do not go astray. Otherwise, you will have to go deeper into the settings and spend more than one hour installing the part.
When installing the timing belt, it is important to align the pistons so that in the first cylinder the piston is at the highest point of the first cylinder. In this position, the piston is at its maximum distance from the crankshaft. This is the position the engine is in when the marks are correctly set. In this position it is necessary to change the timing belt.
The number of marks, as well as their location, may vary depending on your engine type.
The following marks can be distinguished:
- Mark on the flywheel.
- Mark on the pulley.
- Camshaft mark (two on a 16 valve engine).
They all must match before replacing the timing belt. In order to set the correct position, rotate the crankshaft by the bolt securing the pulley to it. Please note: turning the camshaft pulley is prohibited.
After you have set TDC, replace the belt and tighten the tensioner.
At the end of the work on installing the belt, rotate the crankshaft several revolutions, check if the marks have gone astray. Repeat the adjustment if necessary.
Where is the timing belt located?
First, let's remember where the timing belt is located and what it looks like. Its location is in front of the engine, but do not forget that motors come in longitudinal and transverse locations. In most cases, gas distribution mechanisms use a toothed rubber belt, but in a considerable number of car models from different manufacturers, a steel chain is also used for this.
Engine cylinders can be equipped with two or four valves with one and two camshafts (CV), respectively. The kinematics of the gas distribution mechanisms of such engines differ. We will show them using the example of 8- and 16-valve power units for the VAZ 2110, 2111 and 2112.
The scheme with two shafts is more complicated, and in it, in addition to the pulley of the second RV, a support roller is added. This also complicates the belt replacement procedure. It is most difficult to perform this operation after a break or severe stretching of the belt, when the factory timing settings can be completely lost. Replacing in normal mode is not so difficult that you can’t try to do it yourself.
Purpose and design of the drive
The gas distribution mechanism is responsible for supplying the fuel mixture to the cylinders and releasing exhaust gases. To ensure timely opening of the intake and exhaust valves, the camshaft must rotate synchronously with the crankshaft. In the Zhiguli, this function is assigned to a chain drive installed in the front of the engine.
Replacing the timing chain and gears cannot be classified as complex operations, but the procedure is quite labor-intensive. To do the work yourself, you need to understand the operating principle and design of the drive, which consists of the following elements:
- a small-diameter drive gear is installed at the front end of the crankshaft;
- above it there is an intermediate large sprocket, which is responsible for rotating the drive of the oil pump and distributor;
- a third driven gear of large diameter is attached to the end of the camshaft;
- The 3 above stars are connected by a double-row chain;
- on one side, the chain is tensioned by a curved shoe, which presses the plunger device;
- to prevent the weakened chain from beating, a second shoe is provided on the other side - the so-called damper;
- A limit pin is installed near the drive sprocket, which prevents the chain from jumping off the teeth.
The main role in the mechanism is played by a double-row chain connecting the lower driving gear with the driven ones.
The gear size ratio is approximately 1:2. That is, while the crankshaft drive sprocket makes 2 revolutions, the camshaft gear rotates 1 time.
The required tension of the VAZ 2106 timing drive is provided by a plunger device supporting a semicircular shoe. Older cars were equipped with a purely mechanical plunger - a retractable rod with a powerful spring, which had to be tightened manually. Later models received a hydraulic chain tensioner that operates automatically.
More information about the timing belt drive: https://bumper.guru/klassicheskie-modeli-vaz/grm/grm-2107/metki-grm-vaz-2107-inzhektor.html
Unknowingly, I once found myself in a stupid situation. A friend’s chain on the “six” was stretched out and began to make a lot of noise, I advised it to be tightened. On site it turned out that the plunger fixing bolt was missing; the advice turned out to be useless. Later it turned out that the car has an automatic tensioner that is activated by oil pressure. The stretched chain had to be replaced.
The timing drive is lubricated by engine oil coming from the camshaft. To prevent lubricant from splashing, the mechanism is hidden behind a sealed aluminum cover, screwed to the end of the cylinder block with 9 M6 bolts. Another 3 screws connect the protective casing to the oil pan.
So, the chain drive performs 3 functions:
- rotates the camshaft, which alternately presses the cams onto the valve stems;
- through a helical gear (in driver's jargon - “pig”) transmits torque to the oil pump;
- rotates the shaft of the main ignition distributor.
Procedure for replacing the timing belt
Before starting work, please note that 16-valve engines have 2 camshafts with a separate toothed pulley (gear) for each. The belt for a 16-valve engine is always longer than that of an 8-valve engine, since in addition to the water pump gear and tensioner, the belt additionally passes through an auxiliary support (guide) roller. Where the timing marks are located, and what type they look like, look in the “Operation and Repair Manual” of your car.
- Raise the hood and disconnect the battery terminal “to minus” (the key in the ignition switch must be “off”) so that the brake lights do not light up in vain and “just in case”. Important!
Before removing the terminal from the battery and turning off the power to the car, you need to study the “Operation and Repair Manual” of the car. In some cars, you cannot disconnect the terminal from the battery (!), as the adaptations in the electronic control system will be reset. In this case, you need to work more carefully with a car that is not de-energized. - To ensure free access to the necessary mechanisms, you will need to remove the wheel, engine cover, protection, and generator belt. Depending on the make of the car and engine modification, work may require removing the power steering fluid reservoir or adsorber, or the air conditioner bracket, intercooler with terminals, air intake (or something else).
- Using a hexagon, unscrew the screws securing the belt and gear guard.
- If there is a crankshaft position sensor (CPS), disconnect the connector with wires from it.
- Unscrew the bolt and remove the timing belt tensioning roller. Also remove the support (guide) roller, if there is one.
- Remove the old timing belt.
- Check the position of the mark on one camshaft gear (on an 8-valve engine) or on two gears on two camshafts (on a 16-valve engine) in relation to the marks on the timing case. If the marks do not coincide, to set them in the desired position (against each other), you need to turn the camshaft with a wrench using the bolt securing the gear to the camshaft.
- To check the alignment of the mark on the crankshaft gear with the mark on the oil pump housing, unscrew and pull out the crankshaft toothed pulley with a special washer. If the pulley bolt does not unscrew, then you can rest the handle of the L-shaped key against the rod, put on the negative terminal of the battery (if it has been removed) and turn it with the starter. After unscrewing the bolt, remove the terminal back. You can also use a pneumatic impact wrench or have an assistant engage the highest gear and apply the brake while you unscrew the bolt. If the gear mark is set incorrectly, then screw the fastening bolt into place and turn the gear by this bolt with a wrench until the mark on the crankshaft gear is correctly aligned with the mark on the oil pump housing.
- Install the support (guide) roller, if equipped.
- First place the new timing belt on the crankshaft gear, on the support roller, then on the camshaft gear (or two gears, if there are two camshafts) and then on the pump gear. In this case, you need to control the position of the marks on one or two camshaft gears. If the marks are lost, they must be set correctly immediately.
- Install the tension roller and tighten it loosely, without tightly tightening the bolt until it stops.
- Check the evenness of the belt pad. Then tighten the belt using a special key for the tension roller, turning the roller counterclockwise (or in the direction of the arrows on the roller body). Next, holding the roller with a special key in the desired position, fix the position of the roller by tightening the fastening bolt until it stops, with a little force.
- You can check the belt tension with one hand by turning the belt lengthwise with your fingers. A well-tensioned belt should not turn more than 90°.
- At the final stage, reinstall and secure all dismantled elements in the reverse order.
After completing all the work, you need to start the engine and check the work by ear.
If the belt is installed and tensioned correctly, there should be no abnormal sounds. If you hear a hum or whistle from the roller, it means the belt is a little too tight. A slight loosening of the belt can be done using the same tension roller by turning it clockwise (or counter-arrows on the body of the roller itself). If, after replacing the timing belt, the car begins to pull poorly, the engine will detonate a little and idle unevenly (and the tachometer needle will jump), and there will be a black exhaust - it means that the marks were set incorrectly when replacing the timing belt. Everything will have to be repeated all over again.
Checking chain tension on VAZ 2101-VAZ 2107
Welcome! Timing chain - thanks to it the engine works, over time this chain relaxes (Stretches out) and begins to knock, the knocking is very unpleasant and because of this the chain wears out faster and most importantly, if the chain is too loose, it can jump one tooth, and sometimes at two or three, etc., and this is already a mixture of valve timing, and therefore after a while the car will drive incomprehensibly, that is, its speed will fluctuate very much, and it may stall often or even at all will not start.
Note! In order to check the chain tension, you will need to remove the cover at the head, if you have never done this before, don’t be alarmed, there is nothing complicated about it, it is only attached to 8 nuts, so in order to unscrew them, you will need to stock up: A wrench with a socket head, as well as a new gasket will be needed for the head cover (It costs pennies in auto stores, but you definitely need to get a new one) and a regular flat-head screwdriver, which you will use to check the tension!
- Checking timing chain tension
- Additional video clip
Where is the timing chain located? It is located under all kinds of covers, namely its upper part is under the cylinder head cover, the lower part is under the camshaft cover, and in the middle you can’t get to it unless you remove it from the car, but you don’t need the lower, as well as the middle part you only need to get to the top one, so for clarity, in the photo below the cover has already been removed and the chain is indicated by an arrow.
When should you check the timing chain tension? Let us tell you right away that if you want to tighten the chain, this is done using a chain tensioner (For information on how to tighten a chain, read the article: “Adjusting the chain on a car”) and you don’t need to remove the cover to check the tension (But in principle you can remove it if you want to tension the chain correctly with 100% accuracy), the tension is checked only when you do any work, for example, you changed the chain to a new one and checked whether it is tensioned normally or not, and just disassemble the engine of the car to tug on the chain and there is no need to check its tension, besides, if the chain weakens, it will let you know about it, firstly, the operating noise of the engine will increase (Try to start the car on an adjusted chain and let it idle and on an unadjusted chain, the same perform the operation, the sound of the engine in these situations will be radically different).
Note! By the way, if the chain is very weak, but you don’t know how to figure it out, then just open the hood and listen if there are any extraneous knocks in the place where it is located, but when you press the gas (pull the gas cable a little or ask an assistant to press the gas a little pressed) this knock disappears, that is, it is likely that it is the chain that makes this knock and tighten it using the tensioner!
How to check the chain tension on a VAZ 2101-VAZ 2107?
1) At the beginning of the operation, you will need to remove that same cover, read about how it is removed in the article: “Setting the valve timing by marks”, in this article everything is explained and chewed in detail, and you need to study it starting from point 1 and ending with 10 , in these points the removal of the cover is explained.
2) Now that the cover is removed and it no longer bothers you, proceed to checking the chain tension, this check can be done either with a screwdriver or by hand, but it is better with a screwdriver, to do this, install it in two different ways, as shown in the two photographs below, and in these position, check the tension of the chain in the photo below, where you need to move the screwdriver is shown in detail, but we will still look at these photos a little, the first photo shows how to insert the screwdriver and use it as a lever to press on the chain (It shouldn’t bend if it bends just a little then adjust the chain using the tensioner), then go to the other side of the chain (see photo 2) and also install a screwdriver and use it to press the chain in that place (You can also try to push the chain with your finger), the chain should also not bend and the string should be tensioned, and this is how the chain tension on classic cars is determined.
Note! You need to press on the chain with medium force, but in no case should you press with all your strength, even though it is metal, this does not exclude its deformation!
Additional video clip: For more details about what tension the chain should have, see the video below, it shows the installation of the chain on the engine removed from the car and at the very end it explains and also shows what adjustment should be.
Clearing access to the timing belt
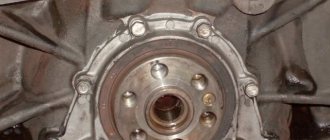
Having dismantled the engine compartment, we got excellent access to the bolts securing the right power unit support, as well as to the retainer of the upper timing belt cover. To remove the cover itself, turn the lock to the Open position using a slotted screwdriver. We press and the latch comes unfastened. There are two of them - front and back; unfasten both and remove the cover.
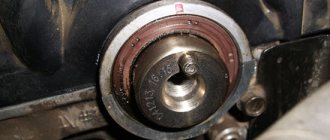
Combining the marks
The next important stage of work is combining the marks. To do this, you need access to the crankshaft pulley, which means you will have to remove the right front wheel, the lower dirt shield and the right side protection. Having successfully “cleared” the path to the crankshaft pulley, we begin to rotate it by the bolt with a 19mm wrench, aligning the marks. We control the process using the camshaft mark. Now you can unscrew the pulley mounting bolts. To do this, hold the bolt of its fastening with a 19mm wrench, and with a 6mm hexagon, unscrew all four fastening bolts of the flange.
Jack up the engine
The last obstacle on the way to the belt is the right engine mount. To remove it, we use a jack to lift the engine, and only after that we use an 18-mm head to unscrew the bolts securing the upper support. Then, with a “16” head, two adjacent bolts, with the help of which the support is attached to the car body. Having removed part of the support, we gain access to the bolts securing the remaining part directly to the engine. There are three of them: two on top and one on the bottom. We unscrew all the bolts with a 16mm head.
VAZ 2109 carburetor timing marks
Replacing the timing belt is one of the most important vehicle maintenance procedures. A broken belt leads to engine breakdown, which can lead to costly repairs within an hour, especially since this type of work does not require large material costs and the skills of a qualified specialist. Here it is very important to understand the processes occurring in a running engine in order to correctly orient the order of work to replace the timing belt. At the moment of fuel compression, the piston must be at top dead center; accordingly, there is a mark on the crankshaft toothed pulley, when aligned with the mark on the front engine cover, this position is fixed. When the piston is at top dead center, the valves of a given cylinder in the cylinder head must be completely closed. This also corresponds to a certain position of the camshaft, which is marked with a mark. Markers must be placed on the first cylinder of the engine. That is, the piston of the first cylinder is at TDC, the valves are completely closed. It is also necessary to understand that the next position of the piston at which the fuel is compressed and the marks are located correctly corresponds to one revolution of the camshaft and two revolutions of the crankshaft, that is, the crankshaft mark is twice aligned with the mark on the front cover of the engine, and its correct position corresponds to when the piston is in TDC at the moment of fuel compression and the valves of the first cylinder are completely closed, if you understand all this, then the process of installing the belt itself will not cause any difficulties. Take any existing internal combustion engine, all these processes will remain unchanged, the only difference is in the design of the timing drive, whether it is a belt, chain or gears. All we have to do is understand the nuances characteristic of each type of engine.
In this article I would like to talk about the timing device of an engine installed on a VAZ 2109 car, with a cylinder head having 8 valves, that is, each cylinder has one exhaust and one intake valve, respectively, the operation of these valves is ensured by one camshaft. And so where to start disassembling the timing drive mechanism. On this car it will be more convenient to remove the front right wheel. Remove the protective cover at the bottom. We need this in order to gain access to the generator drive pulley and the camshaft drive gear pulley. By removing the protective shield, we can unscrew the bolt securing the generator drive pulley. You must first loosen the tension on the generator belt and remove the belt. Then remove the plastic protective cover from above. It is held on by three mounting bolts. We loosen the nut securing the tension roller, after which the belt can be easily removed from the toothed pulleys.
Now you need to replace the tension roller with a new one. To do this, install the spacer washer, the roller itself and tighten the roller with a fastening nut.
It is advisable to change the pump at the same time; it doesn’t cost a lot of money, but it can cause a lot of harm if it fails.
VAZ 2109 carburetor timing marks
VAZ 2109 carburetor timing marks
Now you need to install the crankshaft correctly; to do this, scroll until the marks on the toothed pulley and the front engine cover align.
VAZ 2109 carburetor timing marks
The piston is at top dead center. This position also corresponds to a mark on the flywheel, which is aligned with the central slot of the ignition setting scale. It is clearly visible through the inspection window in the flywheel housing housing.
timing marks VAZ 2109 carburetor
The next step is to install the mark of the camshaft drive gear pulley, aligning it with the protrusion on the timing belt protective casing. This camshaft position corresponds to the moment of fuel compression in the combustion chamber, and the valves in the cylinder are closed.
timing marks VAZ 2109 carburetor
We install the timing belt as shown in the photo, passing it through the pump and tension roller.
timing marks VAZ 2109 carburetor
We install the generator drive pulley in its place. We tighten the belt using a tension roller; for this, the roller has special holes.
timing marks VAZ 2109 carburetor
After we have tensioned the belt and fixed the tension roller, it is very important to double-check that the marks are in the correct position. To do this, rotate the crankshaft several times and align the marks if they are aligned correctly. Close the upper protective casing, install the lower casing and wheel. That's it, the engine can be started.
How to correctly set timing marks on a VAZ 2109
Everyone needs to know how to set the timing belt of a VAZ 2109, because no one is safe from a broken belt. You are incredibly lucky if you become the owner of a car with a 1.5-liter 8-valve engine. On them, if the belt breaks, the valves remain unharmed; on the rest, unfortunately, the cylinder head will have to be repaired.
How can you tell if your timing belt is broken? Quite simply, since the spark disappears, the engine does not start, and the crankshaft rotates faster than usual. Of course, you need to know how to set the VAZ 2109 timing belt correctly when replacing the belt. Now let's look at this case.
How to remove the timing belt of a VAZ 2109?
Before starting work, place chocks under the rear wheels and apply the handbrake. This will prevent the car from rolling away. Loosen the bolts on the right front wheel as it will have to be removed.
Raise the right side with a jack and finally remove the wheel (throw it under the engine crankcase so that if the car falls, it will not fall on the brake disc). Open the hood and use a 10 mm wrench to unscrew the three bolts that secure the protective casing of the gas distribution mechanism. That's it, now you have a general view of it, you can continue.
Now loosen the nut on the generator and remove its drive belt. It will interfere with the replacement, since the pulley will have to be removed from the crankshaft. Using a 19 mm wrench (you can even use a cylinder) unscrew the bolt that secures the pulley to the crankshaft.
On carburetor versions of cars, you can insert a screwdriver or a small key into the pulley slot to keep the crankshaft from turning. On injection cars, you will have to use the help of a partner, who will sit in the cabin and press the brake pedal (in this case, you need to turn on the fifth speed).
When you unscrew the bolt, you need to loosen the VAZ 2109 tension roller to make it easier to remove the belt. To do this, take a 17mm wrench and unscrew the nut. Moreover, you can remove the VAZ 2109 timing belt completely, since when installing a new belt, it should also be changed.
Remove the belt from the pulleys and pay attention to the condition of the pump - there should be no play in it, pull its pulley to the sides with your hand. A characteristic feature of the presence of play and strong production of a liquid pump can be the appearance of wear along the edge of the belt. If there is one, then you should immediately change the pump.
As for replacing the pump, this must be done every second belt change. If we take into account that cars of this family are all older than five years, then the recommended period for replacing the belt is about 50 thousand km. The liquid pump operates for about 90-100 thousand km. mileage
Therefore, you need to install a new one in a timely manner, and not wait until it is completely worn out and breaks the belt. But the tension roller of the VAZ 2109 needs to be changed at the same time as the belt, there are no other options.
What you need to know
There are a number of signs indicating that it is time to change the timing belt on VAZ cars:
- black exhaust gases;
- uncharacteristic engine vibration during operation;
- difficult starting of the power plant;
- the appearance of noise in the motor.
If you replace a part, you must also change the roller. The pump requires mandatory diagnostics, as it rarely lasts more than 90,000 kilometers. These procedures can be classified as scheduled repairs.
If the belt breaks, the pump or pulley jams, then restoration work becomes unscheduled. To reduce the risk of such troubles, it is recommended to change the belt and its components more often - once every 35,000-40,000 kilometers.
How to set timing marks on the crankshaft and camshaft
On many domestic cars, in particular VAZ, this procedure predetermines the following actions:
- Remove the old belt and install a new tension roller
- Rotate the camshaft pulley until its mark matches the mark on the cylinder block
- We turn the crankshaft to the level when the mark on the pulley is positioned strictly vertically
- You can verify the correct installation through a special window with a plug in the clutch housing
- Pull out the plug and see if the mark on the flywheel is located opposite the cylinder block strip or not? If yes, then the work can be considered completed
Article on the topic: Contract, what is the name?
If everything was done correctly, first put the timing belt on the crankshaft pulley, and then on the camshaft pulley. It is also worth saying that the location of the shafts does not depend on the type of gas distributor. Therefore, the procedure for replacing the timing chain is largely identical.
Which timing belt to choose
To make it easier for you to find the answer to your questions about which belt to choose or which belt is suitable, we have prepared a table for selecting timing belts for different brands and models of cars:
| Brand, model | Original code | Code analogue |
| Renault timing belt | ||
| Timing belt Logan | 7701477024 130C17480R 130C10178R | K015662XS 130C17529R |
| Timing belt Logan 2 | 130C17480R 130C10178R | K015662XS 130C17529R |
| Timing belt Largus | 130C17480R 130C10178R | K015662XS 130C17529R |
| Timing belt Duster | 130C11551R 7701477028 130C13130R 130C10178R | 130C17529R |
| Timing belt Renault Clio | 7701469776 7701472726 130C10178R | 130C17529R |
| Timing belt Sandero | 130C17480R 130C10178R | K015662XS 130C17529R |
| Timing belt Sandero 2 | 130C17480R | K015662XS |
| Timing belt Sandero Stepway | 130C10178R | 130C17529R |
| Timing belt Sandero Stepway 2 | 130C10178R | 130C17529R |
| Timing belt Symbol | 7701477024 | |
| Timing belt Megan | 7701469776 7701472726 130C10178R | 130C17529R |
| Timing belt Megan 2 | 130284231R 7701063999 130C13130R 130C13191R | CT977 |
| Timing belt Megan 3 | 130C13191R 7701477028 | |
| Ford timing belt | ||
| Timing belt Focus 2 | 1672144 | VKMA04226 |
| Timing belt Focus 3 | 2045356 | KTB764 CT881K5 VKMA04226 530049510 KD452.24 |
| Fusion Timing Belt | 1672144 1672143 | |
| Daewoo timing belt | ||
| Timing belt Nexia | 1987948226 530 0332 10 5900270 | |
| Timing belt Opel | ||
| Timing belt Opel | 95516740 | |
| Chevrolet timing belt | ||
| Timing belt Lacetti | 93185845 93746917 | |
| Timing belt Cruz | 95516740 | |
| Hyundai timing belt | ||
| Timing belt Accent | 24312-26001 | |
| Solaris timing belt | 24321-2B200 | |
| Timing belt Elantra | 24321-2B200 | |
| Timing belt Skoda | ||
| Timing belt Octavia | 06A198119D | |
| Timing belt Fabia | K035565XS | |
| Kia timing belt | ||
| Rio timing belt | 24321-2B200 | |
| Timing belt Soul | 24321-2B200 | |
| Timing belt LED | 24321-2B200 | |
Timing belt options for VAZ
- Timing belt VAZ-2110, VAZ-2112
- Priora timing belt
- Granta timing belt
- Timing belt VAZ-2108, VAZ-2109
- Timing belt VAZ-2105, VAZ-2106, VAZ-2107
If you can’t decide where to buy a timing belt in Volgograd, Volzhsky or another city in the region, contact us, you can’t go wrong.
Pay special attention to how to set the timing marks
. We suggest taking a little more time to watch the video of replacing the timing belt on a VAZ with a 16-valve engine.
Replacement frequency
Natural wear, improper operation or other reasons lead to failure of the timing belt and the need to replace it. At the same time, there is no need to take the situation to the extreme: it is enough to carry out regular diagnostics and visual assessment of the part. Such a check will help to avoid a break at the wrong moment.
Abrasions indicate obvious wear on the timing belt.
The frequency of replacing the timing belt depends on the specific brand of car and is indicated in the vehicle’s operating manual. Despite the standards established by automakers, many experts advise changing the spare part every 50 thousand kilometers.
When buying a used car, you will have to check the condition of the timing belt yourself - a visual inspection of it for wear is enough. Clear signs of wear are abrasions or cracks on the surface of the belt. However, the presence of such defects does not mean that the belt will immediately fail, since inside it there is a base consisting of metal rods. Thanks to them, the part can withstand shock loads and maintain its working condition throughout its entire service life.
A cracking timing belt is another clear sign of wear.
Some cars are equipped with timing belts with reinforced metal cord, which affects their service life, increasing it by an average of 30%. Modern car models are equipped with belts made of rubber and metal, which have a limited shelf life.
Such parts cannot be repaired; if they fail, they are simply replaced. The decision to replace the belt is made not only if it breaks, but also if it sag, stretches or reduces the tightness of the fit, which negatively affects the synchronous operation of the valves. As a result, this can lead to malfunctions in the functioning of the entire car, the main symptom of which is engine malfunction.
Visible traces of belt stretching, as well as abrasion along with cracks, indicate that it has worn out
Almost always, the water pump or water pump is replaced along with the timing belt. On most cars, this device copes with its duties perfectly until the car dies, however, in some situations it needs to be changed ahead of schedule. For this reason, experts advise changing the pump at the same time as the timing belt .
The water pump is a part that is replaced along with the belt
Timing faults
Main malfunctions of the gas distribution mechanism:
- Reducing compression and popping in pipelines. As a rule, it occurs after the appearance of carbon deposits, shells on the surface of the valve, and their burnout, which is caused by a loose fit of the intake and exhaust valves to the seats. Factors such as cylinder head deformation, breakage or wear of springs, jamming of the valve stem in the bushing, and a complete lack of space between the rocker arm and the valves also have an impact.
- Reduced power, engine tripping, and metallic knocks. These symptoms appear because the intake and exhaust valves do not open completely, and part of the air-fuel mixture does not enter the combustion chamber of the cylinder. The consequence of this is a large thermal gap or breakdown of the hydraulic compensator, which causes a malfunction and improper operation of the valves.
- Mechanical wear of parts, such as: crankshaft guide bushings, camshaft gears, as well as camshaft displacement. Mechanical wear of parts, as a rule, occurs when the engine has been operating for a sufficient period of time and the engine is operating within critical limits.
- Engine failure also occurs due to wear of the toothed belt, which has its own warranty period, the chain, which becomes less efficient after a long period of operation and constant exposure to it, the chain guide and the toothed belt tensioner.
Signs of improper removal and replacement
After installing a new timing belt, car owners often notice the appearance of unpleasant noise and whistling while driving. There may be two reasons for this:
- Technical liquids get onto the tape. If whistling and noise appear after a cold start of the engine, then there is a high probability that either the coolant or the engine oil has leaked.
- Low quality of installed part. In this case, only replacing the belt again will help.
Eliminating whistling and noise after replacing the timing belt is simple - just lubricate it. For this purpose, special aerosols are used, which can be purchased at automobile stores.
The timing belt is lubricated with a special compound
If lubrication does not help and the whistle persists, then you will have to check all components for leaks. If they are found, they are eliminated, parts are replaced if necessary, after which the extraneous noise should disappear.
One of the common causes of leaks is a broken cylinder head gasket.
Often, after replacing the tension rollers and timing belt, an unpleasant engine hum and vibration appears. The main reasons for this are incorrectly set marks or errors when installing the balancer belt, which rotates 180° in the wrong direction. Vibration is eliminated by checking the marks and reinstalling them, as well as adjusting the position of the balancers.
The timing belt is a consumable part that plays a huge role in the operation of a car engine. It may well break and fail, but this problem can be solved. Regular replacement and correct tension ensure the normal functioning of all machine systems and guarantee driving safety.
Consequences of incorrect labeling
If the timing marks are set incorrectly, serious consequences for the car can occur.
The most common cases:
- Due to misaligned timing, valves can become deformed during engine operation, and the damage will accumulate.
- The valves will become deformed - bent. Although this will not happen in an 8-valve engine.
- Due to deformation of the valves, the cylinder head may be damaged. As a result, the guide bushings will fail, and cracks may appear on the main power elements.
- The piston mechanism may burn out due to incorrect placement of the timing marks.
- There will be an oil residue on the spark plugs. Plus, the ignition moment of the fuel mixture worsens.
- And also other unpleasant consequences arise.
Sources
- https://djago.ru/dvigatel/kak-vystavit-metki-grm/
- https://prometey96.ru/ustrojstvo-avto/metki-kolenvala-i-raspredvala.html
- https://www.vk-sto.by/blog/vazhnye_momenty_pri_zamene_remnja_grm/2020-01-03-118
- https://grmexpert.ru/o-grm/pereskochil-remen-grm-simptomy-prichiny-remont/
- https://stodorog34.ru/articles/zamena-grm-svoimi-rukami/
- https://fastmb.ru/autoremont/2932-kak-zamenit-remen-grm-svoimi-rukami.html
- https://www.zr.ru/content/articles/921088-zamena-remnya-grm-svoimi-rukami/
- https://mashinaa.ru/avtovaz/vaz-2109/1307-metki-grm-vaz-2109-kak-vystavit-po-metkam-grm.html
- https://pol-z.ru/zamena-remnya-grm/
- https://grmexpert.ru/o-grm/kak-pravilno-vystavit-metki-grm-kolenvala-i-raspredvala/