The average service life of a Niva camshaft is 100–150 thousand km, depending on operating conditions and the quality of the purchased spare part. Signs of its breakdown may include a constantly stalling engine, loss of power and knocking valves. Although, before replacing the Niva camshaft with a new part, you should make sure that the old one cannot be repaired.
This article will describe in detail the most important aspects related to the malfunction, repair and replacement of the camshaft for the famous domestic SUV NIVA.
Camshaft device for Niva 2121
The camshaft is cast iron, rests on five journals and rotates in an aluminum bearing housing mounted on the cylinder head. The main dimensions of the camshaft and bearing housing are given in Fig. 2-54
The cam surfaces are bleached to improve wear resistance. The camshaft is held against axial movements by a thrust flange placed in the groove of the front support journal of the shaft.
Camshaft drive. It is driven from the drive sprocket 5 (Fig. 2-55) of the crankshaft by a double-row roller chain 2. The same chain also drives the sprocket 4 of the oil pump drive shaft. The chain drive has a semi-automatic tensioner 8 with a shoe 7 and a chain guide 3 with rubber linings.
A limit pin 6 is installed in the lower part of the cylinder block, which prevents the chain from falling into the crankcase when removing camshaft sprocket 1 from the vehicle.
Niva 2121 – camshaft features
At first glance, the camshaft of a NIVA car is very similar to any other camshaft, however, there are some points by which you can easily determine that this part is specifically for the NIVA.
- Most camshafts have a hex key (usually 27) between the cams of the second cylinder. The camshafts that are manufactured for the NIVA car have two hexagons on their axis (between the cams of the second and third cylinders). Visually, this is the main distinguishing feature of this part.
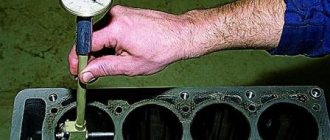
- The next differentiating factor is the distance between the base and the top of the cam. If you need to make sure that the part is specifically for NIVA, and the presence of a second hexagon does not guarantee the authenticity of the product, pick up a caliper and start measuring. The basic camshaft cam size is the same in most cases and is 30 millimeters. But the distance from the base to the top of the Niva is 37 millimeters. Measuring any other camshaft, the distance will be no more than 36.3 millimeters.
If both of these points are met, rest assured that the spare part is genuine and you can begin installing the camshaft on your Niva.
NIVA camshaft
Installation of a low camshaft from OKB engine in NIVU
After much thought and searching the Internet, a camshaft 21214-14+2 split gear and modified valve plates were ordered.
There were no questions about the camshaft and the gear either, but the plates were poorly made - they had to be modified with sandpaper. Since there are new type hydraulics for installing valve overlap, I bought two adjustable bolts and had a turner grind out the adapters. Hydraulics have M24 threaded fittings, while regs have fewer bolts. I set the TDC, replaced the hydraulics with bolts, selected the gaps and spent a long time catching the overlap. When I caught it, I made a mark on the inside of the gear to match the bed mark. Then I put the hydraulics back, set everything to the new marks, reassembled it, reset the ECU (it's a Bosch 17.9.7), started it up and was amazed how smoothly the engine idled without shaking. It was worse with the original shaft (perhaps the phases ran away due to the chain stretching). After driving it, I realized that this was what I needed - the torque ceiling had shifted down. Now it pulls confidently from 1800-1900 rpm and spins up to 5500 to 6000, but already sluggishly. The original shaft gave its “torque” from 2800 and spun confidently up to 6500 (this was done a couple of times to check how much it could pull).
Camshaft knock on Niva 2121 - what's the problem?
Such a problem as crankshaft knocking on the Niva 2121 is familiar to many drivers, but not everyone understands the moment when the camshaft begins to knock. This is due to the fact that the sounds that the driver hears in such a situation are very similar. Determining that the crankshaft is knocking and not any other component of the car is quite simple:
- The camshaft knock can be called “dull”, and it appears when starting a cold engine;
- The sounds that a bad crankshaft makes, as noted above, are similar to the sounds that occur when there is a problem with the camshaft, but there are some differences. If the crankshaft knocks, then as the speed increases, the sound becomes much louder.
It should be understood that you can hear a knock in the camshaft only during a “cold” start of the engine, since during downtime the lubricant is completely removed from the rubbing parts. Once the engine starts running, the oil will begin to lubricate the bearings. After some time, they will receive the required amount of lubricant, and the camshaft knocking will stop.
The camshaft of the Niva 2121 car consists of a number of elements, and the malfunction of most of them leads to the appearance of a characteristic knocking sound during operation of the car engine. If you hear the camshaft knocking, you can assume one of the following reasons:
- Problems with the camshaft bed. In such a situation, independent repair is impossible. It will be necessary to boring or honing the camshaft bed or completely change the part;
- Lubrication system malfunction. Even a small deviation from the norm in the lubrication system can cause the camshaft to start knocking. In this case, the reason may be associated not only with the small amount of incoming oil, but also with its quality. If, as it passes through the units, coolant or other impurities enter the oil, it begins to cope with its tasks worse;
- Deformation of the camshaft or mechanical damage to it (its parts). The most common problems include broken camshaft bearings and broken journals; The fuel supply process adjustments are violated;
- The life of the cams has been exhausted. This malfunction can be diagnosed if you are sure that the camshaft is knocking. If it continues to knock while the engine is running hot, then the problem is with worn cams.
The above are just some of the problems that can lead to camshaft knocking. The sooner a specific malfunction is identified using diagnostic equipment or visual inspection by specialists, the greater the chance of eliminating the problem before it begins to affect other elements of the unit.
Installing camshaft 21213 to 21214
* Limit speeds are given for serial masses of valves and discs and with a reduction in the preload of serial springs by 3.6 mm.
Technical parameters M18/M28/M48
| Product prices |
| Contacts |
| Patents and know-how |
| Camshafts of the XXI century |
| 25 years of DynaCAMS camshafts |
| RS pushers |
| Experience using RS pushers |
| Camshafts: |
| VAZ 2110/2111 |
| VAZ 2112 |
| VAZ 2112 RS |
| VAZ 2112 SR |
| VAZ "classic", Niva and ChevyNiva |
| UZAM 331x...3320 |
| ZMZ 402/410, UMZ 417 |
| ZMZ 405/406/409 |
| CHEVROLET / DAEWOO / OPEL SOHC-8v |
| PEUGEOT / CITROEN / SAMAND XU7 JP SOHC-8v |
| Accessories |
| Tuning examples |
| VAZ |
| Foreign cars |
| Partners |
| Publications |
| FAQ |
Until mid-2008, VAZ used hydraulic compensators of the old design - with external thread M18x1.5 mm. They were screwed into standard threaded cylinder head sockets instead of bushings for mechanical adjusting bolts. These hydraulic compensators turned out to be unreliable and often after replacing the camshaft, it didn’t matter which one, serial or tuning, they began to knock. Let's try to explain the reason for this phenomenon. When assembling the engine at the factory, hydraulic compensators are initially installed “empty” and tightened to a strictly defined torque. Hydraulic compensators collect oil during operation and can then operate normally for a long time. When dismantling the camshaft, the hydraulic compensators pick up “excess” oil. Therefore, when installing the camshaft, the hydraulic compensators must be seated, otherwise the engine simply will not start. This is difficult to do. Unscrewing - settling - wrapping the hydraulic compensator of an old design often leads to its damage and, as a result, to knocking. Therefore, our recommendations regarding hydraulic compensators of the old design in a threaded housing remain the same - they should be replaced with conventional mechanical adjusting bolts and the corresponding camshafts 21213 should be used, i.e. for mechanical adjustment of clearances. Since 2008, VAZ has been using hydraulic compensators of a new design - embedded ones with a smooth outer surface, which are simply inserted into the corresponding sockets. New hydraulic compensators are called INA, although they may be from other manufacturers and differ in appearance. The sockets in the new cylinder heads for bushings for new hydraulic compensators have an M24x1.5 thread. New cylinder heads can be identified by markings - they have the number 21214-1003015-30. In cylinder head 21214-1003015-30 with hydraulic compensators of a new design, camshafts 21214 must be used, i.e. designed for hydraulic compensators. Note that if you set the goal of using a camshaft 21213 with mechanical adjusting bolts in the new cylinder head, you will need to make steel adapter threaded bushings with external thread M24x1.5 and internal thread M18x1.5; 20 mm high, which should be installed in the cylinder head using fixing glue. Please note once again that you cannot use camshafts 21214 with mechanical adjusting bolts - the valves will “knock”. The use of 21213 camshafts with hydraulic compensators is also undesirable - the hydraulic compensators will work out the transition sections of the cam profile and the valve opening phases will increase without increasing the actual filling.
Modified upper valve spring retainers
The photo on the right shows a view of a dried valve with a serial and modified valve spring plates. In the first case, the spring preload is 42 kg, in the second - 36 kg. A decrease in preload, of course, leads to a decrease in the limit of force closure of the kinematic chain of the valve drive, but it is only about 300 rpm. In the voltage graphs below for the production camshaft cams 21213, the force limits are 7630 rpm for the exhaust cam and 7480 rpm for the intake cam. When modified valve discs are used, these values are 7320 and 7180 rpm.
It follows that the margin for force closure is quite sufficient even with modified plates. And what’s really important is that as a result of a significant reduction in spring preload, friction losses and operating noise are reduced, and the durability of timing parts and camshaft drive chains increases. When installing tuning camshafts, replacing the serial plates with modified ones simultaneously with the camshaft is even more important, because allows you to increase valve travel without increasing the ultimate spring force.
DynaCAMS ® camshafts for VAZ “classic”, Niva and ChevyNiva engines
| 21213/14 | |||||||
| Valve lifts, mm exhaust inlet | 9,5 9,5 | 9,5 10,7 | 10,9 10,9 | 11,3 11,3 | 11,6 11,6 | 11,8 12,4 | 12,2 12,4 |
| Release phase, deg. (before BDC – after TDC) | 55-30 | 55-30 | 43-27 | 50-27 | 57-28 | 63-31 | 70-33 |
| Intake phase, degrees T (before TDC – after BDC) | 30-55 | 30-73 | 27-46 | 28-53 | 29-61 | 31-71 | 37-76 |
| Valve overlap height, mm | 0,8 | 0,8 | 1,1 | 1,1 | 1,2 | 1,4 | 1,7 |
| Base diameter, mm | 30 | 30 | 30,5 | 30 | 29,7 | 28,5 | 28,5 |
| Clearance on exhaust/intake cam, mm | 0,17-0,18 / 0,15-0,16 | ||||||
| Recommended valve seat lowering, mm | — | — | — | — | — | 1,2 | 1,2 |
| Maximum operating rpm with modified plates | 6760 | 6950 | 7190 | 7230 | 7540 | ||
- The phases are given when setting the valve overlap to TDC of the crankshaft. To compensate for chain wear, it is recommended to install the camshaft using an adjustable sprocket so that at TDC the intake valve lift is 0.2 ... 0.3 mm greater than the exhaust valve lift.
- When installing camshafts 74 and 94, it is necessary to lower the valve seats or change in another way (for example, by reducing the height of the camshaft bearing housing) the position of the valve end relative to the camshaft, which is necessary for the correct operation of the valve drive lever and to avoid wear of the valve ends.
- To reduce the tightening force of the springs, ensure increased valve travel and reduce timing wear, it is necessary to replace the serial valve spring plates with modified ones.
- Camshafts 21214-14 and -44 for working with hydraulic compensators differ in the height of the cam run-out, have a base diameter of the cams that is 0.2 mm larger than indicated in the table and are marked: 4-14, 4-44. Camshafts 04, 74 and 94 are available only with mechanical clearance adjustment.
- After installing the camshaft, the carburetor should be adjusted to the mixture composition. It is recommended to install the OZ when detonation occurs. For injection engines, ECM calibration is required. Camshafts 14 and 44 can be used with serial firmware.
- Production camshaft parameters are for reference only.
21213/14 — 1006010 — 14 / 44 Low-level camshaft for 1.7 engines. 1.8 l. Camshafts for engines up to 1.7 liters. with an operating range up to 6000 rpm. Recommended for Niva and Chevy Niva.
21213 — 1006010 — 74 / 94 Camshafts for engines from 1.7 to 2 liters. with an operating range up to 6500 rpm.
21213/14 — 1006010 —| 480 | 580 | 680 | 780 | |
| Valve lifts, mm exhaust inlet | 11,6 11,6 | 11,2 11,2 | 11,7 11,7 | 11,7 11,7 |
| Release phase, deg. (before BDC – after TDC) | 62-28 | 70-33 | 70-30 | 78-32 |
| Intake phase, degrees T (before TDC – after BDC) | 28-70 | 34-76 | 30-78 | 32-86 |
| Valve overlap height, mm | 1,2 | 1,7 | 1,4 | 1,6 |
| Base diameter, mm | 29,8 | 30,2 | 29,7 | 29,7 |
| Clearance on exhaust/intake cam, mm | 0,17-0,18 / 0,15-0,16 | |||
| Maximum operating rpm with modified plates | 7460 | 8170 | 7190 | 8330 |
- The phases are given when setting the valve overlap to TDC of the crankshaft. To compensate for chain wear, it is recommended to install the camshaft using an adjustable sprocket so that at TDC the intake valve lift is 0.2 ... 0.3 mm greater than the exhaust valve lift.
- Camshafts are installed without removing and modifying the cylinder head. To reduce the tightening force of the springs, ensure increased valve travel and reduce timing wear, it is necessary to replace the serial valve spring plates with modified ones.
- The camshaft 21214-480 for working with hydraulic compensators differs in the height of the cam run-out, has a base diameter of the cams that is 0.2 mm larger than that indicated in the table and is marked 4-480. Camshafts 580, 680 and 780 are available with mechanical clearance adjustment only.
- After installing the camshaft, the carburetor should be adjusted to the mixture composition. It is recommended to install the OZ when detonation occurs. For injection engines, ECM calibration is required.
21213 - 1006010 - 580 / 680 Wide-phase camshafts for 1.7 liter engines. with an operating range up to 7500 rpm..
21213 — 1006010 — 780 Wide-phase camshaft for engines up to 2 liters. with an operating range up to 8000 rpm.
Camshafts VAZ 21213—M15 ... M55 DynaCAMS ® sport
Technical parameters M15 ... M55
21213 — 1006010 —| M15 | M25 | M35 | M45 | M55 | ||
| Valve lifts, mm exhaust inlet | 11,8 12,0 | 12,0 12,2 | 12,2 12,4 | 12,4 12,6 | 12,0 12,2 | |
| Valve opening angle, degrees. exhaust inlet | 295 300 | 305 210 | 315 320 | 325 330 | 326 330 | |
| Release phases, deg. (before BDC – after TDC) | 78-38 | 78-47 | 79-55 | 89-55 | 84-62 | |
| Intake phases, deg. (before TDC – after BDC) | 39-82 | 47-83 | 56-83 | 56-94 | 63-87 | |
| Valve overlap height, mm | 2,3 | 3,4 | 4,5 | 4,5 | 5,2 | |
| Base diameter, mm | 28 | 27,5 | 27 | 27 | 27 | |
| Clearance on exhaust/intake cam, mm | 0,17 / 0,15 | |||||
| Limit speed, rpm * | exhaust inlet | 8230 8170 | 8520 8540 | 8810 8720 | 9090 8900 | 9230 9040 |
* Camshaft 21213-M28 was previously designated M18, camshaft 21213-M38 was previously designated M28.
** Limit speeds are given for serial masses of valves and discs and with a reduction in the preload of serial springs by 3.6 mm.
For normal operation of the valve drive mechanism, it is necessary to ensure the correct position of the valve end relative to the swing axis of the valve drive lever. It is recommended to use the following relationship: B = 0.5 (30 – D) + 0.5 ... 0.8 (mm) where, B – increase in the height of the valve end relative to its position on the serial cylinder head; D is the actual base diameter of the jaws.
Usually, in order for the valves to fit higher into the cylinder head, the valve seats are countersunk. On a classic cylinder head, it is permissible to countersink the seats by up to 2 mm. At the same time, the preload of the springs also decreases, which is actually required when increasing the valve stroke.
Another way to change the position of the valve ends relative to the swing axis of the lever is to mill the mating plane of the camshaft bearing housing (CRB). Typically, the amount of modification of the CRF is 1 ... 1.2 mm. In this case, the preload of the valve springs will have to be reduced in another way, for example, by using modified valve spring retainers.
Page last updated 08/15/16
© 2005-11 OKB Engine. All rights reserved. Copying site materials without approval from OKB Dvigatel is not allowed.
source
Setting the camshaft in advance
Installing camshaft 21213 to 21011
Popular posts
Installing a CVT instead of a manual transmission
Installing a perforated corner on drywall
Installation of oil pressure sensor sf5
Installation of branching connections for fire hoses
Installing a plug in the estimate
Installation of silent bolts on a grant
Do-it-yourself removal and repair of the Niva 2121 camshaft - step-by-step instructions
In order to remove and replace the camshaft on a Niva 2121, you must perform the following procedure:
- Prepare the necessary tool Preparation for replacement consisting of: wrenches; torque wrench; chisels; socket heads for 10, 13 and 17.
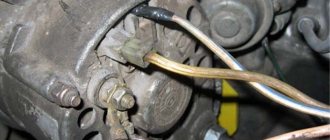
- At the first stage of work on removing the shaft, the following actions are performed: Removing the negative terminal from the Niva 21213 car battery (2121 and any other domestic modification of this car); Removing the cylinder head cover; Install the camshaft in a position where the mark on its sprocket coincides with the corresponding protrusion on the bearing housing. And the mark on the pulley is with the protruding part of the shaft drive. Using a chisel to bend the blades around the lock washer of the bolt securing the sprocket.
- Next Unscrew the sprocket bolt of the part being removed (key “17”) and remove it from the hole;
- Dismantling the timing chain tensioner;
- Removing the camshaft sprocket (recommended tie a chain to it – this will ensure that there is no skipping;
- Uniformly unscrew (using a 13mm wrench) all the nuts securing the shaft bearing housing and remove it from the cylinder head studs along with the camshaft.
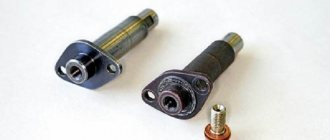
- Unscrewing, using a 10mm socket wrench, the fastenings of the thrust flange to the bearing housing;
- Removing the flange and then the camshaft.
- If it is necessary to replace the valve levers, these parts are also removed immediately after dismantling the shaft . To do this you should:
- Move the presser spring legs to the side;
- Remove the lever;
- Remove the spring.
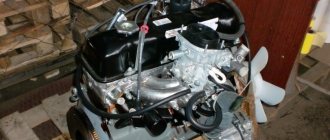
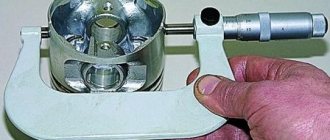
- At the same stage, diagnostics of the condition is performed. If there are noticeable damages (cams are worn by 0.5 mm or more, scratches, grooves and nicks are visible on the surface), indicating the impossibility of repair, proceed to the process of installing a new part. The camshaft, which can be repaired, is brought back into working condition. If the question about the need to replace the camshaft of any Niva model (including 2131 and more modern versions) receives a positive answer, you should purchase a new part. As a rule, they are sold complete with cases. It is worth noting that installing a new shaft requires replacing its rockers and hydraulic compensators, which increases the cost of repairs by approximately one and a half times.
- Before installing the shaft inside the bearing box, lubricate the working surfaces of the journals and cams with engine oil. Now you should install the camshaft so that its pin is located exactly opposite a certain reference point - the upper hole of the thrust flange. The part is fixed and the fasteners are tightened, adhering to certain rules: the nuts must be tightened, trying to maintain a force of 19 Nm;
• twisting is carried out in a certain sequence, which can be seen in the diagram: - Now unfasten the wire that secured the timing chain to the sprocket (leaving marks for ease of installation), and install both of these parts on the shaft. Having unscrewed the fastening bolt, bend the petals of the lock washer. And as a final stage:
- installing a tensioner for the timing chain (observing the marks made);
- returning previously removed parts to their place in the reverse sequence;
- adjustment thermal gaps old or newly installed valves.
- The result of the replacement is a new camshaft installed on your Niva 21214, 2121 or 2131, which can last at least another 100 thousand km - without the appearance of knocking and most other problems with the engine. At the same time, funds are saved that could have been spent on paying for repair services, and relatively little time is spent.
Installing a new camshaft
The replacement process will take no more than 15 minutes; beginners may need more time. Before installation, using a syringe with fresh oil, go over the main elements of the mechanism; it will also be useful to coat the parts that will come into contact with the head with a layer of sealant.
The oil seal is put on the new camshaft and installed in place in the position in which the old one was removed. After the camshaft has been placed in its place, it is necessary, as during disassembly, to tighten the nuts evenly, crosswise. The next most important assembly step will be adjusting the valve clearances:
- For intake valves from 0.2 mm,
- For graduation from 0.3 mm.
For those who have not previously encountered adjusting valve clearances, it is strongly recommended that you familiarize yourself with this topic in more detail, since there are many methods and devices for this.
After installation and adjustment, replacing the gaskets on the cover will be beneficial. The oil seal is replaced depending on its wear. Adjust the position according to the previously set marks. After completing the replacement, do not rush to start the engine, go through all your actions in your head again, check the fastening of the main elements, the chain tension, and whether the ignition is set correctly. Sometimes it happens that beginners have to re-disassemble the distributor and adjust the ignition.
source