Operating principle
This oil seal was invented to neutralize lubricant leaks from the engine through the hole from which the crankshaft emerges. This element is made from silicone or fluorine rubber. It looks like an o-ring. The diameter of the ring is equal to the diameter of the crankshaft. The rear crankshaft oil seal for most car models measures approximately 99 millimeters.
Silicone, like fluorine rubber, is a fairly heat-resistant material. Therefore, the oil seal does not suffer in any way from high temperature influences. These elements interact with the rotating shaft. As a result, the oil seal is exposed to a frictional force, which entails an increase in temperature along with the release of heat.
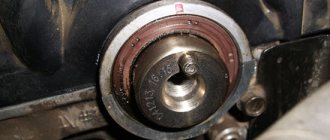
Manufacturers apply special marks and inscriptions on the outside of the oil seal. They can be used to determine which direction the crankshaft rotates. Using this information, errors are eliminated during the process of replacing the rear crankshaft oil seals.
Tools and accessories
To carry out the repair process you will need:
- container for draining oil from the crankcase;
- rags;
- a set of figured and flat screwdrivers;
- a set of wrenches (socket wrenches, open-end wrenches, socket wrenches);
- hammer and mandrels.
The entire replacement process can be carried out independently, adhering to the correct sequence of technological stages of repair work. Below we describe methods for dismantling and installing new main seals using the example of a VAZ “Nine”.
Where is the element installed?
This sealing element is installed in the area of the cylinder block where the crankshaft comes out. In ordinary cars, where the engine is located longitudinally and the gas distribution process is carried out using a chain drive, the oil seal is installed in front of the support bearing in the crankshaft shield. In the case of front-wheel drive cars, where the engine is located transversely and a belt is used in the gas distribution mechanism, the element is located in the cylinder block, since there is no shield in the engine design.
Inside the engine crankcase, the lubricant is under a certain pressure. Due to this pressure, the seal is constantly pressed against the parts that it is supposed to seal. This way the engine is reliably protected from oil leaks.
Typical faults
In modern engines, the crankshaft rear oil seal is an extremely important element. This is due to the fact that even with the slightest displacement of the part, the lubricant will flow. But how can you determine when it’s time to install a new seal? The first sign is oil leaks in the place where the power unit crankcase connects to the gearbox.
If lubricant leaks, it can get into the clutch housing, settle in a thick layer on the walls and stain the clutch disc. All this will lead to clutch slipping. Oil consumption will also increase significantly.
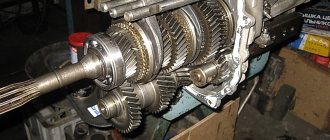
Replacing the rear crankshaft oil seal
Replacement of the crankshaft rear oil seal is carried out in an inspection pit or using a lift. The work involves removing the gearbox. During this procedure, all adjacent nodes should be additionally inspected. This is due to the fact that removing the gearbox is a rather complex and time-consuming process. Due to the high wear resistance of the rear oil seal, it is extremely rare to resort to such actions.
This is interesting: Installment payment of a fine at the traffic police
Replacing the oil seal for rear wheel drive vehicles
STEP 1. First of all, the cardan transmission is removed, followed by disconnecting the starter and clutch slave cylinder (removed entirely along with the hose).
STEP 2. The speedometer cable and reverse gear wire are disconnected. After this, you need to release the gearbox slide in the vehicle interior.
STEP 3. Remove the bolts connecting the gearbox and engine. After this, the cross member (rear mount) of the gearbox is removed.
In some cases, it becomes necessary to remove the muffler pipe. This will simplify the task of removing the necessary parts. In case of independent repairs, the car owner must first prepare the base on which the gearbox will be lowered (you can use a regular board located across the inspection hole).
After removing the clutch basket and disc, flywheel and shield, unimpeded access to the oil seal will be provided. The crankshaft oil seal is replaced using a self-tapping screw, which is placed on the edge and gradually screwed into it. First, you need to hit the tool a little so that it goes into the metal more easily. The most successful would be to use a device used during apartment renovations to secure the profile.
After several turns of tightening, the worn out oil seal is pulled out using pliers. In some cases, several screws can be used to achieve greater effect.
Replacing the oil seal for front-wheel drive vehicles
Initially, the left front wheel is removed. Before doing this, you need to loosen the axle nut, which will eventually be completely unscrewed. This will allow the strut to be moved from the axle shaft. Sometimes you have to remove the steering pin in the fastening.
As an option, the driver carrying out the repair may also consider removing the rear housing, after which it, together with the oil seal, can be reinstalled. Such manipulations are more labor-intensive and can result in damage to the oil seal housing gasket, which will lead to the opposite result.
Along with replacing the oil seal, it is necessary to inspect the bearing in the crankshaft, which includes the input shaft of the gearbox: when it sticks and makes noise when turning, you need to install a new one.
After completing the replacement of the oil seal, all procedures must be carried out exactly the opposite.
Causes of oil seal leaks
As a rule, the service life of the seal is quite long, and most often it is determined by the service life of the car. So, among the reasons for part failure are the following:
- Usually the oil seal leaks after the car has driven 100 thousand kilometers. This is caused by vibrations in the engine crankshaft. As a result, the inner part of the element wears out intensively. Initially, this inner part should be pressed tightly against the part being protected. But since over time, due to vibrations, the internal part is deformed and loses its shape, it can no longer fit well to the crankshaft.
- If the car has not been used for a long time or has been parked outside for a long time in winter, the oil seal often freezes and hardens. If it has been exposed to low temperatures, then it is no longer able to fit tightly to the surface of the protected part.
New seals can leak for other reasons. So, often one of the most popular reasons is the quality of the part. In stores you can buy a fake rear crankshaft oil seal for a VAZ. Its cost is low, and car enthusiasts do not notice that they are buying a fake. Poor quality of a part will definitely affect how it performs in the future.
Another reason is a violation of installation rules. Often the seal is placed in a convenient position and carefully hammered into place with a hammer. But manufacturers do not recommend using a hammer or applying significant force when installing the part.
Next, you can highlight engine malfunctions. If certain changes occur in the operation, the gas pressure in the crankcase increases, then these gases can squeeze out the oil seal. As a result, the contact with the crankshaft will be loose, and the lubricant will flow out through the resulting gap.
If the oil filter is leaking, some motorists think that it is the rear crankshaft oil seal that is leaking. Sometimes a completely normal part is replaced with a new one, but you just needed to replace the oil filter.
Causes of breakdown
Often the main oil seal has a service life of 150 thousand kilometers. But it may happen that it is damaged before the stated date. There are several main reasons why radial seals, whether front or rear, can become damaged: engine overheating, use of inappropriate lubricants, engine operation without timely oil and filter changes.
The use of poor quality seal parts also leads to the possibility of a main oil seal leak. Regardless of the reason, replacing cuffs should not be put on hold. Due to the fact that the front sealing part is more susceptible to environmental influences (dirt, moisture, dust) and vibration loads, it most often fails earlier than its counterpart at the rear of the engine. But if the problem happened only with the front oil seal, then they need to be changed in pairs, since their service life is the same. If damage to the seal in the pulley area can be seen visually, then with the second one it is a little more difficult - you cannot determine it by eye. Basically, when it wears out, you can notice the fact that the clutch is slipping. This is due to the fact that oil from the crankcase gets onto its elements.
Manufacturers
You should not purchase these sealing parts in dubious stores or markets. There is no need to buy cheap products from unknown brands. This way, you can not only purchase an oil seal, the replacement of which will cause certain problems, but also get more serious malfunctions.
The most popular are the following manufacturers: Viuctor Reinz, Elring, Goetze. They make quality products. The products of these brands are found not only in car stores, but also at numerous disassembly sites.
Consequences of oil seal leakage
Above, we briefly examined what a leak in the crankshaft rear oil seal can lead to. Now let's look at the consequences in more detail. There will not be any catastrophic consequences for the engine, but lubricant leaks themselves are a significant problem.
To solve the problem, you will have to dismantle the gearbox, remove the clutch - disc and basket, and remove the flywheel. All this is necessary to get to the crankshaft and its oil seal.
Quick replacement
There is another, more efficient way to replace the lip seal. But he's a little risky. The method is based on the absence of the need to remove the pan, oil receiver and oil pump. The cuff is changed directly on the engine. The disadvantage of this method is the inconvenience of the work. In addition, there is a possibility that the oil seal will not be pressed into the oil pump cover sufficiently. There is a risk of damage to the glossy coating of the crankshaft - accordingly, there is the possibility of new leaks.
The process of replacing the oil seal on a VAZ
Replacement will require some work, since the required part is hidden behind the clutch mechanism. To carry out this event, it is better to ask someone to help. It is better if the assistant has experience in such work.
First of all, unscrew the engine flywheel and remove the clutch. The rear oil seal is located in a bolted housing. There are eight of them. Unscrew the bolts and the body will be in your hands. The oil seal can be removed and a new part pressed into the body instead.
The size of the rear crankshaft oil seal is quite large, and the shape is simple, so there should be no problems when pressing in and out.
Installing the oil seal housing on the engine
To avoid damaging the main oil seal during installation, you need to apply a layer of oil to the surface of the crankshaft flange.
When mounting the seal housing in its place, we adjust the edge of the seal with a screwdriver so that it does not have any kinks. You can use a mallet for planting, but don’t be too zealous with it. Next, you need to begin assembling the power unit in the reverse order of the disassembly process.
All work on replacing the main oil seals can be considered completed.
Renault
Using the Renault Logan car as an example, let's see how to change the rear oil seal. The first step is to remove the transmission or gearbox mechanism. The car is hung on a lift. Next, the battery is dismantled. Then unscrew the bolt holding the gearbox linkage. After this, remove the bolt holding the clutch cylinder. Then remove all the bolts holding the gearbox.
Next, remove the wheels, unscrew the CV joint nuts, disconnect the ball joints from the steering knuckles, drain the oil from the gearbox and dismantle the axle shafts. A support is placed under the engine pan and the upper transmission mounts are removed, and then the entire gearbox housing.
Remove the flywheel, basket and driven disk. In this case, it is necessary to remember the position of the flywheel relative to the crankshaft. After this, unscrew the flywheel bolts and remove the Renault Logan crankshaft rear oil seal.
The oil seal is replaced with a new one in the reverse order. This completes the procedure. After a successful replacement, you can put everything back together.
Replacing the front crankshaft oil seal
Replacing any part or assembly of a vehicle always takes place in two stages: removing the old worn-out module and installing a new one. Crankshaft seals will be no exception. Such a repair cannot be done without a hammer and a screwdriver, but before you start work, you need to stock up on the necessary tools to perform the following procedures: removing the gas distribution mechanism drive, removing the cylinder head cover. The replacement process for the front oil seal itself consists of three steps.
STEP 1. First, remove the timing belt from all pulleys. After this, using two flat-head screwdrivers, lift the gear-type pulley, which must be removed from the crankshaft toe.
A car enthusiast doing repairs should not forget about the key, which must be removed with a screwdriver so that it does not get lost.
STEP 2. Using a screwdriver, remove the worn element from the cover, after which it is lubricated with engine oil. A new oil seal requires the same treatment with working fluid.
STEP 3. The repairman must press the new oil seal into the desired location using a pipe of a certain diameter or a mandrel. This field is repeated in reverse order, everything that was specified in the first step.
Expert advice
Oil seals are made from materials of varying degrees of density. This is done so that they are selected according to the type of oil. If you install oil seals for mineral oils, and the engine is filled with synthetic oil, the seals may dissolve.
Before installation, the oil seal is tried on the crankshaft. The surfaces of the seal housing and the crankshaft are lubricated with oil. After installation, check the status. If no leaks are observed, then everything turned out well. Experts also advise changing both engine seals at once - both the rear and the front.
Installing a new seal part
Before installing a new seal, wipe the seat with a rag and lubricate it with oil. Using a mandrel with a diameter of ninety-nine millimeters and a hammer, we press the new rear cuff into place.
This stage of work must be carried out with extreme caution so as not to damage the element. After the main oil seal is pressed in, replacing the oil seal housing gasket is the next mandatory stage of work. The old gasket is removed (if it is stuck, you can carefully cut it off with a knife), and a new one is installed in its place.