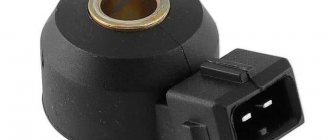
Any leak, be it water, oil or information, is unpleasant, since a leak is the loss of something worthwhile... In my article today I want to talk about oil leakage through the crankshaft oil seal. You will learn about why the crankshaft oil seal leaks, for what reasons this happens and how to fix it.
There are actually many reasons why the front crankshaft oil seal or rear crankshaft oil seal leaks. And the solution to the problem, as a rule, comes down to a banal replacement of the defective part, in our case the oil seal. However, before replacing the crankshaft oil seal, I think it’s worth understanding why it failed in order to prevent this problem from happening again.
Causes of failure
Traces of oil drips are the main and main sign that indicates wear of the crankshaft oil seal. The presence of traces of oil indicates that the tightness of the engine lubrication system has been compromised.
Oil seals can be destroyed under the influence of several factors:
- Natural wear and tear, aging of the rubber used for the manufacture of crankshaft oil seals;
- Incorrect installation, which led to premature wear and loss of functionality. This usually happens during repairs at dubious service stations or when an inexperienced car owner does the replacement with his own hands;
- Mechanical damage to the element;
- Use of a defective, counterfeit oil seal.
The blame should not always be placed solely on the cuffs, which come in front and back. Before you suspect seals, make sure that other potential causes are not to blame.
https://youtube.com/watch?v=TPXHBhYYS6I
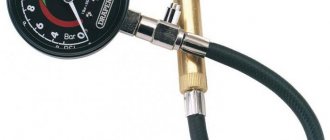
Checking node status
By checking all elements of the lubrication system, you can make sure that the cause really lies in worn out, deformed oil seals. And then they can be replaced with new elements.
| Object to be checked | Peculiarities |
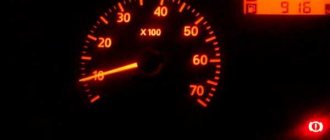
| Engine oil level | Oil can leave the system for various reasons, including the oil seal. Therefore, it is recommended to be patient and check the level every day, adding a little oil while actively maintaining it. The sensors do not always work correctly, so you need to make sure that there is no pressure violation yourself |
| Crankcase ventilation system | If the ventilation system is clogged, this will lead to active accumulation of crankcase gas. By creating pressure, it pushes the oil through the seals. In this case, simply replacing the cuff will not do anything, since it will be necessary to clean the ventilation |
| Oil hoses | They can bend, become deformed, or crack. As a result, oil comes out and the engine loses lubricant. |
| Lubrication system pressure | If the pressure increases, it causes oil to be pushed out through all sorts of passages. There are quite a few reasons for an increase in pressure, so check why exactly this indicator is increasing |
If problems are detected with the crankshaft seals, the only correct solution is to replace them.
Causes of leakage
First, let's look at the reasons why the crankshaft oil seal leaks. Before you start looking for a leak, you need to find out which component has failed.
There may be two oil seals on a car:
- Front single. This part is characterized by its small dimensions and short service life. It usually fails and leaks more often.
- Back. Typically the service life of this part is longer. As a rule, this corresponds to the service life of the vehicle as a whole. The rear oil seal is larger than the front oil seal.
The following are reasons why the oil seal must be removed and replaced:
- Natural wear and tear. Car owners encounter this problem when the car's mileage exceeds 100,000 kilometers. km. Natural wear is caused by vibration emitted from the crankshaft, which causes the internal components of the part to deteriorate. After all, the oil seal fits tightly to the shaft. Over the life of the device, it will fail and may lose its shape, causing it to become detached from the surface of the assembly.
- A crack in the structure due to the car being parked outside for a long time in winter. If the vehicle is not used, the seal may dry out or harden due to prolonged exposure to freezing temperatures. As a result of drying out, the unit will not be able to fit tightly to the crankshaft.
- New parts leak due to manufacturing defects. If the oil seal has a short service life, then the whole point is the low-quality material from which it is made. To avoid such a problem, experts recommend not using parts from unknown manufacturers in machines.
- Installation errors. The problem occurs when the device is unevenly installed on the crankshaft. During assembly, the oil seal is driven lightly into the seat with a hammer. But it is better to use a special installation tool; it will make the process easier and will not damage the device.
- Problems in the operation of the power unit. Engine malfunctions, such as high gas pressure in the crankcase, can lead to leakage. Because of this, the oil seal is forced out. In the area of the element on the crankshaft, a gap is formed through which engine fluid flows out.
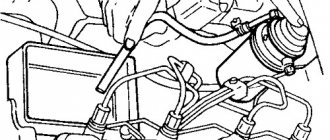
How to determine the location of the leak
Our compatriots often confuse damage to packaging with failure of the oil filter.
Having noticed signs of leaks, many drivers immediately replace the seals without finding out the cause. Therefore, the need to replace the oil filter never goes away. Before replacing the device and repairing any signs of leakage, determine which part has failed. If there are traces of oil on the rear of the power unit, you should conduct a visual diagnosis of the oil pan, as well as the gearbox. Leakage may also occur in the gearbox, so drain the oil into water. If the gearbox seal leaks, the lubricant will immediately spread onto the surface of the water, and the fluid from the engine will stick to it like a drop.
Signs of a leak may include a lack of engine oil in the lubrication system. If you check the oil level and find that there is not enough oil, you do not need to add fluid immediately. Inspect the engine to see if there is a leak, then you can fix the problem.
Replacing the crankshaft oil seal: detailed instructions
Before you begin repair work, you should find out which crankshaft oil seal needs to be replaced. The engine has:
- Rear seal. This is a large item. Typically, replacing the crankshaft rear oil seal is rarely required, because its service life is quite long.
- Front seal. Its dimensions are slightly smaller, just like its service life. The front seal fails much more often than the rear.
How to determine which seal has become unusable? To do this, inspect the pan and transmission block to find out which part of the engine is leaking.
The leaked lubricant will help determine whether the rear crankshaft seals or the front ones need to be replaced. Just take some oil and drop it into a container of water. If it is gearbox lubricant, it will spread over the surface of the water. Engine oil will not change the shape of the droplet even in water.
Now let's start inspecting the seals. Your goal is to find the leak
Pay attention to the condition of the oil pump gasket. Since these parts are located close to each other, it may appear that the seal is leaking when in fact the oil pump gasket needs to be replaced.
The technology for replacing the crankshaft oil seal is as follows: first, a new front seal is installed, which is located on the drive side of the gas distribution mechanism. Then the seal on the gearbox side is replaced.
How to replace the crankshaft oil seal? There are two ways: simple and complex. The first one was invented by car owners trying to make repairs as quickly as possible. The second method was developed by specialists, and this is what we will describe below.
What to do:
We drive the vehicle onto the overpass and secure it securely. We remove the engine protection, as well as the timing cover. Remove the battery terminals and then drain the engine oil. We remove the six bolts protecting the engine compartment on the right. We loosen the generator belt, then dismantle it. After the front wheel on the right is removed, you need to engage a low gear. You will need a nineteen wrench, using it, carefully so as not to tear it off, loosen the pulley mounting bolt. Then unscrew it completely and remove the crankshaft pulley. Note! The crankshaft key should be placed in a safe place; if it is lost, the pulley will not function properly. Then we install the piston of the 1st cylinder at top dead center. To control its location, look at the mark in the engine flywheel hatch, as well as at the mark on the timing shaft. This must be done when the front wheel is raised and 5th gear is engaged. After this, loosen the tension roller and remove the timing belt. To remove the lower cover of the clutch housing, unscrew the fastening bolts
It should be removed along with the gasket. Next, unscrew the 16 bolts securing the engine crankcase cover and remove it. Important! A new gasket should be installed during assembly. Now we proceed to dismantling the oil receiver from the oil pump, as well as the main bearing. To do this, unscrew the mounting bolts by ten. Using 2 screwdrivers, remove the toothed pulley from the shaft and unscrew the oil pump mounting bolts
It will come off along with the crankshaft oil seal. The seal can be pulled out easily if you use something sharp. To make the new oil seal fit easier, lubricate it with oil. You can press in the seal using a mandrel or an old oil seal. Reinstall the removed parts in reverse order.
Changing the rear oil seal
First, we'll tell you how to change the rear oil seal. As a rule, this is where the most difficulties arise:
- We dismantle the box and clutch basket. More details about this work should be found in the repair instructions for your car;
- Remove the flywheel. Usually it is attached to 8-10 studs. To tear them out of place, you need to jam the crankshaft; it is most convenient to do this with a pry bar;
- Using a screwdriver, remove the old oil seal from its seat;
- Clean the crankshaft journal with a soft cloth. Do not use sandpaper for cleaning;
- The new one is lubricated with oil and installed in place. It is better to use a special mandrel for pressing, but if you don’t have one, you can use a piece of pipe of a suitable diameter.
Install all previously removed components onto the machine.
Causes of leakage
Oil leakage occurs due to the oil seal losing its original shape. This can happen for the following reasons.
- Freezing or drying out due to the car being left in the cold for a long time without moving.
- Wear on the interior. The service life of this part is approximately 100 – 150 thousand kilometers. Vibrations of the crankshaft during movement “break” the oil seal, changing its shape and disrupting the fit to the parts.
- Incorrect installation. Most often, this situation occurs when you replace a part yourself. For installation, service centers use special equipment or a light hammer, which is used to hammer the oil seal into place. Inexperienced craftsmen use a standard hammer during installation, deforming the part with strong blows.
- Untimely oil change. With prolonged use, dust and dirt accumulate in the lubricant, which scratch the seal and gradually destroy it.
- Engine malfunctions. The increased pressure of crankcase gases knocks the oil seal out of its proper place, and cracks form at the joints.
IMPORTANT. In an effort to save money, some car owners purchase cheap fake parts that fail prematurely.
An original oil seal made of high-quality material can last up to 200 thousand km without replacement.
Reasons why the crankshaft oil seal leaks
With high mileage, more than 100,000 kilometers, the oil seal may leak. This is caused by the fact that the crankshaft has some runout, due to which the inner surface of the oil seal, which should fit very tightly to the crankshaft, breaks. But since it is broken and has lost its elasticity, it is not able to press tightly against the compacted surface.
If the machine has not been used for a long time, the oil seal may dry out and become stiff. Then it will definitely not be able to press against the sealing surface. Loss of elastic properties can also occur due to the influence of low-quality oil, which corrodes everything that is possible.
A new oil seal leaks for other reasons - this could be the quality of the product itself, or its incorrect installation. Do not use parts of questionable manufacture; the leaders in the production of sealing products are the following companies: Victor Reinz, Elring, Goetze and others. These companies supply their products both to the assembly line of the world's leading manufacturers and to the aftermarket.
If installed incorrectly, the inner working surface of the oil seal may be damaged if it is installed unevenly. Usually the oil seal is set in the desired position and, through a spacer of the appropriate size, the oil seal is hammered into place with light blows of a hammer. Manufacturers, however, recommend using their original equipment.
The oil seal may also leak for reasons not directly related to the oil seal. If the engine is faulty and there is an increased pressure of crankcase gases, then these gases can easily squeeze out the oil seal, thereby creating a gap so that the oil can flow freely.
Why the crankshaft oil seal leaked and how to determine the location of the leak
Let's start with the fact that there are several main reasons for the crankshaft oil seal to start leaking. Since there are two oil seals (front and rear), the individual causes of oil leakage are slightly different. The rear oil seal is a massive product that is designed to last about 100 thousand km. and more. After this period, it is quite possible that the element gradually begins to leak. The front oil seal is smaller and fails more often. There have been cases when the front crankshaft oil seal on some cars leaked for no apparent reason after only 30 thousand kilometers traveled.
At the initial stage, it is necessary to determine exactly which of these elements has leaked. For diagnosis, it is enough to study the location of the leaks.
If traces of oil are noticeable on the rear of the engine, gearbox housing, sump, then increased attention should be paid to the crankshaft rear oil seal. At the same time, it should be taken into account that the gearbox itself can also leak.
For an accurate determination, it is enough to remove a little of the leaking oil and then place a drop in water. The gear oil from the gearbox will spread over the surface, while the engine oil will retain its droplet shape. In the case of PSKV (front crankshaft oil seal), the location of the leak is also determined by visual inspection. It should be added that in some cases an oil pump gasket leak can be mistaken for an oil leak through the oil seal, since these seals are located nearby. As a result, it may turn out that the oil is not flowing from the oil seal at all.
The crankshaft oil seal is leaking: is it safe to drive?
Along with the fact that engine oil consumption naturally increases and you have to top it up, operating a vehicle with a leaking crankshaft oil seal can unexpectedly result in serious troubles. As already mentioned, in addition to severe contamination of the engine with oil and dirt adhering to the lubricant, a leak can cause complete failure of the internal combustion engine or other components under the hood.
The list of the most serious consequences rightly includes a broken timing belt, which occurs as a result of a leaking oil seal. On many engines, such a break leads to bending of the valves, which results in expensive repairs. If the rear oil seal leaks, then the transmission suffers, and the oil gets into it. Less frequently reported are cases where problems occurred in the operation of electrical equipment or ECM sensors, where excess oily contaminants accumulated under the hood.
Types of dependent suspensions
There are two types of dependent suspension: suspension with longitudinal springs and suspension with guide arms.
Suspension on longitudinal springs
The chassis consists of a rigid beam (bridge), which is suspended on two longitudinal springs. A spring is an elastic suspension element consisting of bonded metal sheets. The bridge and springs are connected using special clamps. In this type of suspension, the spring also acts as a guiding device, that is, it ensures a given movement of the wheel relative to the body. Despite the fact that dependent leaf spring suspension has been known for quite a long time, it has not lost its relevance and is still successfully used on modern cars.
Suspension with guide arms
A dependent suspension of this type additionally consists of four diagonal or three to four longitudinal rods (levers) and one transverse rod, called the “Panhard rod”. Each lever is attached to the car body and to a rigid beam. These auxiliary elements are designed to prevent lateral and longitudinal movement of the axis. There is also a damping device () and elastic elements, the role of which in this type of dependent suspension is performed by springs. Suspension with guide arms is widely used on modern cars.
Balancer suspension
Balancer suspension
It is worth mentioning separately the balancer suspension - a type of dependent suspension that has a longitudinal connection between the wheels. In it, the wheels located on one side of the car are connected by longitudinal reaction bars and a multi-leaf spring. The impact of road unevenness in a balancer suspension is reduced not only by elastic elements (springs), but also by swinging balancers. Redistributing the load allows you to improve the smoothness of the vehicle.
When is it necessary to replace transmission seals?
There are oil seals in every gearbox. Their number depends on the type of drive; the functionality will be the same in all cases. The main task of oil seals is to prevent oil leakage from the main element of the transmission - the crankcase. In addition, they provide protection from dust and dirt to the internal parts of the gearbox.
The oil seal performs its functions only if it is fully operational. But, of course, he cannot work forever. As a result of regular intense loads, the element wears out and requires replacement. Oil seals are consumables. They are located in the clutch housing, near the inside of the gearbox. Replacing the seals in the box involves disconnecting the casing. The machine must be on an overpass or above an inspection hole.
There are no high loads or heating of elements in the gearbox; transmission oil is not supplied under high pressure (except for hydromechanical automatic transmissions). However, leakage can still occur. This is a serious problem as the oil level decreases, causing rapid wear of the gearbox and serious damage can occur.
- The main sign of a leak is transmission oil stains remaining after the car has been parked for a long time. You need to make sure that the problem is with the gearbox, as engine oil may leak due to improper installation of the filter.
- If you have established for sure that the leak is coming from the gearbox, you must stop using the car and carry out diagnostics and repairs. If the malfunction is not corrected in time, a decrease in the oil level will lead to wear and breakdown of the gearbox.
In addition, due to increased leakage, the gearbox may fail at the most inopportune moment. In this case, simply replacing the seals will no longer be enough. The box will have to be removed, troubleshooting and completely repaired.
Of course, the price to fix the breakdown will be much higher than if you had to buy only new oil seals.
It is important to note that periodic monitoring of the oil level in the gearbox allows you to promptly notice and eliminate the malfunction and avoid possible problems in the future. It should be checked regardless of the condition of the gearbox. You also need to monitor the occurrence of noise, crunching and grinding noises during gearbox operation.
If any of these signs appear, as well as difficulties with shifting gears, it is necessary to diagnose the gearbox.
You also need to monitor the occurrence of noise, crunching and grinding noises during gearbox operation. If any of these signs appear, as well as difficulties with shifting gears, it is necessary to diagnose the gearbox.
If you do not detect in time that there is a transmission oil leak, it will completely leak out of the gearbox. In this case, it will be necessary to carry out expensive repairs of the gearbox, while the cost of the oil seal is 50-100 rubles.
Oil seals are consumables. If they break, they cannot be restored. Therefore, if an element ceases to perform its functions due to damage or wear, it must be replaced with a new one.
Also, the replacement of the gearbox seals is carried out together with the change of the CV joint. If it is necessary to install this unit, the gearbox seals are also changed. This is done because if the oil seal is removed, it will no longer be fully operational.
In an automatic transmission and a manual transmission, replacing oil seals is almost the same
At the same time, it is important to understand that an automatic transmission has such an integral part as a torque converter. This is a device with blades that works on the principle of a windmill - it transmits torque from the engine to the gear shift mechanism, which allows the car to change the speed without driver intervention
The advantages of a torque converter are the absence of a clutch pedal, smooth acceleration of the car, and protection of the engine from overloads.
The weak point of the gas turbine engine is the rubber seal. If the automatic transmission seal needs to be replaced, then the sealing ring of the unit also needs to be changed.
The operation of the element is designed for approximately 200 thousand km. However, it may wear out earlier. Even small gearbox oil leaks must be eliminated and repaired, otherwise premature wear of the shaft, pump and the entire gearbox as a whole may occur.
Consequences
Now, let’s take a look at the consequences that can arise when oil regularly leaks from under the crankshaft oil seal. The timing belt is located next to the front oil seal: if engine fluid gets on it, the belt may break faster during operation.
Installation of the front SCV
The clutch mechanism is located next to the rear oil seal, and if consumables get on it, the system will lose its friction characteristics. One way or another, in both the first and second cases, fluid leaks and engine contamination are inevitable,
There was a leak from under the front oil seal
It should be noted that a leak from under the oil pump gasket can also be confused with a leaking oil seal. These elements are located next to each other and the motor fluid in both cases will flow from one side. It is also worth adding that in this case the crankcase will be dirty, since any dirt that remains there will stick to the lubricant.
A broken timing belt is the worst outcome if the crankshaft oil seal leaks. Moreover, on many engine models, cases where engine valves were bent were recorded. In this case, the motorist will need:
- replace the timing belt;
- replace the cylinder head gasket;
- replace the valves, and grind them in;
- grind the engine cylinder head, since in 98% of cases it will be uneven and, accordingly, will not fit tightly to the engine, which will negatively affect the reliability of the power unit.
In addition, if the vehicle is regularly used, the pistons may be damaged by a leaking oil seal, since these are the elements that rub against the valves and can be damaged by them. Experienced car enthusiasts know that minor defects and irregularities on the piston surfaces will not in any way affect the operation of the power unit as a whole.
Installation of a new SCV
But in practice, there have been cases when the piston was simply pierced by the valve itself: in this case, the car owner will have to fork out for expensive repairs, almost a major one. After all, you will have to replace:
- directly failed piston;
- broken shaft valve;
- all liners around the circle will also need to be replaced;
- and change the crankcase gasket.
So, let’s summarize the total costs that a driver may experience in the event of a leak of engine fluid from under the oil seal:
- replacing the timing belt;
- changing valves, grinding them in;
- grinding the surface of the cylinder head;
- replacing the head gasket;
- adding lubricant to the engine, as well as antifreeze to the cooling system;
- It is also advisable to replace the cylinder head mounting screws;
- replacing the piston (if it fails);
- it may also be necessary to replace the piston rings;
- replacing the pan gasket.
This is what the new front SCV looks like
A motorist who operates his vehicle with a leaking oil seal may face such consequences.
Extinguishing device
This definition hides nothing more than the shock absorber itself. Its purpose is to reduce the amplitude of vibrations of the car body, which are precisely caused by the work of elastic elements.
Typically, the operation of all types of shock absorbers is based on hydraulic resistance, which occurs when fluid flows from one cavity to another through the calibration holes of the valves.
As for these cavities, shock absorbers can be mono-tube (1 cylinder) or double-tube (2 cylinders).
Types and purpose of oil seals
Essentially, an oil seal is an O-ring. For its manufacture, fluorine rubber or silicone are used, which can withstand heat and temperature changes, and are also resistant to the negative effects of motor oil.
Based on their location, there are 2 types of oil seals:
- Rear. Larger and more wear-resistant. If it was made with high quality, it can last a very long time - especially if the engine is properly cared for.
- Front. It differs from the front one in its smaller size and in that it wears out more intensively. Before you start replacing it, you should find out exactly which of the seals has failed.
Purpose of oil seals
The motor is equipped with a lubrication system that supplies oil to all working mechanisms. The peculiarity of the crankshaft is that its housing is brought out, so lubricant leaks at the exit points. It is at this point that the oil seal is installed, the diameter of which fully corresponds to the diameter of the crankshaft.
During operation, the oil is under a certain pressure, which causes the oil seal to be pressed against adjacent parts, thus sealing the leak. Depending on the design features of the engine, the location of the seals may vary.
In vehicles with rear-wheel drive and longitudinally mounted engines, the seals are located in the crankshaft shield in front of the support bearing. In engines that do not have shields (front-wheel drive cars with longitudinally mounted engines and timing belts), the oil seals are installed in the cylinder block.
If the seal is faulty, lubricant leaks.
How to fix the problem?
If the device is leaking, then the only solution to the problem is to replace the seals.
What is needed for the job?
The set of tools may vary depending on the specific car model. Typically, repair work requires wrenches, the oil seal itself, a rag and two screwdrivers - with a Phillips and a flat head.
Replacing the front oil seal
The front part is replaced as follows:
- First, the pulley block is dismantled. To remove, use the service book for the car.
- Remove the plastic cover from the timing belt.
- Remove the strap itself.
- Remove the drive pulley using the necessary keys.
- Once you have access to the part, remove it and perform the change. Perform further assembly in reverse order.
Replacing the rear oil seal
The process of changing a device is performed as follows:
- Remove the transmission. The dismantling process differs depending on the specific car. To remove, read the service book for the car.
- Using a screwdriver, remove the failed oil seal from its seat. You can also use a knife for dismantling, but be careful with the working surface of the crankshaft.
- After removal, clean the crankshaft. To do this, use a dry cloth. The use of sandpaper to clean the surface of the crankshaft when replacing the oil seal is not allowed. This will lead to accelerated wear and failure of the mechanism.
- Install the new part.
- Reinstall the transmission. Make sure there are no leaks.
You can learn more about replacing the device without dismantling the transmission from the video filmed by the Bombezh TV channel.
Engine flushing
To remove contaminants from the lubrication system, the power unit must be cleaned.
To do this, do the following:
- Drain the old consumables from the system into a bucket or basin.
- Pour flushing oil into the engine.
- Start the engine and let it run.
- Drain the flushing fluid.
- Replace the oil filter.
- Refill with new grease.
What to do if it leaks after changing it?
If, after replacing the part, it still continues to leak, the reason may be either improper installation of the oil seal or its unsuitability.
There are two options to solve the problem:
- If you changed the oil seal incorrectly, the part should be dismantled and reinstalled.
- If the quality of the device is poor, return it to the store and buy a working oil seal.
Types of crankshaft oil seals
Manufacturers, in order to save materials or reduce prices, produce crankshaft oil seals with sections of varying complexity. Let's consider their main types, namely:
- with a metal outer surface (option a);
- with a smooth surface (option b);
- with a corrugated surface (c);
- with hydrodynamic effect (d).
Types of oil seals
Model a seals will not provide the same degree of sealing as models b-d, but require less rubber for production and lower cost accordingly. A smooth oil seal (type b), even with sufficient density, will have cavities in the seat; such an assembly may “sweat”. Grooved grooves (like those of oil seal B) are crushed during installation and contribute to a tighter fit in the engine housing, this is an advantage over “bare” oil seals (a).
Special mention should be made of hydrodynamic seals (model d). They are more technologically advanced and efficient. The principle of their operation is as follows:
- special notches of small depth with the direction of rotation are applied to the inner plane;
- high crankshaft speeds swirl the oil in the area of the inner plane of the statically fixed oil seal, the oil flow hits the internal notches and receives the direction of movement from it;
- Such processes improve the efficiency of stuffing box units.
In order to further seal the oil seal-engine housing assembly, it is recommended to apply sealant to the outer surface of the oil seal before installation.
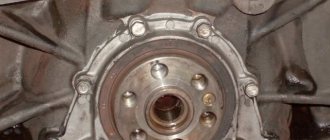
The crankshaft oil seal is installed at the points where the shaft exits the engine and is secured by pressure plates or adjacent engine components. The crankshaft has two oil seals: front and rear. The rear oil seal, as a rule, has a separate housing - a “flange”.
VAZ 21061 engine structure - crankshaft pulley; 2 – generator drive belt; 3 – front crankshaft oil seal; 4 – camshaft drive chain; 5 – spring plate; 6 – guide sleeve; 7 – valve; 8 – internal spring; 9 – outer spring; 10 – lever spring; 11 – adjusting bolt; 12 – valve drive lever; 13 – camshaft; 14 – oil filler cap; 15 – cylinder head cover; 16 – spark plug; 17 – cylinder head; 18 – flywheel; 19 – rear crankshaft oil seal; 20 – oil pressure sensors; 21 – piston; 22 – oil level indicator; 23 – oil drain plug; 24 – connecting rod; 25 – oil pan; 26 – drive shaft of auxiliary units; 27 – crankshaft.
Crankshaft seal kit for VAZ 2106
How to eliminate oil leaks from crankshaft seals?
It is important to know
The only option to stop a leaking front or rear oil seal is to replace it.
How to replace the front oil seal?
Replacing the front crankshaft oil seal with your own hands is done as follows:
- The cover is removed from the timing belt.
- The generator drive belt is being removed (to complete the task, you need to loosen the nuts on the pulleys). The belt is removed first from the generator pulley and then from the crankshaft.
- The crankshaft pulley is dismantled; to do this, the screw is unscrewed. To unscrew, you can insert a thick screwdriver into the special inspection hole on the flywheel into its teeth to lock the device. After this, the bolt can be unscrewed.
- After dismantling, the camshaft pulley is brought to the mark, and the tension roller of the timing belt is loosened. The belt is removed, and then the crankshaft gear. The latter is dismantled using a screwdriver or a thin pry bar. To perform the task, you can use a special puller, but if you don’t have one, you need to spray the crankshaft and gear with WD-40.
- After the gear is dismantled, it is necessary to remove the timing belt and the part itself. At this stage you should be careful not to lose the key.
- If the gear is installed tightly on a carburetor engine, then you need to tighten the strap and start the engine so that it can work without the crankshaft pulley. A few seconds after starting, you need to see if the gear comes off the crankshaft; to do this, the part needs to be pryed off. If the product is disconnected, then you need to mark the gear, remove the strap, and then the part itself along with the oil seal.
- This method cannot be implemented on injection engines, since the engine will not start without the crankshaft pulley (the spark moment is read from it by the controller). You can try to pry the gear in a circle by turning the crankshaft with a pry bar. If this does not help, the product can be treated with WD-40 liquid several times.
- After replacing the oil seal, you need to put the gear on the crankshaft with a key. At the final stage, the timing belt is installed. All components are assembled in reverse order. After installing the strap, you need to slightly tighten the tensioner roller.
Video: detailed instructions for replacing the front crankshaft oil seal
The Elsa Studio channel made a video showing the procedure for replacing the front crankshaft oil seal using the example of classic VAZ models.
How to replace the rear oil seal?
Replacing the rear crankshaft oil seal using the example of a VAZ 2106:
- The transmission unit is being dismantled. To do this, you need to drain the oil from the box by unscrewing the plug and first placing a container under the unit.
- Then the clutch is removed. To do this, a special mandrel for centering the driven shaft is installed so that the front part of the part is completely seated in the bearing. The latter is pressed into the end of the crankshaft.
- Instead of the left bolt securing the clutch housing to the engine cylinder block, a screw is screwed in. Next, you need to unscrew the six bolts securing the pressure plate to the flywheel. When performing this task, hold the flywheel with a screwdriver to prevent it from turning. At this stage you need to remove the pressure plate.
- Then the driven shaft is dismantled along with the mandrel, the latter is removed from the hub.
- The flywheel is being dismantled.
- The two screws securing the front crankcase cover are unscrewed and removed.
- Then you need to unscrew the two bolts that secure the oil pan to the oil seal retainer. Carefully prying it with a screwdriver, the latter is dismantled. At this stage you need to be careful and put aside the two bolts equipped with square heads. These elements are loosely located in the holder slots and may fall out.
- If the gasket remains on the holder or cylinder block, it must be separated.
- The crankshaft oil seal is removed from the holder using a screwdriver. The new part is treated with motor fluid and installed in the holder from the outside. When performing the task, you need to orient the device with the working edge towards the centering protrusions. The working part of the product is characterized by the presence of a spring element.
- Using a hammer, lightly tap through the mandrel to press the crankshaft rear oil seal until it stops.
- After the user has replaced the oil seal, it is necessary to check the holder gasket. If this element is heavily compressed or worn out, it needs to be replaced. Before installation, the product is lubricated with silicone sealant, and for greater convenience it is recommended to fix it on the holder.
- The holder with gasket is being installed. To do this, you need to tighten all the screws that secure the device without tightening them all the way.
- A special mandrel is installed on the crankshaft. When performing this task, it is necessary to center the holder in relation to the shaft.
- Lightly tighten the screws securing the holder to the cylinder module. Then they are twisted to the end according to the criss-cross principle.
- The bolts securing the holder to the crankcase pan are tightened. All other components and parts are assembled in the reverse order.
Video: DIY rear oil seal replacement
The “Sunday Garage” channel made a video that shows in detail the process of replacing the rear crankshaft oil seal using the example of a Renault Logan car.
What to do if it leaks after replacing the oil seal?
If the user has changed the oil seal, but the leak problem still remains, then the malfunction is due either to improper installation or to the use of a defective part. To fix the problem, you need to dismantle and reinstall the spare part. If this does not help, you need to remove the old oil seal and install a new one.
How to flush the engine?
The engine flushing procedure looks like this:
- First you need to drain the used oil. To complete the task, place a container under the drain hole and unscrew the plug with a wrench. It is advisable to drain the old lubricant on a warm engine, since in this form it will be more liquid. However, you need to act carefully so as not to get burned.
- The drain plug is screwed in and flushing oil is poured into the engine through the filler hole.
- Then the power unit starts. Depending on the flushing, a test drive may be required or the engine may need to be idled. You can clarify this point by reading the instructions for the oil.
- The draining procedure is repeated. If there are traces of deposits and carbon in the drained oil, you need to repeat the flushing procedure.
- The oil filter is being replaced. To do this, you can use a special key if the device is stuck. If a tool is missing, you can pierce the filter through with a screwdriver or use it as a lever to unscrew it.
- Fresh oil is poured into the engine.
What additives should I use?
It is allowed to use any protective antifriction additives that increase the service life of the power unit. The main thing is that the product contains additives and elements that extend the service life of rubber elements. The use of additives that destroy the rubber structure is not allowed.
Step-by-step instructions for replacing the rear crankshaft oil seal
Just when the rear crankshaft oil seal leaks, then all the troubles begin: the engine begins to get dirty in oil at a rapid pace, and all the dust from the road then very actively sticks to it. One has only to look at such a motor and already there is a desire to pull it out and throw it away. Moreover, the oil will also corrode rubber parts and drip onto the clutch disc, after which it risks losing its frictional properties. Everything starts to creak, slip, rub against each other... In general, because of the small seal, the whole car seems to have gone crazy.
All the oil, of course, most likely will not leak out (however, do not be sure of this), but such a nuisance can add serious problems to you. If there is a leak from the rear oil seal, it must be replaced. There is no other solution to the problems and there simply cannot be.
As we have already noted, this oil seal was invented to neutralize lubricant leaks from the engine through the hole from which the crankshaft emerges. The rear crankshaft oil seal for most car models measures approximately 99 millimeters.
After dismantling the oil seal
Manufacturers apply special marks and inscriptions on the outside of the oil seal. They can be used to determine which direction the crankshaft rotates. Using this information, errors are eliminated during the process of replacing the rear crankshaft oil seals.
This sealing element is installed in the area of the cylinder block where the crankshaft comes out. In ordinary cars, where the engine is located longitudinally and the gas distribution process is carried out using a chain drive, the oil seal is installed in front of the support bearing in the crankshaft shield. In the case of front-wheel drive cars, where the engine is located transversely and a belt is used in the gas distribution mechanism, the element is located in the cylinder block, since there is no shield in the engine design.
Inside the engine crankcase, the lubricant is under a certain pressure. Due to this pressure, the seal is constantly pressed against the parts that it is supposed to seal. This way the engine is reliably protected from oil leaks.
Even with the slightest, slightest displacement of the part, the lubricant will flow. But how can you determine when it’s time to install a new seal? The first sign is oil leaks in the place where the power unit crankcase connects to the gearbox.
If lubricant leaks, it can get into the clutch housing, settle in a thick layer on the walls and stain the clutch disc. All this will lead to clutch slipping. Oil consumption will also increase significantly.
The most surprising thing is that even new oil seals can leak and the reason will not be due to poor installation. In stores you can buy a fake rear crankshaft oil seal for a VAZ. Its cost is low, and car enthusiasts do not notice that they are buying a fake. Poor quality of a part will definitely affect how it performs in the future.
An example of an incorrect oil seal installation
Another reason is a violation of installation rules. Often the seal is placed in a convenient position and carefully hammered into place with a hammer. But manufacturers do not recommend using a hammer or applying significant force when installing the part.
Leakage of poor-quality oil seal
If certain changes occur in the operation, as a result of which the gas pressure in the crankcase increases, then these gases are undoubtedly capable of squeezing out the oil seal. As a result, the contact with the crankshaft will not be tight enough, and the lubricant will leak out through the resulting gap.
Is it possible to confuse the oil seal with something else? Yes, you can. Very often, many experienced motorists confuse an oil filter leak with an oil seal leak. Sometimes a completely normal part is replaced with a new one, and it was just necessary to replace the oil filter.
You should not purchase these sealing parts in dubious stores or markets. There is no need to buy cheap products from unknown brands. This way, you can not only purchase an oil seal, the replacement of which will cause certain problems, but also get more serious malfunctions. Imagine that after buying a cheap oil seal and saving $5, oil will get on the timing belt and damage the entire cylinder block at a cost of $1000, if not more! Saving on oil seals is a real absurdity.
The most popular are the following manufacturers:
- Viuctor Reinz;
- Elring;
- Goetze.
They make quality products. Products of these brands are found not only in car stores, but also at numerous showdowns.
Consequences of a leaking oil seal
There are two oil seals on the crankshaft - front and rear. Both of them represent a unique nuisance. There is a timing belt near the front oil seal; if oil gets on it, it can easily break during operation. Near the rear oil seal is the clutch; if oil gets on it, the clutch will lose its frictional properties. But in both cases, oil loss and a dirty engine are inevitable.
The front crankshaft oil seal is leaking
If the seal has recently been changed, then there is a high probability that it was installed incorrectly, namely, the inner edge of the rubber was bent, through which the leak began to flow. In this case, only for replacement, because the oil seal is already damaged, even though it is new.
In some cases, oil seal leakage is mistakenly diagnosed; the oil pump gasket may be leaking; they are located nearby and oil flows from the same side. With such leaks, the crankcase will always be dirty, because any dust sticks to the oil and remains on the surface without flowing anywhere.
The worst problem can be a broken timing belt. On many engines, the valves bend. The consequence will be expensive repairs - replacement of the timing belt, cylinder head gaskets, replacement of valves with their subsequent grinding, grinding of the cylinder head plane (and the plane in 99% of cases will be uneven, which will affect reliability). The pistons will also be damaged, since they are the ones that come into contact with the valves and are damaged by them. But minor deformations and even shallow depressions are not scary for the pistons; they move as if nothing had happened. But there are cases when the piston is pierced through by the valve - this is only for replacement, and this is almost capital - you will also have to change the liners all around, and the crankcase gasket here.
So, let's calculate the cost of replacing the oil seal:
If the belt breaks and the valves are bent, then add:
If the piston also breaks:
Causes of leaks
The most common causes of oil seal leaks are:
- Achieving a car mileage of 100 thousand kilometers. In such situations, under the influence of the vibration effect of the crankshaft, the inner part of the oil seal wears out. As a result, it no longer fits tightly to the box and will contribute to the flow of working fluid.
- Drying of the oil seal, which is associated with the use of low-quality oil. This often occurs if the working fluid is kept at low temperatures for a long time.
- Poor quality of the part or its incorrect installation, which should also not be excluded as the cause of the breakdown.
- Malfunctions in the engine itself. The most common failure in this case is an increase in crankcase gas pressure, which leads to displacement of the oil seal.
- The oil filter is leaking, as a result of which the problem is unlikely to be solved only by replacing the oil seal.
Note. The rear and front oil seals have certain differences, which is due to the design of the engine
Therefore, their replacement is not equal in complexity. The maintenance process will not be difficult for an experienced driver. However, for beginners who do not understand the peculiarities of engine operation, the procedure will not always be possible.
Consequences of a leak
Let's look at the consequences that may arise when operating a car with a leaky oil seal. Learn more about the leaking unit in this video on the Nebitanecrash channel.
Is it possible to drive?
In addition to the need to constantly top up engine fluid, the driver may face serious problems. The power unit will begin to become clogged, which will lead to further flushing as contaminants will stick to the oil. Lack of lubrication in the system will cause failure of the unit, as well as the main mechanisms of the engine as a whole. The timing belt will break and this can damage the valves. Eventually, the device will have to be repaired. A leak in the rear oil seal can lead to gearbox failure. Sometimes the problem causes electrical devices or controllers and sensors to fail. The accumulation of dust on devices negatively affects their functionality.
Leaking from under the front seal
It doesn't matter why the crankshaft seal is leaking. As soon as the first symptoms appear, the defect should be eliminated.
This is fraught with the following consequences:
- failure of the timing belt;
- damage to the valves, which will require their replacement and grinding in;
- the need to grind the cylinder head surface;
- damage to the cylinder head gasket;
- oil and coolant leaks requiring their purchase and refilling;
- Repairing the cylinder head requires replacing the assembly bolts;
- piston damage;
- It is necessary to replace the oil pan gasket, as it is necessary to replace the working fluid;
- bending and damage to piston rings.
Rear oil seal leaking
Learn more about the causes and consequences of a leak in a device in this video made by Sanja Autosmith.
If the rear end is damaged, it is usually necessary to disassemble the transmission, shaft clutch mechanism, and also the flywheel to fix the problem. It all depends on the design features of a given car model, but in most cases it is necessary to dismantle these components and assemblies. This will be necessary for access to parts. Due to lubricant leakage, the clutch itself may flood, which will lead to loss of frictional properties of the unit.
It will be:
- loss of car engine power;
- increased fuel consumption, since the driver will have to press the gas pedal harder to ensure normal engine power;
- the need to add lubricant to the engine.