Repair and operating instructions for Renault Duster
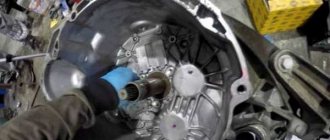
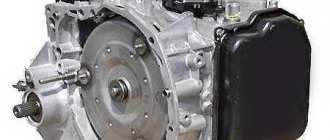
We remove the gearbox for repairs, replacement of parts and components of the clutch mechanism, as well as when dismantling the engine. We carry out the work on an inspection ditch or overpass. Transmission removal operations are shown on the 2.0 liter engine. The operations for removing the gearbox on a 1.6 liter engine are similar. Drain the oil from the gearbox (see Checking the level and adding oil to a manual gearbox). Remove the front wheel drives (see Removing the front wheel drives). We disconnect the cables of the gearbox control mechanism from the gearbox levers and remove the installation sleeves of the cable sheaths from the support bracket (see Removing the gearbox control mechanism). We remove the starter (see Removing and checking the 2.0 engine starter). Remove the subframe assembly with the anti-roll bar (see Removing the subframe).
Using a Torx T-20 wrench, unscrew the plastic retainer of the piston securing the protective casing...
...and remove the casing.
Using a 13mm socket, unscrew the bolt securing the plastic holder of the wiring harnesses to the clutch housing...
...and remove the bolt.
Using a flat screwdriver, pry the piston for securing the wire harness holder and remove it from the hole in the thermostat housing.
We remove the wire harness holder with the harnesses from the gearbox.
Remove the tip of the hydraulic clutch tube from the adapter (see Replacing the hose and tube of the hydraulic clutch). Disconnect the wiring block from the reverse light switch (see Removing the reverse light switch for a manual transmission).
Using a 13mm socket, unscrew the bolt securing the end of the ground wire to the clutch housing...
...and take him aside.
We remove the crankshaft position sensor from the hole in the gearbox housing (see Removing the crankshaft position sensor).
Using a 13mm socket, unscrew the two bolts securing the exhaust manifold flange to the gearbox bracket.
Using a 10mm socket, unscrew the two bolts securing the bracket to the gearbox...
...and remove the bracket.
We remove the plastic tip of the breather hose from the holder...
...and remove the breather hose from the plastic bushing.
Using a 13mm socket, unscrew the bolt securing the power steering tube holder to the gearbox housing.
Using the same tool, unscrew the bolt securing the other tube holder (the arrow shows the threaded part of the bolt). Using a 13mm socket with an extension, unscrew the eye-bracket mounting bolt...
We place adjustable stops under the engine oil pan and under the gearbox housing, having previously placed pieces of boards.
Using a 13mm socket with an extension, unscrew the rear upper bolt securing the gearbox to the engine cylinder block...
My Duster
One of the most important components of the Renault Duster is the transmission, which transmits torque from the engine to the front wheels (front-wheel drive versions), as well as through a transfer case, electromagnetic clutch and gearbox in addition to the front and rear wheels (all-wheel drive models). During operation, the transmission may fail due to breakdowns or wear of parts, so diagnostics, repair and replacement of the main components and parts of the gearbox and clutch are necessary, that is, you need a full Renault Duster service , which is offered by Technical in Kazan. All work is performed by experienced and qualified craftsmen using modern equipment using special tools. The Duster spare parts necessary for high-quality repairs and replacement can be purchased at affordable prices by contacting the Renault store, located on the territory of our technical center, where Renault spare parts in a wide range, with a quality guarantee.
Design Features
In front-wheel drive modifications of the crossover, the torque from the power unit is transmitted directly to the gearbox, and then distributed through the shafts between the two front wheels, where CV joints (constant velocity joints) are installed. Everything is very simple and reliable.
For all-wheel drive modifications of the SUV, the gearbox is additionally equipped with a transfer case of compact dimensions (necessary for transmitting torque to the rear gearbox, on which an electromagnetic clutch is installed). Depending on the selected mode, the clutch turns on or off all-wheel drive.
Main elements of the transmission design:
single-plate clutch , dry type, with a central diaphragm spring installed;
drive shafts with CV joints (constant velocity joints);
transfer case, electromagnetic clutch and rear gearbox for all-wheel drive versions.
Transmission options
The crossover is equipped with either a manual or automatic transmission. The Duster automatic is a well-known four-speed AL4/DPO, a budget gearbox, its main problems are the possibility of overheating, especially under operating conditions in metropolitan areas or at high summer temperatures, accelerated wear of clutches, and breakdown of hydraulic valves.
manual transmission can be a five-speed JR5 or a six-speed TL8. Although they are budget, they are very reliable and only fail during extreme use or improper care, so it is recommended to undergo a technical inspection every 15 thousand kilometers.
Symptoms of a problem
Repair or replacement of the Duster gearbox may be necessary when:
- the appearance of extraneous sounds during the operation of the car (crunching, noise, grinding when changing gears);
- crossover movement with jerks;
- clutch slipping;
- the appearance of a not very pleasant smell in the cabin;
- increasing the degree of rigidity of the clutch pedal;
- difficult gear shifting in versions with manual transmission;
- transmission oil leakage due to wear and deformation of seals and gaskets;
- spontaneous or not very clear gear shifting in a manual transmission;
- spontaneous switching of all-wheel drive to front-wheel drive.
In order to identify transmission faults, the Technical Masters perform a test drive, visual inspection and computer diagnostics. Units can also be dismantled and troubleshooted to identify breakdowns. After this, a decision is made to repair or replace faulty components, for example, the clutch can be replaced if necessary.
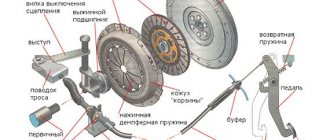
Clutch design
The French SUV is equipped with a dry clutch with a diaphragm spring.
The housing contains the following parts:
- Leaf spring made of sheet steel. In its free form, the part has the shape of a truncated cone with slots. The part forms 18 petals, characterized by increased elasticity. The spring distributes pressure evenly, ensuring smooth operation of the system.
- Steel plates connected to the pressure plate. The parts form a non-separable basket. If it fails, this element is completely replaced.
- Driven disk. Located on the splines of the transmission shaft. The damper dampens vibration that occurs when the clutch system is loaded.
- Friction linings. The parts are installed on 2 sides of the spring, which is connected to one of the damper plates.
- The clutch slave cylinder is combined with a release bearing.
Principle of operation
After pressing the pedal, the Duster clutch transmits torque from the crankshaft to the flywheel. Next, through the leaf springs on the clutch housing, the torque goes to the drive disk, after which it goes to the driven disk. The hub of the device is connected to the drive shaft using a spline connection.
The Renault Duster clutch is a dry single-plate clutch. For foreign cars, this type of clutch is the most common. Experts note the reliability of this type of device and its long service life. The drive is carried out through the action of a hydraulic working cylinder. The mechanism is equipped with a special bearing that minimizes the effect of friction.
Components:
- Duster clutch housing
- Release bearing
- Shutdown cylinder working
- Basket (pressure plate with casing)
- Slave disk
- Flywheel
By transmitting the volume of brake fluid and pressure, which pass through the high-pressure pipes, the working cylinder is squeezed out. The fluid flows from the master cylinder to the Duster clutch. In this case, the slave cylinder ensures the movement of the plate from the clutch basket.
This is interesting: Checking the technical condition of Renault Duster rear suspension parts
Step-by-step instructions for replacing the clutch on a Renault Duster
Replacing the clutch is done as follows:
- Remove the gearbox.
- Hold the flywheel with an adjusting blade and unscrew the fastening screws of the subframe pressure plate. The bolts are loosened gradually, making one turn each time and moving on to the next element.
- Remove the stationary and driven disks from the flywheel. Inspect the part for cracks or other defects. Assess the degree of wear of the linings. If rivet failure or oil stains are detected, the disc is replaced.
- Assess the reliability of the damper springs by trying to move them in their sockets. If this requires no effort, replace the disk.
- When there are defects on the body of the driven element, pay attention to the axial runout. If the parameter exceeds 0.5 mm, the part needs to be changed.
- Check the working parts of the flywheel for burrs, holes, dents, and abrasions. Damaged elements are replaced.
- If the casing rivets become loose, the pressure plate is replaced completely. At the same time, check the condition of the retaining spring. It should not have cracks. The connection points between the petals and the switch must lie in the same plane.
- Check the connecting parts of the disk and casing. Broken or damaged links cannot be replaced; the disk is completely renewed. The spring support rings must not have any defects.
- Install the clutch, first assessing the ease of movement of the driven element along the splines. Eliminate the causes of jamming or update damaged parts.
- Apply refractory lubricant to moving parts. Using a mandrel, the moving disk is mounted. A casing is put on the centering pins and the bolts are returned to their place. Fasteners are screwed in slowly, alternately moving from one element to another.
- The mandrel is dismantled and the gearbox is returned to its place.
- Replace clutch slave cylinder. Bleed the system.
How is pumping done?
When replacing the clutch, air enters the hydraulic release system.
Pumping helps to avoid this problem.
The work is done like this:
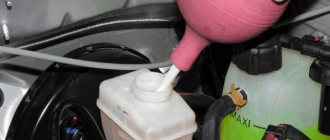
- Measure the brake fluid level in the brake cylinder cavity. 2 elements are connected to a common tank. The liquid should reach the maximum mark marked on the container body. If necessary, top up.
- Remove the valve cap and bleed air from the clutch cylinder.
- Install a hose on the valve, the end of which is immersed in a canister of brake fluid.
- Ask your partner to gently press the clutch pedal every 2 seconds.
- Pull out the spring element securing the hose. Remove the tip from the outlet of the working cylinder. At this time, the assistant presses the clutch while holding it. Brake fluid with bubbles should flow from the hose. After this process stops, the tip is inserted into the pipe until it stops. Install the spring retainer.
- Release the pedal and wait 5 seconds. The steps are repeated until bubbles stop appearing in the liquid.
After bleeding the clutch, do not forget to put the cap on the valve to bleed air.
Recommendations
Comments 29
Hello, I sorted it out. Pull out the 2nd lock, press the 1st lock all the way and hold it pressed with your right hand, insert your left hand from the side of the radiator and pull out the fitting with one click. Remove the cap. unscrew the brake reservoir. liquid and wait until the old liquid flows out by adding it to the tank. Then we do everything the other way around, press the fitting with our left hand, and put lock 2 in place.
Now it’s much calmer...thank you and have a nice weekend.
The video shows a release lever with one lock. I have 2. Maybe the first one shouldn’t be touched? Do we press the second one and pull out the fitting?
I don't remember exactly. You just have to try it. It seems that only one needs to be pressed and then the plug can open
The video shows a release lever with one lock. I have 2. Maybe the first one shouldn’t be touched? Do we press the second one and pull out the fitting?
from dialogys: Brake bleeder with two holders To open the bleed valve, lower the holder (6) and lift the holder (7) by pulling it one click.
Thanks, I'll look into it...
Hello, I removed the rubber cap, nothing is leaking, there are 2 clamps on the fitting itself, maybe I need to do something with them, I removed the first one, which is near the casing, maybe I need to remove the second one somehow. Do you need to start the engine for the fluid to flow out or not? Thank you
Hello. Yes, you need to release the latches there). Here is a good video where you can clearly see:
No need to download anything. Nonsense, long and useless. On all Renaults without exception, a hydraulic release bearing is very easy to do. Pour the liquid into the tank up to the stopper; there is a fitting on the box at the outlet of the release tube. Let's open it. We smoke and wait, making sure the tank is full. From the reservoir, the brake fluid passes by gravity through the release valve and begins to flow out through the fitting. First a little, then more. We wait until clean liquid comes out without air and close the fitting. Add liquid to the maximum in the tank. Five or six pedal strokes and voila
Renault Duster manual transmission repair prices*:
- Changing the oil in the box - 600 rubles
- Disassembly and reassembly of gearbox - 7500 rub.
- Removal and installation of manual transmission (front-wheel drive) — 6800 rub.
- Removal and installation of manual transmission (all-wheel drive) - 11,800 rubles
- Renault Duster clutch replacement (front-wheel drive) — 6,800 rub.
- Renault Duster clutch replacement (all-wheel drive) - 11,800 rubles
- Replacing the intermediate bearing (with the drive removed) - 500 rubles
- Removal and installation of right-hand drive — 1800 rubles
- Removal and installation of the left drive - 1600 rubles
- Replacing the boot of the external CV joint - 1500 rubles
- Replacement of external CV joint - 1500 rub.
* Attention! Prices may vary due to the design features of your modification.