2278-4-27-01
When replacing, pump out the old fluid from the reservoir with a rubber bulb.
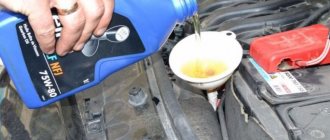
After pumping out the old brake fluid, pour new brake fluid into the reservoir.
We carry out the replacement with the engine not running, first in one circuit, and then in the other in the following sequence:
- Right rear wheel brake
- Brake mechanism of the left front wheel
- Left rear wheel brake
- Brake mechanism of the right front wheel
We clean the bleeder fitting of the brake mechanism of the right rear wheel from dirt.
This is interesting: Vibration when braking Renault Sandero
2278-4-28-01
Use a spanner wrench or an “8” socket to loosen the tightening of the bleeder fitting. We put a hose on the fitting, and immerse its free end in a container partially filled with working fluid.
An assistant should vigorously press the brake pedal all the way 4-5 times and keep it pressed.
Renault Duster
We carry out the work on an inspection ditch or overpass.
Bleeding the hydraulic clutch on Renault
To perform the operation of bleeding the brake mechanisms and hydraulic clutch, you will need an assistant.
Leveling up with an assistant
An assistant is needed if the fuel fluid is completely drained from the system. Pressing the clutch pedal will speed up the process. But even just to remove air from the hydraulic drive system, an assistant will not be superfluous.
You will need:
- New brake fluid. The manufacturer recommends ELF FRELUB 650 DOT4. Others can be poured, the main thing is that it complies with the specification FMVSS 116 (DOT 4) and SAE J 1704, for example, TRW DOT4. It is important to understand that if you are only pumping the clutch with topping up, and not a complete replacement, then fill the hydraulic system with the brand of TJ that has already been filled.
- A transparent tube with a diameter of 4-5 mm can be taken from a dropper or from the VAZ washer line.
- A flat-head screwdriver or wrench for removing the radio from the shaft.
- Container for collecting fuel fluid.
- Rags. It should always be at hand, since TJ is an aggressive liquid and can corrode the paintwork of the body. Therefore, it is important to immediately remove it from all surfaces on which it comes into contact.
Preparatory activities:
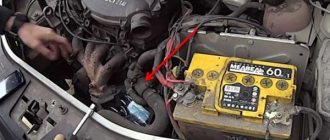
- To get to the fitting of the Renault Duster clutch slave cylinder, dismantle the pipe of the engine intake system, and also, for ease of work, remove the battery.
- Unscrew the cap of the brake system reservoir and check the fluid level. If necessary, top it up to capacity. It is important to understand here that two intake pipes extend from the barrel, the upper one for the operation of the clutch hydraulic system, and the lower one for the operation of the brake system. Therefore, brake fluid must reach the upper pipe.
- After cleaning the working cylinder from dirt and deposits, remove the protective rubber cap from the fitting.
- Place a transparent pipe onto the fitting. Lower its second end into the prepared container.
- On the Renault Duster clutch slave cylinder, unlike Megan 2, there is only one lyre (lock). It must be carefully moved down and held, while simultaneously moving the black tube to the right (towards the battery) by 5 mm, as shown in the figure below.
- The fuel fluid with air will begin to flow out of the system. To speed up the process, an assistant can press the clutch pedal and hold it until fluid and air leave the system. Once the process has stopped, the black tube is pushed to the left and secured with a lyre. The pedal is released. Wait at least 5 seconds and repeat the cycle.
- Carry out the procedure until all the air is removed from the system. As a rule, you need to do 4-6 repetitions.
- Slide the black tube to the left to its original position and secure it with the lyre. Make sure that the latter securely fixes the tube and that it does not come out of the working cylinder.
- Put on the protective cap.
- Fill the tank to the TJ level.
- Install the battery and air duct in their original places.
Renault Duster Bleeding the hydraulic clutch Renault Duster
Renault Duster Clutch Bleeding the Renault Duster hydraulic clutch
Bleeding the clutch
If you briefly familiarize yourself with the clutch bleeding algorithm, it happens as follows:
- Preparing the system for operation.
- Connecting a rubber hose to the fitting.
- Press the clutch and drain the fluid until all air comes out.
To bleed the hydraulic clutch, you will need the following tools:
- Tool for fixing the clutch pedal.
- Canister for draining brake fluid.
- Rubber hose that we will connect to the drain fitting.
- New brake fluid.
- Standard set of tools.
Before bleeding the clutch, it should be adjusted, since it is impossible to effectively bleed the clutch system if the piston pusher does not move freely. In this situation, the air will not escape.
working cylinder, malfunction
The following symptoms indicate a malfunction of the working cylinder:
We check and replace the sorcerer VAZ 2110 with our own hands
- A visual decrease in the level of brake fluid, which indicates a leak caused by wear of the working cylinder seal or a violation of the integrity of the hose, which will be clearly visible in spots under the vehicle.
Renault Duster, how to bleed the gearbox clutch system
Periodic pedal failures or too soft travel, which indicates air has entered the system.
- If the clutch pedal drops lower and lower and there are problems with gear shifting, and adjusting the pedal height does not work, then the spring in the slave cylinder is broken and needs to be replaced.
Bleeding the Renault Duster clutch release hydraulic drive
To complete the work, you will need a transparent flexible tube with an internal diameter of 4-5 mm, a container with a volume of about 0.5 liters, and new brake fluid. If the liquid from the system has been completely drained, then to speed up the process, the work can be done with an assistant.
6. Connect a transparent tube to the bleeder fitting. We lower the other end of the tube into the prepared container.
7. Press spring clamp 1 all the way and hold it in this position. By carefully pulling, we move fitting 2 by one click (about 5 mm). After this, liquid will begin to flow through the transparent tube and flow into the container. As soon as air bubbles stop coming out along with the liquid through the tube, close the bleeder fitting. To do this, return fitting 2 to its place.
Comment
If the fluid has been completely removed from the system, an assistant can press the clutch pedal several times to speed up the process.
8. After making sure that the spring clamp 1 securely holds the bleeder fitting 2, disconnect the transparent tube from it and put on the protective cap.
9. Install the removed parts in reverse order.
10. Adjust the brake fluid level to
Renault Duster Service and Repair Manual
Video on the topic “Bleeding the hydraulic clutch release” for Renault Duster
Bleeding a hydraulic clutch on a Renault HOW TO BLEED THE CLUTCH QUICKLY AND WITHOUT AN ASSISTANT. Bleeding the clutch, several ways.
We replace the working fluid in the Renault Duster brake and clutch hydraulic drives in accordance with the maintenance schedule - every 90 thousand kilometers or after 3 years (whichever comes first).
Renault > Duster
We carry out the work on an inspection ditch or overpass.
To perform the operation of bleeding the brake mechanisms and hydraulic clutch, you will need an assistant.
Bleeding the hydraulic clutch Renault Duster, 2010 - 2015.
You will need: a flat-blade screwdriver, brake fluid, a bleeding hose, and a container for draining the fluid.
If, when the pedal is pressed all the way, the clutch does not disengage completely (“drives”), which is accompanied by a characteristic grinding of gears when reverse gear is engaged, air may have entered the clutch hydraulic drive. Remove it by bleeding the hydraulic drive.
In addition, pumping is performed when filling the hydraulic drive with liquid after replacing it or after repairing system components associated with depressurization of the system.
1. Check the brake fluid level in the master cylinder reservoir (common reservoir for both master cylinders). It should be at the level of the “MAX” mark marked on the tank body; if necessary, bring the level to normal.
2. Remove the protective cap from the clutch slave cylinder bleed valve.
3. Place a hose on the valve and lower its end into a container with a small amount of brake fluid. 4. Ask an assistant to slowly press the clutch pedal 10-15 times at intervals of 2-3 seconds and release the pedal.
5. Pull out the spring clamp on the hose end...
6. ...and remove the tip from the working cylinder pipe by 10 mm. Ask an assistant to depress the clutch pedal and keep the pedal pressed; Liquid with air bubbles will flow out of the hose into the container. As soon as the fluid stops flowing, push the tip of the hose into the nipple of the clutch slave cylinder and secure it with a spring clip. Release the clutch pedal and wait 5 seconds, 7. Repeat steps 4-6 until the fluid in the drive is completely pumped (clean fluid without air bubbles should flow out of the hose). 8. After pumping the working fluid, be sure to put the protective cap on the air bleed valve.
Replacing the working fluid in the hydraulic drive
You will need; brake fluid, bleeding hose, 10mm wrench, container for drained fluid.
Due to the fact that the hydraulic clutch release drive and the service brake system are combined by one reservoir, the replacement of the working fluid in the hydraulic clutch release drive occurs when the brake fluid in the hydraulic brake drive is changed. According to the manufacturer's recommendation, the fluid should be replaced after 90 thousand kilometers or 6 years of operation (whichever comes first).
To replace the working fluid, bleed the clutch release hydraulic drive. The criterion for completing the replacement is that the old (dirty) brake fluid stops coming out of the air release valve on the hydraulic clutch release cylinder adapter.
Reverse pumping using a syringe
This method was found on one of the forums, we have not used it in practice, but probably has a right to life. We provided a link to direct pumping using a syringe above.
Its essence is to push the fluid from the clutch slave cylinder towards the reservoir, thereby expelling air from the system.
To bleed the clutch you will need:
- Brake fluid (brand listed above).
- Two syringes for 20 (50 ml). More is possible. Why - read on.
- The pipe is transparent with a diameter of 4-5 mm and a length of no more than 30-50 cm. Suitable from the VAZ washer line.
- Clean rags.
- Container for collecting fuel fluid.
Work order:
POPULAR WITH READERS: Ground clearance (ground clearance) Renault Logan
For us, reverse pumping with a syringe is more difficult than direct pumping. But one plus is that in both cases you can do without an assistant.
Also read about the reasons why the clutch pedal fails.
Tool required for bleeding
In order to start bleeding the clutch we will need:
- Brake fluid of the brand intended for your car.
- Medical syringe.
- Small hose. (Good fit from the windshield washer system VAZ 2108-99).
- Container for draining old fluid.
The tool is ready for use
Step-by-step work order
There is a Renault Megane 2 fitting located here, which is designed for bleeding the clutch system (working cylinder).
- Next, for convenience when performing work, remove the battery and dismantle the platform under it.
- Then remove the cap from the brake fluid reservoir and add fluid to the maximum mark.
- We clean the plug on the fitting from dirt and remove it.
Clean carefully so as not to damage the surface of the cap.
In order to put on the hose, you will have to make a small effort
The best option is a 20 cc syringe
We take it out carefully so as not to break it
In order to remove the tube from the place of fixation, only a little force should be applied
This procedure will have to be done more than once.
Fill the liquid within the MAX level
Important!
Renault Duster four-wheel drive clutch replacement
On a car with a manual transmission, a single-disc, dry, central diaphragm spring clutch is installed
The drive disk (basket) is connected to the engine flywheel with six bolts.
There are three pins pressed into the flywheel that center the clutch housing.
A diaphragm spring is installed in the drive disc casing, which is stamped from sheet spring steel.
When free, the spring has the shape of a truncated cone with radial slots extending from the inner edge of the spring.
The spring slots form eighteen petals, which are elastic release levers.
Due to the elasticity of the levers, the diaphragm spring creates more uniform pressure on the clutch pressure plate, which facilitates smooth engagement and disengagement of the clutch.
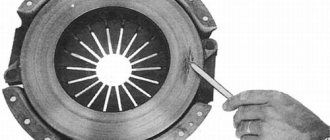
At three points, the clutch housing is connected by elastic steel plates to the pressure (drive) disk.
The casing with the diaphragm spring and the pressure plate form a non-separable unit (also called the clutch “basket”), which is balanced on a stand.
If the clutch basket fails, the entire clutch basket is replaced.
Replacing the “basket” is necessary if there is severe ring wear on the diaphragm spring petals and if the ends of the petals are not located at the same level.
We also replace the “basket” if the force on the pedal decreases when the clutch is disengaged (and, accordingly, the working stroke increases), which indicates large wear on the surface of the pressure plate or “settlement” of the diaphragm spring.
The driven disk with a spring-loaded torsional vibration damper is located on the splines of the gearbox input shaft between the engine flywheel and the pressure plate.
The torsional vibration damper dampens vibrations arising from dynamic loads in the transmission and uneven engine operation.
Two friction linings of the disc are riveted on both sides to the spring plate, which in turn is riveted to one of the two damper plates.
The spring plate has a wavy shape.
When the clutch is engaged, the friction linings compress the spring plate, which facilitates smooth engagement of the clutch.
A disc hub is installed between the damper plates. Damper springs are installed in the grooves of the hub and damper plates.
The damper plates are connected by support posts.
In the disk hub, opposite the support posts, there are cutouts that allow the hub to rotate within certain limits relative to the damper plates, while compressing the damper springs.
This is interesting: Sealing the body of Renault Duster
Clutch Renault Duster
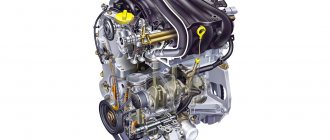
Clutch elements: 1 – clutch housing; 2 – clutch release bearing; 3 – clutch release working cylinder; 4 – pressure disk with casing assembly (“basket”); 5 – driven disk; 6 – flywheel
The clutch is single-plate, dry, with a central diaphragm spring. The mechanism is located in an aluminum crankcase, structurally integrated with the gearbox and attached to the engine cylinder block. The clutch is designed to briefly separate the engine and transmission and smoothly connect them. The clutch housing is connected to the engine flywheel with six bolts. Three pins are pressed into the flywheel, which, when installing the clutch, fit into the corresponding holes in the casing, centering it.
“Basket” and driven disc of the clutch: 1 – casing; 2 – pressure disk; 3 – diaphragm spring; 4 – friction linings; 5 – damper springs; 6 – driven disk hub; 7 – support stand; 8 – torsional vibration damper; 9 – elastic steel plates
The casing contains a diaphragm spring, which is stamped from sheet spring steel. When free, the spring has the shape of a truncated cone with radial slots extending from the inner edge of the spring. The spring slots form eighteen petals, which are elastic release levers. Due to the elasticity of the levers, the diaphragm spring creates more uniform pressure on the clutch pressure plate, which contributes to smoother engagement and disengagement of the clutch.
Replacing the working fluid in the clutch hydraulic drive
Since the reservoir ensures the operation of two systems - the brake and the clutch drive, the replacement must be carried out in two circuits at once (do not confuse it with the circuits of the brake system).
The manufacturer recommends that such work be carried out every 90 thousand kilometers or 6 years of operation (whichever comes first).
Required tools and accessories:
- Brake fluid recommended by the manufacturer - at least 1 liter.
- Open-end wrench 10 (for bleeding brakes).
- A pipe with a diameter of 4-5 mm and a length of about 1 meter (preferably transparent). We wrote above which ones are better to use.
- Container for draining waste.
- Syringe for 20 - 50 ml (as needed).
- Clean rags.
To bleed the clutch and replace all the brake fluid, it is advisable to have an assistant (this will be faster) who will depress the pedal at the right moment and hold it for a certain time. If you are alone, use a syringe.
Bleeding is considered complete when clean brake fluid flows from the working cylinder fitting instead of dirty waste.
You can use the same methods to bleed the hydraulic clutch on Renault cars:
- Sandero 12.2009 - 08.2014, 09.2012 - 12.2018 1st generation and 2nd generation respectively.
- Sandero (07.2018 - present) 2nd generation.
- Sandero Stepway 12.2010 - 10.2014 and 11.2014 - 10.2018, 1st and 2nd generation respectively.
- Megane 3 (08.2012 - 06.2014) restyling / 07.2014 - 07.2016 2nd restyling 3rd generation, hatchback.
- Kangoo restyling 2nd generation (03.2013 - 06.2016), minivan.
- Logan (09.2009 - 06.2016) restyling 1st generation, sedan.
- Fluence restyling 1st generation (04.2012 - 07.2017), sedan.
- Logan 2nd generation (03.2014 - 12.2018), sedan.
- Logan 2nd generation restyling (07.2018 - present), sedan
- Logan Stepway 1st generation (08.2018 - present), sedan.
Lada:
- Largus 07.2012 - present station wagon
- Largus Cross (11.2014 - present) 1st generation, station wagon.
Nissan:
- Terrano (04.2014 - present) suv 3rd generation.
- Almera (11.2012 - 08.2019), sedan, 3rd generation, G 15.
Where the K4M engine is installed.
Clutch Renault Megane 2
The clutch is located between the engine and transmission and is designed to disconnect and connect the flywheel mounted on the engine crankshaft and the transmission input shaft.
On vehicles equipped with a manual transmission, a dry single-plate diaphragm-type clutch is used (Fig. 1).
The clutch consists of a driven (friction) disc (Fig. 2)
Clutch housing (Fig. 3)
Pressure plate (Fig. 4)
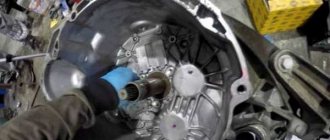
Release bearing 1 (Fig. 3) is a closed type, mounted on the guide sleeve of the clutch working cylinder. The bearing is moved by working cylinder 2 mounted on the input shaft of the gearbox.
Before performing any operation on the clutch, several checks must be carried out to ensure that the clutch is faulty.
First of all, check the fluid level in the tank, then check the condition of the hoses and their connections.
Inspect the clutch pedal bushings for wear and secure fit.
BLEEDING THE HYDRAULIC CLUTCH DRIVE
Be careful not to spill clutch fluid on painted surfaces. If this happens, immediately wash off the liquid with water.
Do not mix different brands of hydraulic clutch fluids. Do not reuse drained clutch fluid.
Any hydraulic system works normally if air is removed from it. When bleeding, add only clean fluid recommended by the manufacturer.
Never reuse fluid that has leaked from the hydraulic clutch release.
If different brands of fluid are accidentally mixed in the hydraulic system, remove the fluid from the system, flush with clean fluid of the correct brand, and install new O-rings.
If fluid constantly leaks from the hydraulic drive or air gets into it, determine the cause and location of the leak, and repair the damage.
Poorly performed pumping of the hydraulic drive can cause incorrect diagnostic results and unjustified replacement of parts.
When performing any work on the clutch hydraulic drive, be sure to remove air from the sections of the hydraulic circuit:
– between the tank and the air bleeder fitting;
– between the air bleeder and the clutch slave cylinder;
– with increased pedal free play.
Place the vehicle on a two post lift.
Remove the engine oil pan protection.
Disconnect the brake fluid level sensor connector in the reservoir.
Remove the brake hydraulic reservoir cap.
REMOVING AIR FROM THE CIRCUIT BETWEEN THE RESERVOIR AND THE AIR BLEEDING CONNECTION
Install and lock the clutch pedal in the upper position.
Fill the hydraulic reservoir with certified brake fluid.
Remove the plug from the air bleed fitting.
Place a transparent tube (Fig. 3) on the clutch slave cylinder bleeder fitting, lowering its end into an empty container installed below the bleeder fitting.
Ask an assistant to slowly press the clutch pedal 10 - 15 times at intervals of 2 - 3 seconds. and release the pedal
Press the latch (Fig. 4).
Do not pull on the latch. In case of any erroneous action, it is necessary to replace the pipeline.
Open the air bleeder by pulling out the clutch hydraulic line one click.
Have an assistant depress the clutch pedal and hold it depressed. Liquid with air bubbles will flow out of the hose into the container.
As soon as the fluid stops flowing, push the hose tip into the working cylinder pipe and secure it with a spring clip.
Release the clutch pedal and wait a few seconds.
Wait until there are no air bubbles in the brake fluid flowing into the container.
Make sure that the fluid level in the master cylinder reservoir does not fall below normal when bleeding air.
Fixing the hydraulic clutch pipeline should be accompanied by a characteristic click.
Disengage and engage the clutch about ten times.
Add fluid to the reservoir up to the maximum level mark.
Check clutch functionality. Repeat the operation if necessary.
ADJUSTING THE FREE STROKE OF THE CLUTCH PEDAL
Disconnect the supply line between the reservoir and the clutch master cylinder.
Close the tank opening.
Add a small amount of certified brake fluid to the syringe.
Insert the syringe into the supply line between the reservoir and the clutch master cylinder.
Use a syringe to remove air from the clutch master cylinder.
Connect the clutch master cylinder supply line to the reservoir.
Replacement of cable, cylinder
The cost of replacing a clutch on a Duster 1.6 compared to other services will be much cheaper with us. The car service has been working with a trusted supplier for many years and for this reason provides guarantees for all goods and services. One of the important components of this machine is the clutch, which performs the function of disconnecting the motor from all other components of the equipment. Due to this, speed switching occurs.
In most cars, this mechanism is the same, and you often come across single-disk, dry samples that do not have a special liquid inside.
The work becomes more complicated if the car has four-wheel drive. The design of the unit is more complex and requires greater skills to maintain. As a rule, clutch repairs in this case are carried out by several qualified craftsmen.
Installing a new clutch is necessary in the following cases:
- when changing gear the car starts to shake;
- with severe deformation of the friction linings;
- when the leaf-type spring is critically worn.
Replacement of cables and clutch cylinders is resorted to in cases where a break or excessive stretching is diagnosed. Activating the gearbox, as well as manipulating the gears, is impossible in this case. The cylinder usually cannot be repaired and is simply replaced with a new one. We do a thorough check before major service and always choose the most appropriate solution to fix the problem.
Replacement of brake pads on Renault Duster, clutch, etc. carried out on a special, illuminated stand, this guarantees efficiency and complete safety for your car. Renault Duster service works with original components and certified dealer equipment. Now you don't have to worry about your own safety on the roads. Call us and we will do a free diagnostic of your Renault!
Step-by-step instructions for replacing the clutch on a Renault Duster
Replacing the clutch is done as follows:
- Remove the gearbox.
- Hold the flywheel with an adjusting blade and unscrew the fastening screws of the subframe pressure plate. The bolts are loosened gradually, making one turn each time and moving on to the next element.
- Remove the stationary and driven disks from the flywheel. Inspect the part for cracks or other defects. Assess the degree of wear of the linings. If rivet failure or oil stains are detected, the disc is replaced.
- Assess the reliability of the damper springs by trying to move them in their sockets. If this requires no effort, replace the disk.
- When there are defects on the body of the driven element, pay attention to the axial runout. If the parameter exceeds 0.5 mm, the part needs to be changed.
- Check the working parts of the flywheel for burrs, holes, dents, and abrasions. Damaged elements are replaced.
- If the casing rivets become loose, the pressure plate is replaced completely. At the same time, check the condition of the retaining spring. It should not have cracks. The connection points between the petals and the switch must lie in the same plane.
- Check the connecting parts of the disk and casing. Broken or damaged links cannot be replaced; the disk is completely renewed. The spring support rings must not have any defects.
- Install the clutch, first assessing the ease of movement of the driven element along the splines. Eliminate the causes of jamming or update damaged parts.
- Apply refractory lubricant to moving parts. Using a mandrel, the moving disk is mounted. A casing is put on the centering pins and the bolts are returned to their place. Fasteners are screwed in slowly, alternately moving from one element to another.
- The mandrel is dismantled and the gearbox is returned to its place.
- Replace clutch slave cylinder. Bleed the system.
2278-11-2-05
...and slightly (by 4–6 mm) move the tip of the tube from the adapter.
In this case, part of the brake fluid is forced into the container. After the liquid stops flowing into the container, put the tip of the tube onto the adapter until it stops. After this, the assistant can release the clutch pedal. We repeat this operation several times.
Remove the hose and put a protective cap on the fitting.
When pumping, check the fluid level in the tank and add fluid if necessary.
There is a simpler option for replacing brake fluid in hydraulic brake drives. This method does not require the presence of an assistant. With this method, a certain supply of brake fluid (at least a liter) is desirable.
We place the car on an inspection ditch or overpass and ensure free passage between the brake fluid reservoir in the engine compartment and the brake cylinders of all four wheels.
Use a rubber bulb or syringe to pump out the brake fluid from the reservoir. Add new fluid to the top edge. To speed up the process (to release fluid from all cylinders at once), it is advisable to select four pieces of tubes that fit tightly onto the bleeder fittings of all cylinders. We lower the free ends of the tubes into small transparent bottles.
We unscrew the fittings of all brake cylinders. We make sure that the liquid has flowed through all four tubes. We control the decrease in fluid from the reservoir located on the brake cylinder and immediately replenish the reservoir. We observe an increase in the level of liquid in bottles located near the wheel brake cylinders.
It is necessary to move several times from the position of observing the flow of fluid from the brake cylinder fittings to a position where you can check and replenish the fluid level in the reservoir located on the brake cylinder in order to prevent the reservoir from drying out.
Typically, the level rises most quickly in bottles that contain hoses coming from the brake cylinders of the front wheels. As soon as there is about 200 ml of liquid in the bottle near one of the front wheels, wrap and tighten the fitting of this cylinder. Next, we wait for the same result for the cylinder of the other front wheel and also tighten its bleeder fitting. The process can be completed after 200–250 ml of liquid comes out through the fitting of each rear wheel.
We make sure that all fittings are tightly tightened. We put on protective caps. Check the fluid level in the master cylinder reservoir.
Renault Duster: replacing fluid in brake and clutch hydraulic drives
Bleeding the hydraulic clutch
We pump the clutch hydraulic drive to remove air from it after depressurization when replacing the clutch master or slave cylinders, tubes and hoses, as well as when removing the brake master cylinder or brake and clutch hydraulic reservoir.
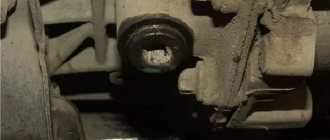
To bleed the clutch hydraulic drive, there is a fitting on the plastic tip of the tube, closed with a rubber cap.
The adapter on which the tip of the tube is placed is not fixed in the clutch housing, therefore, for ease of bleeding, we recommend making a lock washer for the adapter from a metal washer (1.0-1.2 mm thick, outer diameter 23 mm and hole with a diameter of 10.5 mm) .
Before pumping, check the fluid level in the tank. If necessary, add liquid.
We install the manufactured lock washer into the groove of the adapter (for clarity, shown with the tube tip removed).
Remove the protective cap from the bleeder fitting.
We put a transparent hose on the fitting, the other end of which is lowered into a container partially filled with working fluid so that the free end of the hose is immersed in the liquid.
An assistant presses the clutch pedal several times and holds it down.
Press the spring clamp of the tube tip
Move the tip of the adapter tube by 4 - 6 mm
In this case, part of the brake fluid and air are forced into the container.
Air bubbles are clearly visible in the container with liquid.
After the liquid stops flowing into the container, push the tip of the tube onto the adapter all the way.
After this, the assistant can release the clutch pedal.
We repeat this operation until the release of air bubbles from the hose stops. Remove the hose and put a protective cap on the fitting.
When pumping, check the fluid level in the tank and add fluid if necessary.
Recommendations
Comments 29
Hello, I sorted it out. Pull out the 2nd lock, press the 1st lock all the way and hold it pressed with your right hand, insert your left hand from the side of the radiator and pull out the fitting with one click. Remove the cap. unscrew the brake reservoir. liquid and wait until the old liquid flows out by adding it to the tank. Then we do everything the other way around, press the fitting with our left hand, and put lock 2 in place.
Now it’s much calmer...thank you and have a nice weekend.
The video shows a release lever with one lock. I have 2. Maybe the first one shouldn’t be touched? Do we press the second one and pull out the fitting?
I don't remember exactly. You just have to try it. It seems that only one needs to be pressed and then the plug can open
The video shows a release lever with one lock. I have 2. Maybe the first one shouldn’t be touched? Do we press the second one and pull out the fitting?
from dialogys: Brake bleeder with two holders To open the bleed valve, lower the holder (6) and lift the holder (7) by pulling it one click.
Thanks, I'll look into it...
Hello, I removed the rubber cap, nothing is leaking, there are 2 clamps on the fitting itself, maybe I need to do something with them, I removed the first one, which is near the casing, maybe I need to remove the second one somehow. Do you need to start the engine for the fluid to flow out or not? Thank you
Hello. Yes, you need to release the latches there). Here is a good video where you can clearly see:
No need to download anything. Nonsense, long and useless. On all Renaults without exception, a hydraulic release bearing is very easy to do. Pour the liquid into the tank up to the stopper; there is a fitting on the box at the outlet of the release tube. Let's open it. We smoke and wait, making sure the tank is full. From the reservoir, the brake fluid passes by gravity through the release valve and begins to flow out through the fitting. First a little, then more. We wait until clean liquid comes out without air and close the fitting. Add liquid to the maximum in the tank. Five or six pedal strokes and voila
Procedure for bleeding the Megane 2 clutch
As with almost all other passenger cars with a manual transmission, bleeding on the Renault Megane is performed by bleeding air from the control valve fitting, and this work can be carried out by one person, without an assistant. Before performing the operation, we prepare everything you need, you will need:
- a piece of transparent hose, suitable for the windshield washer system;
- container for draining brake fluid (TF);
- standard medical syringe;
- bottle with new liquid DOT-4.
Now you can get to work, first of all, open the hood and remove the filler tank cap, top up the fuel fluid to the top level.
The following is the procedure:
- For convenience, we remove the battery;
- under it at the gearbox we find the RCS, there is a fitting on it, onto which we attach a transparent hose, having first removed the cap;
- At the other, free end of the tube we attach a syringe;
- there are two clamps on the RCS, and the one that is recessed is raised up, the other clamp located above, on the contrary, is recessed (lowered);
- the black tube, which is in the photo above, is located to the right of the cylinder, blocks the access of liquid to the fitting, and when the position of the clamps changes, it can move. We move the tube to the right approximately 5 mm, thereby freeing up the channel for pumping;
- use a syringe to extract the fluid from the system; first, air will come out along with the liquid;
- having filled the syringe full, or install the black tube in place, again swapping the clamps, or pinch the transparent hose to recharge the syringe, such actions must be done to avoid air getting into the line;
- do not forget to constantly add liquid to the tank, otherwise the GPS may become airy again;
- We carry out the operation until air bubbles no longer appear in the transparent hose; after pumping is completed, we put the black tube in place; it is also necessary to return the clamps to the reverse position.
Having filled the tank with fuel fluid to the required level, close its lid, and at this point the pumping can be considered complete.
The procedure for replacing fluid in the Duster brake system with bleeding
To ensure convenience and safety, work on the vehicle is carried out without starting the engine on an overpass or inspection pit, with an assistant. First, you need to pump out the old “brake fluid” (hereinafter referred to as fluid) with a rubber bulb from the brake and clutch refill reservoir. Then, fill the tank with fresh DOT-4 fluid. All you have to do is bleed the brake mechanisms of each wheel, that is, replace the fluid in them with fresh one. The work is carried out in the following order: 1. right rear; 2. left front; 3. left back; 4. right front.
After cleaning the bleeding fittings from dirt, remove the rubber caps.
Using an 8 mm wrench, unscrew the fitting half a turn. We attach the hose and its other end should be in a bottle half filled with old liquid, so that it is hidden in it. The assistant is required to sharply press the foot to lower the brake pedal all the way, only then will the fitting be unscrewed.
With each press and release of the pedal, the old “brake fluid” will flow into the bottle; before pressing the pedal, remember to tighten the fitting, after which the pedal can be released to return it to its original state. This work is done until the air comes out and fresh brake fluid (light) appears, on average 4–5 times. When finished, remove the hose, wipe the fitting with a dry cloth and place the rubber cap on it. After these actions, liquid with air bubbles will flow from the hose, and the pedal will sink even more.
We perform these operations on the remaining brake mechanisms. During pumping, liquid will leak from the refill tank, so do not allow the level to drop below a critical level, and replenish the tank with liquid in a timely manner. Finally, bring the level within normal limits.
Procedure for bleeding the clutch when replacing fluid.
The work is done through a fitting on the plastic tip of the tube.
For manufacturability of work, you will need a lock washer to lock the loose adapter (the tip of the tube is located on it). It can be made from a 10.5 mm steel washer, with an outer diameter of at least 23 mm and a thickness of 1-2 mm. The photo below clearly shows where the washer is installed (without the tip, so that the place where the washer is installed can be better seen).
In the working cylinder, without disassembling it, the old fluid is mixed with fresh fluid and thereby improved.
To access the bleeder fitting, the cap must be removed.
The installation location of the lock washer is shown by the red arrow. Next, we pull a hose (preferably transparent) onto the fitting and lower the free end into a plastic bottle partially filled with liquid, just like when bleeding the brake system. An assistant presses the clutch pedal all the way and holds it.
To ensure fluid flow, you need to press the locking bracket...
... tighten the plastic tip by 4–6 mm.
The liquid will begin to flow into the bottle. After the leak stops, return the tip to its original state, followed by releasing the clutch pedal with an assistant. We do this several times until we are sure that fresh liquid is entering the bottle (air bubbles are not allowed). During operation, the liquid level should not drop below the Min mark. Upon completion of the work, the hose is removed, the protective cap is put on the fitting, and bring the brake fluid level in the reservoir to normal.
Related posts:
How to galvanize a crankshaft journal in a garage
Checking the oil level in Renault K4M and F4R engines and its proportion...
What kind of oil to fill in engines 1AZ-FE, 2AZ-FE, 2AD-FHV, 2A...
Marking of size groups and indices in the internal combustion engines of Ural motorcycles
What kind of oil to fill in the engine 1C, 2C, 2S-T
The nuances of installing the camshaft and timing gears of the Ural 650 internal combustion engine
Procedure for bleeding the brakes
You can pump the brakes yourself, or you can have an assistant, whose task is to press the brake pedal on command. The procedure for bleeding the brakes should be found in the manual for a specific car.
If the diagram is not indicated, then bleeding is done in the form of the letter Z. This means that you need to pump in this order: right rear - left rear - right front - left front wheel.
To bleed the brakes, you will need a brake fluid container and a clear rubber hose.
Pumping the system
To bleed the hydraulic line, simply fill the reservoir with DOT4 fluid.
After this, together with a partner we carry out the pumping procedure. One presses the master cylinder pedal, while the second opens the bleed valve. The adjustment procedure must be repeated until all the air has escaped.
READ Niva Chevrolet clutch slave cylinder is loose
There is another way that will help you do this operation alone.
- Take a medical syringe with a volume of 20 cubes, put a hose of a suitable diameter on its spout.
- Fill it with brake fluid and place the end of the hose on the bleeder fitting of the working cylinder.
- After unscrewing the fitting, slowly squeeze the liquid out of the syringe, then close the fitting and remove the hose.
In most cases, one procedure is sufficient.
Procedure for bleeding the clutch when replacing fluid
The work is done through a fitting on the plastic tip of the tube.
For manufacturability of work, you will need a lock washer to lock the loose adapter (the tip of the tube is located on it).
It can be made from a 10.5 mm steel washer, with an outer diameter of at least 23 mm and a thickness of 1-2 mm.
The photo below clearly shows where the washer is installed (without the tip, so that the place where the washer is installed can be better seen).
- In the working cylinder, without disassembling it, the old fluid is mixed with fresh fluid and thereby improved.
- To access the bleeder fitting, the cap must be removed.
The installation location of the lock washer is shown by the red arrow. Next, we pull a hose (preferably transparent) onto the fitting and lower the free end into a plastic bottle partially filled with liquid, just like when bleeding the brake system. An assistant presses the clutch pedal all the way and holds it.
- To ensure fluid flow, you need to press the locking bracket...
- ... tighten the plastic tip by 4–6 mm.
The liquid will begin to flow into the bottle. After the leak stops, return the tip to its original state, followed by releasing the clutch pedal with an assistant.
We do this several times until we are sure that fresh liquid is entering the bottle (air bubbles are not allowed). During operation, the liquid level should not drop below the Min mark.
Upon completion of the work, the hose is removed, the protective cap is put on the fitting, and bring the brake fluid level in the reservoir to normal.
Self-replacement
To carry out this process of replacing Renault Duster brake fluid, you need to first prepare everything you need.
Tools
You will need the following tools:
- Transparent hose.
- Rubber hose.
- Wrench for pipeline nuts “8”.
- Transparent vessel.
There are two replacement methods.
First replacement method
With the first method, the entire replacement cannot be done alone, so you will need at least one assistant. During the process, the car engine must be turned off. The first step is to pump out the old brake fluid. Now you can fill in a new one. First you need to replace the brake mechanisms of the right rear wheel, left front, left rear, and finally the right front wheel.
Replacing brake fluid in a Renault Duster should occur in exactly this order. First you need to tackle the right rear. The cap is removed from the bleeder fitting, and the tightening of the latter is loosened with a key. Afterwards, you need to put a hose on it, the other end of which is immersed in a reservoir with working fluid. The assistant should then press the brake pedal four to five times while holding it. It is necessary to control the level in the tank. After the procedure is completed, you need to bring this level to a normal value.
When the liquid stops flowing out, you need to unscrew the fitting. Now the pedal can be released. It is necessary to repeat the process until the liquid coming out of the hose turns light. Then the hose is removed, the fitting is wiped and the cap is put on. If the latter is cracked, you need to replace it with a new one.
The same must be done with all other wheels in the above order. You can begin replacing the clutch master cylinder, as well as the connecting pipes. To do this, you need to bleed the clutch hydraulic drive. For the adapter at the tip of the tube, it is better to make a lock washer. This can be done from an ordinary metal washer with a hole of 10.5 millimeters, a diameter of 23 millimeters and a thickness of 1 millimeter.
The bleeding process is generally identical to that on the wheel brakes. Unless here the liquid begins to be forced out into the transparent reservoir after moving the tip of the tube from the adapter by 4-6 millimeters. When the fluid stops flowing out, you need to put the tip on tightly, after which you don’t have to hold the brake pedal. Then pumping is repeated in a new cycle until the process is completed.
This was one way, but there is also an alternative replacement option for the Renault Duster brake system. It's simpler and doesn't require any help. You will need a certain volume of brake substance, at least 1 liter. The machine is installed on a suitable overpass. An inspection ditch can be used for these purposes. In this case, there must be a free passage between the wheel brake cylinders and the reservoir.
Second alternative replacement method
It is necessary to pump out the brake fluid and then add new fluid to the top edge. To make things go faster, you can immediately put four pieces of tubing on all the fittings, and lower the ends into bottles. Then the fittings are turned off, and the level of the substance in the tank and bottles is taken under control. In the latter it will increase. Decreasing fluid in the tank must be replenished regularly.
When the level in the bottles at the front wheels reaches 200 milliliters, and in the bottles at the rear wheels up to 200-250 milliliters, you need to screw in and tighten the fittings. Bottles fill faster from the front. Upon completion, you need to make sure that all fittings are tightened tightly. All that remains is to put on the caps. The result must be checked by direct braking.
Replacement
The housing with the pressure plate and diaphragm spring is a non-separable assembly, which is also known as the “clutch basket”. If any component of this system fails, then the entire clutch basket is replaced.
Clutch basket components:
- casing
- Diaphragm spring
- Pressure plate
- Damper springs
- Friction linings
- Driven disc hub
- Torsional vibration damper
- Support stand
- Elastic strips made of steel
As a rule, replacing the Duster clutch basket is required when the diaphragm spring petals are severely worn, as well as in cases where the ends of these petals are not at the same level. Another signal that the basket needs to be replaced is a decrease when the clutch is released on the pedal. This fact may be evidence of “settlement” of the diaphragm spring or severe wear of the pressure plate plane.
Stages step by step:
- Install the Renault Duster car on an inspection hole or overpass
- Remove the gearbox from the Duster
- Unscrew the 6 bolts securing the Duster clutch basket to the flywheel
- To prevent the flywheel from spinning, you need to insert a mounting spatula or screwdriver between its teeth, resting it on the gearbox mount (pin)
- The bolts must be unscrewed evenly - one cycle at a time
- When the action of the diaphragm spring weakens, the bolts can be unscrewed arbitrarily
- Before unscrewing the last bolt, you should support the Duster clutch driven disc and its basket
- Afterwards you can freely remove the driven disc and clutch basket
- Installation is carried out in reverse order
- Centering of the driven disk is carried out along its part protruding towards the clutch basket
- When installing the clutch, the flywheel pins must fit into specific holes in the basket.
- After installing all parts, the clutch is bled
The Duster clutch is an important component of the car, without which its normal functioning is simply impossible. Throughout the entire service life of the Duster clutch, the device must be periodically adjusted - this will ensure its longest service life and protect it from unforeseen situations on the road.
Spare parts, maintenance
Products from the Dustershop77 range that may be of interest to you:
| Image | vendor code | Name | Manufacturer | Price | Availability | Add to cart |
| BR-001-GARD-URDP | Mud flaps enlarged (widened) Duster-GARD front | Duster-Guard | 1300 / 1100 rub. Discount: 1000 rub. | >10 | ||
| DC495 | Discount card (Dusterclubs.ru, Dustershop77.ru) | RF | 700 / 500 rub. Discount: 500 rub. | >10 | ||
| DC218 | Air deflector “Warm feet” for Duster, Logan, Sandero, Largus | RF | 500 / 300 rub. Discount: 250 rub. | >10 | ||
| patriot-001-1 | Gearbox coupling and gas tank protection (steel) | Patriot | 4900 / 4000 rub. Discount: 3500 rub. | >10 | ||
| 005-008502 | Trunk sill protection | Russian Artel | 1000 / 800 rub. Discount: 700 rub. | >10 | ||
| PT014-7010402 | Trunk sill trim PTGroup | Pt GROUP | 1200 / 1000 rub. Discount: 800 rub. | >10 | ||
| R12711 | Wind deflectors (window deflectors) COBRA/Autoplex | COBRA/Autoplex | 2000 / 1600 rub. Discount: 1500 rub. | >10 | ||
| DC654 | Frill with fastening without 3M tape (Duster/Terrano) (ArtForm) | ArtForm (Yuago) | 3500 / 2500 rub. Discount: 1900 rub. | >10 | ||
| RA0052 | Door sill trims (front+rear) RA | Russian Artel | 2500 / 1500 rub. Discount: 1300 rub. | >10 | ||
| def-001 | Hood deflector Vip-Tuning | VIP-Tuning | 2000 / 1500 rub. Discount: 1100 rub. | >10 |