Replacing the timing chain of an Opel Astra j with a 1.4 Turbo engine
Here we will talk about replacing the timing chain transmission on the Opel Astra j 1.4. We will be talking about replacing this consumable yourself. Yes, you can contact the service center, they will do the work with guaranteed quality, but our whole interest is to carry out this repair ourselves, without involving professionals. This procedure cannot be called simple, but still many car enthusiasts cope with it quite well. The main thing is to follow the detailed instructions given below and show diligence.
Replacement Regulations
The timing chain drive on an Opel should be changed after 150,000 km. Although the manufacturer does not regulate the frequency of replacement in any way, experts recommend exactly this interval. But the chain can exhaust its life a little earlier. Therefore, it is very important to carry out diagnostic procedures from time to time. If you don’t do this, you may miss the moment when the chain stretches. And this may happen ahead of schedule. There may be several reasons for this. Firstly, the life of the chain drive can be significantly reduced if the vehicle is constantly subject to increased loads, if a trailer is often used, for example. Using the machine primarily in urban areas also does not help to increase the service life of the chain. Some drivers practice aggressive driving, and this also wears out the chain prematurely. Bad oil is another cause of premature chain drive wear. Oil generally requires special attention. Use only high-quality motor oil in your cars, and also monitor its level. The chain is lubricated through a whole system of nozzles. Its quality must be very good. In addition, you could simply buy a low-quality consumable, and it would serve its purpose ahead of time.
If the chain is worn out, this can be determined both audibly and visually. If the engine no longer makes a pleasant rustling sound when operating, or if unusual noise and grinding noises are heard while the engine is running, then it’s time to think about the condition of the chain drive. As a rule, this is precisely the reason why drivers decide to look over the hood of their iron horse. If there are chips on the chain, then it's time to replace it. If regular gear tension no longer gives the desired results, this also indicates the need to replace the chain.
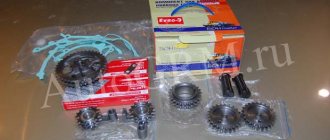
So, if you determine that the chain drive needs to be replaced and decide to do the replacement yourself, the first step is to prepare everything you need. Go to the store and buy a new chain there. In addition to it, you need to buy related consumables, such as a tensioner and dampers. You should also buy a set of seals. Experts recommend replacing the gears along with the chain. But this should only be done if they are really worn out. They may still be quite usable. If you do not really rely on your competence, then it is better to invite a specialist who will carry out the necessary diagnostics and tell you whether only the chain needs to be changed or the gears also need to be replaced.
The process of replacing the chain yourself
- We drain the antifreeze liquid and dismantle the air filter along with all its pipes.
- Raise the engine with a jack and unscrew the first mount. There are many connectors and all kinds of pipes mounted on the cover. They will also need to be removed.
- The engine support is attached to the cylinder block using 3 bolts. Unscrew them and remove the support.
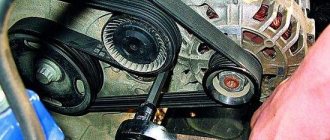
- Now you need to discharge the automatic tensioner. The belt will loosen if we turn the tensioner clockwise. This is done using the E14 head.
- Now the tensioner needs to be fixed. To do this, you can use a regular nail or drill.
- Now unscrew the antifreeze pump pulley. Here you will have to try, since this requires unscrewing 9 bolts. After this, remove the pulley. Be sure to remember where the long and short bolts were installed. This will greatly help you during assembly.
- We remove the tensioner. To do this you will have to remove 2 bolts.
- Remove the crankshaft pulley. But here you will have to remove 6 bolts.
- Remove the casing protecting the valve.
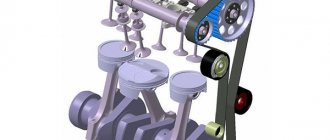
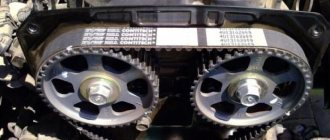
- We turn the crankshaft by its mounting bolt. You need to scroll to the right. The slots at the ends should be located in one line. This way we will determine the top dead center.
- Now we need to fix the camshafts. To do this, use a 45mm corner. It happens that it is impossible to insert the corner. This can only mean one thing - the chain is stretched to its limit. In this case, further repairs will have to be continued without fixing the camshafts.
- The marks on the timing case and the crankshaft pulley must match.
- Unscrew the bolt that secures the crankshaft pulley. We remove the bushing of the oil supply pump.
- Now remove the timing case. To do this you will have to unscrew a lot of bolts. The location of the chain must be marked. Moreover, this must be done when replacing it and when removing it for other purposes. You need to put 1 mark on each camshaft. 2 marks are placed on the crankshaft.
- After setting the marks, the chain tensioner is discharged. You need to press the tensioner with your finger until the plunger goes in completely. After this, it should be fixed. To do this, we use any object that will fit in diameter. Now we unscrew the 2 bolts and remove the tensioner.
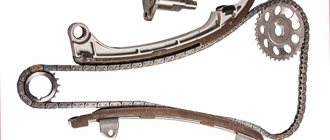
- We remove the dampers, and then proceed to remove the chain drive.
- A new gasket must be installed on the timing case.
- Now we proceed to install the new chain. Before this, we place the old and new chains side by side and move the marks to the gear being installed. After installing the chain, install the tensioner and dampers. We remove the fixing object from the tensioner, after which the chain will tighten.
- We install the pump.
- We check the crankshaft mark and begin to adjust the timing phases.
- This is done as follows. Unscrew the plug from the timing case. Use a thin object to press the tensioner shoe until the plunger is completely recessed. Insert the retainer into the hole in the casing. To do this, you will have to loosen the bolts securing the gears and install the clamp in the camshafts. We use a metal corner as a fixing object. When we remove the tensioner clamp, the chain will be tensioned. We look at the crankshaft mark. We adjust it if necessary. Now you should take a protractor and install a master disk on it. The beginning of the window should be located at 60. We take out the clamps and tighten the bolts securing the gears. Scroll the crankshaft 2 times to the right and check the alignment of the marks. If everything is fine, the remaining parts are installed in reverse.
Read more: Morandi chip tuning reviews
Replacing the timing chain on an Opel Astra G
During routine maintenance, it is recommended to replace the chain on the Astra G 1.4 TwinPort at a mileage of 150,000 km. Although many car owners of such a car dispute this figure and claim that the car can travel 250,000 km - 300,000 km on one chain.
When changing the chain, it is necessary to change all the sprockets, stabilizers, shoe and chain tensioner. To fix the shafts and set the correct camshaft timing, you must use the special tool JTC-JW0456 or its equivalent. Without this tool, it is better not to start replacing the chain yourself! Therefore, it is very difficult to do this with your own hands, and it will also take quite a lot of time.
What spare parts are needed when replacing the timing chain on an Opel Astra Classic 1.4
Timing kit
| Manufacturer | vendor code | price, rub. |
| Original | ||
| OPEL | 6606022 | 10026 |
| Analogs | ||
| BGA | TC0235K | 4527 |
| ET ENGINETEAM | RS0008 | 7581 |
| SWAG | 99133082 | 11799 |
Pan gasket
| Manufacturer | vendor code | price, rub. |
| Original | ||
| OPEL | 652616 | 1737 |
| Analogs | ||
| CORTECO | 26080P | 499 |
| ELRING | 127760 | 605 |
| VICTOR REINZ | 713416600 | 615 |
Valve cover gasket
| Manufacturer | vendor code | price, rub. |
| Original | ||
| OPEL | 5607467 | 2395 |
| Analogs | ||
| TOPRAN | 206513 | 619 |
| ELRING | 392490 | 1331 |
| VICTOR REINZ | 153588801 | 1640 |
Alternator belt tensioner
| Manufacturer | vendor code | price, rub. |
| Original | ||
| OPEL | 6340553 | 3450 |
| Analogs | ||
| INA | 533008530 | 3133 |
| GATES | T38344 | 3782 |
| SKF | VKM35013 | 4202 |
When replacing the timing chain, engine oil and antifreeze will be drained, so the fluids can be immediately replaced with new ones. Engine oil volume is 3.5 liters. Engine oil specification: GM-LL-A-025. The volume of coolant is 5.5 liters. The article number of the original coolant is 1940650/09194431 (red antifreeze).
Tools required for work
- 14.02.2021
- From u174018
- B Engine
- Tags Opel, Timing, Chain
- 958
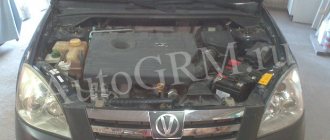
Replacing the timing chain on an Opel Astra J 1.4 turbo
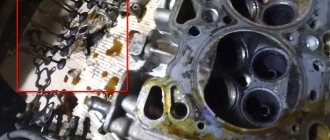
A client contacted us with an Opel Astra J 1.4 turbo, A14NET engine. The mileage on this car was 210,000 km. After inspection and diagnostics, the front cover gaskets and oil cooler gaskets were found to be leaking. There was also an extraneous metallic sound when the engine was running, similar to the so-called “dieseling”. The cause of this sound was a stretched timing chain.
Required spare parts
- Timing chain kit/INA
- Valve cover gasket T-shaped / GM
- Oil cooler gasket/GM
- Oil filter housing gasket/GM
- Coolant pump gasket/GM
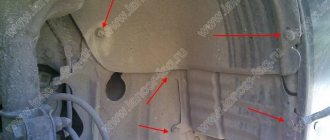
- Front Engine Cover Gasket/GM
- Front crankshaft oil seal / GM
- Turbine oil cooling pipe O-ring / GM
- Oil Filter O-Ring/GM
- Oil filter / ACDelco
- Coolant pipe 8 mm / GM
- Turbine oil supply pipe / GM
- Water turbine inlet hose / GM
- Coolant Fitting/GM
- Parts cleaner / WURTH
Works
- Replacing the timing chain
- Replacing Oil Cooler Tubes and Fittings
To replace the timing chain, first of all, the engine oil and antifreeze are drained. Then you need to remove the valve cover, then the engine pan and the front engine cover, and also remove the generator drive belt with the tensioner pulley.
Assembly must be done with new gaskets. To install tags correctly, specialized equipment is required.
Replacing oil cooler gaskets on an Opel Astra J
The oil cooler on this vehicle was also replaced. To replace it, you need to drain the antifreeze, since we did this work simultaneously with replacing the timing chain - we did this at the very beginning. Then the turbine with the exhaust manifold is removed, as well as the tubes suitable for the oil filter housing. The oil filter housing, also known as the oil cooler, is removed. The case is disassembled, inside of which there are gaskets that we need to replace. Therefore, we change all the gaskets, having first cleaned the oil filter and radiator housing of oil and remaining dirt. We put everything back together in reverse order. It is important to note that after removing the turbine, it is necessary to replace the turbine cooling pipes with fittings, as well as the oil supply pipe to the turbine. We recommend changing the oil supply pipe to the turbine every 30 thousand km.
How to Know When It's Time to Replace Your Chain
Some of the most obvious signs are: the presence of an extraneous metallic sound from the timing chain, as well as errors in the discrepancy between the camshafts and the crankshaft position (the check light on the dashboard lights up).
Typically, the service life of the chain is 90 – 120 thousand km. The timing of replacing a chain depends on many factors, such as: how often the oil has been changed + the quality of the oil itself and the operating conditions of the vehicle. For more accurate diagnosis and identification of a stretched chain, it is better to entrust this to professionals.
ADD A COMMENT