The presence of a turbine in a car provides an increase in engine power due to the entry of the same air flow into the cylinders with its preliminary compression. Before removing the turbine and replacing it, it is recommended to familiarize yourself with the reasons for the failure of the unit.
Turbine malfunctions and their symptoms
The average lifespan of a turbocharger is about ten years. But despite this, if used incorrectly, the unit may fail much earlier.
Signs of breakdown
Symptoms that can help determine the need to replace the turbine:
- The car's traction has decreased. The power has dropped; to reach the required engine speed, the driver needs to press the gas harder.
- The appearance of black, white or blue smoke from the exhaust pipe. Blue smoke from the muffler indicates the combustion of engine fluid in the cylinders of the power unit; oil enters there from the turbocharger. Black smoke indicates an air leak, which may indicate a leak in the system. White smoke indicates a clogged supercharger oil drain.
- The appearance of a grinding noise, uncharacteristic noise or whistle when the motor is operating. The presence of a whistle indicates an air leak from the junction of the compressor outlet and the engine. The appearance of a grinding sound indicates friction of the components of the turbocharging system.
- The consumption of engine fluid has increased or a leak has appeared.
- The lubricant or air pressure has decreased or periodically drops.
- Checking the components of a turbocharged system is required when the turbine is regularly shut down or fails.
FORGISTO spoke in detail about the signs of a turbocharger failure using the example of a Mitsubishi Pajero.
Main reasons
If signs of a turbocharger malfunction appear, the vehicle cannot be used until the cause is identified and eliminated. Otherwise, the turbine may completely fail.
The reasons for the malfunction are as follows:
- mechanical damage due to impact;
- contaminated motor fluid;
- lack of lubrication;
- overheat.
Roman Lysenko spoke about the reasons for the turbine failure.
How to remove the turbine?
To change the turbine yourself, you must first dismantle it. The removal procedure can be performed in a garage.
What will you need?
Before removing the turbine, prepare the following for the task:
- a set of screwdrivers - with a Phillips and a flat tip, preferably of different lengths;
- set of wrenches;
- ratchet wrenches 1/2 and 1/4, preferably with extensions;
- WD-40 liquid.
Algorithm of actions
If the car is more than five years old, it is recommended to treat all fastening nuts and bolts with WD-40 the day before the dismantling procedure.
We are talking about the elements of fastening the turbine to the manifold. This will make the dismantling procedure easier.
The removal process is performed as follows:
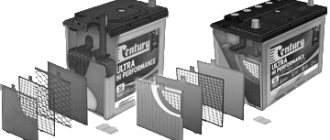
- The machine's power supply is turned off. To do this, the terminals are disconnected from the battery in the engine compartment.
- To carry out work, it is necessary to ensure free access to the unit. The turbine is located between two manifolds - exhaust and intake. If the car is rear-wheel drive, then the unit is installed to the right of the engine. If the car is equipped with front-wheel drive, then you need to look for the turbine to the left of the power unit.
- All components and assemblies that may interfere with the removal of the turbine are dismantled. Here you need to focus on the design features of the internal combustion engine. The generator unit, battery, or windshield washer system reservoir may interfere with dismantling. The fasteners are removed and these elements are dismantled.
- The turbines of modern cars are equipped with many controllers. We are talking about a gas temperature control sensor, a pressure controller, the health of the unit, etc. Before dismantling the unit, these devices must be disconnected from the on-board network by removing the connectors. If this is not done, the wiring may be damaged.
- The cooling system pipes are disconnected, as well as the lines of the turbine cartridge lubrication system. When disconnecting, it is recommended to mark the hoses so as not to mix them up during further installation. It is necessary to dismantle or disconnect the line for draining the engine fluid from the cavity of the cartridge into the crankcase of the power unit.
- The next step will be dismantling the turbocompressor unit. It can be fixed on the uppipe, downpipe or power unit block. First, the section of the line that goes to the exhaust pipe is dismantled. When performing the task, you must not lose the sealing elements and nuts.
- Then the upper line is disconnected, it is dismantled a little easier. Through this hose, compressed air flow is supplied to the power unit, so the temperatures in this line are lower. As a result, the condition of bolted joints is better.
- If the turbine is fixed to the block, then this fastening must also be unscrewed. After this, the unit is disconnected from the collector unit and dismantled.
The DIY repair channel Audi Q7, A6, VW talked about dismantling the turbine using the example of Audi and Volkswagen cars.
Necessary elements for turbine installation
Drivers who do not have enough power in their car decide to install a turbine. Thanks to turbocharging of an atmospheric engine, the car becomes more economical, since the engine power increases, but the volume remains unchanged. So, after installing a turbine on a 1.4-liter engine, the car behaves as if it had a 1.8-liter engine.
However, the issue must be approached with caution, since when technically improving a car, many of its important parts are affected, and additional spare parts are used.
Here is a list of the main parts that will be required when installing the turbine:
Instead of a conventional manifold, you need a turbo manifold through which the exhaust gases will pass and be directed to the turbine.
The manifold must be durable and thick-walled, so it is best to make it in a car repair shop rather than order a cheap option from an online store. The welding must be of high quality so that the manifold does not crack and scale does not get into the turbine.
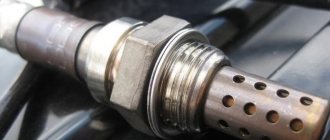
To prevent the turbine from overheating, a cooling system is installed. A lambda probe sensor (oxygen sensor) will need to be built into the pipe.
The turbine impeller speed is very high. To prevent it from malfunctioning, it is necessary to supply oil that will come from the engine. To relieve excess pressure, a special valve (blow-off) is needed.
How to check a removed turbine?
Features of diagnosing a removed turbine:
- The presence of cracks in the hot impeller manifold can be determined after disassembling the unit.
- By touch, you can determine the wear of the bearing sliding elements, as well as the shaft bushings. To do this, the unit must be moved in different directions, but this diagnostic method is inaccurate, since play may be present on the new device. Only an experienced specialist can accurately determine this nuance; it is problematic for an ordinary motorist to do this.
- Attention is drawn to longitudinal and axial play. Ideally, the play should be no more than 1-2 mm. If it is larger, the unit must be repaired.
- The rotation of the turbine elements must be smooth and jamming is not allowed.
- If the dismantled unit is dry, then the play will be large. When the device is filled with motor fluid, the lubricant will create pressure, so the gap should be almost invisible. If the unit is in lubricating fluid, the turbine must be replaced.
- Diagnostics of the internal surfaces of the turbine is carried out. If there is damage on the walls, this indicates that the surfaces are being scratched by the impeller.
- The most accurate result can be obtained by diagnosing the geometry of the unit using a special stand.
VLADIMIR PROKUDIN spoke in detail about diagnosing a turbocharger in a garage without geometry.
What is turbocharging?
And so, you already understand that turbocharging (or as it is also called “turbine”) is a good way to increase engine performance, but let’s take a closer look at how it works.
The first thing I want to say is that a turbine is a very good thing for the environment. The usefulness lies in the fact that the operation of this unit is based on the consumption of energy from already exhaust gases.
The exhaust gases enter the turbine impeller. As a result, the impeller spins, and along with it, the compressor blades, which are located on the same shaft, are set in motion. The advantages of this system are:
Spinning up, the compressor pumps air into the engine cylinders, i.e. gasoline begins to become more enriched with air, and the enriched air-fuel mixture, under pressure created by artificial supercharging, and not by vacuum, enters the cylinders in large volumes, where it burns.
Turbine cleaning
The unit can be restored to working condition by cleaning it; to do this, it must first be disassembled. This procedure is performed in a garage environment.
What will you need?
To disassemble the unit and clean it, prepare:
- wrench 10;
- star key 20;
- hammer;
- flat head screwdriver;
- WF-40 product;
- sandpaper.
Algorithm of actions
The cleaning procedure is performed as follows:
- The holes for the engine fluid must first be closed. This will ensure high-quality sealing of the unit and prevent foreign objects from entering it.
- Unscrew six screws around the unit. Three fastening elements are designed to secure the actuator bracket. After unscrewing, the actuator is disconnected from the turbine; for this, the retaining ring is removed and a screwdriver is used. The action is performed carefully so as not to damage the ring.
- Using sandpaper, the joint part of the cartridge with a hot snail is cleaned. The groove is cleaned, after which WD-40 is poured into it. It is better to leave the unit in this state overnight, this will allow all contaminants to oxidize thoroughly.
- Then carefully tap the hot impeller with a hammer. Tapping is done in a circle and without fanaticism to prevent damage to the unit. For greater convenience, the cold impeller can be clamped in a vice. After tapping the unit for several minutes, the hot impeller may detach from the cartridge, but it is important that it comes off evenly. If the so-called cochlea ends up being skewed, it will be damaged.
- The cartridge with a cold impeller does not need to be disassembled; only the hot component must be disassembled. The guide rollers are dismantled and the ring that connects the blades is removed. After this, the three screws are unscrewed with an asterisk key. Having completed this task, you can see three washers between the unit body and the impeller; they cannot be lost.
- Carbon deposits are cleaned from the impeller housing, as well as the geometry. To remove contaminants, the device can be placed in a container with diesel fuel. It is allowed to use special attachments for a drill or sandpaper. The point is to disassemble and clean each blade separately. If these elements cling to the impeller body, they need to be sharpened a little.
- After cleaning is completed, the assembly procedure is performed in reverse order. When tightening the screws with an asterisk wrench, do not overdo it, otherwise the fastening elements can be torn off.
Cold and hot turbine impellers
Interior of hot impeller
The body of the hot snail must be cleaned of carbon deposits
How to install it yourself?
In general, the installation procedure is performed in reverse order, but there are some nuances when performing the task:
- When performing the installation, you need to take into account which parts from the old unit will be mounted back and which will need to be replaced. We are talking about bolts, sealing elements, studs and nuts. If the supply pipes are worn out, they must be replaced.
- When installing the unit on a diesel engine, sealants are usually not used. But if the car owner decides to use them, this must be done carefully. It is important to prevent sealant from getting inside the pipeline.
- During installation, you need to pay attention to the holes in the oil line, drain, and cooling system. Especially if these lines are not connected by pipes.
- All devices dismantled when removing the turbine are installed. We are talking about a generator set, a battery, and also a reservoir for the windshield washer system. When installing the generator, it is important to properly tension the drive belt to prevent it from becoming loose or overtightened. Errors can lead to incorrect operation of electrical equipment and rapid wear of the belt.
- At the end, the controllers are connected and a test run of the power unit is performed. The engine should idle for some time. Then the revolutions are increased to approximately 3500 per minute and the operation of the internal combustion engine is checked.
Pros and cons of turbocharging an internal combustion engine with your own hands
The main advantage for which motorists decide on such tuning is the increase in power of the power unit. By no other means will you achieve such an increase as by installing a turbocharger. Moreover, you can implement a budget option for supercharging with a compressor yourself, spending money only on equipment.
Note. When the engine develops more force, additional opportunities for tuning the car appear. For example, installing wheels of larger diameter will not worsen the driving performance of the car.
The second advantage of turbocharging is the reduction in fuel consumption. In theory, you get increased power with the same fuel consumption, although in practice this is not the case. As tuning enthusiasts say, it is very difficult to drive in the same calm mode and not “push” when the engine is capable of more. In fact, gasoline consumption increases due to an active driving style.
Now about the disadvantages:
Installing a turbocharger makes sense if you want to increase the power and speed of your car. For everyday driving to work or transporting goods, such drastic changes are not necessary; it is enough to keep the car in good technical condition. Do not forget that any carelessness in handling a turbocharged engine can lead to its breakdown and major repairs.
Advice. If you are the owner of a VAZ car and want to install a supercharger for relatively little money, then it is better to start with a compressor. Its installation will not require major modifications to the engine and fuel system, and you can handle the installation yourself. To install a turbine, you will have to hire specialists to remake the engine and reflash the controller.
The last argument in favor of turbocharging is the tax provided for by the legislation of the Russian Federation on each additional kW of power of the vehicle’s power plant. Installation of supercharged units allows you to increase engine power with a constant annual payment to the state.
How much does a turbine cost?
| Name | Price, rub |
| New turbine for Toyota Carina, Corolla cars | From 8500 to 12 thousand rubles on average |
| Turbine for Mitsubishi cars | About 8 thousand rubles |
| Turbine for Nissan cars | Around 11 thousand rubles |
| For Kamaz vehicles and other heavy trucks | About 16-20 thousand rubles |
| Prices are relevant for three regions: Moscow, Chelyabinsk, Krasnodar. | |