see also
Comments 44
What kind of piston was installed, whose production? Name?
Hello, I’m installing the piston 126th 82.5, I want to assemble it on the Prior’s cylinder head gasket, won’t the valve bend if the belt breaks?
Having become the piston recesses and becoming a metal package gasket. Everything will be fine
I had a Priora 222000, but 3 days ago a problem happened at 155 speed, either a piston pin or a piston broke, the head was removed, there was a bare connecting rod in the 3rd cylinder, the piston was in the trash, and there was a hole in the block opposite the 4th
Such a question: Priora car, Connecting rods 124 After a thorough overhaul, 20 tons went through. Ditonation began after 6 tons. Oil changed every 5 tons. Mobile oil 10 to 40. At 20 tons. I drove from the countryside and pressed decently. And at that moment the traction disappeared, the revolutions began to drop, from the rear. smoke screen. The temperature was normal. I stopped, opened the hood, oil squeezed out from the dipstick, the car was shaking and stalling. Somehow I got home at 40 kph and it didn’t flare up anymore. At home I unscrewed the spark plugs. In cylinder 2 there is a spark plug in metal shavings. What is the reason? How much will the repair cost? By the way, this happened after refueling 30 km. After refueling, a ringing sound appeared after 4 tons of revolutions. Maybe the fuel is not of good quality?
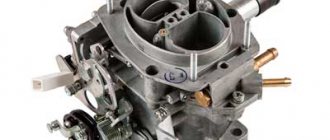
Hi all! Tell me, I want to make capital, 126 engine. Which pistons are better to choose with which group? What does Stoda need for the piston group? Some people are talking about ten pistons, others about Priora FM pistons. If you set the decimals, then do you need to change the connecting rods? I also don’t want to overpay... What pistons can be installed on the original connecting rods? Please advise something, dear prior leaders. This is the first time I’ve encountered such a problem, simply as a major overhaul... Thanks in advance.
Install black edition
Hi all! Tell me, I want to make capital, 126 engine. Which pistons are better to choose with which group? What does Stoda need for the piston group? Some people are talking about ten pistons, others about Priora FM pistons. If you set the decimals, then do you need to change the connecting rods? I also don’t want to overpay... What pistons can be installed on the original connecting rods? Please advise something, dear prior leaders. This is the first time I’ve encountered such a problem, simply as a major overhaul... Thanks in advance.
If you don’t want to change the connecting rods, then if you became a 10 piston, I would install Priorov’s ones, I would already install STK dick expert super piston
Hi all! Tell me, I want to make capital, 126 engine. Which pistons are better to choose with which group? What does Stoda need for the piston group? Some people are talking about ten pistons, others about Priora FM pistons. If you set the decimals, then do you need to change the connecting rods? I also don’t want to overpay... What pistons can be installed on the original connecting rods? Please advise something, dear prior leaders. This is the first time I’ve encountered such a problem, simply as a major overhaul... Thanks in advance.
Now I’m assembling an engine also using Kostroma pistons on my Priora. Do you remember how many hundred parts were made for the thermal gap of the piston-cylinder?
honestly - I don't remember
Now I’m assembling an engine also using Kostroma pistons on my Priora. Do you remember how many hundred parts were made for the thermal gap of the piston-cylinder?
and where is the manufacturer’s description of the spare parts you took?
Greetings! How are things going with the engine at the moment? Did you remove the block to bore it? I'm also going to invest
I sold the car to a friend and he is tearing it up in its tail and mane. Doesn't eat oil, pistons don't rattle. after capitalization the car has already run more than 80k
The pistons also started knocking at 120 thousand, we changed the pistons, the knocking went away, but the oil began to burn. Now it’s 160 thousand and the pistons are knocking again... I’ve been thinking for a long time whether to set it to 124 or to risk sticking it in at 126 again. I decided to put 124, because... the master seems to have been caught with a ball and says that it will work even better, but there are tricks) In general, they installed 124, punched the catalyst, reflashed and voila))) It’s tearing right away, I’ll say it’s better than on 126, in my opinion, acceleration has become more dynamic and easier, zhor oil is gone. And most importantly, for a long time. So if you just set it, it will be a little worse to drive than 126, but for anyone, someone won’t even notice. You punch the catalytic converter and flash it and it goes better) and most importantly for a long time! I am surprised at our manufacturers, it seems that garage craftsmen are much more competent than these VAZ engineers who make engines up to 100 thousand. Yes, the new Priora drives briskly, but not for long!)))) Fortunately, spare parts and repairs are cheap.
It seems to me that there are 124 pistons, I bought the car after a major overhaul, everything was replaced, the piston connecting rods, etc. the question is, if there are 124 pistons, what kind of gasoline can be poured in? AI92
AI 95 is everywhere. Although you can flash the ecu for 124 shg, for driving on AI92.
I found out that they supplied me with lightweight plugless pistons with a displacement combustion chamber
Repairing engine 21126 VAZ 2170 Priora after timing belt break
Today we brought one of the old clients to the Priora, as it turned out, the jammed pump broke the belt and, as a result, the valves were bent.
But progress at AvtoVAZ does not stand still, and if on the engines of the tenth family the valves were simply bent, then on the Priora 126s the connecting rods also lose alignment and, if they are not changed, there is a high probability that the engine will begin to eat oil and, accordingly, your money. Glory to the designers of AvtoVAZ!
But every cloud has a silver lining, there are sets of pistons for 126 engines with grooves that do not bend the valves. In this article we will describe the procedure for repairing the cylinder head after a broken timing belt, as well as replacing the piston. Removing and installing the timing belt is described in this article, so we will not dwell on it in detail.
Chip tuning
The most affordable method for increasing engine power, which does not involve making changes to the hardware, but working exclusively with electronics.
In most cases, the standard version of the software is replaced with a program for the racing characteristics of VAZ cars.
Results after chip tuning.
Changing these parameters is best left to specialized companies, since this work requires certain skills. If you own one, you can easily cope with this task. And after flashing the controller, you will immediately see an increase in dynamics and overclocking (about overclocking the stock version to 100). However, your consumption will definitely increase (about consumption rates here) and the level of emissions into the atmosphere will decrease.
In addition, you can consider online firmware of the system without fundamentally changing the program, but only making changes with minor adjustments to the operation of the engine.
Let's start to disassemble
First, drain the oil and antifreeze. We remove the protective cover, the air filter with pipes, disconnect the ignition coil connectors, the throttle cable and the throttle assembly.
We remove the thermostat housing and simultaneously disconnect all the available connectors and pipes. We remove all the wiring that was in our way towards the battery.
We remove the generator. We unscrew the eight thirteen nuts holding the intake manifold and remove it. We unscrew all the bolts securing the valve cover, as well as the side engine support.
Unscrew the eight nuts and remove the exhaust manifold.
Remove the timing belt, camshaft pulleys and pump.
In three passes, so as not to deform the part, we first loosen and then unscrew twenty bolts of the camshaft bearing housing, the head is eight. Be sure to follow the sequence shown in the photo.
Remove the bearing housing. We remove the camshafts; there is a distinctive lip on the intake camshaft.
Also, in several passes, we first loosen and then unscrew the ten cylinder head mounting bolts. Be sure to follow the sequence shown in the photo.
Remove the cylinder head. All sixteen valves are replaced.
Cylinder head repair
We mark all hydraulic compensators with numbers using an ordinary clerical touch and put them away. An ordinary magnet will help you pull them out. We dry out the valves and remove the oil seals (valve seals), the valves into scrap metal, the oil seals into the trash. We clean all channels. We take the head for grinding, just in case. After washing it again with kerosene after sanding and blowing it with air, we begin to assemble it.
We arrange the freshly purchased valves in the sequence in which they will stand in the cylinder head and begin to grind in one by one. Lubricate the valve stem with clean oil and apply lapping paste to the edge.
We insert the valve into place and put a valve grinding tool on the valve stem. The stores sell a device for manual lapping, but since this is the twenty-first century, we are mechanizing the process. We take the old valve and cut off the rod from it, select a rubber tube for it of such a diameter that it fits tightly. The rod is in a reversible drill, one end of the tube is on it, the other is on the valve being ground in. At low speeds we begin to grind the valve, constantly change the direction of rotation and periodically press it to the seat or weaken the force. On average, the valve takes about twenty seconds. We take it out and wipe it. The valve is considered ground in if a uniform gray strip of at least 1.5 mm wide appears on the chamfer.
The same stripe should appear on the valve seat.
Video of manually grinding valves
For a sixteen valve head, everything is the same, only there are twice as many valves.
After lapping, all valves and seats are thoroughly wiped and washed with kerosene to remove any remaining lapping paste. We check for leaks. We tighten the old spark plugs and put all the valves in place. Pour kerosene and wait three minutes, if the kerosene does not run away all is well, otherwise we grind the valves on this cylinder.
We had to grind four valves again, after which the kerosene stopped flowing.
We stuff new valve seals.
We put the valves in place and dry them. Before doing this, lubricate the valve stems with clean oil. After lubricating it with clean oil, we put the hydraulic compensators in place and, covering them with a clean cloth, remove the head out of sight. We're done with the cylinder head.
Tags: tuning
Comments 36
don’t be fooled by all sorts of links 33 sports where as many as 143 horses are removed on rollers 9.12 277), you will need shafts of at least 9.8 306 as the best option Stolniks, split gears, a larger receiver with short channels, but not a bad option 128 receiver, worse Stinger 3.3 liter, DZ 54 mm, Volgo injectors, spider 4-2-1 of course and further forward flow, January 7.2 to skate this whole thing online, about 140-150 forces should come out of this config, but these forces will be revealed at rpm 7000-8000, while at the low end it will be a little difficult to move around the city, to compensate for the low end it is necessary to increase the engine volume due to a larger piston stroke, in general, this whole thing is not cheap, is it worth it?
Let's move on to the cylinder block
We remove the pallet. Rotating the crankshaft as it is convenient for us, unscrew two bolts on each connecting rod cap. We use a TORX E10 head for this.
We take out the pistons along with the connecting rods. To do this, use the wooden handle of a hammer to press the connecting rod from below and lightly tap it to knock it up. We remove the old liners and buy new ones of the same size according to the markings on them. Here is another stone in AvtoVAZ’s garden, the owner has never climbed into the car from the interior or into the engine, but three pistons were of group “B” and one was “C”. It turns out that at the factory they re-sharpened one cylinder a little and simply put an enlarged piston there, no words. There are no options, we take group “C”, don’t sharpen the engine because of this. We will not touch the main liners either.
We buy a new piston group that does not bend the valves, connecting rods and connecting rod bearings.
Eliminating longitudinal play of the crankshaft
It was noticed on this motor. To eliminate it, replace the thrust half-rings. Standard and repair sizes are available. We take the first repair size, if they are too tight we sand them down a little. We unscrew the middle main bearing and gently push it with a screwdriver and move the half rings. The mark on it is in the form of three serifs, shown below.
When the half ring comes out a little, turn the crankshaft, it will push it out. There are two types of half rings: white at the front and yellow at the rear; the grooves on them should point towards the crankshaft cheeks.
We install them as we removed the new half rings; if they go in with great effort, you can grind them a little on a small abrasive stone, but not from the side of the grooves. Checking the play. We tighten the main bearing with a torque of 8 kgf*m.
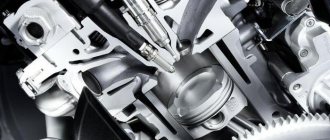
Assembling the piston
There is an arrow stamped on the top of the piston; it should be directed towards the front of the engine. And there are marks on the connecting rod that should look the same way. Don't get confused!
We insert one retaining ring into the groove on the piston. We insert the connecting rod into the piston and, having lubricated the connecting rod and the piston pin with oil, insert it into place. Insert the second retaining ring. Although this operation seems simple, it will take some pains. We inspect the assembled structure; all retaining rings must be clearly in their grooves, otherwise a ring that has jumped out while the engine is running can cause a lot of trouble.
After assembly, you need to break off the connecting rod bearing cap, since the connecting rod is made in one piece. It's like that on our cars. First, unscrew the bolts. We insert the connecting rod into the cleats at the level of the mark shown in the figure with the black arrow and lightly clamp it, then break it off with a slight movement of the hand. The first time is very scary. We put the cover in place and tighten the bolts so as not to mix it up in the future.
Checking the thermal gap in the piston rings
We lay out each set of rings for each cylinder. In the future we will not change their places. In turn, we insert each ring into its own cylinder and push it a little with the piston approximately to the middle.
We measure the gap with feeler gauges.
Nominal clearance: 0.25 - 0.45 mm.
The maximum clearance for all is 1 mm. But this already smacks of waste.
Installing new rings
First, install the oil scraper ring expansion spring, then the ring itself. The oil scraper ring lock should face the opposite direction of the spring lock. Then we install the lower compression ring and finally the upper compression ring. The inscription “TOP” must be stamped on the rings; it must face up. The rings in the piston grooves must rotate easily.
Rules for long-term use
Surely every Priora owner wants to operate his car without unnecessary unexpected costs and is thinking about how to increase the life of the car. To do this you need to follow a few simple rules:
- The power unit of the VAZ 2170, even without various improvements, has sufficient potential for “spirited” driving. But in order to save it and extend its life, such driving should be avoided. Smooth acceleration and maintaining a stable speed not only on the highway, but also in the city will help extend the life of the engine and save fuel and your own money. The maximum permissible speed on the highway should be no higher than 120 km/h, the optimal is 100-110 km/h, and it is important to maintain stability.
- It is important to timely replace consumables, that is, oils in units, filters, spark plugs, high voltage wires, generator and timing belts, and coolant. The interval between engine oil changes depends on its quality and chemical base. Mineral-based oils should be changed more often, synthetic oils less often. You should never determine the quality of motor oil by its color. If it has acquired a black tint, this does not mean that the oil is bad - it means that an excessive amount of combustion product deposits is forming in the engine. First of all, you need to find the source of the carbon deposits and eliminate it, and then change the oil.
- The new engine must be properly broken in, and then the oil must be changed, following the manufacturer's instructions. When running in, avoid increased loads, sudden movements of the accelerator pedal, and do not exceed the speed specified in the instructions.
- Always monitor the engine coolant temperature, check the operation of the electric cooling fan, thermostat and temperature sensor. Overheating is the main enemy of the piston group; every time the temperature is exceeded, it wears out intensely, and the life of the unit is sharply reduced.
"Lada Priora" is a modern high-speed domestic car that will bring its owner a lot of positive impressions and driving pleasure, provided that the engine is cared for and properly modified and operated.
Engine assembly
We wipe the crankshaft journals, cylinder bores and connecting rod bearing seats with a clean rag; by the way, they can also be degreased. We put new liners into the connecting rod and the cover, so that the antennae of the liners fit into the grooves.
Lubricate the bearings, crankshaft journals and cylinders with clean oil. We unfold the piston rings with locks as shown in the figure, the angle between them should be 120 degrees.
We put a mandrel on the piston to compress the rings, having previously lubricated it inside with clean oil. Not forgetting about the direction, the arrow on the piston should be directed towards the front of the engine, we place it in its cylinder.
We turn the crankshaft so that the connecting rod journal is at the very bottom. Gently tapping the wooden handle of a hammer pushes the piston into the cylinder. We remove the mandrel and push the piston down until the connecting rod sits on the crankshaft. We put the connecting rod bearing cap on the bottom, remembering the marks. Tighten the connecting rod cover mounting bolts to a torque of 5 kgf*m. We also repeat with all the other cylinders.
We put back everything that we removed from below. We blow through the top and clean the holes for the cylinder head mounting bolts. We install a new cylinder head gasket and the head itself. Lubricate the bolts with a thin layer of oil, most importantly without fanaticism. We tighten the bolts in several passes in the reverse order of unscrewing, see photo at the beginning of the article. The tightening sequence is as follows:
- first tighten everything with a torque of 2 kgf*m
- then we tighten everything to a torque of 7 – 8 kgf*m
- turn it 90 degrees
- turn it 90 degrees again
We install hydraulic compensators, camshafts and camshaft bearing caps. Lubricate all rubbing surfaces with clean oil. Before installing the camshaft bearing caps, lubricate the perimeter and rims around the spark plug wells with a thin layer of sealant. We tighten the bearing cover bolts in the reverse order of unwinding, with a torque of 2 kgf*m, see photo at the beginning. Well, then we install all the parts in the reverse order of removal. We fill in all the fluids and start it, it may not start right away, this is normal. When you first start it will smoke well until the oil on the cylinders burns, make sure the oil pressure light goes out. Let it run for a minute and turn it off, and suddenly see where something is leaking. We start it several more times, constantly increasing the operating interval, bring it to operating temperature, constantly checking the oil and antifreeze, and also pay attention to the fact that no extraneous noise appears. Let it rest for an hour and then idle again for about an hour, constantly monitoring the temperature. Well, then the break-in, if you sharpened it, if not, then you can drive only the first thousand kilometers, try not to raise the speed above 3000, and not tow it.
Engine tuning Priora 21126 1.6 16V
Chip tuning of the Priora engine
For fun, you can play with the sports firmware, but there will be no obvious improvement; see how to properly increase the power below.
Priora engine tuning for the city
There are legends that the Priora’s engine produces 105, 110 and even 120 hp, and the power was underestimated to reduce taxes, various measurements were even taken in which the car produced similar power... what everyone decides to believe, let’s focus on the indicators declared by the manufacturer. So, how to increase the power of a Priora engine, how to charge it without resorting to anything special, for a small increase you need to let the engine breathe freely. We install a receiver, a 4-2-1 exhaust, a 54-56 mm throttle body, and we get about 120 hp, which is quite good for the city. Boosting the Priora engine will not be complete without sports camshafts, for example, STI-3 camshafts with the configuration described above will provide about 140 hp. and it will be fast, an excellent city motor. The refinement of the Priora engine goes further, sawn cylinder head, Stolnikov 9.15 316 shafts, light valves, 440cc injectors and your car easily produces more than 150-160 hp.
Compressor for Priora
An alternative method of obtaining such power is to install a compressor, for example, the most popular option is an Auto Turbo kit based on PK-23-1, this compressor is easily installed on a 16-valve Priora engine, but with a lower compression ratio. Then there are 3 options: 1. The most popular, lower the coolant gasket with a gasket from a twelve-wheeler, install this compressor, exhaust on 51 pipes, Bosch 107 injectors, install it and go to the track to watch the car go down. But the car doesn’t run very well... then running to sell the compressor, writing that the Autoturbo doesn’t work and all that... is not our option. 2. We lower the coolant by installing a thick cylinder head gasket from 2112, for a St. Petersburg supercharger at a pressure of 0.5 bar this will be enough, we select the optimal narrow-phase shafts (Nuzhdin 8.8 or similar), 51 exhaust pipes, Volga BOSCH 107 injectors, a receiver and a standard throttle body. To fully push the configuration, we give the cylinder head to cut the channels, install larger lightweight valves, this is not expensive and will provide additional power throughout the entire range. This whole thing needs to be configured online! We’ll get an excellent motor with a power of more than 150-160 hp that can perform in any (!) range. 3. We lower the coolant by replacing the piston with a tuning one for the turbo, you can put a proven Nivov piston with a puddle under the turbo on 2110 connecting rods, on such a config you can put a more efficient compressor, a Mercedes one for example, blowing 1-1.5 bar with a power of well over 200+ liters .With. and act like the devil! ) The advantage of the config is the ability to install a turbine on it in the future and blow out at least all 300+ hp. if the piston doesn't go to hell))
Boring the Priora engine or how to increase the volume
Let's start with how you don't need to increase the volume, an example would be the famous VAZ 21128 engine, don't do that)). One of the easiest options to increase volume is to install a motorcycle kit, for example STI, we choose it for our 197.1 mm block, but do not forget about the jambs of the 128 engine, do not rush to install a long-stroke elbow. You can go the other way and purchase a high block 199.5 mm Priora, 80 mm crankshaft, bore the cylinders to 84 mm and a connecting rod 135.1 mm pin 19 mm, this will give a total of 1.8 volume and without damage to R/S, the engine can be twist freely, install evil shafts and squeeze out more power than a regular 1.6l. To spin your engine even more, you can build up a standard block with a plate, how to do this, how it spins on a 4-throttle intake and wide shafts, and most importantly, how it runs is shown in the video below, watch:
Attention MAT (18+)
Priora on throttles
To increase the stability of the engine and the response of the gas pedal, 4 throttle bodies are installed on the intake. The bottom line is that each cylinder receives its own throttle valve and, thanks to this, resonant air vibrations between the cylinders disappear. We have more stable engine operation from bottom to top. The most popular method is to install a 4-throttle intake from Toyota Levin on a VAZ. It is necessary to purchase: the unit itself, make an adapter manifold and pipes, in addition to this you need a nulevik filter, Bosch 360cc injectors, DBP (absolute pressure sensor), fuel pressure regulator, wide shafts (phase over 300), sawing cylinder head channels 40/35 , light valves, Opel springs, rigid pushers, 4-2-1 spider exhaust on 51 pipes, or better yet, on 63 pipes. There are ready-made 4-throttle intake kits on sale that are quite suitable for use. With the correct prior configuration, the engine produces about 180-200 hp. and more. To go beyond 200 hp. on a VAZ atmosphere, you need to take shafts like STI Sport 8 and spin them at 10,000 rpm, your engine will produce more than 220-230 hp. and this will be a completely hellish drag cramp. The disadvantages of chokes include a reduction in engine life and this is not surprising, because even city engines on pipes spin at more than 8000-9000 rpm or more, so you cannot avoid constant breakdowns and repairs of the 21126 Priora engine.
Priora turbo engine
There are many methods for building a turbo Prior, let's look at the urban version as it is more suitable for use. Such options are most often built on a TD04L turbine, Niva pistons with grooves, ideally Stolnikov 8.9 shafts, USA 9.12 or similar, 440cc injectors, 128 receiver, 56 damper, exhaust on a 63 mm pipe. All this junk will give more than 250 hp, and how it will go, watch the video
Attention MAT (18+)
What about the serious Valilov? To build such engines, we leave the bottom the same on a reinforced block, sawn head, Nuzhdin 9.6 shafts or similar, rigid studs from the 8th valve, pump more than 300 l/h, injectors plus or minus 800cc, install the turbine TD05, direct-flow exhaust on the 63rd pipe. This set of iron will be able to pump 400-420 hp into your Prior motor; for a light car weighing a little more than a ton, this is enough to fly into space)
ENGINE RATING: 3+
Motor 126 and 127: working life, differences
These engines on Priora had a displacement of 1.6 liters (or 1596 cm3). Optimal for city sedans, the engine size of the Lada Priora gave a good combination of dynamics and consumption: along with very decent acceleration, fuel consumption does not exceed sky-high numbers. Both engines received good marks, because the car behaved perfectly in the city and on the highway.
In fact, the 126 Priora engine became the first sixteen-valve engine for this model, and the 127 is a modified version, “overclocked” by AvtoVAZ designers. In addition to the same engine displacement, they have other identical characteristics. The in-line type of arrangement of four cylinders provides a simplified design that can be repaired on your own.
The distributed multipoint injection system is involved in creating a good, rich fuel-air mixture (a lean mixture can lead to breakdowns). The cylinder diameter is 82 mm, the piston stroke is 75.6 mm, the compression ratio is 11. The “engines” fall under the Euro 4 standard, they are powered by gasoline with an octane rating of 95.
The 126 engine for the Priora received the following characteristics: 98 hp. (72 kW at 5600 rpm), acceleration to 100 km/h in 11.5 seconds (with manual transmission), city consumption 9.1 l - 100 km (manual transmission), maximum torque - 145 Nm.
The 127 engine for the Priora was upgraded to the following figures: 106 hp. (78 kW at 5800 rpm), acceleration to 100 km/h in 11.5 seconds (with manual transmission), city consumption 8.9 liters per 100 km (with manual transmission), maximum torque – 148 Nm.
The difference may not seem so noticeable, but this is a very small but strong step in design on the part of AvtoVAZ (this is where the change to sixteen-valve “engines” with a volume of 1.6 liters ended). For a car of the Lada Priora class, the engine power was sufficient.
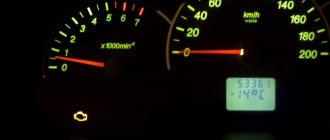
In the same block it is necessary to say about the operating temperature. An absolutely normal operating temperature is considered to be between 90 and 95 degrees Celsius. Further, when the car is being pushed in a traffic jam, is basking in the sun, or for some other reason, but can still work - from 97 to 110 degrees. The engine is slow in places and wears out a lot, but you can still get to your destination. A temperature below 90 degrees is a direct sign indicating that the car has not yet warmed up, and it is better to wait in place until the arrow points to the coveted 80-90 mark.
Operating a car at temperatures above 110 degrees is dangerous because the service life of the engine is noticeably reduced - hot parts undergo very severe wear, overcoming the force of friction.
In general, the service life of the Lada Priora engine with a normal driving style and careful treatment is 200,000 km - after this mark the time comes when the “engine” requires major repairs. AvtoVAZ mentioned the timing belt separately as a recommendation, saying that it needs to be checked every 100,000 km (many car enthusiasts talk about the figure of 50,000 km).
All Lada engines have a problem, and it is related to the valves, which will be discussed further.
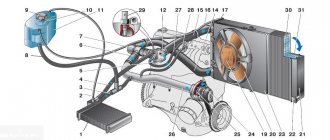
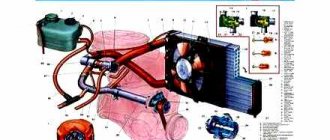
Exhaust system
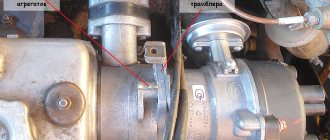
And so, as mentioned above, the standard Lada Priora hatchback was taken. Perhaps it would be enough to replace only the cat. calector (already replaced with a spider 4-2-1 made by Stinger and the City firmware, the increase in power is 9.52 hp) To calculate the increase in power in horsepower:
take the values of P max.
from the first graph (before installing the 4-2-1 spider) which is equal to 79.0 kW and multiplied by a factor of 1.36. The remaining elements of the exhaust system remained standard during measurements; measurements were carried out with one oxygen sensor. This increase in power is maximum and was achieved in 4th gear at a speed of 169.5 km/4 at 5549 rpm. Spider 4-2-1
for a 16-valve engine with a nut for an oxygen sensor for PRIORA cars. Material: 0.8 ps cold rolled steel. The diameter of the primary pipes is 38 mm, the secondary pipes are 43 mm, the outlet is 51 mm.
Resonator
direct-flow with corrugation for a flow area of 51 mm, powder painting, filling with basalt wool and basalt fabric (heat resistance 1200 deg C) to prevent cotton wool from blowing out.
Muffler
main Priora 21723 Hatchback (C-006), standard installation, outer diameter 120 mm, inner diameter 51 mm, perforation 3 mm.
Barrel length 480mm. Nozzle – stainless steel. It consists of three chambers: two filled with natural basalt wool and basalt fabric to prevent the cotton from blowing out, the third is intermediate. Powder coated, black. Oxygen sensor extension
. I would like to note that the system was installed without problems in the standard places and took about 1.5 hours, with the exception of one thing - installation into the standard rubber bands was very difficult (the factory rubber bands were very hard, but after installation the main muffler stood as if welded =) and in future operation this is a very big plus!).
Naturally, I would like to describe the first sensations after leaving the service station; the sound of the exhaust immediately became noticeable (aurally). But this has a completely different sound, so to speak, you can’t compare any “Chinese ProSport” that screams, but there’s no point! Here everything is just the opposite, the sound is more rumbling and pleasant to the ear. Now we get out into the city and pull away from the intersection, and lo and behold, the car starts to drive completely differently... pick-up occurs somewhere around 2200-2500 rpm and the car starts to move!!! Of course, some may say that 9.5 l/s - yes who will notice them, and what can they do to the car. But still, the engine begins to work more easily (the unloaded state is celebrated), this can be compared to how the water tap was opened halfway, it seems like there is water, but still not enough. So in our case, by removing the catalytic collector, we free the system from unnecessary “plugs”.
How much does engine 126 and 127 cost?
Engine 126 has catalog number 21126100026030, sells for about 107,000 rubles, engine 127, respectively, has catalog number 21127100026030, its price is slightly higher by 3-5 thousand rubles. The price on the secondary market will be significantly lower (up to 20-25 thousand rubles), but the savings will not pay off - a used “engine” can last no more than 1000 km, this is a real lottery.
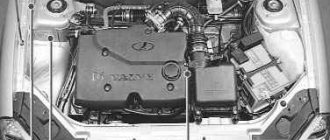
How to find out what engine is in a Priora
You can find out by looking at the plate on the left glass of the rack, where the engine number is written on the edge. From it you can understand the 8-valve unit, or 16. You can also recognize the modification 21126 or 21127.
Factors affecting the service life of the VAZ 2170
According to the manufacturer, the ICE 21126 with sixteen valves has a stable operation duration of 200 thousand kilometers. After a certain mileage it is necessary to carry out major repairs. Taking good care of the VAZ 2170, proper maintenance (MOT) and timely replacement of damaged components and parts will lead to a long service life of the vehicle.
Reasons affecting the service life of the power unit:
- Engine overheating. Elevated temperatures of a running engine negatively affect the overall service life of the motor. Maintaining the operating temperature of the power unit elements at a constant level significantly extends its operating time.
- Fuel. The vehicle's owner's manual contains detailed information about the recommended brand of gasoline. Filling the 16-valve Priora engine with fuel must be of proven quality.
- Machine oils. Which oil is best to fill, its brand and how much lubricant is needed is indicated in the accompanying documentation for the car. The 126 sixteen valve engine accepts semi-synthetic and synthetic motor oils most well. A complete oil change should be carried out annually or after a mileage of 15 thousand kilometers.
Signs of the need for internal combustion engine repair
The reasons why the operation of the engine is disrupted are arranged in a small list, starting with refusal to start and ending with floating idle speed (this problem was removed on the 127 “engine”). Not all breakdowns end in capital damage - sometimes it’s enough to add oil, sometimes it’s enough to adjust the ECU settings.
Compression reduction
A decrease in cylinder compression below 16 atmospheres is a bad sign. Such a high limit corresponds to a compression ratio of 11.
If the compression decreases (or vice versa increases), then the “engine” will have to be rebuilt.
Knocks in the engine
Engine knocks can come from several points. These could be hydraulic compressors, timing belt rollers or pins. The knocking noise could also be caused by low oil level. The answer to the question will be given by a thorough detailed inspection of all parts of the unit and checking the oil level.
Blue smoke from the exhaust pipe
The blue smoke that comes from the exhaust pipe appears when oil enters the combustion chamber. It can leak either from the valves or from under the piston. The result is the same: the oil is eaten up and blue smoke pours out of the chimney. Once the leak is located, half the problem will already be solved.
Troit motor
Sometimes in the cold the engine may stall - don’t be alarmed by this, because it may simply be one of the spark plugs that fails. In this case, we advise you to simply restart the engine and it will stop running.
Problem areas in the engine
During the operation of this vehicle, owners discover malfunctions and weak points of the engine. These include the following:
- Water pump. This element is also called a liquid pump. It breaks quite often. If the vehicle owner did not look at the temperature sensor readings in time, then a breakdown of the liquid pump can lead to serious consequences. This installation quickly overheats, and then it simply jams. To restore the functionality of the part, you will have to sharpen the cylinders and then change the piston group.
Quite often, Priora drivers complain that oil is leaking under the cover of the valve mechanism. To fix this problem, you just need to replace the gaskets.
As a rule, repair work consists of boring the cylinders or simply replacing the pistons.
Weaknesses of the VAZ 21126 engine
List of the most common weak points in the engine 21126.
Engine cooling system thermostat. Problems occasionally arise due to the thermostat valve sticking. If this happens in winter, then the engine does not warm up, but in summer, on the contrary, overheating can occur. The main causes of malfunction are scale deposits or contamination. It is easier to replace the thermostat than to try to clean the bypass valve from contaminants.
Engine control sensors. They become inoperative regardless of mileage and operating conditions. It is also possible for them to fail due to voltage fluctuations in the network or a short circuit.
Throttle valve. Unstable engine operation, particularly at idle, tells us about problems with the throttle valve. It is necessary to periodically remove dirt from the throttle valve (every 20,000 km) from low-quality fuel and promptly change the fuel filter.
Maintenance
The service interval for the Priora engine is approximately 15 thousand km. This is what the plant that produces this unit does. Experts recommend carrying out the first check after 3 thousand km. Basically, at this stage, more attention should be paid to the places where the fastenings for mounted equipment are located. In addition, during the first inspection and maintenance, the oil or oil filters must be changed.
If the engine has an 8-valve design, then it is necessary to check the condition of the valve clearances during the first check. If the engine has a 16-valve design, then such actions will not be necessary, since such a unit has hydraulic compensators. Similar checks are also carried out after 15 thousand kilometers for the Priora.
When the odometer already shows more than 30 thousand km, you will need to not only replace the oil filters, but also the oily liquid itself. Be sure to also change the spark plugs, and then the filters in the power system.
Often, at approximately this mileage, the timing rollers begin to function poorly or completely break. If the Priora has an 8-valve engine, then the gasket in the valve mechanism cover should also be replaced.
When the mark on the odometer reaches 45 thousand km, you should change the oil again. It is imperative to check the tension in the timing belts. Moreover, these actions are carried out for engines with both 8 and 16 valves.
Then scheduled maintenance is carried out when the mileage reaches 60 thousand km. This time you need to pay attention to the spark plugs and generator drive belts. Sometimes you need to flush the power system. This is especially true for the place where the throttle pipe is located. It is recommended to change the sensors that control idle speed at this time.
When the mileage reaches 75 thousand km, on a unit with 8 valves it is necessary to change the timing belts. The same applies to the oxygen sensor. It is also better to replace the coolant, since by this time it has already partially or completely lost its functions.
Further maintenance will be repeated for the Priora. As a result, the minimum risk for this engine is approximately 100 thousand km. Sometimes, if all the rules are followed and proper maintenance is performed, it is possible to stretch this time to 200 thousand kilometers. Of course, if you change the design (tuning), this increases the power of the unit. But even if you comply with all the requirements, sooner or later you will not be able to do without repairs. Of course, following the rules will delay this, but you will have to either replace the parts yourself or contact a specialist.
Description of Lada Priora
Lada Priora is a family from AvtoVAZ, including the VAZ 2170 sedan, VAZ 2171 station wagon and VAZ 2172 hatchback. The Priora was released in 2007 and replaced the tired, by that time, VAZ 2110. The station wagon replaced the VAZ 2111, and the hatchback, beloved by the people, came to replace the VAZ 2112. The rare 2112 Coupe model was replaced by the even less common Priora Coupe.
The Priora was based on the Lada 110 platform; the exterior and interior of this car were changed, and the technical part also changed in some places.
In 2021, Lada Priora was replaced by a new model - Lada Vesta.
The engines on the Priora are 1.6 liter 98 hp, known as 21126. Since 2013, the most expensive Prioras come with a new engine 21127 106 hp. Less popular among the people are Priory models in budget versions, with 1.6 8 valves (21116). At the facilities of JSC "Super-Auto", even more powerful versions with a 1.8 liter 128 engine are produced, which were restyled in 2014.
Which engine in Priora is more reliable, more powerful, better? Priora engines, in general, have proven themselves well, and are also easy to tune, which has made the Lada Priora quite a popular car among young people. Below is all the most necessary information for Priora owners and potential buyers: malfunctions, why the Priora engine knocks, troits, its tuning, what oil to pour and how much, characteristics and much more