A little history
It is not known for certain who was the first to use the ability of elastic branches of certain types of wood to throw arrows. However, the use of bows significantly increased the chances of ancient hunters in defeating prey and warriors in clashes with the enemy. At first, this throwing weapon was made by simply bending a suitable branch, but over time its design became more complex and improved. The pinnacle of development was the composite bow, when the elastic elements were made separately from the handle and joined together during the assembly process. The process of making good military throwing weapons is complex, and reproducing it at home is not easy, but the use of modern tools and materials allows you to achieve good results.
The structure of onions and raw materials for its processing
The design of this type of throwing weapon is quite simple; it consists of three parts: elastic elements, a handle and a bowstring. Making onions at home is possible in several ways:
- From a relatively straight and elastic branch.
- From logs of such wood species as birch, elm, oak, maple, hickory or ash. It should be borne in mind that industrially made boards are not suitable for these purposes.
- From plastic, for example, from skis.
The first option can be done in just a few minutes, but the firing range, as well as the accuracy, will be unsatisfactory. The latter method is more complicated and will require skills in working with polymer materials. The second option is the longest, but if done correctly, the result will be worth the time spent.
Procurement of materials and drying
There are many descriptions of how to make onions at home, but in all of them, without exception, the emphasis is on using high-quality ingredients. The wood is cut in winter at sub-zero temperatures and dried indoors. The log must have a diameter of at least 12-15 cm, and a length equal to the shooter’s arm span plus 0.5 m for possible cracking and deformation. The sections are painted with oil paint, and the bark is not removed from the workpiece. Drying takes about three months, always in a vertical position.
Preparation of the workpiece
Almost all descriptions of how to make a bow at home contain recommendations to use only those tools that could be used in those days. However, using a modern circular saw will not harm the future product in any way. Naturally, all necessary safety measures must be strictly observed. The thickness of the board should be at least 30-35 mm. and not have developmental defects or damage; it is desirable that the fibrous structure be uniform and parallel to the longitudinal axis.
Roughing
The question of how to make onions at home is not an easy one. In addition to high-quality materials, you will also need skills in working with wood. From the existing board we cut out the front profile of the weapon using a special pattern. In this case, a plane and a well-sharpened knife are used; if possible, the shape of the shoulders should be the same, permissible deviations are tenths of a millimeter. An arrow stop is cut out at the top of the handle. The cross-section of the elastic elements is variable with a gradual decrease from the middle to the edges.
Making a bowstring and bending a sporting weapon
Many instructions on how to make a bow at home recommend using ox veins and tendons when working on the product. Firstly, it is quite difficult to obtain these materials, and secondly, it is also not easy to process them. As a bowstring, you can use a cord made of high-quality polymer materials with a diameter of approximately 2-3 mm. Loops are knitted at the ends, and a PVC tube is placed in the middle under the heel of the arrow. The process of bending the workpiece is carried out after steam treatment; there are different methods of soaking in herbal decoctions, but they are not always effective.
Production of arrows and zeroing of throwing weapons
Having received a detailed description of how to make a bow at home, the master must still learn how to make arrows. The diameter of this product is about 8 mm, and the closer its cross-sectional shape is to an ideal cylinder, the higher the ballistic properties will be. A triangular tip with a stripe equal in width to the diameter of the arrow is attached to the cut using glue and threads. The tail is glued to the rear to stabilize it in flight, and the center of gravity should be shifted forward. The bowstring is put on immediately before shooting and removed at the end. To protect fingers and forearms, special gloves and gaiters are worn. When shooting, it is necessary to observe safety measures and under no circumstances point weapons at people or animals.
It is unknown whether you will ever need to make a bow and arrow yourself, but if you take six minutes to watch a video from Primitive Technologies, you may acquire such a skill in the future. Crafted using homemade tools and trees from the nearby forest, they are truly remarkable creations that would have made craftsmen proud since the dawn of mankind.
How to make a bow and arrow without tools
As you can see, to begin with, a tree trunk of suitable thickness is cut down. Then a part of the required length is taken from it (in this case it is 1.25 m) and, using available tools, it is split in two. The resulting part is subjected to further processing, with tools even more primitive than the bow itself. Naturally, due to their imperfections, the grinding process will take a lot of time.
The result is a stick with a thickening in the middle and polished ends, which due to this have become much thinner. The material for the bowstring is mined in the same forest. You need to choose a type of wood that will allow you to bend the trunk without breaking it in the process.
Next, it’s time to think about arrows, the source of which will be the same forest. The length of the arrows will be 60 cm. The grinding process takes place, then using resin from wood and homemade twine, the plumage is fixed into a specially made recess on the arrow, which is processed using fire.
The quiver for arrows, which is made of tree bark, is not forgotten either. Surely it will not be possible to create a bow, arrows and quiver as easily as shown in the video the first time, so it is better to stock up on patience and perseverance in advance. Afterwards, all that remains is to practice and improve your archery skills, getting an unforgettable experience and a feeling of belonging to the hunters of ancient times
This article will be useful for novice reenactors or skilled fathers whose children have longed to play Robin Hood. So, our goal is to create something that shoots, has an acceptable appearance, with low costs for materials and a minimal set of tools. The easiest to make, but very effective and impressive model is the compound longbow. The product consists of a shoulder handle and a bowstring. In order to make onions at home, you must have:
- screwdriver or drill;
- plane;
- confirmat (furniture) drill;
- chisel (semicircular) or knife;
- electric or regular jigsaw;
- a large amount of sandpaper with different grain sizes;
- rasp.
Story
More often, straight branches and shoots were taken for arrows, or they were cut from a split solid tree. Reed was also used. For accurate shooting, it was necessary to monitor their straightness and correct it by bending, usually by heating it over a fire.
The best arrows were glued ones. Their shaft was glued together from four strips with fish glue; such arrows were called “ hardened”
"[2] from the Turkic
qalïn
"numerous, consisting of a large number of them"[3]. During storage, they did not deform for decades.
Bamboo arrows were also of good quality. But only every hundredth sprout turned out to be suitable.
The purpose of the arrow is usually determined by the type of tip. In Russia, arrows were called by their heads: severgi
,
srezni
,
tamarka
, etc.
Preferable, both from the point of view of hitting accuracy and from the point of view of penetrating power, was the faceted shape of the tip - in the form of a narrow pyramid. The Scythians were the first to cast faceted bronze tips.
Leaf-shaped, and especially triangular with burrs, tips, however, throughout the entire era of bow use did not give up their positions, since they inflicted a significantly more severe wound and were difficult to remove from it.
Finally, “cutters”—arrows with a flat, chisel-like tip—were often used. Theoretically, their penetrating power was worse than that of arrows with a faceted tip, but in practice such a tip had anti-ricochet properties. The penetrating power of the “shears” dropped significantly less when deviating from the normal upon impact.
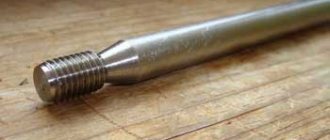
Modern sports arrowhead
Even during the Middle Ages, arrows were a mass-produced product, because they were consumed in huge quantities, and most often were not reused - although after the battle, and sometimes even during it, they tried to collect whole arrows. Therefore, rather cheap materials were used to make the tips, processed without much care. In the Stone and Bronze Ages, bone was used as the material for making arrowheads, with rare exceptions. In Western Europe, bone arrowheads ceased to be used only in the 13th century.
During the transition to the iron industry, arrowheads remained mass-produced and low-quality products.
Despite this, the arrow, suitable for long-range and accurate shooting, was a fairly high-tech product; its production required little material (relatively little - up to 45 g of iron was required for the tip of a heavy arrow), but a lot of labor. Manual labor was widely used in the Middle Ages, but an archer could not make a high-quality arrow on a campaign on his own.
In addition to the usual ones, incendiary arrows were also used - with a bunch of burning tow. Such arrows from good bows flew at about 100 meters, that is, at a distance one and a half to two times less than ordinary ones, since tow greatly increased drag.[4]
To minimize drag, heavy arrows that did not require great accuracy were often made unfeathered.
How to make the simplest arrows for a bow?
This method is best suited if you are walking with your child in the forest. Find straight and dry branches. The length of the branch should be no more than half the length of the bow. We will now describe which types of branches are best suited for this purpose.
- Goldenrod. It is well suited because it has elastic and even branches. Most often it is found on the field.
- Any other straight branches will also work, even green ones. However, if they are freshly cut, you need to give them time to dry. Do not dry them over a fire because the sap inside the branches may catch fire.
Now the cut branches need to be cleared of skin and all irregularities must be cut off so that they become smooth. If the branch is crooked, you can heat it a little on the fire, then straighten it and hold it until it cools.
At one end, cut a recess so that the arrows can hook onto the bow string.
Now you need to sharpen the opposite ends of the arrow. To make the tip harder, you can lightly burn it over a fire. You can make the tips separately from metal and attach them to the arrows, but this is not necessary.
Now you need to make fletching so that the arrows fired from the bow fly more accurately to the target. They can be made from any type of feathers. Take the feather and glue it to the part of the arrow where the border for the bow string is cut.
You can cut a cross-shaped border, insert a feather into it and then fasten the tip together again using thread or glue.
Summary
Experienced hunters say that you can kill a wild boar from 75 meters (if you have a Phantom CLS crossbow in your hands). To do this, you need to be able to calculate the flight path of the arrow, taking into account the loss of height and taking into account the direction and strength of the wind. Such successful shots do not happen often and are a highlight of a hunter's resume. According to manufacturers' recommendations, the optimal distance for hunting is 40 yards, no more, this is the target firing range of a crossbow. It should be remembered that, unlike firearms, hunting with a crossbow requires even more skill and dexterity. In fact, hunting with a crossbow is suitable for those who are not afraid of difficulties and really value vivid sensations.
How to make perfectly straight arrows for a bow?
To do this, you need to take a block of wood, the cross-section of which is twelve by twelve millimeters. Using a shoemaker's knife, cut off the edges of the workpiece, giving it an oval shape. The very tip of the arrow does not have to be processed evenly. The main thing is that it fits into the drill drum.
Now you need to make a device with which you can round the entire surface of the future bow arrow. To do this, you need a die, which must be clamped in the workbench pliers. The diameter of the die should be the same as that at the base of the workpiece, that is, twelve millimeters. Everything is shown in the picture below.
Then you clamp the base into the drill drum, and insert the opposite end into the die. Now start the drill and run the workpiece a couple of times, moving it along the die.
Surviving in a metropolis: how to stay healthy all year round?
What is the best position to sleep in?
How to find your soulmate: tips for women and men
Thus, after processing, you will have an excellent blank from which you can make arrows for a bow.
To achieve perfect roundness of the workpiece, you need to make one more fixture.
To do this, take a hardwood block of wood (beech can be used). You need to drill a hole in it at the beginning of the block, slightly at an angle. Now, using a plane, plan the block until the beginning of the hole appears. What you should end up with is shown in the figure below.
As you can see, it turned out to be a whole hole on one side, and a little smaller on the other. For drilling, take a drill thirteen millimeters in diameter.
Using a clamp, attach a wide chisel diagonally.
Then reinsert our future bow arrow into the drill drum and shoot it again using this device.
This way you will get a perfectly smooth product that can be sanded if desired. To do this, hold a drill in one hand and a piece of sandpaper in the other. Now, turning on the drill at the lowest speed, grind the product.
A very important part of the arrow is its feathering. It helps her fly smoothly and hit the target more accurately.
What you will need to make an arrow for a bow:
- Aluminum adhesive tape.
- Colored adhesive tape.
- A sheet of A4 paper.
- Ruler.
- Paper knife.
- Scissors.
Mark the papers as shown in the figure below and cut them. The width of each resulting piece will be four centimeters, and the length will be twenty-one centimeters.
What happens if you stop washing your hair frequently?
9 of the most terrible tortures of the ancient world
What do people regret most at the end of their lives?
Cut the aluminum adhesive tape so that you get a line one centimeter wide and twenty-one centimeters long.
Now place the colored tape with the sticky side facing up. Carefully lay the paper strips on it so that there is approximately five millimeters of free space at the edges. Glue strips of aluminum onto this free space. Glue a sticky colored strip to the very top.
Then, using hard cardboard, you need to cut out the future feather ten centimeters long and two centimeters wide. Cut out the feathers. Don't forget to leave about one centimeter on one side so you can wrap it later.
Now take the prepared arrow and carefully peel off the strip from the feather and glue it to the blank.
In the same way, glue another pair of feathers to each of the arrows so that the stripes touch each other.
Using colored adhesive tape, cut strips that are a centimeter wide and ten centimeters long. Glue these strips onto the arrow blanks. Then glue two more strips in the same way.
What we ended up with is shown in the figure below.
Types of bows
Modern bows fall into three main categories: traditional (historical), classic (Olympic), and compound. Let's look at the features of each of these types.
Traditional
They are made of wood, plastic or modern glass laminate material and imitate weapons that were used in different historical periods by certain peoples. Prominent representatives of such bows are English, Turkish, Mongolian, etc. There are three subtypes of weapons in this group:
- Long or longbow
- long bows of a simple shape without a bend or with a slight bend in the shoulders. Quite long, imitate old English bows. - Recurve
- weapons that have a bizarre curved shape. The camber increases the speed of the arrow and reduces the effort required to tension the bowstring. A recurve bow retains the same parameters as a longbow, but has a shorter length, which is convenient when shooting from a horse or from cover. They imitate Mongolian, Tatar and Turkish weapons. - Yumi
- Japanese asymmetrical bows. They are made from a single tree branch, one end of which is much thicker than the other. Shooting from them requires learning a special technique.
Classic (Olympic)
A sporting type of bow, made by analogy with traditional weapons, having additional devices (sight and stabilizer). Most models are collapsible for ease of transportation and replacement of individual elements.
Block (compounds)
A powerful modern weapon with specific arrow launch mechanics. A special system of eccentrics and cables relieves tension at the moment of peak bowstring tension. Thanks to this system, shooters are able to calmly aim and shoot more accurately. The compound bow has high power and rate of fire, and is made of light metal alloys.
Tracer Crossbow Arrow
Why is it needed? If you are going to shoot at night, then, firstly, a regular arrow can be easily changed, and secondly, a tracer arrow is easier to hit the target. Although it seems like a difficult task, it is not.
Take a duralumin tube and make a glass out of it. It should be twenty-one millimeters long. The outer diameter should be six and a half millimeters, and the inner diameter 5.75 millimeters.
Now you need to carve the edge to which the 4.2 millimeter spring will be attached. You can make the spring yourself, or you can take a ready-made one. It can be taken from a lighter four millimeters in diameter.
We need to make a ledge on our workpiece; it will interfere with pressing the spring into the arrow.
Now you need to get three batteries with a diameter of 5.65 millimeters. Connect them together using tape.
Now, using caprolon, you make a reflective penny. Make a hole in it for LED lighting. Its diameter should be three millimeters and its depth seven millimeters.
Using a millimeter drill, drill holes for the legs of the luminous element. One of them will be located in the center, the other slightly to the side. Make the second hole in such a way that it comes out in the same place with the diameter of the reflective element. By the way, its size is 7.8 millimeters, and the diameter of the bushing entry point is 5.8 millimeters.
It should be noted that this is not the only way such an arrow can be made. Experiment by selecting other components. The most important thing is that you understand the principle of the tracer boom.
Insert the luminous and reflective elements to the very end of the product. Bend the legs and cut off the excess pieces. The leg that is located in the center is twisted into a circle, and the second one is bent towards the reflective element at an angle of ninety degrees.
Now we need you to assemble everything into one product.
To do this, make a hole in the arrow body as long as the height of the cup. Then you pull and compact the cup until it stops, install a spring in it and insert the batteries. Now press the reflective element so that the leg of the lighting element does not reach the cup a little.
Present tense
All modern arrows are divided into two very different groups - sporting and hunting and traditional.
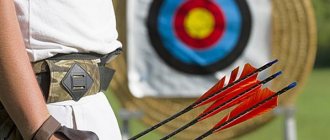
Arrows in an Olympic target
Sports and hunting arrows
All sporting and hunting arrows are composite. The boom consists of the following parts:
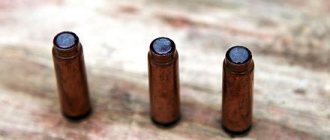
- Arrowhead. There are sporting and hunting tips. The first are simply bullet-like fairings that serve to improve the aerodynamic properties of the arrow and to ensure that the arrow is easily stuck in and removed from the target. The purpose of the latter is to inflict maximum damage on the victim, so they are performed using several sharp blades. All tips are made of solid steel. Sports tips are produced in sets with the same weight, as a rule, with the ability to change the weight of the tip in multiples of 10 grains.
- Shaft. The shaft is the body of the arrow. The shaft of a modern arrow is made in the form of a tube. A tip is attached to it at one end, and a shank at the other. The tube is made of aluminum, carbon fiber, fiberglass and their combinations. When shooting at long distances, thin tubes are used because they are less exposed to side winds, and when shooting at short distances (including indoors) and hunting, thick tubes are used because a large tube is more likely to “catch” the size of the larger spectacle zone, and due to greater strength. Most tubes have a fixed diameter along their entire length, but some sport tubes are barrel shaped for better aerodynamics. Barrel-shaped tubes are much more difficult to select, and therefore are used only by highly qualified athletes and are not used by hunters at all.
- The shank is the small plastic end of the arrow. It holds the arrow on the string during the draw. To prevent the destruction of an expensive tube when one arrow hits another on the same target, adapter inserts or knock inserts are used.
- Plumage. The fletching consists of 3 (rarely 4) feathers glued in a circle at the end of the tube to stabilize the arrow in flight. Another purpose of the fletching is to make the arrow distinctive; Each archer chooses his own plumage colors, often choosing the most variegated combinations. Thanks to this, if several shooters are shooting at the same target, which happens quite often in competitions, the arrows of different participants can be easily distinguished. Participants in any competition are required to sign the shafts of their arrows, as the fletching may fly off when fired or remain in the target.
Modern manufacturers produce specialized software for selecting arrow components based on the length, type and strength of the bow, and tip weight.
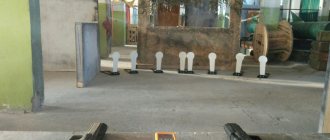
Arrows in a target for field shooting
Traditional arrows
These arrows are designed for shooting with traditional bows. They are made as close as possible to ancient samples.
Crossbow firing range
The Ten Point Pro Slider (crossbow tested) with a force of 79.5 and an arrow speed of 93 m/s showed all the advantages of a crossbow over a bow. Testing was carried out at three distances of 20, 40 and 60 yards (or 18.29m, 36.58m and 54.86m). I note that the performance of a bow and a crossbow is almost the same. Based on the results of testing, we can say that the similarity remains only at a distance of 20 yards - the arrows land exactly on target. At a distance of 40 yards, the crossbow arrow lost height - about 30 cm. At a distance of 60 yards, the loss doubled (60 cm). At all distances, the depth of entry of a crossbow arrow is the same, that is, hunting with a crossbow is possible at 50 meters, but you need to aim with adjustments for loss of height. Even choosing a distance twice as large - 100 meters - the arrow will enter with the same force, but hitting such a target is a difficult task, which a trained shooter can cope with. Of course, the tested crossbow is far from the most powerful, and its speed is average, but this test allowed us to evaluate the firing range of the crossbow.