Simple replacement of the timing belt on the Opel Astra H 1.6 Z16XER
Finally, an old friend of mine exchanged his rusty bucket for a normal car and immediately came to our sales post.
So, we have an Opel Astra H 1.6 Z16XER replacing the timing belt, rollers, oil and filters. Since this is an Opel, in addition to regular keys, we will also need Torx sockets, but they have long been in every tool kit. We will also make a clamp for variable valve timing clutches from an eight bolt and two washers. If this method seems unreliable to someone, you can buy clamps in any online store for only 950 rubles. Let’s make a reservation right away that if the car is equipped with a manual transmission, then there will be no difficulties, but if it’s a robot, then you will have to either make a crankshaft clamp or use a pneumatic impact wrench. We do not change the pump since it is driven by the alternator belt. It took an hour and a half and one mug of tea to replace the timing belt.
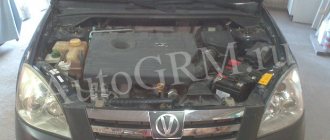
Under the hood is a 1.6-liter engine called Z16XER.
First, disconnect the air filter with pipes from the throttle valve.
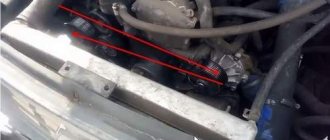
We remove the front right wheel, the side plastic protection and jack up the engine through a plank. We remove the generator belt, using a nineteen key, using a special protrusion, turn the tension roller, thereby loosening the belt. In the photo it has already been removed.
Remove the engine mount.
Remove the upper protective cover of the timing belt.
Remove the middle part of the plastic protection.
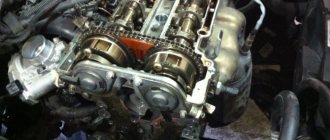
Set the top dead center. We turn the crankshaft by the bolt, always clockwise, until the marks on the crankshaft pulley and the lower protection coincide. It's not very visible, but it won't be difficult to find them.
The marks on the top of the camshaft couplings should also match.
Unscrew the crankshaft pulley bolt. If the transmission is manual, then this procedure will not pose any special problems. We place stops under the wheels, turn on the fifth wheel, insert a specially trained screwdriver into the brake disc under the caliper and, with a slight movement of the hand, unscrew the bolt. But if the robot is like in our case, then a wrench helps us, but if there is no current one, we make a crankshaft pulley clamp. In the corner we drill two holes by eight and insert two bolts there, tightening them with nuts; we eventually insert these bolts into the holes in the pulley. You will get the dimensions yourself by measuring the distance between the holes. In the photo, the lock is shown schematically with a red rectangle; any holes can be used.
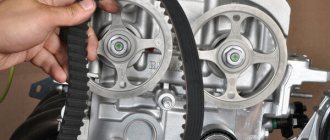
Remove the pulley and lower timing belt protection. On the left we see a tension roller, on the right a bypass roller.
We check the camshaft marks and, if they are gone, we bring them down. The marks on the crankshaft sprockets, in turn, should also match.
We install our Russian clamp on the camshafts and mark the old belt, just in case.
Using a hexagon, we turn the timing belt tension roller counterclockwise, thereby loosening the belt and removing the belt and rollers.
We put the new rollers in place, and the tension roller has a protrusion on the body that should fit into the groove during installation.
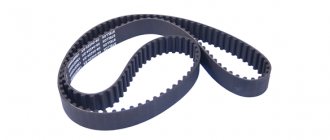
We check all the marks again and install a new timing belt, first on the crankshaft sprocket, idler pulley, camshafts and pulling the tension roller onto it. Do not forget about the direction of rotation indicated on the belt. We remove our clamp.
We check the marks and, having replaced the lower protective cover and the crankshaft pulley, turn the engine two turns and check all the marks again. If everything matches, install all the remaining parts in the reverse order of removal. In principle, there is nothing complicated here, the main thing is to be attentive.
Opel Astra N, timing belt replacement. — logbook of Opel Astra 2006 on DRIVE2
It's time to change the timing belt. In the book Astra with an internal combustion engine 1.6/105 hp, replacing the timing belt, 10 years or 150,000 t.km. My mileage was already 160,000 km. Having removed the upper protective timing cover, it was clear that the condition of the belt was in good condition for a long time. Although there was dust from the belt on the casing, this means the belt was already dry. But in order not to risk it, I decided to replace it. We disconnect the battery, remove the air vent, the protective upper casing. We remove the wheel so that it does not interfere with unscrewing the crankshaft pulley, jack up the engine and unscrew the motor mount. We align the marks, unscrew the tension roller, throw off the belt. We change the idler pulley and everything is reversed. sequences. I've already driven 2000 km, everything is fine. I haven't changed the water pump, since it is driven by the generator's hanging belt. Its condition is normal. Good luck to everyone.
new belt in place
Issue price: 130 € Mileage: 160,000 km
Opel Astra Z16XER on the handle › Logbook › Replacing the timing belt
It's time to replace the timing belt. The car has already driven more than 100 thousand and I felt... it's time! My personal stories about replacing the timing belt are connected with the VAZ 2114. I felt that it was time... but I delayed and twice the collaboration led to the same thing - a broken belt on the highway. But the Z16XER engine is not a VAZ 2111 where in two hours (and with skill of 20 minutes) the belt was changed and drove on, here it could all end in a sad meeting of valves with pistons...
Accessories
— Toothed belt GoodYear EP G1592H —
945.57 rubles
;
— V-ribbed belt SWAG 40 92 8881 — 439.74 rubles
;
— Timing belt return roller Febi 27819 — 985.36 rubles
;
— Timing belt tensioner roller Febi 27792 — RUB 1,934.31
.
Purchased, but not supplied
Cooling system pump Febi 28531
1613.94
I’ll share my impressions from replacing the belt, which have not yet cooled down. If you are too lazy to read to the end, I’ll say right away: If you have money and no time, it’s better to go to a service center
It’s not a fact, of course, that they will change it correctly if they change it ;(. There will be a lot of text, there will be no photos, there are already so many of them.
1. The timing belt is just a stone's throw away. I did everything according to this guide. But in addition to the article, I will say that you will also need a TORX E10 wrench (to remove the timing belt casing), and a 19-point socket wrench (dodecahedral) - to loosen the tension roller of the hinged belt. But if you are planning to repair your Opel, then you should already have, in addition to the standard “Chauffeur” set, a set of TORX T keys and TORX E heads.
2. Camshaft pulleys need to be fixed
before removing the belt.
To do this, it is better to use the following sequence (here it’s like a babe, but still): — remove the hinged belt; — using 5th gear, the brake pedal (I used a board spread between the driver’s seat and the pedal, but you can use an assistant) and a pipe, unscrew the bolt of the outboard belt pulley; — remove the lower cover of the timing belt casing (4 Torx E10 bolts) — screw the pulley bolt back into the crankshaft and, turning it, set it to TDC of the 1st cylinder until the wonderful marks on the camshafts coincide. The crankshaft is in the TDC position, but the marks do not match? This is how it should be, the KM on the intake gear should be slightly higher than on the exhaust gear; — with a marker we make marks on the pulleys and the rear cover of the timing case (I didn’t do it and I regret it) because of the ambiguity of the standard marks, their use is difficult; — either with a special device for 1.8 kilo rubles (I now have it), or as written here (a very useful link) we fix the camshaft pulleys
.
After this,
do not pull or pull
the belt
under any pretext, otherwise the entire fixation will fly to... I didn’t fix the shafts in principle, which caused such a headache. — then we do everything according to the instructions.
Opel Astra Z16XER on the handle › Logbook › Rearranging the timing belt
The snow that “suddenly” fell on April 25 has melted, and the tires can be transferred to the summer. I signed up for a tire shop for the next weekend, but... I gave my turn to my father-in-law, since it was very difficult for the astro to go to the tire shop, I could barely drive it into the garage (10% increase). Blame it on my slightly crooked hands, but it’s better to follow the chronology
Prologue
After I changed the timing belt, an additional error 001166 appeared - the mechanical synchronization of the shafts is broken (read - the belt is not worn according to the marks). Since it is very difficult to set marks on this motor, I ordered a special device for fixing the shafts for 1.2 kilo rubles from Poland (bought on eBay e Tesam). Before this, a model was made for printing on a TriDe printer, but the total amount was the same
With such a device, fixing the shaft and changing the timing belt takes about one hour - easier than on the 2111 engine.
Day one
Everything went very smoothly
When installing the belt, I noticed that it was painfully easy to put on, even with sagging, but I didn’t pay attention to it
Additionally, I changed the stabilizer link. I collected everything, drove around a bit, and felt that a couple more mares had returned to the car. I decided that I was great and collected the tools.
Day two
The car is just a rocket - I haven’t seen such dynamics in a long time (even after changing the oil it seems like a dozen horses have been added), but 10 kilometers after installing the belt it started to feel dull. The horses seemed to be starting to go on vacation. I rode 50-60 horses to work. I cleared the error codes with a pedal test. As I expected, a couple more related to the timing mechanism were added to the previous ones that had not been reset.
After work, the horses continued to go on vacation, 30 km after replacing the belt they started beeping at me, saying why are you riding like a donkey - but she doesn’t ride at all until 3000.
Having reached the garage, I realized that I needed to leave the car and repair it. In the evening, the engine running at XX speed produced a clear and beautiful sound of diesel operation. The verdict is simple - the camshaft gears need to be replaced. One thing was confusing - judging by the forums, a malfunction in the phase control system caused a bunch of very specific errors, I had them, but not all of them... At work I borrowed an ELM from a colleague to reset errors.
So, at the time of repair, the following were purchased: - 12992408 Valve timing valve (2 pcs.) 5175.82 - 55567048 Camshaft pulley with exhaust drive mechanism (1 pc.) 4672.18 - 55567049 Camshaft pulley with inlet drive mechanism (1 pc.) 4736.83 — 06 36 930 Camshaft oil seal (2 pcs.) 385.78 — 20 05 086 Screw (2 pcs.) 85.72 — Valve cover seal (1 pc.) about 1500
Repair
During disassembly, one thought tormented me... How did such a sudden failure of the camshaft gears occur? Well, you can’t use a device to put the shafts in the wrong position. Everything became clear as soon as I placed the marks on the camshafts and fixed them with a device. I made a mistake... I made a mistake on the crankshaft gear - the mark was shifted by a tooth. I rearranged the belt, pulled the gears - the intake is already playing.
We assemble it, clear the errors, start it - the car with the key goes out completely. All errors were reset and no new ones appeared, even the temperature sensor error was reset...
Additionally, I only changed the valves of the phase control mechanism (I had them of a new type - with oval holes) - oil was oozing somewhere from under the valve (exhaust gear). The screws came off without any problems, the only thing to remove the intake manifold valve is to have a long socket for this screw.
Epilogue
The purchased gears took their place on the shelves, so the work (despite the impressive list at the top) cost me 6,673 rubles. The machine with the key went out. It would seem idyllic, but the roar when starting the engine seemed to hint that the gears needed to be changed.
Timing belt Z16XER
One of the main routine maintenance tasks for the Z16XER power plant is replacing the timing belt. The ability to operate the motor depends on the condition of the consumables.
Changing the belt yourself will not be a big problem. At the same time, it is important not only to observe maintenance intervals, but also to purchase only high-quality consumables for maintenance.
According to the official regulations, replacing the timing belt on the Z16XER engine is required every 150 thousand km. When operating the engine in domestic conditions, it is recommended to reduce the interval to 100 thousand km. Unscheduled belt replacement is necessary in the following cases:
- oil got on the belt;
- there are cracks;
- the fabric peels off from the rubber;
- tears are observed.
When to change the timing belt on an Opel Astra Z16XER
Replacing the timing belt on Opel Astra Z16XER, Z18XER and Z20XER is theoretically performed at a mileage of at least 150,000 km. However, experienced drivers who take into account the specifics and quality of spare parts supplied to our market try to change the belt at least once every 60-70 thousand km.
Repair kit for replacing the timing belt Astra 1.6
In most cases, the belt can withstand more, but it’s still better not to use up the resource reserve until the last kilometer. Reviews from Opel Astra owners indicate the optimal replacement period for a mileage of up to 90 thousand km. Of course, unless force majeure occurs:
- Cracks on the surface of the timing belt.
- Breakage of teeth on the inner surface.
- is oiled , antifreeze gets on the belt due to a pump malfunction or for other reasons.
- Cuts, tears and other mechanical damage to the belt.
- Destruction of the belt ends , fraying and delamination.
In any of these situations, without thinking, we will change the camshaft drive belt, having prepared for the work properly.
We understand that any operating fluid has a destructive effect on the rubber material. Therefore, before installing a new belt, we will eliminate problems with oil leakage (crankshaft seals, camshafts) or antifreeze leakage from the pump.
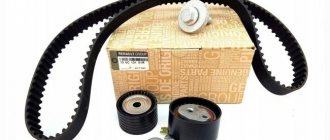
Article number and approximate price for the original timing belt for Z16XER
For the Z16XER power plant, the original timing belt is produced by General Motors. The consumable has article number 24422964. The retail price for a branded timing belt ranges from 4,000 to 6,000 rubles.
General Motors also produces special kits for maintenance of the gas distribution mechanism drive of the Z16XER power unit. The relevance of this set is due to the fact that by the time it is necessary to replace the belt, a number of timing parts and assemblies have exhausted their service life.
Therefore, when carrying out maintenance, it is convenient to comprehensively change all the elements that have served their purpose. The branded set has catalog number 24405896. The cost for the original set starts from 7,000 rubles.
Article number and cost of good analogues of the original Z16XER timing belt from third-party manufacturers
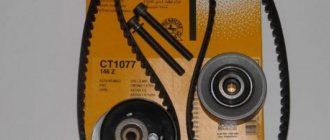
The original timing belt for the Z16XER power plant has a very high cost. For this reason, car owners have to buy consumables from third-party manufacturers. The best timing belt alternatives for the Z16XER powertrain are presented in the table below.
Table - Good analogues of the Z16XER timing belt
| Brand | Article number | Cost, ruble |
| Contitech | CT1077 | 1000-1500 |
| Dongil | 146STS24 | 700-1100 |
| Gates | 5603XS | 1100-1600 |
| Bosch | 1987949590 | 800-1200 |
| Flennor | 4592V | 1200-1900 |
Original timing drive maintenance kits are not always easy to find in retail stores. The price of branded sets is very high. Therefore, car owners purchase similar kits from third-party brands.
The table below provides a list of kits from alternative manufacturers. These kits not only have decent quality, but also have a very attractive price.
Table - Good alternatives to the original Z16XER timing belt replacement kit
| Brand | Catalog number | Approximate prices, ruble |
| Hepu | PK03630 | 6000-6500 |
| Bosch | 1987948800 | 4900-5500 |
| SKF | VKMC35260 | 4900-5700 |
| Contitech | CT1077WP2 | 5900-6700 |
| INA | 530045030 | 5000-5900 |
Required tools for DIY replacement
In order to replace the timing belt on the Z16XER power unit, it is important to first prepare a set of tools, the list of which is given in the table below.
Table - Tools for replacing the timing belt
| Name | Description |
| TORX head | "E14", "E18", "T50" |
| Spanners | Set |
| open-end wrench | Kit |
| Twelve-sided socket wrench | "at 19" |
| Socket head | "at 11" |
| Hex key | "at 6" |
| Rags and wire brush | To clean dirt |
Tools and accessories
Since this is an Opel, in addition to regular keys, we will also need Torx sockets, but they have long been in every tool kit. We will also make a clamp for variable valve timing clutches from an eight bolt and two washers. If this method seems unreliable to someone, you can buy clamps in any online store for only 950 rubles. Let’s make a reservation right away that if the car is equipped with a manual transmission, then there will be no difficulties, but if it’s a robot, then you will have to either make a crankshaft clamp or use a pneumatic impact wrench. We do not change the pump since it is driven by the alternator belt. It took an hour and a half and one mug of tea to replace the timing belt.
Actually, the patient himself.
Under the hood is a 1.6-liter engine called Z16XER.
Opel Astra H 16XER – do-it-yourself timing belt replacement
Some of the actions are performed on a raised car (a pit or a lift will do).
Catalog numbers of suitable spare parts:
- 1987949590 – timing belt Opel Z16XEP from BOSCH (STDM1168S8M24);
- EPG1592H – GOODYEAR timing belt;
- 40928881 – SWAG poly V-belt;
- 278 19 – return timing pulley Febi;
- 277 92 – Febi tensioner pulley.
Tools for work:
- set of keys and TORX heads;
- 12-point spanner 19 mm;
- hex key 6 mm;
- socket head 11.
Procedure for replacing the timing belt Opel Astra H 1 6 Z16XER:
- Remove the front wheel and engine mudguard from the right side of the car.
- Remove the auxiliary drive belt - to do this, you need to turn the tensioner pulley counterclockwise using a wrench.
- Remove the air filter - to do this, you need to loosen the clamp securing the air duct sleeve to the filter, remove the sleeve from the pipe, and disconnect the bolts holding the filter element.
- Move the piston of the 1st cylinder to top dead center - the shaft marks are in a horizontal plane opposite each other (see figure below).
- Unscrew the 2 bolts of the front drive cover, and then remove the cover itself.
In the case where the belt is not intended to be changed, before removing it, it is necessary to draw arrows with a marker indicating which direction it rotated. This is done due to the fact that the teeth of the inner surface of the belt “break in” to the pulleys of the operating shafts. If you put the belt in the opposite direction, it will exhaust its service life much faster.
- Remove the crankshaft pulley by unscrewing its bolt.
The crankshaft pulley bolt is tightened with a large torque. To prevent the crankshaft from turning while removing the fastening, it is necessary for a second person, while in the cabin, to engage 5th gear and press the brake.
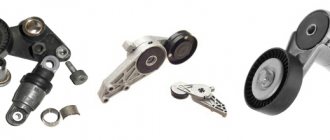
- Remove the accessory belt tensioner roller.
- Unscrew, but not completely, the fastening of the intermediate roller.
- To remove the tension of the timing belt with key “A”, you need to completely rotate the roller in a clockwise direction (you will feel resistance from the spring) and, without removing the key, remove the bolt and dismantle the intermediate roller.
- Remove the timing belt from the crankshaft pulley and remove it from the system.
- Remove the tension roller by unscrewing the fastener that holds it and replace the part.
During the work, you need to change the tensioning and intermediate timing rollers - the service life of these parts is not much longer than the period of use of the belt, and in order to change them after, you will have to repeat all the steps to disassemble the car again, which will take a lot of effort and time.
We put in a replacement:
- The shaft alignment marks must match.
- Place the belt on the crankshaft toothed pulley, place the drive branch behind the intermediate roller, then, tensioning the belt, put it on the camshaft pulleys.
- Place the rear branch behind the tension roller, turning it clockwise until the end.
When the tension roller ceases to be influenced from the outside, the part, under the influence of the spring, will return to its normal position for correct operation.
- Screw the pulley bolt into the crankshaft shank, then rotate the crankshaft 2 turns - this will create the required tension. The alignment marks of the shafts must coincide.
- If the marks do not align, you need to reinstall the belt.
At this point, the replacement of the Opel Astra N Z16XER timing belt is considered complete. After installing the new belt, it is necessary to put the previously removed parts in place and check the operation of the engine.
Direct signs of a faulty timing belt
- Critical wear of the belt tensioner or its rollers (can be seen by removing the valve cover);
- Worn sprocket teeth (can be seen by removing the valve cover);
- Cracks and other signs of wear and damage.
If you notice the appearance of at least one of the described signs of malfunction, you must immediately check the condition of the timing belt. Experienced car owners can easily do this on their own, but it is better to carry out this procedure at a service station.
At a car service center, a specialist will be able to do a full inspection of the timing belt, check its tension and identify the degree of wear. If necessary, immediately adjust or replace it with the necessary components. Only an experienced specialist at a service station will be able to correctly tension the belt, because a weakly tensioned belt is more at risk of breaking.
Depending on the specific Opel brand, our specialists perform a number of procedures that allow:
- check the degree of tension of the timing belt;
- carry out a visual inspection of the entire length of the belt;
- inspect the condition of its teeth;
- identify cracks and other signs of wear
- Identify and eliminate the causes of contamination of the timing system with coolant or oil.
It's time to change the timing belt or you notice signs of a faulty belt, do not delay your visit to a car service center, otherwise the consequences may be unpleasant.
Replacing timing belt Z16XER OPEL ASTRA H
We open top dead center. Rotate the crankshaft using the bolt, always clockwise, until the marks on the crankshaft pulley and the lower casing match. It's not very noticeable, but finding them won't be difficult.
At the top of the camshafts.
Unscrew the crankshaft pulley bolt. If the transfer is manual, then this procedure will not be special. Let's replace the stop wheels, turn on the fifth one, insert a specially prepared screwdriver into the brake disc under the caliper and unscrew the bolt with a slight movement of your hand. But if the robot is in our case, then the wrench helps us, and if there is no master, then it weighs the blocking of the crankshaft pulley. In the corner we drill two holes for eight and insert two bolts there, tightening them with nuts, these bolts eventually fit into the holes in the pulley. The dimensions you get yourself by measuring the distance between the holes. In the photo the lock is shown schematically with a red rectangle; any holes can be used.
We remove the pulley and the lower belt guard. On the left we see the tension roller
on right.
Check the camshaft marks and if they are gone, lower them. On star wheels.
Install our Russian lock on the camshafts and mark the old belt just in case.
Allen key, turn the pulley tension belt counterclockwise to loosen the belt and remove the belt and rollers.
We are installing new pulleys and the idler pulley has a tab on the housing that needs to fit into the groove during installation.
Once again we check all the marks and install a new timing belt, first on the crankshaft sprocket, bypass shaft, camshafts and by pulling the tension roller . Remember the direction of rotation indicated on the belt. Remove our lock.
Check the labels and reposition the lower protective cover and crankshaft pulley. If everything is the same, install all other parts in reverse order of removal. In principle, there is nothing complicated here, the main thing is. attentiveness.
Why is it best to leave the timing belt replacement to specialists?
Replacing a part on a gas distribution mechanism is a very complex and painstaking process that requires a high level of professional knowledge and special tools. If you make even the slightest mistake during the work, the following consequences cannot be avoided:
- excessive fuel consumption;
- rapid wear of engine parts, crankshafts and camshafts;
- unstable operation of the motor, presence of extraneous noise and vibration;
- reduction in power and deterioration in vehicle dynamics.
Replacement steps
1. First you need to turn off the power to the car by disconnecting the left terminal of the battery. 2. Remove the air filter. This must be done in order to ensure access to all nodes. Before doing this, be sure to disconnect the air duct. 3. Now remove the right wheel. 4. Unscrew the bolts and remove the mudguard. 5. Raise the engine with a jack, place a wooden base under it and remove the engine protection. 6. Remove the bracket and engine mount located on the right side.
7. Loosen the tensioner of the drive of mounted units and dismantle the drive. 8. Remove the crankshaft sensor. 9. Remove the upper casing of the timing mechanism. 10. Now we need to fix the flywheel and unscrew the bolt securing it. You may not be able to do this manually. In this case, you need to sharply press the brake in fifth gear. To do this, we need an assistant. 11. Remove the crankshaft pulley and then screw the bolt back into place. 12. Turn the crankshaft clockwise to set the engine to TDC mode. To do this, the marks on the camshafts must be aligned. Don't forget about the marks on the crankshaft.
13. Take the lock and use it to block the camshafts. 14. Loosen the tension roller and move it to the side. 15. Now we proceed to the actual dismantling of the timing belt. 16. Before installing a new belt, be sure to double check the placement of the skeins. 17. Start tightening the new belt from the crankshaft. Then the consumable is wound onto the pump and tension roller. The belt is then put on the camshafts. 18. Check the belt tension after installing it. Press down on the belt, but it should not bend much. 19. Fasten the tension roller. 20. Turn the crankshaft clockwise 2 turns. This is done to align the marks. 21. We unlock the camshafts. 22. Install everything else in the reverse order and check the operation of the engine.
Instructions in the photo
Unscrew the crankshaft pulley mounting bolt
Remove the pulley
Unscrew the bolt securing the tension roller
Remove video
Unscrew the bolts securing the rear drive cover
Remove the cover
Loosen the bolt securing the intermediate roller
Use key A to loosen the tension on the drive belt.
While holding the tension roller, unscrew the bolt securing the intermediate roller and remove it
Remove the belt from the timing pulley
Remove the belt from the remaining timing elements
This element must also be replaced when installing a new timing belt.
This element must also be replaced when installing a new timing belt.
To remove the tension roller, you need to unscrew the fastening bolt
. Thus, the replacement requires certain dexterity or skill. Having bought a light bulb and contacted the nearest service station, you will be surprised to learn that replacing a low beam lamp in an Opel Astra H costs approximately twice as much as the optical part itself. Armed with instructions, an assistant and a tool, as well as having looked at the topic, you can handle this stage of servicing the Opel Astra H with your own hands.
source
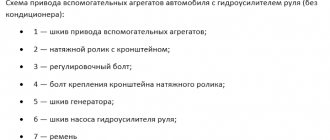
Engine Z19DTH
57. When installing the timing belt, place it on the gear wheels so that its pulling side is tensioned (see accompanying illustration). In this case, observe the specified direction of rotation of the toothed belt (clockwise).
58. The toothed belt is tensioned with the help of an assistant, for which screw in the bolt to use it as a support (see accompanying illustration), and press the adjusting lever using a screwdriver in the direction of the arrow so that the tension roller pointer is opposite the hole. Tighten the mounting bolt.
59. Rotate the crankshaft 2 full turns clockwise and set the TDC position for the piston of the first cylinder. Loosen the tension roller bolt and readjust the timing belt tension. After this, tighten the roller mounting bolt with a force of 25 Nm.