In order to have a serviceable battery in your car and count on its many years of service, you must be able to service it in a timely manner. One of the activities associated with its preventative maintenance is checking it using a load fork. Let us consider further how such work is performed and what needs to be taken into account.
What is a load fork and what is it used for?
To understand how a load fork works, you need to know what it is for. This is a special device whose task is to test the battery charge as a power source in various modes. For a relatively small fee it can be purchased at any automobile store.
Now let's see what the design of this tester consists of:
- housing to protect the entire mechanism;
- voltmeter for measuring voltage;
- a pair of probes for connecting a device with a battery;
- resistance spiral made of sheet steel.
In general, the design of different fork models is fundamentally the same, but there may be slight differences. A thick wire is usually connected to the “plus”, and the “minus” is fixed to a special bracket on the back cover of the case. To be able to monitor batteries with a small capacity, one resistance spiral is enough, and more powerful batteries are tested with devices with a pair of spirals. It is advisable to study the instruction manual before starting to test the device.
In what cases is the battery checked using a load fork?
This tester will certainly be useful to those car enthusiasts who want to extend the service life of their battery. However, it is of greatest value when a car is purchased on the secondary market. In this case, the load plug will help to establish the basic characteristics of the battery in order to understand when it will need to be replaced with a new one.
It will not be possible to obtain such detailed information with a conventional multimeter. In order to have a complete understanding, a load will be required. It is the fork that is capable of simulating real load conditions.
What is a load fork?
This tool is rightfully considered one of the most important assistants for motorists who constantly monitor the status of all systems of their “iron horse”. With the help of a load fork, the driver can easily determine the performance of the car battery, and always be sure that it will not let him down at the most crucial moment.
A standard plug of the simplest design is a high-power load resistor, equipped with two probes and a voltmeter. The latter is integrated into a metal body. A steel pin located on the back surface of the device is connected to one of the outputs of the voltmeter (to the negative one), and a wire (usually it is quite thick) goes to the positive output.
In addition, on the back of the voltmeter there is a clamp with which the device is connected to the battery terminals, and two nuts to which load resistors or spirals are connected.
In stores for motorists these days you can find more “sophisticated” devices for checking the batteries of any vehicles (not only cars, but also trucks). Such modern devices allow you to carefully check and analyze the performance of each component of the machine’s electrical circuit.
Common types and types of load forks
Many people do not even suspect that there are different types of load forks for charging batteries. They may have an electronic display or a primitive pointer dial. They also come in different types and differ in purpose.
The most common, especially in the past, were analog designs with a pointer-type voltmeter. They can measure battery characteristics either without a load or with a simulated starter load. As a rule, their current strength is between 50 and 100 amperes.
In order to test a battery with a load of 125 amperes or more, it makes sense to use an electronic device like the Ring RBA 15 plug. A user-friendly interface will allow the user to easily configure the necessary parameters, including the value of the cold cranking current. This characteristic is also established by battery manufacturers and means by it the number of amperes that the battery can produce to start the engine at subzero air temperatures.
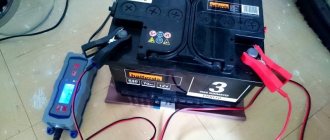
Measuring battery voltage using Ring RBA 15
Testers existing on the market may differ in their operating range and level of measured current. Additionally, there are different designs for acid or alkaline batteries. However, the most key difference is the load they are designed to carry. So, the most popular and successful fork models are the following:
- NV-B - this plug is designed for measurements up to 3 Volts. But the maximum current for it is as much as 100 amperes. Used to test low-power batteries, mainly in various equipment.
- VN-01 - its range is already from 0 to 15 volts. A pause of 15 seconds is required between checks, and the operating temperature is up to 35 degrees Celsius.
- HB-01 is designed for the same range as the model described above. The main difference is the operating temperature: you can use it even at minus 30 and up to plus 60 degrees Celsius.
- HB-03 is one of the most common modifications among our car enthusiasts. The electronic voltmeter is equipped with a liquid crystal screen. With such a device it is already possible to measure the voltage even of powerful batteries, because the maximum capacity is up to 240 Volts. It is possible to connect one or two loads at once.
- HB-04 is another popular tester for 12 or 24 Volt batteries. It is possible to check individual cans, and this plug also functions properly at temperatures up to 60 degrees Celsius above zero.
How to test a battery with a load fork: basic steps
If you want to learn how to test a battery with a load fork and do the work yourself, you need to first read the instructions for the plugs and perform a number of simple steps:
- The voltage at the terminals of the battery is preliminarily measured without using load resistors. For the procedure, you must wait up to 7 hours after turning off the charging current to the battery or completely turning off the car. The device is connected with a positive terminal, and the negative pin of the plug touches the negative terminal of the device, after which the voltmeter readings are monitored. This action allows you to check the open circuit voltage of the battery.
- The obtained data is compared with the table values, and based on the numbers, the battery charge level is summed up. If the charging reading reaches one hundred percent, measurements can be taken under load.
- The necessary loads are connected to the device , after which the same actions are performed as indicated above.
When the negative pin touches the terminal, a small spark may occur, since the loads are similar to the starting current of the motor. It is important to ensure that the battery plugs are deployed. It is advisable to take five-minute breaks between measurements. Also, do not pick up the pin, as it gets very hot. The load plug is left connected for five seconds, after which readings are taken.
Depending on the type of device, if the battery results are good, you can continue to operate the vehicle. If the results are unsatisfactory, you should charge or completely replace the battery. The voltage of a charged car battery is 12.6 V and above, and if the battery is not working properly, the value will be close to 11.5 V.
Features of the test that need to be taken into account
Before you start taking readings from the tester, you should learn to decipher the features of measurements and the rules of use. So, beginners should take note of the following recommendations:
- Before making connections, be sure to ensure correct polarity.
- To carry out measurements, a temperature of 20-25 degrees Celsius is used.
- During operation, the probes heat up under the influence of current and can cause burns to the limbs.
- Measurements are taken no longer than 7-8 seconds. Re-recording of data should be done after a 5-minute break.
- If the battery is completely discharged, it is charged to the maximum and the readings are taken again.
For checking small batteries, a plug equipped with just one load coil will be sufficient. But in the case of powerful batteries with large capacity, you will need a couple of spirals. The most common models of load testers are capable of testing devices with a capacity of up to 240 ampere/hour. They simulate the load level that occurs when the engine starts. The starting current can reach up to 250 amperes.
The simplest models of load plugs, as a rule, only evaluate the battery charge level. More complex and expensive varieties can be equipped with an additional ammeter. This allows you to more thoroughly test the characteristics of not only the battery itself, but also the state of the electrical circuit.
How to use a loading fork - brief instructions
Learning how to use a load fork is not difficult at all, and you don’t have to be an electrician to do it. We take the device in our hands and connect the black clamp to the positive terminal of the battery, and the red one, respectively, to the negative terminal. The battery should not be under load at this time. The device display will show information about the current voltage. We select the criteria that the battery must satisfy in the “cold current” mode, press the left button, after which the testing process will start.
Once the process is completed, the user will see the results on the screen - they may take the form of one of the icons that will say the following:
- desulfation processes have occurred and the battery requires charging;
- mechanical damage is present;
- The battery is in working condition.
If the test was performed correctly, information about the technical characteristics of the battery will appear on the screen. Based on these parameters, it will be possible to draw a conclusion about the state in which it is located. Normal voltage should be in the range of 12.6 to 12.9 Volts. A complete discharge will be indicated by a voltage below 11.5-12 Volts.
It is also necessary to check the condition of the battery under load. This will provide a more complete picture, based on which the car owner will decide whether to replace a new battery.
The procedure will be as follows:
- We connect the resistor.
- We connect the terminals with the current leads in the same sequence as described for testing without load.
- Measurements should be taken no longer than 5 seconds.
Working principle of the load fork
Sometimes batteries, for unknown reasons, refuse to turn the car engine. It seems that the voltage at the terminals shows normal, and the control light is bright, but the battery does not work under load.
The battery charge level is assessed using the following indicators:
- Voltage 12.7 V or more – excellent charge;
- Voltage 12.6÷12.69 V – good charge;
- Voltage 12.5÷12.59 V – satisfactory charge.
If the voltage is below 12.5 V, then such a battery must be charged; it is not advisable to use it, especially at sub-zero temperatures to avoid freezing of the electrolyte.
Testing batteries is quite simple: first we check the open circuit voltage. For a working and fully charged battery, it should be in the range of 12.6 ÷ 12.7 V. Some battery manufacturers consider 13.0-13.2 V to be normal voltage.
If the open circuit voltage is below 12 V, this indicates a 50% discharge of the battery.
But if you connect a load to the battery, the voltage parameters will be completely different. It is necessary to use a load, because often all batteries support normal voltage, but “dead” ones cannot withstand the load.
Then we check the voltage value with a load for 5 seconds. The load fork creates a load that is 2 times the battery capacity. Those. if the battery has a capacity of 50 A/h, then the load should be 100 A.
If, when connecting a load, the voltage drops below 10 V, then your battery has serious problems.
There is an opinion among novice car enthusiasts that using a load fork harms the battery. This is a false judgment, not supported by practice. It simply simulates one engine start, i.e. one-time energy consumption by the starter from the battery.
How to make your own battery fork
Many car enthusiasts have no idea that you can easily make a load fork with your own hands without overpaying for it in auto stores. This device will serve its purpose more than once in the garage when diagnosing both the power source and the generator.
So, to make a simple tester you will need to stock up on:
- a voltmeter that will measure voltage with a measurement limit of at least 20 V;
- body made of any non-combustible material;
- 6 mm insulated wires that can withstand high current values;
- steel lugs for wires;
- pen holder.
A homemade meter can be designed for 1 or 2 spirals. As we can see, it is quite possible to assemble it at home, even without the appropriate electrical qualifications. Resistance alone is sufficient when measurements are made for a battery with a capacity not exceeding 100 Ah. If this value is greater, you will need a device with two spirals.
Let's see what the manufacturing process will look like step by step:
- It is advisable to place all elements on a PCB plate and securely fix it. Some may require drilling holes. The housing cover must also be made of non-flammable material.
- We measure the required resistance, and if necessary, connect additional resistance.
- The probes from the voltmeter are connected to wires on which special powerful tips are thrown.
- As a final step, a handle made of rubberized material is attached to the body, which will serve as an insulator for the user.
- The on/off button can be selected from the ground switch of an old car or from any device.
As an improvement, an ammeter can be additionally placed on the same board.
How to choose the right load fork?
Every motorist must have the described device in his possession. When choosing, you need to consider the following characteristics:
- the type of your battery;
- fork design;
- application features.
If the device has 2 pointed contacts, this is for six-volt batteries. For a twelve-volt battery, the devices have an external connection of the cans.
If you choose between pointer and electronic ones, you need to take into account the capabilities of the buyer and the type of activity of the device itself. Electronic ones are a little more expensive, but they are easier to navigate. Pointers have been distinguished by their reliability since ancient times.
The main thing is that the device is useful and fulfills its functional purpose, and the choice is a purely personal matter for each car enthusiast.
Any driver should have a load fork, which is easy to purchase, and if you want to make it yourself, the circuit is easy to create with your own hands. She will always help out. The main conclusion is that the unit will help you understand how efficient the battery is, and whether it will be useful to constantly charge it.
Similar news:
- Selection of spark plugs by car make, by VIN code
- Fuel rail pressure tester
- Characteristics and operating features of the battery
- Diagnostics and troubleshooting of the mass sensor...
- Causes of strong engine vibrations at idle
- Do-it-yourself wheel toe adjustment
- Causes and solutions to the problem of squealing car brakes
- Definition of engine torque
The battery does not hold the load: what to do
When we test the battery using a load plug, the voltage first decreases, and only then does it begin to increase. In cases where the drop continues, we can conclude that the battery is out of order and must be replaced.
Testing a car battery in itself is not a panacea. If regular problems occur, you should also test the entire on-board network for possible leaks, and also analyze the condition of the generator. For example, there is often a need to replace the relay regulator, which leads to overcharging or undercharging of the car battery. If you do not replace it in a timely manner, the battery will not serve its intended life.
How long a car battery should last depends not only on its manufacturer, but to a greater extent on its service life and surrounding temperature conditions. However, testing it too frequently can harm the battery and shorten its service life, so you should not overuse such tests. In addition, before testing begins, the battery should not be running for at least 7-8 hours. Do not forget to take breaks between measurements of at least 5 minutes so that the heating elements have time to cool down. During the inspection, it is necessary to unscrew the plugs on the batteries being serviced.
We invite readers to share in the comments after the article their experience of testing batteries using load forks or other equipment with these functions.