Hyundai Solaris Manual
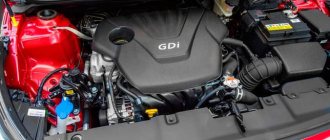
Location of components and assemblies in the engine compartment: 1 – power steering reservoir; 2 – engine oil filler cap; 3 – spark plug cover; 4 – reservoir for hydraulic brake and clutch drives; 5 – battery; 6 – fuse and relay block; 7 – air filter; 8 – cooling system filler cap; 9 – engine oil level indicator; 10* – expansion tank of the cooling system; 11 – auxiliary drive belt; 12 – filler neck of the glass washer reservoir. *The item is not visible in the photo.
Bottom view of the front of the car: 1 – additional muffler; 2 – resonator; 3 – metal compensator; 4 – front suspension subframe; 5 – right steering rod; 6 – front suspension arm; 7 – front wheel brake mechanism; 8 – right wheel drive; 9 – engine sump; 10 – glass washer reservoir; 11 – air conditioning compressor; 12 – oil filter; 13 – air duct for blowing the internal hinge of the right wheel drive; 14 – rear support of the power unit; 15 – gearbox; 16 – left wheel drive; 17 – stabilizer bar; 18 – front wheel brake hose; 19 – left steering rod; 20 – heat shield.
Bottom view of the rear of the car: 1 – niche for a spare wheel; 2 – main muffler; 3 – heat shield; 4 – rear wheel brake mechanism; 5 – rear suspension spring; 6 – rear shock absorber; 7 – rear suspension beam; 8 – parking brake cable; 9 – additional muffler pipe; 10 – fuel tank; 11 – rear suspension lever; 12 – rear towing eye.
Source
Fuse box in the engine compartment
The mounting block is located on the left side, between the air filter housing, battery and body. To repair your car yourself, you need to be able to read electrical diagrams. Fuses are used to protect circuits from short circuits. List of fuses located in the engine compartment:
- F1 – generator circuit protection (rated 100 A). When this fuse fails, the battery begins to discharge faster. If there is no charge at the battery terminals, it is necessary to check the belt tension, the contacts on the generator, the condition of the brush assembly and the voltage regulator.
- F2 – protection of the door lock circuit. The fuse rating is 50 Amps. It also protects the power supply circuits for the alarm system, horn, heating element on the rear window, microcontroller engine control unit, interior lighting, and various electric drives (including mirrors). Therefore, if the brake light, sensors on the Hyundai Accent do not work, the car does not start, the first thing you check is this fuse. If the alarm system fails, you need to check fuses No. 1 and No. 7 located in the cabin block. If they are working properly, then you need to diagnose relay No. 10. The last thing to diagnose is the button and wiring.
- F3 (30 Amperes) – designed to protect the power supply circuits of the head light and side lights. In the event of a lighting failure, it is necessary to check fuses No. 27 and 28, as well as relay No. 4, which are located in the passenger compartment.
- F4 - this fuse supplies power to the motor control unit. Rated current 20 A. If the engine cannot be started, you need to check this fuse. Only after F5, F6, F16, F17, F18, F21 and in the cabin F5 and electromagnetic relay 3.
- Through F5 (30 Amperes) power is supplied to the ignition coils.
- Through F6 (20 A) and F18, power is supplied to the radiator fan electric motor.
- F10 (10A) – power supply for interior lighting circuits.
- F11 (10A) – protection of the car radio power circuit.
- F16 protects the power supply circuits of the DPRV (phase sensor) and IAC (idle air regulator). Rated current 15A.
- F17 – power is supplied to the ECU through it. View information on F
- F19 (rated 10A) – power supply to the air conditioner control circuits.
- F21, F22, F23 (all rated 10A) - protection of ECU circuits, air conditioning compressor clutch, sound signal, respectively.
- F24 – fog lights.
- F25 and F26 (10A) – head lighting on the left and right sides, respectively.
- F27 and F28 (10A) – side lighting lamps on the right and left sides, respectively.
- F32 – protection of the air conditioner condenser heat exchanger fan circuit.
- F33 – power supply circuit for electric windows.
- F34 and F37 – ABS control unit (if equipped).
- Heating fan – F
Engine compartment of Hyundai Solaris 2021 compared to Solaris 2021
Solaris
newbie
Since our Hyundai Solaris 2021 club was sent photographs of the Hyundai Solaris 2021 engine compartment, we decided to compare it with the current generation Solaris 2021, which is currently sold in a restyled version in Russia.
Above in the photo is the new (second) generation of Solaris, below is the first.
It is clearly visible that the changes in the new generation are minimal, the most important thing is that the engines cost exactly the same (Gamma MPI), on the one hand this is good, they are time-tested, on the other hand, I would like something more dynamic and at the same time more economical in terms of fuel consumption.
To make it easier to compare, let’s designate all the elements known from the 1st generation Solaris restyling: 1 - power steering reservoir plug 2 - right power unit suspension support 3 - engine cylinder head cover 4 - oil filler plug 5 - spark plug well cover 6 - camshaft position sensor 7 - vacuum brake booster 8 - master brake cylinder 9 - master brake cylinder reservoir 10 - battery 11 - relay and fuse box 12 - air filter housing 13 - air intake 14 - radiator cap of the internal combustion engine cooling system 15 - hood lock 16 - fuel rail 17 - intake manifold 18 – oil dipstick 19 – generator 20 – CVVT system solenoid valve 21 – transport eye 22 – washer reservoir neck.
And so, the first thing that catches your eye is the absence of a power steering reservoir, will there really be a power steering in the new Solaris?! Good question, it rather depends on the configurations in local markets, in Russia, for example, Hyundai offers both power steering and electric steering in the new Creta crossover, depending on the configuration. Perhaps the same thing will happen with the 2nd generation Solaris.
In addition, slight changes to the engine mounts are visible.
If anyone sees any other changes or new details, be sure to write to this topic
Source
Possible malfunctions with heated seats
The heating device must have a fuse. On the VAZ-2114, two such elements are responsible for the measured heating operation. One fuse is located in the mounting block (F16), the other is located under the dashboard.
If you notice that the control lamps do not light up when the heating is turned on, the problem most likely lies in the fuses.
Relay problems:
- The system is turned on in an electromagnetic relay, which is located under the dashboard.
- After the unit is triggered, check the voltage at terminal 87 with a multimeter.
- If operation does not occur, then you need to examine the relay winding at terminals 86 and 87 with an ohmmeter.
- If the problem lies in the relay, it needs to be replaced.
Another problem may be the usual lack of nutrition. To check this, do the following:
- It is necessary to check the power with the power off at the connectors under the seats.
- The black wire is the ground of the car, the second is the power supply, which should have 12 volts.
- Use an ohmmeter to check the resistance of the heater windings. As practice shows, the problem most often lies here. The windings burn or break.
Depending on the situation, the problem with heated seats can be solved independently. However, this requires disassembling the chairs.
To summarize the article, we note that we have not considered all the possible reasons why heated seats may not work. But using the information above, you will know which direction to go to identify the problem.
If you have experience in carrying out such a repair plan, then finding the problem will not be difficult for you. Otherwise, we recommend contacting a specialist.
There is a special offer on our website. You can get a free consultation with our corporate lawyer by simply submitting your question in the form below.
Comrades, the heated driver's seat does not work, what should I do? look for the problem in the fuse or somewhere else. The button itself lights up, the passenger side works great. VAZ 2114 2011.
Hello guys. The heated driver's seat does not work. When I press the button, the button lights up, but the seat doesn’t heat up. Has anyone encountered this?
Hyundai Solaris 1 fuses and relays
Hyundai Solaris 1st generation was introduced in 2010. Produced in 2011, 2012, 2013, 2014, 2015, 2021 and 2017 with sedan and hatchback bodies, mainly with 1.6 and 1.8 liter petrol engines. During this time, Solaris underwent restyling. In this material you will find a description of the fuses and relays of the Hyundai Solaris 1 with block diagrams, photos - examples of execution and locations. Note the fuse responsible for the cigarette lighter.
p, blockquote 1,0,0,0,0 —>
p, blockquote 2,0,0,0,0 —>
The purpose of fuses and relays in Hyundai Solaris 1 units may differ from those presented and depend on the level of equipment and year of manufacture. Check the purpose with the diagrams on the back of the protective cover.
Repair work
They are carried out in a garage or in a comfortable room with good ventilation and sufficient lighting.
Repair procedure for heated seats:
- All plastic is removed from the seat shell. In some models it is attached to squeezing clamps, in others it needs to be unscrewed using a screwdriver.
- The casing folds back neatly. If it is attached with rings, then you can cut them with pliers or pliers.
- Removing the casing and inspecting the heating element (wire).
- If a burnt or burned-out wire is detected, it must be extended by soldering on both sides into the circuit.
- The spliced section is laid in thermal insulation and then in its place.
- Determining the cause of a wire break. If this happened due to pressure from the seat frame, then the contact point should be made as thin as possible using sandpaper or a file. It is recommended to place a thin gasket (rubber or plastic) on top of the wire and secure it with rubber glue.
- The seat is assembled in the reverse order. Instead of rings removed with pliers, you need to use plastic clamps.
Changing fuses
The cause of a malfunction of the front seat heating system may be a failed fuse. The car owner must refer to the “Operating Instructions” for the vehicle. In it, on the page with the diagram and description of the fuse box, find the one that is responsible for the operation of the seat heating system.
Having specified its denomination and marking, you need to purchase a new one and put it in place of the burnt one.
For example, on Citroen cars:
The fuse responsible for heating is marked: 10A 6997L2 VIN 6997L2
Its cost can range from 12 to 20 rubles. Fuse location: under the steering wheel, to the left of the main unit. It must be removed carefully by removing the block from the guides and prying it with a thin screwdriver.
Heating element integrity
This is a prerequisite for the functioning of the built-in seat heating system.
- Heating element. It is a wire with a nichrome spiral, coated with Teflon on top.
- Outer shell. It is made of technical fabric (thermal or carbon fiber).
In order for the elements to begin functioning in heating mode, it is necessary to ensure:
- Continuity of the circuit with the vehicle's on-board electrical network.
- No ruptures in the heating element or other damage to its integrity.
Replacing cables
Some car enthusiasts replace the standard nichrome wires with carbon fiber ones. For an ordinary seat you will need 5-5.5 m. This cable has greater mechanical resistance compared to nichrome and guarantees long-term trouble-free operation.
Technical parameters of carbon cable:
- resistance 1 m – 33 Ohm;
- supply voltage – 7-380 V;
- heating temperature (max.) – 200º C;
- insulation material – silicone rubber;
- diameter – 3 mm.
DIY replacement procedure:
- The circuit is assembled on top of the standard one and is connected in parallel.
- It is recommended to connect carbon fiber to copper wire by crimping them with copper tubes.
- To adjust the degree of heating of the seats, you can use a step-down board with voltage indication.
If you encounter difficulties when repairing the seat heating system yourself, it is recommended to contact service centers or auto electricians.
Paid links
Use the fuse puller located on the front passenger side panel. Check the removed fuse; if it is burnt out, replace it with a new one.
Insert a new fuse of the same rating and make sure it is securely seated in the terminals. If spare fuses are not available, use fuses of the same rating installed in circuits of devices that are not essential to the operation of the vehicle, such as the cigarette lighter.
- Bonnet deflector for ASX!
- New Hyundai Accent model year: photo configuration price
- Differences between German and Kaliningrad assembly? — Forum for BMW owners and lovers
Table. Universal fuses.
№ Chain Nom. 1 Electronic air conditioning control unit, heated side mirrors 10 A 2 Alarm 10 A 3 Rear fog lights 15A 4 Electronic air conditioning control unit 10A 5 Electronic control unit (air conditioning, ETACS), sunroof, automatic headlight leveling system 10 A 6 Door lock relay 15A 7 Power front seats 25 A 8 Switches for opening the fuel filler flap and trunk lid 15 A 9 Brake lights 15 A 10 Headlight, xenon headlight. Headlight washer, headlight leveling system, DRL system 10 A 11 Instrument cluster 10 A 12 Hazard switch 10 A 13 Air conditioning switch, heater fan motor relay (HIGH mode) 10A 14 Connector for connecting additional equipment 15A 15 Front seat heaters 15 A 16 SRS system 15A 17 Reversing lights, automatic transmission electronic control unit, automatic transmission pulse generator, vehicle speed sensor 10 A 18 Electronic control unit (immobilizer, cruise control, constant speed, ETACS), instrument cluster 10 A 19 Electronic control unit for constant speed control, engine start switch, starter (models with manual transmission), standard anti-theft system relay 10 A 20-23 Not used 15 A 24 Radio, clock, instrument cluster 10A 25 Exterior and interior lighting 10 A 26 Radio tape recorder 10 A 27 Windshield wiper and washer, AQS system 20 A 28 Interior lighting, side door opening lighting, electric antenna 10 A 29 Exterior and interior lighting 10 A 30 Cigarette lighter, power side mirrors 15 A 31 Electronic control unit for constant speed control 10 A Fuse and relay box in the engine compartment. A - condenser fan relay (HIGH-1 mode), B - headlight relay (low beam), C - radiator fan relay (HIGH-1 mode), D - condenser fan relay (LOW mode), E - starter relay, F - air conditioning compressor electromagnetic clutch relay, G — condenser fan relay (HIGH-2 mode), H — horn relay, J — radiator electric fan relay (HIGH-2 mode), K — front fog lamp relay, L — headlight relay (high light), M - windshield wiper motor relay, N - radiator fan relay (LOW mode).
Hyundai Solaris. Reasons for the increased content of harmful substances in exhaust gases
| Contaminated injectors can be washed on a special stand. Replace leaking and heavily contaminated injectors. | ||
| Damage to the insulation of high-voltage devices and circuits - interruptions in sparking | To check the high-voltage wires and ignition coil, replace them with known good ones. | Replace the faulty ignition coil and damaged high-voltage wires. In severe operating conditions (salt on the roads, frosts alternating with thaws), it is advisable to replace the wires every 3 to 5 years |
| Defective spark plugs: current leakage through cracks in the insulator or carbon deposits on the heat cone, poor contact of the central electrode | Check the spark plugs | Replace defective spark plugs |
| The air temperature sensor in the intake manifold or its circuit is faulty | Use a tester to check the serviceability of the sensor | Restore contact in electrical circuits, replace the faulty sensor |
| Coolant temperature sensor faulty | Check the sensor resistance with an ohmmeter at different temperatures | Replace the faulty sensor |
| The throttle position sensor or its circuit is faulty | Check the serviceability of the throttle position sensor | Restore contact in electrical circuits, replace the faulty sensor |
| The oxygen concentration sensor or its circuits are faulty | You can evaluate the performance of the oxygen concentration sensor and the reliability of its electrical circuit connections using diagnostic equipment | Restore damaged electrical circuits. Replace faulty sensor |
| The absolute air pressure sensor and its circuits are faulty | You can check the serviceability of the absolute air pressure sensor using diagnostic equipment | Restore contacts in electrical circuits. Replace the faulty sensor |
| The ECU or its circuits are faulty | To check, replace the ECU with a known good one. | Restore contacts in electrical circuits. Replace the faulty ECU |
| Leakage of the exhaust gas system in the area between the exhaust manifold and the exhaust pipe | Inspection at medium crankshaft speed | Replace the defective gasket, tighten the threaded connections |
| Exhaust gas catalytic converter faulty | You can check the serviceability of the exhaust gas catalytic converter using diagnostic equipment | Replace the catalytic converter |
| Increased pressure in the fuel system due to a faulty pressure regulator | Inspection, checking the pressure in the fuel system with a pressure gauge (no more than 3.5 bar) at idle | Replace the faulty regulator |
| Increased resistance to air flow in the intake tract | Check the air filter element, intake tract (no foreign objects, leaves, etc.) | Clean the intake tract, replace the dirty air filter element |
| Large amounts of oil entering the engine combustion chambers due to wear or damage to oil seals, valve stems, valve guides, piston rings, pistons and cylinders | Inspection after engine disassembly | Repair the engine |
How to reduce levels
of harmful substances in exhaust gases
One of the most common reasons for sending cars for repeated inspection is the increased content of harmful substances in exhaust gases. They are measured using special equipment that shows both the CH and CO content in the exhaust. Moreover, both indicators must comply with the standards established by the Ministry of the Environment, as well as generally accepted European standards specified in the registration certificate of the vehicle.
Emissions-related problems are usually a source of headaches for owners of older cars. But it happens that relatively new cars cannot pass inspection for a seemingly trivial reason. Of course, compliance with environmental standards is an important matter, but often the CO level indicators that prevent the receipt of a ticket turn out to be high solely due to the driver’s fault, while technically the car may be completely in good working order.
A catalyst is responsible for purifying exhaust gases from harmful substances in modern cars. The principle of its operation is based on the combustion of residual fuel that was not properly processed by the internal combustion engine. However, few people know that the effectiveness of this device appears only after it reaches its operating temperature, which can range from 250 to 900 degrees.
In order for the exhaust gas test to be passed successfully, take the trouble to warm up the engine to operating temperature before visiting the inspection point. Owners of diesel cars equipped with turbocharged engines are advised to drive at least 10 kilometers at high engine speeds (around 3000-3500) to clean the exhaust system of soot and deposits. While waiting for your turn to go through inspection, make sure that the engine temperature does not fall below 80-90 degrees.
However, it happens that following these recommendations does not allow you to achieve the indicators necessary to receive the coveted coupon. In such cases, you can ask the inspector to run the engine for a few minutes under load. This helps to “wake up” the old catalysts and ultimately achieve the CO content in the exhaust gases required to pass the technical inspection.
However, much of the quality of the exhaust also depends on the general technical condition of the vehicle. For example, holes in the exhaust pipe lead to a violation of the tightness of the system, which in practice also manifests itself in increased levels of harmful substances. Therefore, shortly before the inspection, it is recommended to carefully inspect the system for damage. However, they can be diagnosed by hearing. Holes in the exhaust pipe contribute to an increase in noise levels that simply cannot be ignored.
A dirty air filter, as well as existing malfunctions in the ignition system, can have an indirect effect on the quality of exhaust gases. Most often, problems are associated with old spark plugs, which, as you know, need to be changed every 60,000 kilometers traveled. As for the air filter, it must be changed once a year, during the next scheduled maintenance of the vehicle.
Some motorists believe that the level of harmful substances in exhaust gases can be influenced by filling the tank with fuel with a higher than usual octane number. The logic is clear, but in practice there is no benefit from such an action. Of course, the system will be cleaned a little, but the problems will not go away, and if the emissions are twice the norm, then it is at least naive to believe that they can be brought to the required level by law using higher quality fuel. Therefore, those who want to pass the technical inspection without problems the first time have no choice but to think about replacing the failed catalyst, since it is this that most often turns out to be the source of the problem in such cases.
content .. 19 20 21 22 ..