The thermostat and antifreeze are part of the cooling system that prevent the engine from overheating and regulate the temperature in it. These parts are not expensive and it is recommended to change them at least once a year. Effective operation of the thermostat is the key to normal engine performance. We will not go into the fact that overheating can lead to the replacement of the cylinder head and a major overhaul of the engine. The article will tell you how to change the antifreeze and thermostat with your own hands, the reasons for failure and the manufacturer’s recommendations.
Selecting a thermostat and antifreeze
You should choose a high-quality thermostat, one that will last at least a year without problems. Original spare parts do not always work properly and are better than analogues. Therefore, the issue of choosing this part should be taken seriously. In this chapter we will write catalog numbers, analogs and photos of parts.
| Name | Catalog number | Analogue |
| Thermostat Skoda Octavia Tour | VAG06A 121 111 | Dello30-121011106-A, Gates7412-10602, GatesTH396105G1, Jp Group1114507900, Topran109 346, VemoV15-99-1908, Vika13946 |
| Antifreeze | VAGG 013A8JM1 | Febi38200, SWAG30 93 8200, VaicoV60-0164 |
Functionality check
First, let's not rush to remove the thermostat, because this requires a lot of fiddling. It may turn out that we are wrong to blame him, but the issue is something else:
- Heat. We take hold of the lower radiator pipe, and let someone start the engine. If there is no assistant, then start it yourself, you will have time to hold on to the hose. Please note that the car must be cool beforehand. At first, the pipe is naturally cool, but when the engine is running it heats up very quickly. If this happens, it means that the thermostat is working properly, installing a new one is not required yet;
Replacement
thermostat
covers 2112 If you want to contribute to the Yandex channel means 410013139365069 QIWI 79293953175.
Reasons for thermostat failure
There are many reasons why thermostats fail, let’s look at the main ones:
- dirt in antifreeze;
- the release spring has lost its rigidity;
- poor performance of the boost pump;
- use on diesel engines, thermostat from gasoline;
- malfunction of the air valve in the thermostat housing;
- high engine speed when warming up;
- air lock in the cooling system;
- violation of the seal of the housing.
All these factors can cause the thermostat to fail.
The main “sores” of the Renault Logan thermostat
The operating principle of the thermostat on Renault Logan is no different from similar devices installed on other cars, therefore its malfunctions are completely typical:
- The valve does not close or open completely;
- Opening delayed or vice versa ahead of time;
- Wear of the rubber seal;
- The valve is fully seated in the closed or open position.
But the Renault Logan thermostat is characterized by another problem, which is rarely found on other cars; we are talking about ill-conceived design solutions introduced into the product, which lead to frequent leaks of coolant.
The fact is that the Renault Logan thermostat housing is made of glass-filled plastic, the ears have holes for bolts and the distances between them are large.
This leads to the fact that, despite the fact that the body of the product itself is firmly screwed to a solid aluminum plate, it bends under the influence of high temperatures (bends the ears). As a result, instead of a solid plane, a hole forms on the Renault Logan thermostat housing.
As a result, the tightness of the connection between the cover and the seat is broken and this leads to a leak of coolant. And even the sealing rubber that fits the valve itself does not save the situation.
Also, there have been cases when, as a result of the weakening of the valve spring, which occurs over time, the valve opens earlier, when the antifreeze temperature is lower than necessary, as a result, coolant that has not yet been warmed up begins to circulate in a large circle.
Therefore, replacement can be carried out as an entire element assembly, or only its valve, body (which was damaged by high temperatures), or only the rubber seal.
But you can do without replacing the housing; for this you will need a sealant, provided that the bend on it is not strong. But more on that later.
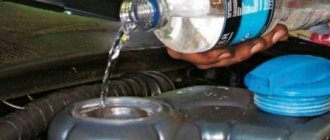
Antifreeze replacement process
- We relieve pressure in the cooling system by opening the expansion tank.
- We drain the old antifreeze. To do this, unscrew the drain valve on the radiator and liquid begins to flow out. Don't forget to substitute the container.
- A variety of methods can be used to speed up the process. You can blow into the tank, which will create pressure and the liquid will flow faster. Or be smarter and use a vacuum cleaner.
- Now it’s time to move on to replacing the thermostat, where the process of replacing antifreeze will end.
Pre-check the thermostat on the Niva Chevrolet
Of course, no one will remove the thermostat for fun. Just for the preliminary check, we will carry out several simple operations in order to make sure that it is not working or, conversely, that it is working properly.
To do this, start the cold engine and touch the lower radiator pipe. It should be cold.
This means that the thermostat is closed and the coolant flows in a small circle : expansion tank, pump, thermostat valve, cylinder head and cylinder block, throttle heating system (in an injection engine), heater radiator.
As soon as the engine warms up to operating temperature (82-85 degrees), as can be judged by the temperature gauge on the dashboard, the lower radiator hose should begin to warm up .
This indicates that the thermostat valve has opened and antifreeze flows in a large circle through the radiator of the cooling system. Fast and easy. If the hose begins to warm up when the engine is cold or does not begin to warm up when the engine is hot, the thermostat must be checked in more detail or replaced. Let's start with replacement.
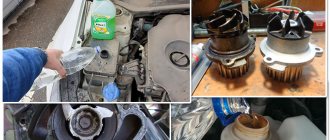
Thermostat replacement process
According to the previous chapter of the article, it became clear that the coolant had already been drained. Now you need to move on to replacing the thermostat itself.
- Preparatory process. We dismantle the additional air tube, remove the air filter cover and move it all to the side.
- Disconnect the wires from the sensors: thermostat and temperature.
- We dismantle all the pipes going to the thermostat.
- Now you can unscrew the thermostat itself.
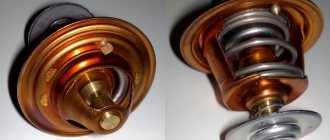
- Compare the old part and the new one.
- We put everything back together in reverse order.
- Fill with antifreeze. We start the car. After letting it run for a while, turn it off and add coolant again.
- We check for leaks from the pipes.
Which thermostat is better to install?
More details in the material: Choosing which thermostat is better to install on a Chevrolet Niva.
The price of any thermostat existing on the market is quite low, within 500 rubles. This is a real gift, since a non-native Volkswagen one costs from 1,700 rubles.
Since 2006, on the GM-AvtoVAZ assembly line, Chinese-made thermostats with article number 21230-1306010-05-0 have been installed. They are manufactured at the DFT factory in China. Trade name ThomsonAuto.
In addition to Thomson, there are Luzar, Pramo and MetalInkar with a plastic case, these are the cheapest, but there are also thermostats from the same company in a metal case.
Judging by user reviews, the native Chinese thermostat, which comes in a branded box, suits the vast majority, and the price in the range of 500-600 rubles is not particularly bad. I wish everyone a stable operating temperature and successful replacement of the thermostat!
Where to buy a thermostat and antifreeze
You can buy a thermostat and antifreeze in several places:
- car markets. A colossal selection of parts and liquids, where you can find everything your heart desires. Only the monetary plan is expensive, since car market resellers make money even on cheap spare parts;
- dealer store. A little market is better, but still they also add a percentage to the cost;
- shops selling analogues. Here, you can choose a good option a little more expensive than Internet prices, and sometimes cheaper, it all depends on the store;
- online stores. A large selection of products and low prices attract more and more customers, and delivery to any corner of the country is another plus for them.
How to change a thermostat
Very often, even the most reliable car parts fail. If the issue does not require special efforts and repairs, you should not go to a car service center. You just need to be patient and have some free time. Let's see how to change the thermostat yourself if it fails.
1
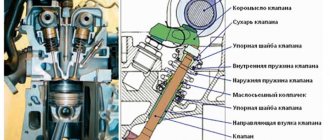
First you need to figure out what this part is and what it is needed for. So, the thermostat is the most important component of the cooling device. It creates the necessary conditions for the “circulation effect” of the coolant in a circle. Its main purpose is to prevent overheating of important car parts, electrical appliances, air conditioning devices, etc. The operating principle is simple: when heated, this element opens and works for the purpose of cooling; at the right temperature it closes, allowing the liquid to move in a gyre.
Its main elements:
- Lid;
- Frame;
- Main valve;
- Branch pipes (3 pieces): for launching liquid, moving it and supplying it to the required compartments.
2
If your car is boiling, this may indicate that the thermostat is not working. As a rule, this can be expressed in the following:
- The small circle is not completely closed (as a result, the engine overheats);
- The small circle is not fully open (insufficient engine heating).
The optimal temperature of the coolant (coolant) at full power of the working process can reach 85-90 degrees. If you encounter the first problem, namely overheating, you need to stop the car and go to your house, garage, or car service center. Untimely assistance in this case threatens engine breakdown, and this is already a big problem. In such a situation, your sensors on the car panel will “remind” themselves.
3
In order to replace the thermostat, you cannot do without:
- Screwdrivers (phillips);
- Wrench (12 or 13);
- Coolant;
- Canisters (or other container) 10 liters;
- Sealant;
- Gloves and a couple of unnecessary rags.
Take a responsible approach to purchasing a new thermostat: purchase only from a trusted place, follow the instructions, taking into account the make and year of manufacture of the car. If it is difficult for you to determine the right model, contact the specialists of the auto store. It is not recommended to purchase a thermostat “by hand”.
4
Carefully inspect the place of work: decide on the location of the thermostat. As a rule, it is located in the area where the pipe (lower or upper) borders the engine. First, you will need to drain the coolant: unscrew the plugs and pour it into a prepared canister with a capacity of at least 10 liters. Don't forget to screw the plugs in the wrong place. Using a wrench or screwdriver, unscrew the clamps that hold the thermostat and its pipes. Then remove the pipes (top, middle and bottom). Be extremely careful when working, as residual fluid when the engine has not cooled down can cause burns. It is advisable to use special gloves.
5
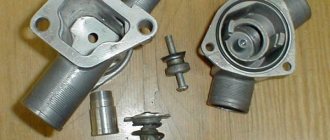
So, proceed to removing the thermostat, first remembering its location. Most often it is securely attached to the engine, so you should unscrew the bolts and remove it. Don't forget to pay attention to the gasket, which is located between the engine housing and the thermostat base - it should be replaced with a new one.
6
The new part that you are going to install should first be coated with sealant. This is especially true for the area of contact with the pipes and gasket. Clean the mounting area from dirt and dust. Bolt the new thermostat to the engine in exactly the same position as it was previously. Then apply a clamp and secure it to the cooling system pipes. And the final stage is filling with new coolant. It must be poured in several stages until the system is completely filled. Your new thermostat is now ready to go!
Be sure to check several times how the thermostat will work after installation so you don't have any "surprises" at the wrong time. To do this, you need to start the engine and inspect it for leaks. If problems arise, you should remove the thermostat and check its functionality.
Diagnostics and replacement of temperature sensors
Washing machine thermostat replacement tool:
- Phillips screwdriver;
- flat screwdriver;
- 10 mm socket wrench;
- tester;
- waterproof glue or silicone.
To replace the thermostat in your washing machine, you need to find out where the thermostat is installed. On most models it is located under the back cover along with the heating element (at the bottom of the drum). But, for example, on Bosh and Siemens machines the thermostat is located behind the front panel, and to dismantle it you need to remove the top and front panels. The installation location of the temperature sensor on your machine can be clarified in documents or on the Internet.
Replacing a gas-filled thermostat
Sequence of operations:
- disconnect the machine from the network;
- drain the water from the tank;
- unscrew the screws and remove the cover;
- loosen the heating element fastening with a key;
- take a photo of the connection diagram before removing the power wires from the thermostat;
- carefully remove the thermostat with a flat screwdriver, being careful not to damage the rubber seal;
- remove the temperature regulator from the control panel;
- inspect the installation site and, if necessary, treat with sealant or glue;
- Install the new thermostat in reverse order;
- turn on the machine and check the operation of the thermostat in heating mode up to 40 degrees.
Replacing a bimetallic thermostat
Subsequence:
- disconnect the machine from the network;
- drain the water from the tank;
- remove the cover;
- loosen the heating element fastening with a key;
- take a photo of the connection diagram before removing the power wires from the thermostat;
- remove the thermostat;
- measure resistance with a tester at room temperature;
- Place the thermostat in hot water and measure the resistance again. If the measurement result does not change or changes slightly, the sensor should be replaced;
- installing the thermostat is done in the reverse order;
- turn on the machine and check the operation of the thermostat in heating mode up to 40 degrees.
Replacing the thermistor
Subsequence:
- disconnect the machine from the network;
- drain the water from the tank;
- remove the cover;
- loosen the heating element fastening with a key;
- take a photo of the connection diagram before removing the power wires from the thermistor;
- remove the thermistor, measure the resistance with a tester and compare with the nominal value for a given machine model;
- install and connect the new thermistor in the reverse order;
- turn on the machine, check the operation of the thermistor in heating mode up to 40 degrees.
Attention! All work should be carried out only after disconnecting the machine from the network!