What is a coolant temperature sensor
All sensors are used to monitor the operation of certain components and parts. If the operation functions are disrupted, the sensor indicates that the operation of a particular device is unstable. A car has many sensors in its design.
The internal combustion engine needs stable operation. So, the cooling fluid temperature sensor provides control over the stability of the internal combustion engine. The car’s engine heats up faster thanks to this sensor and is slower to reach high temperatures that lead to boiling of the coolant in the system.
DTOZH is not a sensor that shows the temperature of the fluid in the block and radiator system. Some people have the wrong idea about this.
The coolant temperature sensor transmits fluid temperature data (antifreeze, antifreeze or water) to the electronic control unit (ECU). And the temperature of the liquid that the driver sees on the dashboard is transmitted by another sensor, also a temperature one.
If the sensor that displays the temperature value for the driver breaks down, then this will not bring anything serious to the system. And, if the sensor that transmits the temperature value to the computer fails, then the control unit will incorrectly regulate the operation of the internal combustion engine.
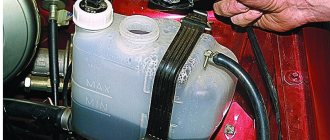
Information for novice motorists: the cooling system (radiator, engine cooling system jacket) must contain a liquid (preferably one that has a high boiling point) that removes heat from the engine.
In addition to removing heat and cooling the engine, the circulating coolant cools the engine oil, which, when boiling, loses its properties.
The coolant also cools the air that is in the turbocharging system (turbine), cools the exhaust gases and the gearbox oil. The sensor has the function of heating air in ventilation and heating systems.
The coolant temperature sensor is a small link in the aggregate design of the car system, but it is very important. The stability of the motor depends on its correct operation and serviceability in general.
What symptoms indicate problems with the sensor?
During long-term operation of the car, obvious and indirect signs may be observed indicating problems with the temperature sensor or its electrical circuit. The first ones directly indicate the need to check the functionality of the device:
- The engine heating indicator on the dashboard stopped working;
- the cooling fan stopped turning on, although the engine water jacket had already warmed up to 100 °C;
- antifreeze leakage from under the part body;
- The fan starts at random, including when the engine is cold.
We recommend: Design and principle of operation of the parking brake
If your car exhibits the listed signs of a malfunction of the coolant temperature sensor, then feel free to proceed to diagnosing it and fixing the problem, which will be discussed below. Indirect symptoms may indicate a breakdown of the meter or other elements of the cooling system or power unit. Here are the most common ones:
- Cold starting of the engine is difficult. The car starts, but immediately stalls, you need to make several repeated attempts. The cause may be a thermocouple, throttle position sensor, insufficient compression or ignition problems.
- Unstable operation at idle. In addition to the temperature meter, it is affected by the serviceability of the spark plugs, mass flow sensor, injectors and many other factors.
- The temperature is within normal limits, but the coolant begins to boil. If the thermostat fails or the level of antifreeze in the jacket decreases, then the readings of the device may differ from the real state of affairs.
The serviceability of an electronic temperature meter can be checked at home. If indirect symptoms of a malfunction are observed, the test will help to identify them or exclude them from a number of parts that are “under suspicion.” If you successfully check the problem, you will have to look elsewhere or contact the nearest auto repair shop.
How does the coolant temperature sensor work?
As mentioned above, the coolant temperature sensor (sometimes simply called the engine temperature sensor) is a thermistor - a resistor that changes its resistance depending on changes in temperature, in particular the coolant of the engine cooling system. The corresponding resistance value and its change are recorded by the electronic engine control unit (abbreviated as ECU), on the basis of which it issues the appropriate commands.
Based on information from the coolant temperature sensor, the ECU, when starting, sets the required number of steps of the idle air control (IAC), thereby regulating the fuel supply. The thermistor mentioned has a so-called “negative temperature coefficient”. This means that at cold temperatures its electrical resistance is of great importance, and when the sensing element heats up, this resistance drops.
The sensor is controlled by supplying it with an electrical signal with a constant voltage of 5 Volts from the electronic control unit through a resistor with a constant resistance, which is located inside the control controller. Accordingly, the control unit calculates the coolant temperature by the voltage drop across the sensor, which, as mentioned above, has a variable resistance. On a cold engine the voltage drop will be greater, and accordingly on a warm engine it will be less. And on a cold engine, the voltage on the sensor will be higher, and on a hot engine, lower.
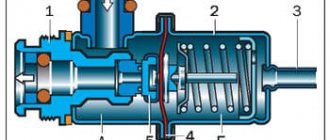
The device, how it works
WE have already explained to you what these sensors are needed for, but I would like to note that the cooling system of internal combustion engines cannot do without proper adjustment and control. It is this “small” but very smart device that gives us, as it were, “control” over the operation of the power unit. But what does it itself consist of?
For many technicians, this is a very simple device, but for “beginner” drivers it may seem complicated. In 90% of cases, it is based on a semiconductor element, usually a resistor or thermistor. These two sensors can change electrical resistance depending on the coolant temperature.
In simple words, if the “coolant” temperature is low, then the resistance on such elements increases. If the liquid has warmed up - then, as you guessed, it goes down - the data goes to the control unit, and is analyzed there; by the way, it is given to you in the temperature indicator on the dashboard. These semiconductor elements are tuned very precisely, so any change in temperature is immediately recorded.
The cooling sensor must always be in liquid in order to provide correct information. If it is not immersed in a liquid medium, it means it will not work correctly! Manufacturers understand this, and therefore install them only in those places that will always (even during depressurization) be “next to” the coolant.
As a rule, this is the thermostat housing, in the cylinder block, less often in the cylinder head. To be fair, it is worth noting that on some foreign cars in the premium segment there are two sensors at once, mounted in different places. For example - one on the thermostat, the other on the block head. More often they perform different tasks, for example, one transmits the temperature of the fluid to the ECU unit and to the car panel, the other can “manage” the function of turning on the cooling fan.
If we look at the relationship between fuel consumption and temperature, we can note that if the engine is cold, then an enriched fuel mixture is supplied, but if the engine is warmed up, then the concentration decreases.
A breakdown of the temperature sensor is regarded by the engine as the “lowest” indicators, similar to a cold engine, so an enriched fuel mixture will be constantly supplied, which will negatively affect fuel consumption and the environment. The catalyst may also be damaged.
In turn, short circuits can cause the sensor to transmit incorrect information that “the engine is supposedly warm.” Then a lean mixture will be supplied, it will be difficult to start the engine, it will not work stably, and there will also be poor response to the gas pedal.
To be honest, sensor failures are not that common due to its simple design. Often, from long-term use, the wires that go to it begin to “stick” or “oxidize.” This can also cause incorrect data, similar to a breakdown.
Don’t forget about the specific designs of thermostats; some take a very long time to warm up, which is why the sensor can record a low temperature for quite a long time. Some German turbocharged engines are guilty of this.
Where is the coolant temperature sensor located?
In different brands and models of cars, the temperature sensor is located in different places. But, usually it is installed in the cylinder head (cylinder head), not far from the thermostat or directly on it. It is also imperative that the sensor is located near the outlet pipe through which antifreeze or antifreeze, or water flows back into the radiator. This is the optimal location. In this case, the sensor transmits accurate information to the ECU.
In order to check the coolant temperature sensor, you need to know where it is located. Naturally, this information will vary for cars of different brands and models. However, there are several typical signs by which you can find the place where the sensor is directly attached. So, in most cases it is located on the exhaust pipe of the cylinder head. Structurally, it has a metal thread, with which it is screwed into the corresponding hole. The main requirement in this case is to ensure direct contact between its sensitive element and the coolant. It is this contact that ensures the accuracy of the sensor readings.
Please note that some vehicles may be designed to have two temperature sensors installed. In this case, the first of them records the temperature of the coolant at the outlet of the engine (cylinders), and the second - at the outlet of the radiator. This approach makes it possible to more accurately monitor the condition of both the engine as a whole and its cooling system in particular. However, two sensors are usually installed on powerful and/or expensive cars, where this parameter is critically important, and the ECU contains special programs for engine operation. You can find additional information about the design of a particular car in the corresponding manual or technical documentation.
Where is DTOZH located?
In different brands and models of cars, the temperature sensor is located in different places. But, usually it is installed in the cylinder head (cylinder head), not far from the thermostat or directly on it. It is also imperative that the sensor is located near the outlet pipe through which antifreeze or antifreeze, or water flows back into the radiator. This is the optimal location. In this case, the sensor transmits accurate information to the ECU.
Types of coolant temperature sensors
Classification of DTOZH by change in resistance:
- Negative temperature coefficient sensor. The operating principle is that the internal resistance drops as the temperature increases.
- Sensor with positive temperature coefficient. The operating principle is the opposite of that of the first type of sensor, that is, the internal resistance increases with increasing temperature.
The most popular in the automotive industry is the first type of DTOZH. It happens that there are 2 sensors installed in the car, the main one and the additional one. The main sensor transmits information to the electronic control unit, and the additional sensor turns on the fan.
Purpose of the device
DTOZH should not be confused with an antifreeze level controller. If the first is intended to detect the temperature of the power unit, then the second is used to control the volume of consumables - refrigerant. Based on the DTOZH readings, the control unit detects temperature changes and transmits data to the on-board computer about the state in which the engine is operating. Using the controller, engine warm-up, overheating, and the optimal temperature of the operating internal combustion engine are determined. Pulses transmitted to the control module determine the functionality of the internal combustion engine control system as a whole.
We recommend: How and which one is better to install a hood lock?
The engine temperature determines the following nuances:
- fuel consumption per 100 km;
- volume and quality of gases;
- ignition of the air-fuel mixture;
- optimal operation of the gearbox.
All these factors are controlled by a control device, which, based on the information received, determines the optimal operating mode of the engine. Therefore, the performance of the temperature sensor is important for the vehicle. If the device is faulty and sends incorrect pulses to the control module, this can lead to problems.
How does DTOZh affect the operation of the internal combustion engine?
Based on the parameters supplied to the control device, the module performs the following functions:
- Enrichment of the air-fuel mixture or its depletion. If the controller detects that the temperature is too low, it will begin to increase the duration of the signal sent to the injectors, which helps to enrich the fuel mixture. In accordance with the normalization of the temperature regime, the fuel is gradually depleted, which prevents possible excessive consumption of gasoline and reduces the volume of exhaust gases. If the sensor breaks down, it can regularly lower the temperature in the engine, which will lead to fuel contamination and increased consumption.
- The control unit sets the ignition. It can be early or late. If the temperature increases, the control module adjusts the ignition timing to reduce exhaust toxicity.
- Thanks to DTOZH, proper recirculation of gases is performed during warming up. The recirculation valve closes tightly when the power unit warms up. If the car’s engine is still cold, then recirculation will cause fluctuations in idle speed and random engine stops.
- With the help of DTOZH, the control unit purges the filtration system, which traps fuel vapors. To achieve better machine controllability, the carbon filter element is not purged until the engine is completely warmed up.
- Locking of the gearbox torque converter when the internal combustion engine warms up. The control module should not limit the operation of the device until the machine warms up.
- The ECU controls the operation of the unit's cooling fan. Based on the temperature controller readings, the module activates and deactivates the ventilation device to correctly select the temperature of the unit. If the DTOZ gives incorrect impulses, there is a possibility of the motor overheating.
Signs of failure of the coolant sensor
A number of signs will indicate the need to check the coolant temperature sensor. However, it is worth noting that the situations listed below may be signs of other breakdowns in the car’s engine, therefore, to obtain an accurate result, it is necessary to perform additional diagnostics. So, signs of a faulty coolant temperature sensor include:
- Activation of the warning lamp on the Check Engine panel. However, it can also be activated during other failures, so it is necessary to perform an additional scan of the error code.
- Increased fuel consumption . This is due to the fact that incorrect information is supplied to the electronic control unit, and accordingly, it is also unable to determine exactly how much fuel is needed not only to create an optimal air-fuel mixture, but also to maintain the engine temperature in the normal (non-emergency) range.
- Unstable motor operation . In particular, its unstable operation at idle, difficulty starting (especially in the cold season), spontaneous stopping at low speeds.
- The engine stalls when hot . That is, it may suddenly stall when the critical coolant temperature is reached. Moreover, this does not depend on what kind of coolant was poured into the system (in particular, factory-made antifreeze or ordinary water).
- Problems with the cooling fan on the radiator . This can manifest itself in different ways. In some cases, the fan does not turn on at all, in others it does not turn on in emergency modes, in others it does not turn off even when the engine cools down. When the coolant temperature sensor is disconnected, the electronic control unit perceives this as an open circuit in the sensor and forcibly turns on the fan. In any case, to obtain an accurate picture, it is necessary to perform additional diagnostics of the sensor and/or thermostat.
Due to the fact that this sensor has a fairly simple device and most often a non-separable housing, if it fails it must be replaced. This applies to almost all machines on which this device is installed.
DTOZH malfunctions and their symptoms
It is generally accepted that DTOZH is quite reliable due to its simple design. However, sooner or later, almost every component of the car is subject to wear and tear. In the case of DTOZH, there is a violation of the calibration. Such a violation leads to an unplanned change in resistance and incorrect operation of the ECU.
The most obvious sign of failure of the DTOZh is the failure of the fan to turn on when the temperature rises above the set values.
This indicator is not considered reliable if the car has both primary and secondary sensors. In this case, the malfunction will be more accurately indicated by oxidation of the wiring or failure of the additional sensor. The main signs of a DTOZ malfunction are as follows:
- a drop in engine speed or spontaneous stopping at idle;
- longer vehicle warm-up time;
- increased frequency of the engine going beyond the optimal temperature range during operation;
- increased fuel consumption;
- decreased driver control over the car;
- smoke from the exhaust pipe takes on a black tint;
- violation of engine stability.
We recommend: Vehicle design. Everything about the car
In addition, detonation knocking in the engine is sometimes possible. Some older car models have a special controller. When the needle of this controller goes beyond the critical zone, the vehicle must be stopped immediately. In this case, sometimes there is also a malfunction of the DTOZH. And in more modern models, the on-board computer notifies drivers of engine overheating. But such a message does not always indicate a malfunction of the sensor. This often occurs due to wiring breakage and oxidation.
Let's take a closer look at the operating principle and types of controllers.
Magnetic
Such controllers consist of coils located on the sides of a steel armature. The arrow of the controller located on the instrument panel in the cabin is connected to the latter. The first coil is connected to the vehicle's on-board network, and the second to a cable with varying resistance. This parameter changes according to the temperature values in the engine. The voltage passing through the coils creates a magnetic field that controls the armature. The element displacement parameter is determined by the field difference depending on the current value.
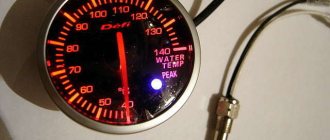
User Irimiya Evgeniy showed in his video how unstable the DTOZh is.
Bimetallic
The operating principle of bimetallic controllers is based on the expansion of elements during heating. The device is equipped with a rod that changes size as the temperature of the internal combustion engine increases. The stripes in the coil rotate the arrow on the control panel in the car's interior in accordance with the current value.
Modern antifreeze temperature sensors can use two types of sensors:
- semiconductor;
- bimetallic.
The latter are practically not used today. The strip in such controllers moves to the coil and opens the contacts, helping to change the amount of current flowing to the dashboard. And semiconductors are used everywhere. The control unit supplies a signal to the device thermistor with a negative coefficient through a resistive element with constant resistance. As the temperature increases, the resistance in this circuit drops. Accordingly, the voltage level decreases. The control module detects a decrease in this parameter and determines the temperature of the consumable material, displaying it on the control panel with an indicator.
Capillary
It is considered the oldest and irrelevant type of sensor for use today. The arrow on the device is directly connected to the device. The controller is made in a housing in the form of a container with consumables, which has a low boiling point. The reservoir is connected to a pointer as well as a steel tube. When the power unit warms up, the refrigerant in the container begins to boil and evaporate, resulting in an increase in pressure in the flask. This parameter is sent to the pointer where the Bourdon tube is located. This element begins to straighten as a result of pressure and moves the arrow on the control panel.
This type of controller is almost never used for several reasons:
- the measuring element itself runs through the entire engine compartment, connecting to the tube on one side and to the control panel on the other;
- The capillary tube is quite thin and is quickly damaged during operation.
Causes of failure of the coolant temperature sensor
Structurally, the coolant sensor is quite simple, and accordingly, it rarely fails. Usually this happens simply due to its old age or mechanical damage. For example, corrosion of contacts and metal parts of the case may occur due to the fact that instead of antifreeze or antifreeze, ordinary water was poured into the cooling system (and even more so if this water is “hard”, that is, with a high content of metal salts). Also, the reasons for the failure of this device may be:
- Hull damage . This can be expressed in various aspects. Often, leaks of coolant are visible, which flows from the threads of the sensor or its housing. Also, the electrical contacts and/or the thermistor itself may be damaged, which will produce an incorrect signal.
- Oxidation of contacts . Sometimes situations arise when, under the influence of fumes or simply from old age, the contacts on the sensor oxidize, so the electrical signal does not pass through them.
- Damage to the chip . In some cases, due to mechanical damage, the so-called “chip” may fail, that is, a group of contacts that is connected to the coolant temperature sensor. Simply put, the wires at the base of the connector fray. According to statistics from reviews found on the Internet, this is one of the most common malfunctions that occurs with the sensor and the corresponding system.
- Lost electrical contact inside the sensor . In this case, unfortunately, repair is hardly possible, since usually its body is sealed and does not allow access to the insides of the DTOZH. Accordingly, in this case the sensor only needs to be replaced with a new one.
- Violation of wire insulation . In particular, we are talking about the power and signal wires that go to the sensor from the electronic control unit and back. The insulation can be damaged due to mechanical stress, abrasion, or even simply from old age, when it “peeles” in pieces. This is especially true for those machines that are operated in conditions of high humidity and sudden changes in ambient temperature.
If it is possible to simply clean the body/threads/contacts of the sensor, then to restore its normal operation it is enough to carry out the appropriate measures. However, if the housing is damaged and/or the internal thermistor is damaged, then repair is hardly possible. In this case, you just need to replace the sensor with a new one. Its price is low, and the replacement process is simple and will not take much time and effort even for novice car owners.
How to check the functionality of the coolant sensor
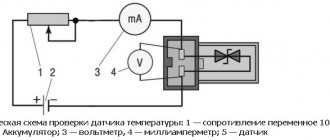
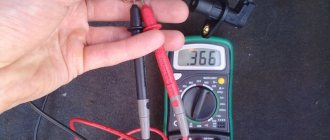
There are two main methods for checking the health of the coolant temperature sensor. The first - with its dismantling, the second - directly on the seat in the car engine. In turn, the first method can also be divided into two more. The first is with the use of a thermometer, the second is without it. Removing the sensor can usually be done using an ordinary wrench of a suitable size, after first disconnecting the contact terminals from it. But before dismantling the sensor, you need to make sure that power is supplied to the DTOZH. Typically it is equal to 5 Volts DC voltage. This can be easily found out by disconnecting its chip from the sensor, and using a multimeter set to DC voltage measurement mode (with the appropriate range) using probes to check the voltage value. If voltage is present and at the specified value, then further testing of the coolant sensor can be performed.
Checking the temperature sensor on the car
Many car enthusiasts are interested in the question of how to check the coolant temperature sensor without removing it from its seat in order to simplify the work and complete it as quickly as possible. And they do this using a multifunctional tester, measuring the resistance between its output contacts, that is, the resistance of its electrical winding.
They do a DTOZh check right on the car by disconnecting the chip from the sensor so that there is normal access to its electrical contacts (terminals). Please note that if the engine is hot, you need to work carefully so as not to burn yourself or melt the electronic multimeter and/or its probes! Next, using a multimeter switched to resistance measurement mode, you need to measure this value between its terminals. As mentioned above, on a cold engine the value will be quite high, and on a hot engine it will be lower. As an example, we provide technical information for the VAZ-2110 car , which gives a general understanding of resistance values. It is necessary to understand that for other passenger cars (using sensors of similar models) these values will be very similar, that is, they will not differ critically.
| Water temperature, °C | Resistance value, Ohm | Water temperature, °C | Resistance value, Ohm |
| +5 | 7280 | +45 | 1188 |
| +10 | 5670 | +50 | 973 |
| +15 | 4450 | +60 | 667 |
| +20 | 3520 | +70 | 467 |
| +25 | 2796 | +80 | 332 |
| +30 | 2238 | +90 | 241 |
| +40 | 1459 | +100 | 177 |
To be fair, it must be said that sensors do not break down so often, but instead there are situations when the DTOZH “lies”, that is, it produces incorrect information. Therefore, you can compare the temperature readings on the dashboard and compare them with the obtained resistance value. If the sensor still produces incorrect information, then it makes sense to dismantle it and carry out additional diagnostics using a thermometer and a water heater.
Checking with a thermometer
So, you must first remove the sensor from its seat on the car engine. This is usually not too difficult and can be done using a wrench of the appropriate size. At the same time, you can carry out preventative maintenance on its threads in the pipe, clean and lubricate it, and the sensor itself, too, if it is in good working order and the car owner will not replace it with a new one.
Next, you need to pour water into an electric kettle or other vessel, but in this case you need to use a boiler to heat the water later. Also, to work you will need an electronic multimeter operating in the mode of measuring electrical resistance. The sensitive element of the sensor must be placed in heated water, and normal access to the electrical contacts must be ensured using the probes of a multimeter. Also place a thermometer in the water (preferably an electronic one, as it provides higher measurement accuracy and ease of obtaining relevant information about the water temperature).
Next, you need to step by step measure the sensor resistance in accordance with the temperature increase. It is advisable to do this at intervals of 5°C (for example, +15°C, +20°C, +25°C, and so on). As a result, you will have an array of data that can be formatted into a table. This data must be compared with the data available in the technical documentation of a particular car or, in extreme cases, with the table given above.
Naturally, during the measurement process some non-critical errors are allowed, which will depend, firstly, on the conditions of the experiment, and secondly, on the characteristics of a particular sensor, since often even for sensors of the same model, the resistance will differ slightly under the same measurement conditions.
Checking without a thermometer
This method of checking the coolant temperature sensor with a multimeter is similar to the previous one, but you do not need to use a thermometer to carry it out. So, it is necessary to bring water to a boil and place the sensitive element of the sensor in it. Next, similarly, it is necessary to measure the resistance value at its output contacts. As indicated in the table above, the corresponding value should be approximately 177 ohms. However, it is necessary to take into account the error and assume that the water temperature at the time of measurement may be a couple of degrees lower, and therefore the resistance is slightly higher.
How to check the temperature sensor on a VAZ 2110 In general, checking the coolant temperature sensor on a VAZ 2110, 2112, Priora, Kalina and other similar Ladas is identical to the processes described in the previous sections. As a rule, the mentioned VAZs use sensors with article numbers 23.3828 and 405213, or their equivalent - 423.3828. To check this sensor, it will be useful for car owners to know its resistance at different temperatures:
- resistance at 15°C - 4033...4838 Ohm;
- resistance at 128°C - 76.7...85.1 Ohm;
- voltage output at 15°C - 92.1...93.3%;
- voltage output at 128°C - 18.1...19.7%.
As for dismantling the sensor for its further inspection/replacement, this activity must begin by draining the coolant a little. Moreover, this must be done when the engine is cold so as not to get burned or damage tools/engine parts. To dismantle you will need a 19mm wrench. With its help, you need to unscrew the sensor and remove it along with the sealing ring. Also, do not forget to change the antifreeze in the engine cooling system on time!
We measure the resistance of the sensor in steps of 10 degrees Celsius, starting from the boiling of water in a vessel with DTOZH and until it cools to room temperature. We compare the results with tabular data.
Overview of types of DTOZH: design and principle of operation
Let's take a closer look at the operating principle and types of controllers.
Magnetic
Such controllers consist of coils located on the sides of a steel armature. The arrow of the controller located on the instrument panel in the cabin is connected to the latter. The first coil is connected to the vehicle's on-board network, and the second to a cable with varying resistance. This parameter changes according to the temperature values in the engine. The voltage passing through the coils creates a magnetic field that controls the armature. The element displacement parameter is determined by the field difference depending on the current value.
User Irimiya Evgeniy showed in his video how unstable the DTOZh is.
Bimetallic
The operating principle of bimetallic controllers is based on the expansion of elements during heating. The device is equipped with a rod that changes size as the temperature of the internal combustion engine increases. The stripes in the coil rotate the arrow on the control panel in the car's interior in accordance with the current value.
Modern antifreeze temperature sensors can use two types of sensors:
- semiconductor;
- bimetallic.
The latter are practically not used today. The strip in such controllers moves to the coil and opens the contacts, helping to change the amount of current flowing to the dashboard. And semiconductors are used everywhere. The control unit supplies a signal to the device thermistor with a negative coefficient through a resistive element with constant resistance. As the temperature increases, the resistance in this circuit drops. Accordingly, the voltage level decreases. The control module detects a decrease in this parameter and determines the temperature of the consumable material, displaying it on the control panel with an indicator.
Capillary
It is considered the oldest and irrelevant type of sensor for use today. The arrow on the device is directly connected to the device. The controller is made in a housing in the form of a container with consumables, which has a low boiling point. The reservoir is connected to a pointer as well as a steel tube. When the power unit warms up, the refrigerant in the container begins to boil and evaporate, resulting in an increase in pressure in the flask. This parameter is sent to the pointer where the Bourdon tube is located. This element begins to straighten as a result of pressure and moves the arrow on the control panel.
This type of controller is almost never used for several reasons:
- the measuring element itself runs through the entire engine compartment, connecting to the tube on one side and to the control panel on the other;
- The capillary tube is quite thin and is quickly damaged during operation.
Photo gallery “Varieties of DTOZH”
Diagrams of different types of sensors are shown in the photo.
Magnetic type DTOZH
Bimetallic sensor
Capillary sensor circuit
How to replace a temperature sensor
This can be done with your own hands; it does not require much experience. The order is:
- Drain the coolant.
- Remove the old sensor. It screws into the special. threaded hole. We unscrew it.
- Screw in the new sensor. It is recommended to lubricate the seat with sealant before screwing it in.
Chevrolet coolant temperature sensor
The coolant temperature indicator sensor is screwed directly into the hole in the cylinder head. It can be seen if you look at the power plant from the left side.
The DTOZH is located in the coolant outlet line. It is inserted into the front pipe of the water jacket.
To see where the outside air temperature sensor is located, you need to look under the front bumper. The meter is located behind the lower right corner of the license plate. Without removing the bumper, the sensor can be seen through the hole located near it.
The article number of the Chevrolet coolant temperature sensor is 96182634.
Chevrolet Niva temperature sensors, although they are not consumables that require periodic replacement, still have a very low price. This is due to the simplicity of the design and the absence of the use of expensive materials or technologies in manufacturing. More detailed prices for meters are given in the table below.
Table - Cost of Chevrolet Niva temperature sensors
| Sensor | Price |
| DUTOZH | 250-350 |
| DTOZH | 230-300 |
| Outdoor temperature sensor | 170-340 |
Self-replacement of the Chevrolet temperature indicator sensor
Replacing the coolant temperature gauge sensor on a Chevrolet Niva with your own hands is presented step by step below.
- Disconnect the on-board network.
- Remove the protective cover from the meter.
- Disconnect the terminal from which the sensor wire comes.
- Loosen the meter. To do this, you will need a key “21”.
- Unscrew the loose gauge by hand. Remove the sensor.
- Install the new meter in the reverse order of removal.
Do-it-yourself replacement of the coolant temperature sensor
To replace the coolant temperature sensor, tools are required, which are presented in the table below.
Table - Tools and materials required to replace the coolant temperature sensor
| Name | Note |
| open-end wrench | "on 10" |
| Wrench | “at 19” |
| Head | “at 13” |
| Vorotok | With extension and ratchet |
| Screwdriver | Medium size, flat blade |
| Rags | For cleaning dirt without leaving lint behind |
In order to replace the DTOZH on a Chevrolet Niva, it is recommended to use the step-by-step algorithm of the instructions below.
- Work should be carried out with a completely cold engine. Therefore, before proceeding with the replacement, if the vehicle is just after a trip, then it is necessary to wait a time interval sufficient for the power unit to cool down.
- Secure the vehicle using the parking brake.
- Open the hood.
- Disconnect the vehicle's power supply. To do this, you need to remove the negative terminal from the battery.
- For easy access to the temperature meter, it is recommended to remove the decorative protective casing of the power unit and the air filter housing.
- By pressing the clamps, remove the terminal from the coolant temperature sensor.
- Unscrew the meter.
- Remove the DTOZH.
- Install a new sensor.
- Reassemble everything in reverse order.
Coolant temperature sensor 2114
If the coolant temperature sensor on a VAZ 2114 -2115 fails, the following symptoms of a malfunction may occur:
Failure of the cooling fan to operate due to incorrect data Difficulty starting the engine, especially on frosty days You can replace this part without any problems yourself and it is enough to have only one 19mm wrench on hand, although it will be most convenient to use a deep socket and a ratchet.
Where is the coolant temperature sensor located on the VAZ 2114
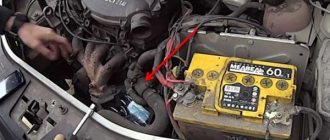
The location of this part will be presented clearly in the photograph below, but in a nutshell, it is located in close proximity to the thermostat and cylinder head. To carry out the process as quickly as possible and without unnecessary problems, it is best to move the air filter housing to the sides:
- First, disconnect the power plug from the sensor, as shown in the photo below.
- Be careful, as the plug has a plastic retainer that will first need to be slightly bent.
- If the engine has been stopped recently, you need to wait until it cools down. Then there are two ways to replace the sensor:
- I chose the second method for myself, since it is the simplest and fastest. We unscrew everything using a deep head
- And closing the hole with your finger, as mentioned above, we immediately install the new one in place.
- The price of a new sensor is not very expensive and its cost is about 200 rubles, while for an imported one you will have to pay about 500 rubles. The part looks like this: