Arrow fletching
The fletching of an arrow can consist of two, three, four or even six feathers, but the standard and most common number is three. This number is optimal for quickly stabilizing the arrow in flight. For an arrow, you can use only the main flight feathers; on one wing their number does not exceed 10 pieces.
For one arrow, feathers from only one wing, left or right, are used, because all feathers must be bent in the same direction. For plumage, it is better to use simple white goose feathers and it is better only from the inner part of the feather - the wen, which is always located overlapping with another feather. The width of the wen does not exceed 1.5-2 cm, the length depends on the size of the feather itself.
Cutting an arrow feather
Divide all the feathers for the arrow into two parts - from the right and left wings. First, cut off the base of the barrel, then apply the template to the feather, cut off the end of the feather and the feather itself. At both ends, leave mortgages for winding, no more than 5-6 mm long. The barrel of the pen always has a groove on the inside, along which you divide the pen into two parts. To do this, you need to place its front (convex) part on a flat, hard surface and carefully cut it in two steps: from the center to the base, then from the center to the tail.
Using scissors or a knife, cut the resulting shelf along the shaft, from the inside of the feather, from the base to the end. After this operation, the rod should resemble a small block. Divide the entire batch into three feathers for gluing three-feather plumage. Insert one feather into the mandrel and pinch it with the fingers of your left hand so that only the bar of the rod remains visible. Sand it with fine sandpaper until smooth along its entire length. Glue the feathers in three sectors so that there is exactly 120 degrees between them (Fig. 3).
Rice. 3. Bending of arrow feathers.
Gluing should be done at a distance of 3-4 cm from the heel, one feather at a time. If you are making an arrow with a cut for the bowstring directly at the heel, then it is better to glue the first feather perpendicular to the axis of the cut. If you are making an arrow with an insert heel, then it makes no difference in what order you glue the feathers, the main thing is that a 120-degree angle between them is maintained. Apply glue to the rod directly in the mandrel and press it to the place where the feather is glued. After 5-6 seconds, when the glue has set, carefully remove the mandrel. Apply glue to the arrow itself and press the shaft tang by hand.
If it was not possible to glue all three feathers at the same distance from the heel, you can trim them evenly with scissors. Next you need to cut the front mortgages at an angle. After the feathers are glued, proceed to winding. Having stepped back from the front edge of the feather 5-10 mm and placing the tail of the thread under the future winding, begin to apply one turn after another, additionally pressing the inserts with your finger so that the transition from the shaft to the feather is as smooth as possible. After all three embeds are wound, cut off the tail of the thread sticking out from under the winding.
Heel in arrow
The heel can be sawn into the arrow, or it can be a separate part made of bronze, bone, horn or dense wood. In the first option, the cut is made before installing the tail and tip, in the second option - after. The width of the cut should match or be less than the thickness of your bow string. Make a rough cut with a sharp file to a depth of 5-8 mm, then use a fine file to give it the correct shape.
Compliance with the angles is necessary for the tightest fit of the bowstring during maximum tension and uniform distribution of the load during lowering of the bowstring. If you mount the heel separately, then, having turned or cast it according to the drawing, you must first drill a hole for the tenon and ensure that the heel fits tightly to the boom. After mounting and winding the feathers, it is necessary to glue the shank according to the location of the feathers and wrap it with thread, which should remain after winding the feathers. The cut in the heel should be located perpendicular to any of the three feathers, or parallel, on the same axis, if there are only two feathers (Fig. 1).
Rice. 1. Arrows.
Arrow shaft
First you make the arrow shaft. The choice of material is important in determining the quality of the finished arrow and depends on the type of wood suitable for making the arrows. Spruce, ash, oak, hazel and even reed can be used as the main material. A standard arrow has a length of 75-80 cm with a diameter of 8-10 mm. The rods must be cleared of bark and dried in the sun. Pine shafts can be made from dry pine planks split into fibers and from logs split into dies. Examine them carefully.
The lines of the tree itself should go along the shaft. If the workpiece is crooked, it can be carefully straightened over steam. After straightening, you need to let the arrow dry for several days. It makes sense to stain a smooth finished shaft with a regular wood stain. This will allow the arrow to last longer. Having selected smooth and straight shafts, you can leave them with the same cross-section along the entire length or give them a spindle-shaped shape, copying medieval arrow patterns. If you choose the second option, then your arrow should gradually taper towards the tip and tail. If in the center its diameter is 10 mm, then at both ends of the arrow the diameter will need to be reduced to 6-8 mm. If you make a cutout for the bowstring directly in the heel of the arrow, then the narrowing should not affect it, but break off before reaching 1 cm from the end of the arrow.
A smooth descent can be made with a knife, planing the workpiece along the fibers from the middle to the ends, with further processing with fine sandpaper, or only with sandpaper, first coarse, then fine-grained. After this, the entire body of the arrow, with the exception of the place where the feathers will stand, must be coated with linseed oil - to protect the shaft from moisture and reduce friction during flight. If you decide that some arrows are not straight enough, you can straighten them. To do this, you need to hang a weight on the boom and leave it for several days.
Crossbow.
Winding feathers onto an arrow shaft
There are two ways to wind feathers onto an arrow shaft. The first is to use a needle to pierce the wen of the feather at the base of the shaft, and the second is to wind the thread over the feathers, pushing the fibers apart. The thread is wound from bottom to top counterclockwise. The distance between the turns should vary from 5 to 10 mm. The end of the thread wraps the rear feathers and is fixed with the same pull-out unit as when winding the tip.
Take the arrow in your left hand, and the tip of the thread in your right, then, rotating the shaft clockwise, pull the thread and cut through the feather with it, then turn the shaft and, with an upward shift of 5-10 mm, cut through the feather again. After you wrap the back tabs tightly, you need to tie a knot. To tighten the knot under the winding, you can put a piece of thread, bent in half, and start winding it.
Next, everything is the same as with a regular knot: having wound it to the slot in the heel of the arrow, insert the tip of the thread from the winding into the loop and pull it out. After this, cut off all the ends and coat with glue. The plumage is ready. The last thing to do with an arrow is to guide it. Rub the arrow with wax and, melting it over the fire, allow the wax to saturate the wood.
Sports bow.
Tracer Crossbow Arrow
Why is it needed? If you are going to shoot at night, then, firstly, a regular arrow can be easily changed, and secondly, a tracer arrow is easier to hit the target. Although it seems like a difficult task, it is not.
Take a duralumin tube and make a glass out of it. It should be twenty-one millimeters long. The outer diameter should be six and a half millimeters, and the inner diameter 5.75 millimeters.
Now you need to carve the edge to which the 4.2 millimeter spring will be attached. You can make the spring yourself, or you can take a ready-made one. It can be taken from a lighter four millimeters in diameter.
We need to make a ledge on our workpiece; it will interfere with pressing the spring into the arrow.
Now you need to get three batteries with a diameter of 5.65 millimeters. Connect them together using tape.
Now, using caprolon, you make a reflective penny. Make a hole in it for LED lighting. Its diameter should be three millimeters and its depth seven millimeters.
Using a millimeter drill, drill holes for the legs of the luminous element. One of them will be located in the center, the other slightly to the side. Make the second hole in such a way that it comes out in the same place with the diameter of the reflective element. By the way, its size is 7.8 millimeters, and the diameter of the bushing entry point is 5.8 millimeters.
It should be noted that this is not the only way such an arrow can be made. Experiment by selecting other components. The most important thing is that you understand the principle of the tracer boom.
Insert the luminous and reflective elements to the very end of the product. Bend the legs and cut off the excess pieces. The leg that is located in the center is twisted into a circle, and the second one is bent towards the reflective element at an angle of ninety degrees.
Now we need you to assemble everything into one product.
To do this, make a hole in the arrow body as long as the height of the cup. Then you pull and compact the cup until it stops, install a spring in it and insert the batteries. Now press the reflective element so that the leg of the lighting element does not reach the cup a little.
What components are needed for the arrows?
Arrow fletchings are made of rubber, natural goose feathers. Rubber tails vary in size and shape. The uniform is selected individually for sports and hunting. Regarding entertainment, any shape and size is suitable. Natural plumage resembles a goose or turkey feather, which is treated with a special paint of different colors, so that by appearance it can be said that it is artificial. Rubber is also used on all bows, crossbows, pistols and crossbows. Natural on classic and traditional bows. There are special sports spin wing feathers, they come with a screw and are glued to a special adhesive tape; gluing the feathers with a screw allows the arrow to scroll faster and stabilize longer during long-distance flights. The shanks for the arrows are made of plastic so that when hit, the arrow does not break; it can be replaced without much difficulty. They come in different shapes, they can have different sizes of traps, they are used for different types of arrows, the required diameter and size. There are even illuminated shanks that light up after the shot, so you can easily find the arrow in the dark. For bows there are two sizes L and S - this is the size of traps for certain arrows and the thickness of the string. Also, the shanks for the bow can be attached to the shaft itself using glue, fum, or put on a special aluminum pin, which is previously inserted into the arrow with hot-melt glue, this protects against the arrow getting into the arrow. For crossbows, the shanks are either flat or grooved. With a groove means the presence of a leading feather and a slot for a bowstring. Flat ones are used for night hunting; the leading feathers can be any of the three; in the dark the arrow is difficult to see and it is difficult to look for the leading feather. However, not all lock systems accept them; it is advisable to use shanks with a special groove on expensive modern American crossbows, otherwise the crossbow can be broken. There are sporting and hunting arrowheads. Sports tips are steel bullet-shaped. They come in different weights: 100 and 125, very rarely 180 grains. Hunting tips look very menacing, with a sharply sharpened end and sharp blades on the sides. There are fixed, drop-down, and shockers. Fixed ones are designed for medium-large game, opening ones for medium game, shockers for birds or small game. There are different companies, the best and most expensive are America, the cheaper and worse quality are China. There are also tips such as laser and sonic, but these are rare. Bow arrows fit 5/16 tips, crossbow arrows 11/32. There are many ways to weight an arrow other than putting sand or rocks in the arrow. There is a whole inlay of special weights inside the boom. Inserts are selected individually for each type of arrow, sometimes they are not even required. The tip is simply glued into the arrow under the sport. The insert is needed to change sporting arrowheads to hunting ones; the threads for crossbow and archery arrows are the same, the only difference is the diameter. You can glue them with the help of a cosmofen; it will be problematic to remove it from there in the future, but this has the advantage that it will not fly out when removing arrows from a specialized arrow catcher. If in the future you want to change them very often, then thermal glue is suitable; when heated, it becomes liquid and hardens after a certain time has elapsed. Regarding the customization of your arrows: beautiful, bright stickers with a pattern are used, their function is also to create a primer for gluing feathers so that they last longer. For comfortable shooting in general, there are arrow removers. They are made of dense rubber, which allows you to avoid damaging your hand when removing arrows, eliminates slipping, and allows you to avoid bending or breaking the arrows. They come in various shapes, square to fit two arrow diameters, rectangular to fit your hand. They are equipped with carbines for wearing on a quiver or on a belt. They work very well in conjunction with a special silicone-based lubricant for arrows, which makes it easy to remove the arrow, quickly and safely.
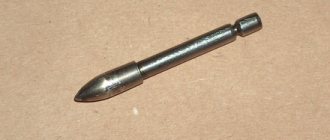
Tips and harpoons for spearfishing
A harpoon for underwater hunting is an element that is responsible for the accuracy of the shot and holding the fish after the shot. The trajectory of the harpoon also depends on the shape and design of the tip.
The harpoon consists of a rod, a tip (can be removable), a shank and a sleeve that moves and slides along the harpoon.
The basis of the harpoon is a rod or arrow, made of stainless metal (stainless steel or titanium), budget options can be made of ordinary steel and spray-coated to prevent rust. In some cases, the harpoon can be made of light metals - aluminum, duralumin or composite materials (carbon fiber with fiberglass additives).
Requirements for the harpoon material: a durable alloy, not bendable and not susceptible to corrosion, especially in sea water. When using a harpoon made of hardened steel, you get the ability to shoot accurately and have an ideal straight arrow shape. But it must be taken into account that hardened steel is susceptible to chipping and breaking, especially where there are changes in the structure of the metal (notches, threaded connections).
If you are spearfishing for large fish weighing 5-50 kg, then it is better to choose ordinary stainless steel - if the shot is unsuccessful, the rod will bend, but will not crumble.
The most common harpoon arrow rods have the following shape:
– Round cross-section of the rod
– Hollow or tubular rod
– Hexagonal harpoon rod
– Sanded on both sides
– Milled with grooves for hooking
The trigger mechanism in underwater guns may be different and the method of attaching the harpoon will be different. In pneumatic guns, the trigger mechanism locks the harpoon along a special locking groove on the harpoon. For crossbows, the body of the harpoon has grooves-notches, to which the tensioner, the cord, is attached.
Standard harpoon rods have a groove in the front part and the sear grabs the arrow precisely by it; in this case, the line is tied to the hole. Such harpoons are used in spearguns with a front hook. Any groove weakens the harpoon rod; when fired, the line, since it is fixed in the front part, directs the harpoon slightly to the side.
For beginners, it is recommended to use cylindrical arrow rods, which are equipped with a runner sleeve for attaching a line, which slides along the body of the harpoon when fired. When fired, the sleeve is fixed in the tail of the harpoon, thereby slightly stabilizing its trajectory.
For professional spearfishers, it is recommended to use milled rods that have two or more grooves. Such harpoons are expensive to manufacture, since the entire harpoon is made from a single piece of metal by milling and retains its bending and impact strength.
Harpoon rods made from tubes are now practically no longer used. They were made of hard metal - stainless steel, titanium. The cavity of the tube could be filled completely or partially with material to improve the dynamic properties of the harpoon when moving in water.
Another type of harpoon for underwater guns is made of titanium, Kevlar steel, and combined composite materials (carbon-metal, glass-carbon-carbon). Such harpoons are a little thicker and stiffer than steel ones; such harpoons are good to use when underwater hunting where there are a lot of stones and the shooting range is short. For example, a titanium harpoon with a diameter of 8 mm has the same weight as a steel one with a diameter of 6.5 mm. Of course, you can’t shoot such harpoons very far - the lighter weight does not make it possible to transfer a lot of kinetic energy to the harpoon when fired, and accordingly, at a long distance, it will not be able to overcome the resistance of the water and maintain sufficient force to shoot through the fish. Sometimes titanium harpoons are placed on air guns for spearfishing - but for sufficient kinetic energy, the length of the harpoon must be 600 -650 mm. It is very successful to use a heavier tip made of hardened metal or stainless steel with a length of 150-200 mm on such titanium harpoons.
Among the new products, we can highlight harpoon rods in a carbon-carbon shell. Such rods combine the qualities of metal and titanium harpoons. It should also be noted here that this applies not only to the types of harpoons, but to hunting in general; such harpoons do not have a metallic sheen, and when hunting in the sea, where the transparency of the water is high, the reflection of the metal can scare off the fish. Now let's talk about spearfishing harpoon tips (the front part of the harpoon).
What is a harpoon tip ?
The point of the tip is to pierce the fish and, with the help of retaining flags, prevent it from coming off. The simplest ones are single-ended ones. On rubber guns, Tahitian harpoons are a long steel rod that has a sharpening at the end (there are different types of sharpening, the choice depends on the place of hunting, the type of fish and other factors) and a latch that opens after breaking through the fish or gets stuck in the body of the fish. At first glance, the removable tip is more convenient to remove, but imagine how inconvenient it will be in the water, with twitching fish, as a result, the tip can simply be dropped and lost when unscrewing.
If we consider the type of tip, the Tahitian harpoon - to remove it, it is pressed against the harpoon and, by rotating around its own axis, it is removed from the wound of the fish, as if twisted. The time required to remove a removable tip will be longer than to remove a Tahitian tip. This is important in competition or when hunting a school of fish that has not yet left when you remove the tip. In addition, the Tahitian harpoon has no joints, it is stronger and smoother and practically cannot unscrew on its own.
It is convenient to use such harpoons with a combined (removable) tip on both crossbows and air guns.
In general, the threaded - removable connection of the harpoon tip makes it possible to use different types of tips with one rod, sometimes even very specific ones.
The thread pitch for harpoon tips varies. For Italian shotguns, for example, the thread pitch is 1mm. The thread pitch may be smaller. The smaller the number, the more turns you can fit on the same tip area. The more turns there are, the less likely it is that the tip will fly off or the harpoon will be deformed due to the threaded connection upon impact. It is also important how the tip is joined to the harpoon - the joining point should be without sudden changes in diameter, there should be no gaps, the tip should fit tightly and without play. The main load on the harpoon upon impact will be on the threaded part of the harpoon. This is where it breaks down more often.
Harpoon tips with a folding flag are practically the most reliable. When fired, the flag lies on the rod of the harpoon and, having pierced the fish, it opens on the other side, thereby preventing the fish from leaving the harpoon. Tips with locking flags require special stops for charging. Such flags are 50-60 mm long and are attached to the rod with a rivet.
Wire flags are suitable for making your own. True, their fixation after a breakdown in the fish is less reliable than that of flag ones. They are not always suitable for hunting large and strong fish - such fish are able to bend the wire and escape from the harpoon.
If spearfishing for large fish, it is better to use a flag tip with two flags. After breaking through the fish, they open in opposite directions and securely fix the fish on the harpoon. You need to ensure that the flags are located on the same axis and open effortlessly and freely. Sometimes more than two flags and several groups are used. The first group is two flags, followed by another group or one flag.
The so-called X-shaped tip has a high penetrating ability, its resistance to movement in water is minimal and practically does not deviate to the side.
There is also a T-shaped tip (Lagutin’s design) - it is difficult to manufacture and is afraid of direct hits on the stone. Its advantages are a straight flight path; when opened, it automatically collapses when fired and opens after hitting a fish. A harpoon with such a tip is easy to load.
Knurled tips are made of soft metal - bronze or brass, used on thin harpoons (6-6.5 mm) for small fish, they are very convenient in guns with a front hook. A harpoon with such a tip is more difficult to break or bend when loading. The tip is a cylinder with notches 10-15 cm long and 10-12 mm in diameter, sharpened or has a replaceable striker. To load a gun with such a harpoon, just grab the tip with your hand and insert the harpoon into the barrel of the underwater gun. Most often, flags are not placed on such tips; the notch holds the shot fish well, and the thick rod prevents the fish from actively trying to escape from the harpoon.
If your catch is a large trophy, then it is better to use detachable tips. The tip consists of two parts connected to each other by a cable. As soon as the fish begins to twitch, the tip remains in the body, and the harpoon dangles nearby on a flexible cable. Such tips are used when hunting sea or ocean fish (blue water fishing) - marlin, sailfish, tuna.
Harpoons without a tip (without flags) are one of the types of Haitian harpoons, mainly used to finish off fish stuck in a shelter from which it cannot be pulled out without first killing them. A harpoon without a flag does not get stuck in the body of the prey and will not interfere with pulling the trophy out through the narrow cracks of the grottoes.
Sharpening the tip for spear guns.
Depending on the conditions of the reservoir and the type of fish selected for spearfishing, the method of sharpening the tip and the sharpening tool are selected.
When making a spearhead on a lathe, it is easiest to make it with a sharp cone or bullet shape, but this type of harpoon tip bends easily and quickly becomes dull, especially when hitting rocks. The double cone of the harpoon tip better withstands impacts on stones, but, like a standard cone, it can fly off and ricochet off the armor-scales of fish. A triangular or tetrahedral sharpening cuts through scales better, but severely damages soft tissues. type of sharpening of the harpoon , as well as the “crown”, at first glance, is not the usual shape for a harpoon tip. But they eliminate the ricochet of the harpoon, and if they hit a fish bone, they cut it or simply knock out a vertebra, immobilizing and paralyzing the fish.
At the tip tip, special cutting grooves and grooves, notches and “feathers”, carbide soldering and inserts are made. An interesting option for sharpening is the “triple radius” - a harpoon sharpened in this way does not get stuck in the wood at all and pierces fish very well.
Another non-standard sharpening method is a chisel. If your shot is accurate enough, the chisel-shaped tip will easily damage the fish's spine, paralyzing it.
After catching a fish, you need to remove the harpoon from it. To solve this problem, many tips with flag latches have been invented. For example, you can “unscrew” the harpoon, you can pull it through the fish, and then, turning it in the opposite direction, pull it back through the fish (through the hole in the wound). You can simply unfasten the harpoon from the gun and, after pulling the line through the fish, fasten it again.